Choosing rolled metal allows you to make strong and durable sashes with your own hands in a short time. At little expense, the owner receives a gate made of corrugated pipe on a rigid, stable frame. He can choose the material for lining the doors at his discretion.
We recommend that you read other articles:
- Standard garage door sizes
- How to make a garage door
Materials for production
To make a gate you will need:
- Profile pipe.
- Profile sheet for covering the frame.
- Rivets or self-tapping screws for fastening corrugated sheets.
- Rollers for sliding gates.
- Accessories: locks, hinges, handles.
The profile pipe can be of the following sizes:
- 60 x 30 mm for making a gate frame;
- 100 x 100 mm for pillars;
- 40 x 20 mm for lintels and stiffeners.
The profile sheet can be used in any configuration and color; the metal thickness must be at least 0.4 mm. It is more convenient to use a profile pipe with a rectangular or square section. To train your skills, it is better to first make a gate.
Preparing a drawing or diagram
Drawing of a gate made of square section metal 40x20
When developing, the location is taken into account:
- stiffeners and their number;
- loop fixation points;
- wickets and which side is opening;
- automation;
- gain points;
- metal racks;
- accessories.
A properly designed circuit requires scaling accuracy down to the millimeter. The quality of installation of parts, the cost of materials for the frame and cladding depend on this.
Scheme of a gate with a built-in wicket
If, when developing a sketch, it turns out that the length of the gates is quite large, then it is better to take a metal profile with reinforced walls. This will minimize the windage of the structure.
The sashes must be freely fixed in the welded frame.
If it is decided to update the gate, and the fence was installed earlier, the scheme still needs to be developed. This will help you avoid old mistakes and work better on your design.
Manufacturing of gates
Let's look at how to weld a gate from a profile pipe with your own hands. For its manufacture, it is necessary to take into account the location. The gate must be located on level ground, without holes, depressions or slopes. Ease of use should also be taken into account. It should be located opposite the entrance to the house or opposite the path leading to the entrance by the shortest route.
After choosing the installation location for the gate, measurements and a drawing of the product are taken. A standard opening must be at least 1 meter wide and height – at the level of the fence. It should be taken into account that the higher the height of the gate, the greater its weight, and the greater the impact it will have on the supporting posts and hinges.
Scheme for manufacturing a gate Source dostup-zabor.ru
To increase the strength of the structure, it is recommended to weld an additional jumper between the pillars. If the gate is about 2 meters high, it is advisable to weld additional stiffeners.
Main manufacturing stages:
- The pillars are being installed. For this, profile pipes 100 x 100 mm are used. They are buried 1-1.5 m and concreted.
- The frame of the gate is made from a 60 x 30mm profile. Pipes are cleaned and treated with anti-corrosion agents. Next, according to the drawing, pipes of the required length are cut. The joints at the corners must be sawed off and welded at an angle of 45°. This results in a more aesthetic and reliable design.
- Additional jumpers are cut out and welded from a 40 x 20 mm pipe.
- Curtains are welded to the gate. Then the curtains with the gate are welded to the support posts.
- All welds are ground. The gate frame and posts are painted.
- Next, the gate is sheathed with corrugated sheets. It is attached using roofing screws or rivets. Holes for rivets must be pre-drilled.
- A handle and lock are attached to the finished gate.
An example of making a gate Source metabox.by
additional information
Gates can be made using different technologies, so the type of materials used, the amount of money and time spent will also differ. Let's look at some interesting features of making your own gates.
Sheathing
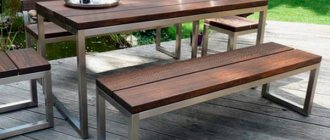
Profiled sheeting is not the only option for gate cladding. They can also be decorated using ordinary steel sheets, polycarbonate, wooden boards or ordinary chain-link mesh. In the latter case (when using mesh structures), the gates will not interfere with passers-by to see what is happening in the yard.
Important! The main rule for gate leaves: the heavier the casing, the stronger the hinges and fastening materials should be.
Gate type
Swing gates are the most common, but there are also several other types that may be of interest to the owner of a private property. Sliding gate structures, due to the presence of additional parts, are more expensive than conventional ones (rollers and rails are also required), but last longer. They, in turn, can be one of three subtypes: cantilever, rail or swing.
Sliding gates made of corrugated pipe Source remont-vorot24.ru
Manufacturing of swing gates
Let's look at how to make a gate from swing-type corrugated sheeting. The main advantages of this type of gate are:
- ease of manufacture;
- cheapness;
- reliability.
The disadvantages include:
- large gate opening area;
- strong exposure to wind loads.
The main element of this type of gate is the stiffening ribs. The swing design involves hanging one side of the sash on curtains. The second side hangs freely, and therefore the structure needs to be strengthened. This is done using a 40 x 20 mm pipe.
Options for stiffeners Source moyaograda.ru
See also: Catalog of companies that specialize in small forms
Options 1 and 2 are the most budget-friendly and are suitable for small-width gates. Used in regions with low wind load.
Options 3-5 – balance between weight and reliability. Various variations provide for strengthening the structure with latches, supporting wheels, and locking devices.
Option 6 is ideal for automatically opening gates. Does not require additional locking and supporting devices.
There are additional options for strengthening the structure using corners or profile pipes in the corners of the sashes. Experienced specialists will suggest the best option for a specific product.
Let's look at how to properly weld a gate. For proper manufacturing, a clear drawing is required indicating the dimensions, dimensions from the ground, and the required clearances. Further:
- According to the drawing, blanks are cut out at 45° angles;
- a 60 x 30 mm pipe is used for the frame; for small gates it is rarely used, for example, in a dacha it is possible to use a 40 x 20 mm corrugated pipe;
- Next, the frame blanks and stiffening ribs are laid out on a flat surface, and the correctness of the design is checked;
- all parts are welded into a single structure, squares are used to maintain the correct shape;
Here you can see how to properly weld a gate from a 40 20 profile pipe with your own hands Source zabor-vorota-stolby.ru
See also: Catalog of companies that specialize in fences and enclosures
- hinges, latches, brackets for locks and additional devices are welded;
- the gates are welded to posts 100 x 100mm;
- the entire structure is cleaned, rust and scale are removed;
- The gates are coated with primer.
Next, the installation site for the gate is prepared. At this stage, you should consider the material of the entrance cover. If the entrance road is covered with asphalt, tiles or concrete, it is enough to leave a gap of 5 cm between the gate and the ground. If the entrance is unpaved, it is necessary to leave a gap of at least 10 cm. Taking this into account, holes are dug for installing the pillars. Further assembly is carried out in the following sequence:
- curtains with shutters are removed;
- the pillars are installed to a depth of 1-1.5 meters and concreted;
- after the concrete has hardened, the doors are hung;
- the structure is painted;
- a corrugated sheet is attached to the frame using self-tapping screws or rivets;
- The lock is cut in, handles and bolts are installed.
To securely fix the bolts, metal tubes are driven into the ground. The latch must go at least 10 cm deep into the tube to prevent spontaneous opening in strong winds.
Ready-made gates Source stella-partner.ru
Which profile pipe is better to use?
When choosing, it is important to pay attention to the following parameters:
- Type of raw materials. Stainless, galvanized, carbon steel is used in production. Welding of stainless steel gates is not done due to the lightness of the material and its inability to withstand high loads. A carbon steel frame will cost less, but a galvanized frame will last longer since the raw materials are coated with a protective layer against corrosion.
- Section type. They produce pipes of square, rectangular and oval sections. The latter type is rarely used in the construction of fences.
Common profile sections
For the frame, it is recommended to take material with a square section - 40 * 40 mm, 25 * 25 mm, 30 * 30 mm or rectangular - 20 * 40 mm, 40 * 20 mm.
- Mode of production. It is customary to produce pipes using the welded method of cold or hot rolling, seamless. Hot rolled elements are not strong enough for fencing. Less expensive cold-rolled pipe is ideal for the frame. Although seamless rolled metal is considered the most reliable, it is rarely used for fences due to its high cost.
- Wall thickness. The optimal value is considered to be 2 mm. If you have little experience in welding, then it is better to take 3 mm steel. You should not take a thicker one, as this will complicate installation and increase the weight of the structure.
DIY sliding gates
Sliding gates are an excellent option for your home or cottage. They have a reliable design and have a long service life. Sliding gates are made from profile pipes and sheathed with various materials, including metal profiles.
Sliding gates come in two types:
- Rail - an outdated model, used mainly in industrial enterprises.
- Console is the most common option. This design provides for a console, which is a continuation of the gate and hidden behind the fence. Thanks to it, the gate moves on sliding trolleys attached to the foundation. Each sliding mechanism is equipped with bearings with polymer or metal rollers. The trolleys themselves are located in a guide, which protects them from contamination and precipitation.
Sliding gates on sliding trolleys Source vorota-goroda.ru
Advantages and disadvantages
Manufacturing gates using profiled pipes provides the following advantages:
- The light weight of the raw materials simplifies and speeds up the process of transportation and installation.
- Low prices for materials reduce construction costs.
- The metal profile is easy to process and weld.
- The design is strong and rigid.
- These gates look neat and beautiful.
Material on the topic: “How to properly weld sliding gates”
Disadvantages:
- Metal corrosion is possible as a result of poor-quality protective treatment or its absence.
- When fastening a profile with threaded elements, there is a risk of deformation of the product.
These shortcomings cannot be considered critical, since provided that all stages of assembly and installation of the gate are followed, they can be completely avoided.
To extend the service life of the sashes, it is recommended to periodically apply anti-corrosion primer or paint.
We adjust the sashes to the racks
First step. We install the gate leaves on stands, which can be made of timber, brick or other suitable material.
Second step. Align the sash along all planes.
Third step. Our frame already has hinge elements. We mark the places for installing the second part of the connecting element on the supports. We weld the hinges to the posts according to the marks.
Fourth step. We hang the sash. We remove the stands installed at the beginning of work.
We place a board at the level of the gate fastening. Level it up
We set the gate according to the level. We tie them to the posts with ropes
Trying on the gate before installation
We cleaned the places for welding hinges from paint on the poles and on the gates
A board was placed in the middle of the gate to raise the gate a little. When we weld them, they will lower a little under their own weight and take a horizontal position.
We connect the gate from above with a pipe and tie it to the posts
We mount the frame of the second rack in the same way. To make the structure even more rigid, we can weld the two outer gate supports with the posts of our fence.
To increase the stability of the gate to wind loads, we can weld a horizontal strip of metal profile along the upper ends of the support posts. This is only relevant for situations where only passenger vehicles will pass through the gate.
We weld one part of the hinge to the stand, the second to the frame, and make cutouts in the corrugated sheet before fastening.
Loops
Don’t get confused, hinges without a pin are welded onto the folding frame
During welding, you need to ensure that the hinges are flush with the profile
Installing hinges
Loops
Next you need to clean the welds with a grinder and a grinding disc and paint the sash with anti-rust enamel
The hinges must be welded parallel to the pole
First, we grab the hinges and then try to open and close the gate. If the gate opens normally, we finally weld the hinges to the posts and to the gate
Finally, all we have to do is paint the parts of the frame that will remain visible after attaching the profiled sheets. We select the paint color so that it harmonizes well with the color of the corrugated sheet and the fence.
Gate frames successfully welded
Painting the frames
Corners were welded over the top hinge of each gate so that the gate could not be removed
Rules for calculating the dimensions of a structure
Having decided on the material of the frame and cladding, you need to start creating a diagram, which first of all includes dimensions. Despite their simplicity, swing gates require precise calculations so that in the end they can fit perfectly into place. It is important to remember the following features:
- The size of the gate when open should allow large vehicles to pass through unhindered. It is better to leave about half a meter on each side of the gate post so that the car can safely pass without hitting the structure. Accordingly, the space that the open doors will occupy is also taken into account;
- the sketch of the future gate should include indications of all dimensions and parameters, even if they seem unimportant. The width and length of the structure must be proportional to the space in which the gate will be installed. The dimensions of the metal pillars that act as a support must be indicated;
- When creating a drawing, scaling with real parameters and materials is observed. According to the sketch and its scale, the number and footage of corrugated pipes, as well as future cladding, are calculated.
Making a frame
It is advisable to make the frame from the same material as the supports. Most often, the racks and frame are made of metal products. We assemble the frame from profiled pipe.
To assemble the frame, we find a horizontal platform that can freely accommodate at least one sash.
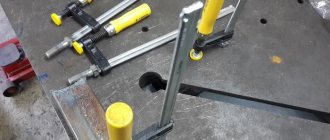
The process is extremely simple: we need to weld a rectangular frame from a pipe (profile) pre-cut into pieces of the required size. The angles must be strictly straight. We verify this using a square.
Marking and welding frame corners
Marking and welding frame corners
Marking and welding frame corners
Having welded the frame, we strengthen it in the corners using steel angles. To give the frame additional rigidity, we divide it in height into 3 approximately equal parts and weld parallel horizontal jumpers along the marks. We also strengthen the junction points of the lintels with the frame using steel corners. We weld the gate hinges at the same points.
When the frame is ready, we weld a steel strip around the perimeter to secure the corrugated sheet.
Helpful advice! There is another popular option for strengthening the frame. To do this, a horizontal jumper is welded in the center of the frame to its vertical sides, dividing the frame into 2 identical rectangles. After this, the corners of each of these rectangles are connected by diagonal jumpers. Choose any of the two hardening methods discussed, they are both good.
The frame for the gate is assembled in a similar way. If you want to make a gate directly in the gate leaf, assemble the frame in a slightly different order. To do this, weld transverse and longitudinal metal jumpers to the rectangular frame of the selected sash, thereby forming the frame of the gate. The average dimensions of the gate are 80x180 cm. If possible, stick to these values. We shift the places where the hinges are attached to the sash to the upper and lower edges of the frame.
Frame for gate
Wicket frame
Prices for popular models of welding machines
Welders
We fasten the corrugated sheet
Self-tapping screws for corrugated sheets
Self-tapping screws for corrugated sheets
The width of the corrugated sheet is usually 110 cm. About 10 cm will be spent on the floors. Thus, to cover a two-meter wide door you need exactly 2 sheets of material. If desired, the gate can be sheathed on both sides.
We attach the corrugated sheet to the gate. We make cutouts for the hinges
We attach the corrugated sheet to the gate. We make cutouts for the hinges
We fasten the sheets using hex head screws and nuts or special rivets. It is better that the color of the fasteners and the base material be the same.
If necessary, pre-paint the fastening elements. We place bolts or rivets in the inner wave of the sheet (the one that fits tightly to the frame). We fix it in each wave of the profiled sheet. For greater convenience, we can pre-make holes in the frame to accommodate fasteners.
The gate is sheathed similarly to the doors. You just need to pre-cut the sheets to the size of the gate.
Front side
View from the yard