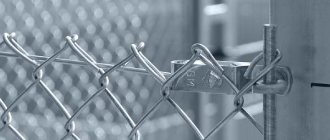
A strong and reliable fence of the site does not have to be made of stone and concrete. A chain link fence is a smart alternative to expensive projects. This simple, lightweight and at the same time reliable material makes it possible to perfectly implement the idea of reliably protecting the site from uninvited guests.
Fencing with decorative elements
Well, if the cost of fencing and work is really affordable, then why not order such a fence for a turnkey plot? Or you can even take a risk and install the fence yourself. Let's look at both options in detail.
The advantages of such a fence
Installing a chain-link fence has several undeniable advantages, which clearly show that the idea of arranging just such a fence deserves attention.
The economic aspects of construction are related to how much the material costs and what the installation price of such a project is:
- installation of a fence made of mesh will cost much less than a fence made of corrugated board and wooden picket fence;
- the service life of such a structure is at least 2 times longer than a wooden one;
- the material for the main fabric, racks and accessories for stretching is quite cheap;
- opportunity to save on installation costs - assembling a chain-link fence with your own hands is much easier than other types of fences.
From the technical side, this design allows:
- install fencing of almost any length;
- when working with ready-made delivery kits, for example, from those sold in Leroy, build them without welding or using additional tools;
- the material allows you to install both relatively lightweight options and those with a rigid frame - a fence in sections made of a metal corner or profile;
- the material is excellent for the perimeters of areas of any shape;
- installation does not require a large amount of work related to the construction of the foundation. The weight of the canvas allows it to be installed on pillars made of a 50x50 mm profile pipe without concreting the supports;
- the material is not afraid of temperature changes, sunlight, and can withstand great mechanical stress;
- PVC coated canvas does not require painting or additional care;
- construction material is easy to calculate and transport. It is sold in rolls of 10 meters, the connection is made by weaving two sections into one common fabric;
- wide choice of sizes. The height of the material can be standard: 1.5; 1.8; 2.0; 2.5; 3.0 meters.
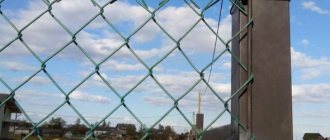
The photo shows an easy to install fence.
Such a fence does not shade the neighbors’ property
Issues related to the placement of the fence include:
- the possibility of its placement both for a city site and for a summer residence. High light transmission allows you to build a fence between neighbors. At the same time, there will be no shaded area on neighboring plots, which corresponds to the standards for placing fences. But do not forget about the permissible height of the fence.
- construction on screw piles will not damage the root system of trees and shrubs. Therefore, it can also be placed in places where a garden is already growing, although this also has its own rules.
Pros and cons of the material
Among the advantages:
- low price;
- a light weight;
- ease of transportation (available in rolls);
- no need to pour a solid foundation under the fence;
- resistance to environmental influences (precipitation, temperature changes, fire, ultraviolet);
- does not require periodic maintenance or repair;
- installation speed: the fence is assembled in 1 day;
- the strength of the material allows it to withstand heavy loads;
- excellent light transmission ensures rapid growth of plants planted along the fence.
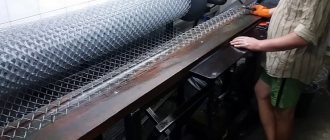
Photo: mesh in rolls
But before making a fence from mesh, you need to take into account a number of disadvantages:
- unaesthetic appearance;
- due to the transparency of the material, everything that happens on the site is clearly visible;
- Inexpensive steel chain-link will have to be painted periodically.
After installing the structure, many people prefer to decorate it with climbing plants, a photo grid, and create different wire patterns on the surface. Thus, an inexpensive fence will turn into a decoration of the dacha and will become protection from prying eyes.
Types of mesh
The construction of the fence requires the correct choice of the main material - chain-link mesh. The durability of the fence, its attractiveness and low maintenance depend on the main parameters of the mesh:
- the material from which the metal base is made;
- protective coating of wire;
- size of the web in a roll.
Metal wire is most often used as the main material from which the mesh fabric is woven. However, it may have significant differences in quality and size:
- wire made of ordinary ferrous metal or low-carbon steel;
- stainless steel wire;
- wire made of alloys or special grades of steel is a soft and pliable material.
The fence calculator includes in the calculation not only the thickness, but also the type of coating:
- uncoated wire, thickness from 1 to 5 and even 6 mm, cells from 25 to 100 mm;
- galvanized wire, thickness from 1.6 to 5 mm, cells from 50 to 100 mm;
- PVC coated wire, wire thickness from 2.5 to 3 mm, mesh size from 25 to 50 mm;
- plastic made of PVC, still rare on the market, thread thickness 3-4 mm, cell size from 25 to 50 mm.
When ordering fencing material, the price per roll, even among PVC-coated ones, can vary significantly. Thus, the cost of a roll with a coating that is not afraid of sunlight will be 20-25% higher than a roll with a conventional polyvinyl chloride coating.
When choosing a material to build a mesh fence, it is worth watching a video about the sequence of work. You can also see photos of finished projects. This will help you imagine which option is best to order for construction.
How to minimize mesh imperfections
Chain-link mesh has a number of advantages: low windage, low cost, ease of installation, which allows you to install it yourself without the involvement of professionals, maintainability - any damaged area can simply be patched up. Gardeners love the mesh: allowing air and light to pass through, it does not trap light-loving plants in a shaded box.
It also has its drawbacks, the main one being transparency. The site will be visible to passersby. But it’s easy to get rid of this drawback, at the same time making the fence more interesting in appearance:
- climbing plants beautifully “spread” along the chain-link, turning it into a hedge: these are actinidia, maiden and Amur grapes, purple morning glory, sweet peas, clematis, climbing honeysuckle;
- polycarbonate sheets will not only protect the area from prying eyes, but will also protect from wind, dust and noise.
Otherwise, service life and reliability depend on the quality of materials. Read on to learn how to select materials and calculate their quantities.
Fencing designs
When planning to start work, you need to imagine what the final appearance of the fence will be. It is necessary to understand how to make a fence from a simple chain-link mesh, broken down into specific stages of work. This means that you not only need to buy material, but also choose the type of base for the mesh fence.
The photo shows an example of a beautiful fence.
Beautiful fencing decor
With guides
Installation of a chain-link fence using guides involves the construction of a rigid frame in the form of horizontal guides. The following are used as guides:
- profile pipe with a profile from 20x20 to 40x20 mm;
- metal rod;
- fittings;
- wooden bars.
Without guides
One of the methods for stretching mesh over a fence is to build fences without guides. A steel cable or wire is used as a tensioner, threaded through rigidly fixed supports. The extreme corner supports are well strengthened with stops. The wire or cable is pulled through the cells at the top and bottom of the fabric at a distance of 5-10 cm from the edge.
Tensioning is done using bolts with holes in the head or turnbuckles.
Sectional option
Mesh fencing in sections is the most durable type of structure. Each section is a frame made of a corner, profile or shaped pipe connected by welding. When filling, galvanized mesh 50x50 mm is used. When starting to create such a structure, you need to correctly calculate all the dimensions and provide the optimal method of fastening.
What posts are suitable for a chain-link fence?
Despite the light weight of the mesh, there may be several options for installed supports. Their choice is influenced by the purpose of the structure, the type of soil, and whether the fence will be temporary or permanent.
Brick
Stands made of this material are durable and do not require additional finishing or decoration, but the laying process is labor-intensive and the cost of bricks is high. A foundation will have to be poured under such pillars, so in practice it is unprofitable to install a chain-link fence.
If you still choose brick, we recommend that you familiarize yourself with the material: “How to make brick pillars for a fence.”
Wooden
Wood is most often used when owners want to build a temporary fence. For this, a beam or log is used. The cheapest species is pine. Expensive, but durable - elm, oak.
A significant drawback of raw materials is instability to external influences. It is for this reason that the tree needs to be pre-treated with antiseptics.
Photo: using timber as a fence frame
The optimal fence posts are timber measuring 100*100 mm. Average price - from 70 rubles. for 1 linear meter.
You can learn how to install wooden fence posts from this article: “Installing wooden fence posts.”
Metal
Ideal posts for chain-link fences. They can be made from square or round pipes or corners. The metal is not subject to climatic influences. The supports are simply treated with an anti-corrosion solution and painted to make them look neat.
If a round pipe is used as a basis, then a diameter of 50 mm is enough. For a rectangular one, 40*60 mm is enough. Wall thickness - 2-3 mm.
It is convenient to attach mesh, wire, and hooks to such supports. Fixation method: welding.
When using a tension fence, the posts should be placed every 2 m so that the material does not sag. For other installation methods, the step between supports can be increased to 2.5–3 m.
Read more about installing metal poles.
Concrete
Pillars made of this material are used extremely rarely for several reasons:
- attaching a mesh fabric to them is quite difficult;
- you will have to hire help for installation;
- To transport them to the construction site, you will need to rent special equipment.
The price is affordable. So, 1 pillar measuring 80*80*2000 mm costs from 350 rubles. for 1 piece Many craftsmen pour concrete supports themselves. But for a chain-link fence, this is an unreasonably labor-intensive option.
Asbestos cement pipes
It is possible to build a fence from such pillars, but for reasons, as in the case of concrete ones, it is not practical.
If you happen to have pipes, the mesh will be attached to them with special clamps or twisted wire, which is not particularly convenient.
A cap is placed on the top of the asbestos-cement support to prevent precipitation and moisture from getting inside. Otherwise, due to the frozen water inside, the pillar will begin to burst.
Photo: fastening the mesh to an asbestos-cement pipe.
They are inexpensive. The average price of a pipe measuring 100*3000 mm is 300 rubles.
Installation of pillars
The production of a fence is associated, first of all, with the correct marking of the site and the installation of support posts. Mesh fence posts are selected depending on the construction budget. For this we use:
- metal profile pipe;
- water pipe;
- metallic profile;
- corner;
- concrete pillars;
- brick pillars;
- asbestos-cement pipes;
- wooden pillars.
The cheapest option is wooden poles. Asbestos-cement pipes and concrete pillars are also inexpensive. Photos of fences using supports made of various materials will help you choose a fence in more detail.
Preparatory stage
The construction of the fence begins with marking the perimeter of the site and dividing it into straight segments. The section where the entrance gate and wicket will be installed is marked separately. It is better to provide powerful supports for the wicket and gates from a thick-walled pipe with a diameter of 100-150 mm or a profile pipe 100x100 mm.
Calculate the dimensions of the spans under the sections with high accuracy; the distance between fence posts without guides can be from 1.5 to 2.5 meters.
Installation of poles
A pit is dug under each pillar. Under the main pillars - corner, turning and on which the gates are attached, the foundation pit is torn off taking into account the pouring of concrete. Intermediate posts can have a pit diameter of 200-230 mm, the same as the diameter of a garden auger auger. The depth of the pit depends on the height of the building: for a height of up to 2.5 meters, a meter is enough; for a larger height of supports, a depth of 1.5 meters is accepted.
Structural installation diagram
Construction begins with the installation of the main pillars. After the concrete of these supports has hardened, intermediate pillars are installed. For corner supports made of a 50x50 mm square pipe, reinforcement is provided in the form of an inclined thrust beam.
Calculation of the amount of mesh for a fence
Before building a fence, you need to determine in advance how many posts and linear meters of material you will need. To do this, it is worth considering the following points:
- The length of the chain-link should be calculated based on the total length of the fence. Most often, the mesh is usually supplied in rolls of 10 m.
- The number of supports is determined according to the same principle, but it is important to take into account the distance between them. It should not exceed 2–2.5 m. Moreover, this rule applies regardless of the method of attaching the mesh.
- In the tension version of the design, the length of the wire is equal to two lengths of the future fence.
- When assembling sectionally, in order to calculate the length of the profile corner, it is necessary to multiply the perimeter of the frame by the number of sections.
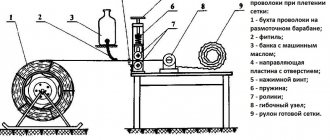
Scheme of installation of poles and fastening of the mesh.
The average price for non-galvanized chain-link with dimensions 50*50*2 mm starts from 45 rubles. for 1 sq. m, galvanized - from 56 rub. for 1 sq. m, with polymer coating - 220 rub. for 1 sq. m.
Step-by-step mesh installation
You can install a fence from a regular chain-link mesh with your own hands without guides without special equipment, especially if you use ready-made elements for installation and tension. For quick installation, it is recommended to purchase all fasteners in advance.
By guides
Chain-link fences along guides are installed in two stages:
- Guides are installed.
- A polymer mesh is being installed.
First, we install guides on the posts. Preliminary fixation is carried out with mounting wire, then the guides are welded by electric welding.
It is recommended to immediately splice all the sections for installation on one side of the site.
Then, using plastic clamps, the canvas is gradually lifted and fixed on the fence. The final tension and fixation with wire or a metal strip is done afterwards and secured by electric welding. The plastic mesh on the guides is fixed only with wire or special clamps.
Methods for installing chain-link
Having determined where the fence will stand, it is necessary to schematically depict the future structure and draw up a cost estimate.
We recommend using metal pipes as pillars, after applying an anti-corrosion agent to them.
The building site is cleared of debris and vegetation. Marking is carried out using pegs and a stretched rope.
Further creation of the fence depends on the selected type of mesh fastener. Let's look at each of them in more detail.
Tensioner
It is easy to install and low cost. One edge of the chain-link is fixed to the post, the other is pulled tightly. The recommended distance between supports is no more than 2.5 m.
To achieve good tension of the mesh, you can use the following intermediate fasteners:
- clamps;
- cable;
- lanyard;
- hook with long thread.
The disadvantage of this method of fixation is that the chain-link will begin to sag, so it is better to use it to create small temporary fences.
Sectional
A good fence option for areas that are on a slope, on sandy, moving soils.
It is recommended to install the posts at a depth below the freezing point of the soil. The supports are fastened using any method other than concreting.
It is better to choose metal as a material for racks. For brick supports, you will have to install the mortgages in advance.
The sectional structure will cost more than other types, but will also last much longer. To make a frame, you need to have welding skills or invite a specialist.
Photo: sectional fence made from a metal corner and chain-link.
An alternative is to buy sections in a store.
The work order is as follows:
- Steel plates 5 mm thick, 5 cm wide, 15–30 cm long are welded to the pillars. They are fastened at a distance of 20 cm from the top and bottom of the supports.
- The frame is made from a metal corner measuring 30*40, 40*50 mm. A corresponding piece of mesh fabric is welded inside the frame. Reinforcement rods are inserted along the edges and fixed with spot welding.
- An alternative solution is to weld long hooks 3 mm thick, bend them inward and attach a chain-link to them. After tensioning the mesh, it is better to weld the ends of the hooks so that the mesh does not slip off over time.
The finished frames are cleaned, coated with an anti-corrosion agent and painted in a suitable color.
With guide
A type of tension. It is mounted using the same method, but 2-3 metal ones are welded between the pillars or wooden logs are fixed.
If installing a fence requires securing a large volume of mesh, then the use of guide beams will be an excellent reinforcement of the structure.
On heaving soils, pillars should not be concreted; it is better to install them below the freezing point of the soil and backfill them.
With metal rod
This is a tension-type fence, which is strengthened by pulling strong wire through the mesh. They fasten it along the top and bottom rows of the chain-link so that the fabric does not begin to sag over time.
The simplest way is to make a loop out of wire, throw it over a post, tighten it, thread it through the cells to the next post and repeat the procedure.
You can weld plates with hooks to the supports and attach a metal rod to them. There is an option to buy special tensioners for wire, but they will not be cheap, and when installing a budget structure made from chain-link, it is not profitable.
It is convenient to use mesh fabric as a sectional material for fencing in summer cottages, when, in conditions of limited finances, it is necessary to delineate the boundaries of the estate without shading the plants growing nearby. For other purposes, it is worth using chain link to create a temporary fence.
Construction of houses
0 votes
+
Vote for!
—
Vote against!
Chain-link mesh is widely used both in construction and in landscape design. To weave it yourself at home, you will need a special device. Let's look at the features of its manufacture below.
Table of contents:
- Chain-link mesh - general concept and features
- Machine for weaving mesh netting: production and use
- Do-it-yourself chain-link mesh
- Tips for using a machine for producing mesh mesh
Chain-link mesh - general concept and features
Chain-link mesh is a structural material that is used in construction for the construction of fences, fences, enclosures for dogs, used for sifting sand and as a frame for weaving plants.
The grid got its name from its inventor, Karl Rabitz. To produce such a mesh, both simple machines are used, on which spirals are screwed into each other, and high-quality automatic machines, which produce a large amount of mesh in a short period of time. The basis for the production of chain-link mesh is low-carbon steel wire; it is also possible to use galvanized or polymerized wire. Stainless steel wire is very rarely used.
Chain-link mesh is a material for the construction of fences, used in mining, in construction work, is the basis for insulating surfaces, and is used to make cages for animals.
In relation to the shape of the cells, the chain-link mesh is:
- rhombic, with a sixty-degree angle;
- square.
Purchased chain-link mesh is transported in roll form, the height of the roll is 150 cm and the length is about 1000 cm. Depending on the manufacturer, the height and length of the roll can be adjusted. If the mesh is made on a simple or manual machine, then its end parts are not bent, otherwise, the spiral ends are bent and they are connected by twisting into a roll. To transport this material, its ends are wrapped with artificial fabric or plastic film.
The scope of use of chain-link mesh is directly related to being outdoors, so it is constantly under the influence of precipitation. If it is not treated using special technology, then after the first exposure to moisture it will become covered with rust.
There are several ways to protect the chain-link mesh from moisture:
- painting;
- galvanizing;
- polymerization.
The most common method is galvanizing. In most cases, galvanized steel is used in the production of chain-link mesh, so you should choose steel that contains as much zinc as possible. Wire production involves applying zinc to its surface using the hot-dip galvanizing method. If the wire is made using this method, its service life will be from twenty to twenty-five years.
If zinc is applied to the wire using the electrolytic method, its service life is significantly reduced and is no more than three years.
Chainlink mesh photo:
When using galvanized high-quality chain-link mesh on the banks of reservoirs, rivers or seas, it will still quickly rust. In this case, it is recommended to make a chain-link mesh from steel coated with polymers. If such a coating is of poor quality, it will quickly fade, crack and fade. When choosing a steel mesh chain-link with a polymer coating, you should give preference to its more expensive options and trusted manufacturers who guarantee the resistance of the wire to ultraviolet treatment and frost. When choosing a chain-link mesh with a polymer coating, pay attention to the spiral surface; the absence of cracks on it indicates the quality of the product, otherwise the mesh will not last more than a year, since water will get into the metal through small cracks and it will rust. The mesh size and wire diameter directly affect the strength characteristics of the chain-link mesh.
Machine for weaving mesh netting: production and use
To make a chain-link mesh with your own hands, you should use a simple device you made yourself. To build this structure, it is enough to have basic metalworking skills.
If we compare the chain-link mesh with other structures of the same type, then against their background it has a number of advantages. The manufacturing process does not require spot welding or an electric drive.
There are industrial purchased machines for weaving stacks of chain-link, but if you need to make it in a small volume, then it is better and cheaper to make a small machine with your own hands.
To carry out work on the construction of the machine you will need:
- a small part of the pipe;
- plates;
- several metal pieces;
- bearing races;
- rollers;
- Bulgarian;
- corners made of high quality metal;
- rope and chalk;
- file;
- sandpaper.
The mesh frame is formed by connecting flat wire. The main point is the construction of the snake in the form of a zigzag. This will require mechanisms for tensioning and winding. Tension prevents excessive twisting, and winding strengthens the structure. The helical spiral is very difficult to weave into the main part of the fabric. Since the wires run either softly or hard, they require constant adjustment. When the wire is bent, it changes and friction occurs with the machine, so lubrication, for example, using waste oil, is a mandatory component.
The winding system is characterized by certain dimensions that cannot be adjusted; the shape and diameter of the cell depend on it. When the turns are formed, the stitching is directed so that it is harmoniously woven into the mesh fabric. After this, the unnecessary fragment is cut off.
We invite you to familiarize yourself with the step-by-step structure of the mechanism that weaves the chain-link mesh. The main working tool is a structure made from a winding block, which includes a screw (screw sleeve and winder), a winding plate and a knife. These parts form the spiral shape and are subject to severe wear. Therefore, they need to be made from high quality and durable components. The rotation of the knife is responsible for the formation of turns of the required sizes. The main function of the screw is to create the correct distance between the turns. Thus, a grid with the same cell size is obtained.
The coiling plate is a flat metal strip that has a hole at the end with which it is attached to the handle. When using wire with increased rigidity, the plate is twisted in a screw form by no more than sixty degrees. The higher the rigidity of the structure, the greater the degree of twist.
The auger looks like a hardened steel pipe, which has a spiral cut over its entire area. It is better to purchase such a bushing, or order it from a mechanic, since making it yourself will not lead to the desired result.
Position all components so that the person operating the machine can easily turn the handle and guide the wire. Do not allow the wire to get tangled during weaving, to avoid this, in the middle part of the bay you need to place the bucket upside down, and put a piece of metal pipe or other weight on the end of the wire. This procedure will help prevent ringing. Pass the end of the wire through the tension rollers, and use the screw to adjust the gap between them. Next, you need to insert the wire into the winding mechanism and twist it, first one or several times, until the required cell size is obtained. Monitor the evenness of the outgoing line; to check it, inspect it lengthwise. When twisting the wire to the right or left, adjust the wire tension. When the wire turns out perfect, start twisting the mesh until you have the required amount.
Building a machine for making mesh netting is not a complicated process that requires close attention and some carpentry skills. To improve this unit, it is possible to install a controller that will independently count the turns and facilitate the wire manufacturing process.
Also, such a device is equipped with an electric motor, which drives the handle using an electric drive. Although the presented machine model is easy to assemble, it is most suitable for home use and is capable of making a small amount of mesh.
Do-it-yourself chain-link mesh
Before considering the process of producing chain-link mesh with your own hands, we suggest that you familiarize yourself with its advantages over other building materials.
If you use chain-link mesh as a fence, then its installation is much more profitable than the installation of a conventional wooden fence, which requires periodic painting and repair. Moreover, it is possible to make a mesh at home. To do this you need a special machine.
To perform the work, you will need to have a wire machine, the main function of which is to form spirals on the wire.
We invite you to familiarize yourself with the manufacture of a manual machine for chain-link mesh. It has a very simple design. Before you begin, you should determine the width and length of the zigzag that will be created when constructing the mesh. After this, you should draw this zigzag on a wooden surface. Drive nails into the corner parts and tighten the wire. It is advisable to use gloves that will protect your hands from scratches. Place the wire on the board and loop it around each nail. The remaining wire must be cut off and then the spiral removed. This procedure should be repeated 15 to 40 times, depending on the length of the wire.
Now let's get acquainted with the design of a more complex machine for making chain-link mesh. Variants of machines that feed wire using a drum imply uneven wire feeding. Since it is located on a large roll, moving which requires a large amount of force, and when this does happen, the drum rotates inertia and the wire is fed unevenly and intermittently.
To avoid such a mistake, use a device similar to the element of knitting machines, in which the thread is pulled upward.
To make such a feeding device you will need:
- bearing,
- leash,
- ring,
- steel plate - as a support.
The central part is a metal axis, the length of which is about one meter. A bearing is installed at its end, which has a leash and a ring. Several rods with a diameter of 1.2 cm are welded to the axle.
All wire is installed on a steel plate, which acts as a platform. The end of the wire is pulled out of the tension device through the ring and a tension device is installed, which contains a lubrication system and rollers.
To construct a tensioning device, the following is required:
- bearing race;
- bicycle pump housing;
- roller;
- holes for the roller axle.
The tensioning device has a frame in the form of a right triangle. a metal corner acts as the legs, and the hypotenuse is a five-millimeter metal strip, seven centimeters wide. This strip has holes into which rollers are installed. At the corner there is a device that provides lubrication of the wire as it moves. To make it you will need a bicycle pump. You need to saw off the bottom from the body part and attach it to the strip using clamps. The pump cover must screw well onto the body, as it secures a felt plug on which cuts need to be made. They are necessary for the free passage of wire through the lubricating device. Do not allow the wire to touch the edges of the tube; a hard metal ring must be installed on it. To do this, use a bearing race.
The winding device is a pipe that has a spiral slot with a knife. The size of the vertical diagonal of one cell is equal to the size of double the internal size of the pipe.
To form a spiral-shaped slot in a pipe, you must first draw a spiral on paper, which is glued to the pipe, and then, using a grinder, cut the pipe in pre-marked places. Use a file or sandpaper to sand the surface. It should be smooth and even.
Select a steel corner that has 2 cm flanges. Prepare two pipe-sized pieces, and then form the structure.
The process of making coiling knives has its own nuances, namely:
- each pipe should contain three or four knives of different shapes, since soft wire requires flat knives, and elastic wire requires twisted ones;
- the size of the shanks should be the same - length - 5 cm, diameter - 2 cm;
- to make a straight knife, any metal is suitable, but for twisted products, choose stronger types of steel;
- Do not allow the knife to dangle freely in the inside of the pipe.
When the knives are ready, all that remains is to begin assembling the assembly table on which the chain-link mesh will be weaved. Before you begin, you need to install the wire on the feeder and then insert it into the feed structure.
Proceed to form the first spiral. By adjusting the rollers in the tensioning device, you need to achieve a perfectly flat spiral.
When weaving a mesh on such a machine, which has a diameter with a large cross-section, it will be possible to make about 90 meters of mesh in one day.
If the chain-link mesh is made from individual pieces of wire, then they are connected to each other by knots.
Tips for using a machine for producing mesh mesh
Do not install wire into the winder type device frequently. It's better to fill it all at once. This will make it easier to work with the machine, since initial refueling requires skill and time. To thread the wire you will need to perform a number of actions:
- bend the end of the wire 180 degrees;
- hook the hook onto the surface of the knife;
- insert the knife with the wire into the pipe;
- make half a turn and press the wire against the surface of the knife using a screwdriver;
- Do not allow the hook to unbend, as there is a risk of the wire jamming in the winder.
Therefore, if the wire runs out, you need to stop work before the end of the wire goes into the lubrication device and attach a new wire to it by creating a knot.
If the wire is too hard, it needs to be annealed. Although this process will make it softer, it will significantly affect its performance: firstly, not all areas are annealed equally, and secondly, if galvanized wire is used, then all the zinc will burn and it will not be resistant to corrosion.
When the mesh is being formed and you need to stop working, watch the position of the knife. It must be in an upright position.
The most durable and high-quality is galvanized mesh, its service life is several decades. Therefore, there is no need to skimp on choosing the right wire.
If the mesh is not needed in the near future, there is no need to weave all the spirals. Then put them in a separate place, this way you can save a lot of space.
Chainlink mesh video:
Installation of a sectional fence
Marking and installation of supports is carried out similarly to a tension fence. A pair of plates with a thickness of at least 4-5 mm are first welded onto each post, to which the sections will be attached.
Frame assembly
To make a frame, corners are cut according to the size of the section:
- the length is equal to the pitch of the pillars minus 10-20 cm;
- height - length of supports minus 15-20 cm.
The frame is welded and polished. You can weld hooks to attach the mesh.
Section preparation
We will tell you how to secure a chain-link using reinforcing bars and welding. This method is convenient because the mesh is often tangled and its edges are uneven. The rods will help not only fix, but also evenly tension the mesh.
The chain-link is spread horizontally, a Æ 6 mm rod is inserted into the outer cells. Stretch the roll to the required length. Place the mesh on the frame. Align the edges. If any wire has become untwisted, it is twisted in a circular motion around the axis.
To prevent the mesh from getting tangled, weld the rod to the corner, cutting off the excess. The step between the welding points is 25-30 cm. Slightly pulling the chain-link, measure the required length. Unscrew the wire, thus disconnecting the fabric. A rod is inserted and secured by welding to the frame.
On the sides of the mesh, the wire is aligned and bent with pliers. The rods are threaded into the cells, cut to size and welded. Clean the seams from scale and prime them.
Installation
The section is installed vertically into the fence span. For fixation, you can use 2 methods:
- welding - the frames are welded to the plates, aligning the top edge horizontally;
- assembly - drill holes and tighten with bolts and nuts.
Welded seams are ground, all sections and pillars are coated with a primer, if this has not been done previously, and finally painted.
One part of the hinge is welded onto the gates and gates, and a counter part is welded onto the post. The panels are hung and adjusted for height and uniformity of movement.
If the area is flat, the level of adjacent fence elements should match. When there is a difference in height, the sections are secured with “steps”.
Wire winding knife
For soft wire, you will need a flat knife, and for stiffer wire, the knife must have a large twist angle.
A knife for hard wire must be made of durable metals, but for a flat knife any kind will do. The knife must fit exactly the dimensions of the pipe so that there are no gaps. This may cause the mechanism to jam. However, the knife should rotate in the pipe without difficulty. For a twisted knife, you need to take a plate 1-2 mm wider than the required size. It is clamped vertically in a vice, heated and the upper part is turned to the required limit. The untwisted parts are cut off, the shank is attached, and then the required width is adjusted. Part of the knife near the shank is hardened, and the rest is ground.
When producing mesh, the machine must be stopped when the knife is positioned vertically.
And the correct position of the spirals during connection is facilitated by the position of the bottom wire in the desired direction, using the table board for installation.
Elastic wire can be annealed to make it more obedient. But this requires special skills, otherwise you may end up with different stiffness along the entire length.
You must remember to change the knife if, after working with a stiff wire, you have to curl a less rigid one. Also, their step length will be different, so you need to screw in the spiral more carefully.
Weaving technology
The scheme for weaving a chain-link mesh on a homemade machine includes drawings and steps based on them:
- the wire used is coated with machine oil or by using a special lubricating device on the machine itself;
- the wire end is bent with a hook;
- the product is pulled through the groove, secured to a knife inside the pipe;
- the shaft rotates due to the lever;
- the shaft is rotated until a waveform is obtained;
- the wire is divided into pieces of the required length;
- The wire is wound on an inverted bucket;
- 1.45 meters of wire gives 1 meter of chain-link mesh;
- before stretching the mesh, its parts are fastened to each other;
- the outermost wire is unscrewed, the ends of the chain-link are applied one to the other, the removed wire secures it;
- The finished bonded mesh is fixed to a fence or other object.
The tensioning and fastening of the chain-link is done with nails and slats. The stretched and secured mesh needs to be painted over with a brush. This will ensure complete penetration of the paint into the weave.