A wood sawing machine (saw bench) is a rather complex special production equipment that requires strict adherence to safety measures during operation. In the conditions of the Russian Federation, your own sawmill can greatly reduce the cost of wooden construction and/or become a source of stable income. The purpose of this publication is to help the reader understand how to make a sawmill with your own hands, choose a suitable design for yourself and avoid insurmountable difficulties in its manufacture.
DIY band sawmill drawings
Dear visitors of the site “ Samodelkin Friend”, from the presented material you will learn how to make your own band sawmill yourself. Every craftsman dreams of having his own sawmill on his farm, because its presence will reduce the cost of lumber tenfold. Using this machine, you can cut the logs into boards and bars yourself; it is also an excellent option for those who are building , that is, the boards can be produced directly at the construction site of the future house.
It is also possible to open your own private sawmill and cut boards for money and replenish the family treasury with additional income. In general, the machine is very good from all sides, and its independent assembly will again cost much less than a factory analogue, because many spare parts can be used second-hand and available to the car enthusiast, for example: wheels from a passenger car, hubs, bearings, bolts and other things that you can get in the garage) The design of a band sawmill consists of 1. a rail track 2. a frame with a power unit 3. a blade 4 adjustment and tension mechanisms 5. a carriage 6. a flat surface (preferably a foundation slab)
And so, let's take a look at the list of necessary components for assembling the machine. We will also analyze the whole process step by step.
Materials
- corner 100x100, channel, narrow-gauge rail (for the manufacture of rail beds)
- car wheels
- hubs
- bearings
- square corrugated pipe
- threaded stud
- chain
- jack
- IV
- power unit (gasoline or electric motor)
- fittings
- bolts, nuts, washers, engravers
- sheet metal 1 mm
- pulley
- belt
Tools
- welding machine
- drill
- emery
- Bulgarian
- hammer
- roulette
- set of wrenches
- Laser level)
- ruler
- corner
The process of assembling a band sawmill with your own hands.
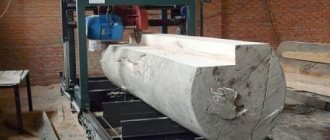
And so, the first thing you should do is get acquainted with the drawings, because any business begins with markings, as they say, “Measure twice, cut once.” So we got acquainted with the drawings, and now I would also like to note that homemade sawmills come in several types
1 Band sawmill with electric motor. 2. Band sawmill with gasoline engine. 3 Tire sawmill. The operating principle of a band saw for sawing wood. The blade is tensioned on 2 horizontally located pulleys, in this case these are ordinary car wheels with a tire and a tube. The undeniable advantage of this design is that the saw can be tensioned by inflating the tires. The limiter and support rollers are located directly at the bottom. Well, I hope the principle of operation is clear, then you should take care of placing a rail track along which a carriage with a saw blade will walk and cut the logs into boards. The area must be at least 3 x 6 m in size, and most importantly, level! Therefore, it is necessary to pour a foundation slab under the sawmill and level it to a perfectly flat surface. A recess is dug, a sand cushion is laid and a reinforced concrete slab is poured. Next comes the installation of the rail track itself; at best, it can be made from rails from a narrow-gauge railway, but it is difficult to obtain, so you will have to make it from a channel or corner. Note. In the photo the corner is positioned edge up. You can connect the corners to each other by welding, but when the metal heats up, it can lead, and we need a perfectly flat road. You can also attach the rail directly to the concrete base using anchor bolts. Support rollers can be made from ordinary bearings, or ordered from a familiar turner. After this, the saw frame itself is manufactured, using pipes of different diameters that can be inserted into one another. due to which the slider can rise up and down. The frame is welded from a square-section corrugated pipe. Support rollers are installed at the bottom. they must match the width of the rail track. Next, the lifting mechanism is manufactured. Then the pulleys and hubs are installed. Connection to the power unit. The saw blade is leveled and supported by bearings. A protective metal casing must be installed on top. Safety precautions are paramount here, because the canvas can fly out. The tension mechanism can be made from a small jack. After the sawmill is fully assembled, a test run is carried out; if everything is in order, the engine is turned off and the log is laid and secured. The log unfolds into planks. You can also watch the work of the sawmill visually on video.
In general, this is such a wonderful sawmill, now lay out the boards and bars for construction and repair as much as you like, just have time to throw the logs)
Source: www.samodelkindrug.ru
What you will need to build a sawmill
For those who think building their own sawmill is not a difficult task, let us say right away that creating a high-quality, efficient unit is not easy. And the point is not even that you cannot do without certain financial costs - as a rule, the budget of a homemade sawmill easily fits into the amount of 30 - 40 thousand rubles. Assembling a unit capable of producing high-quality lumber will require solving problems related to stability of operation, ensuring the strength of components and parts, setting up and adjusting mechanisms, making devices for sharpening a band saw and setting its teeth, etc. Are you not afraid of difficulties? Then check out what materials and tools you will need for the job.
As rail guides, you can use steel angles with a flange width of at least 50 mm, a channel or an I-beam. The main requirement for rails is their straight geometry. It must be borne in mind that any shortcoming of our miniature “railroad” will affect the quality of the cut, since the tape blade will copy every unevenness, transferring it to the surface of the board. That is why the best option would be T, N or U-shaped rolled metal. Unfortunately, corners are most susceptible to bending during manufacturing and transportation. The most ideal case would be to use factory rails, for example, from narrow-gauge transport, which, with some luck, can be found at scrap metal collection points.
The rollers that provide longitudinal movement of the sawmill can be turned on a lathe and hardened. In some cases, the use of conventional ball bearings is allowed.
Excellent rollers are made from linear guides based on ball bearings, which can be found on sale. This solution cannot be called the cheapest, but there is no doubt about the reliability and durability of such a unit
Actually, the frame, saw carriage and bed for laying logs are made of square and rectangular profile pipes. It is best to use rolled metal with maximum wall thickness. This will provide the equipment with the necessary strength, since the operation of the machine is associated with variable dynamic loads.
For the mechanism for adjusting the height of the carriage (traverse), you will need guides made of steel pipes with sliders and two long screws with nuts. For these purposes, you can use parts from decommissioned screw-cutting lathes (unlikely, but never mind), mechanical presses, or threaded rods from a construction store (the most affordable, but least preferred option). You can also order the production of parts from a turner - it’s still unlikely to be possible without contacting a specialist. In addition, you will need a chain drive, which is often borrowed from the gas distribution mechanism of automobile engines. Alternatively, you can use a bicycle chain and sprockets.
Pulleys from old domestic combine harvesters of the Kolos, Niva brands and other agricultural machinery are best suited as impellers for the belt blade. By the way, you can also get shafts and bearing housings from there. Please note that the diameter of the guides must be at least 30 cm (optimally 50 cm), otherwise excessive mechanical stress will lead to cracks at the base of the saw teeth.
Pulleys from decommissioned domestic agricultural machinery can be used in the design of the band saw drive
There are designs of homemade installations with guide pulleys in the form of wheels from passenger cars. For skeptics, we note that such a homemade solution has a lot of advantages, starting from the possibility of using assembled hubs and ending with the fact that fine adjustment of the belt tension during operation can be done by inflating the tires.
As for the tools that will be needed during the work process, every self-respecting owner should have one. In particular, you will need:
- welding machine;
- “grinder”, or, in professional language, an angle grinder;
- drill press or electric drill;
- a set of drills for concrete and metal;
- set of metalwork clamps;
- set of wrenches;
- hammer;
- pliers;
- fasteners (bolts, nuts, washers of various sizes);
- measuring instrument (ruler, caliper, tape measure);
- level (preferably laser type).
Don’t forget that you will need to prepare a strong, level foundation, so be prepared for concrete work - stock up on sand, crushed stone and cement, prepare a concrete mixer, tampers, formwork and a long rule.
Mini sawmill
A mini sawmill will be an excellent device for starting a woodworking production or independently constructing a wooden cottage. Today, many people build and repair wooden buildings with their own hands. In order to quickly and efficiently process a tree trunk, you need to use a sawmill. In this article we will talk about how to make a mini sawmill.
DIY mini sawmill
For domestic purposes, it is much more profitable to make a small sawmill with your own hands.
Pros of making it yourself:
- low material costs
- creating a design that fully meets your requirements and operating features
- The components needed for such a device can be found in any specialized store.
Of course, it will not be possible to create a device at the level of factory devices, for example, Murka, Kostroma, or Logosol, at home. But a simple sawmill, both mobile and stationary, can be created by any craftsman.
When creating a mini sawmill, be sure to consider the following points:
- you need to decide on the performance of your device. Unfortunately, homemade devices have poor performance. In order to calculate productivity you need to determine the volume of wood that you need to process
- dimensions of workpieces to be processed
- transportation. A mobile sawmill is more convenient because it can be easily moved for use in different areas of the home
- battery. Factory machines require power from a three-phase network of 380 V. However, for a homemade tool, 220 V is enough. For a sawmill, it is worth selecting a separate machine for 220 V. Thus, there will be no problems with other 220 V sockets. It is better to avoid using extension cords
- the type of compact sawmill being created - disk, belt or tire.
Mini disc sawmill
As an example, take a closer look at Murka and PD 2000. Such devices are in great demand in woodworking industries.
They are simple, have high productivity, and also do not cause problems when creating them yourself. The design is based on a circular saw, which can be mounted on the motor axis or the spindle shaft. To create the simplest model, you will need a shaft, a table, a motor and a circular saw. The main element of the design can be called a table. It is created from a metal frame, which is connected by welding and fastening bolts. There is a steel plate on top of the table. Such a plate must have holes that firmly fix the circular saw. It is into them that the cutting element is inserted. When installing the saw, you need to make sure that it is located in the middle of the saw.
Features of electronic measuring rulers
The lenses have chrome markings, which allows you to take measurements with high accuracy. The visualization system, consisting of four elements, is configured individually for each user. The lenses have a tenfold magnification, providing high-contrast images.
The rulers are equipped with a parallax system to control the location of the surface being measured. The measurement results are displayed on a monochrome display. The height of the characters is 6 mm.
The guides of the device are made of stainless steel. Smooth carriage movement. The device is supplied in a special case.
Tire mini sawmill
The design is based on the following main elements:
- machine frame. It is the most important because it holds all the equipment equipment. Reliability, durability and safety directly depend on the frame. Dimensions are selected individually, according to the needs of woodworking
- power unit. Without a drive, of course, the sawmill will not work. For domestic use, a three-phase motor is suitable; it requires a power supply of 380 Volts. However, you can also use a gasoline engine. Power supply from 220 V is not suitable in this case, because the power parameters are very low. The minimum power parameter is 3 kW
- fastening elements. Using stationary components, you can make a cut by securing the workpiece to them. Dimensions of hardware are selected according to the parameters of the workpieces being processed
- tire. Usually the tire is 50 centimeters. The best option is to purchase it together with the chain. Thus, the thickness of the cut is minimized, and, consequently, the volume of waste is reduced
- cutting element.
The metal frame must be connected to the sawmill bar. The gap between the frame and the tire is the size of the workpieces being processed, so the drawing of the mini sawmill must include this point. If you wish, you can make it possible to adjust this gap. This useful addition will make it possible to process a wide variety of workpieces.
On the base you need to create guides along which the workpiece will move. To mount the base to the racks, you need to weld plates with drilled holes. After installation is complete, secure the position with nuts and bolts.
When making a homemade sawmill, be sure to remember to follow safety precautions. See how a mini sawmill is made correctly; a video of this process is presented below.
Model overview
Among the manufacturers, it is worth noting the companies BARS and DPU, whose products are in demand in the domestic market.
BARS-5 is a two-disc model, distinguished by its configuration, which can be expanded or narrowed depending on preferences. Radial cutting is possible thanks to 2 cutting elements, the diameter of each of which is no more than 550 mm. As for the diameter of the processed material, the range varies from 100 to 950 mm. An automatic mode is built-in, which can be used for completely autonomous operation of the equipment. In this case, the maximum diameter of the material should not exceed 600 mm.
An important indicator is the feed speed, because the performance of the equipment depends on this indicator. For BARS-5, this characteristic ranges from 0 to 90 m/min, and the result depends on the settings that you set during operation. In this case, the length of the processed log must be a minimum of 2000 and a maximum of 6500 mm. As for the preparation of timber, a size of 200X200 mm or less is provided for it. Vertical and horizontal saw drives have the same power of 22 kW.
Specific energy consumption is 7 kW/m 3, engines with 2940 rpm. It is worth noting that there are 3 trim levels, each of which has its own characteristics. The first is a mechanical system, the second and third are hydraulic, the latter being equipped with a hydraulic loader. As a result, the weight of each model is very different, since in the first case it is 2670 kg, and the maximum is 4050 kg. Of course, there is a difference in the total installed capacity.
The key feature of these models is the power of the circular saw engines. For the DPU-500 this characteristic is 11 kW, for the 600 model it is 15 kW. It was this change that entailed a difference not only in versatility, but also in efficiency. If the power of the transverse carriage motor is the same and equals 0.37 kW, then the vertical part for the more advanced model has been increased to 0.55 kW. It is worth adding that the feed speed of the processed material has not changed, because 21 m/min is the maximum for both models.
An increase in the power of the second unit entailed a change in the possible dimensions of the manufactured products. For example, the maximum dimensions of the exit beam are 210X210 versus 180X180 mm for the first option. The productivity of edged material is 6–10 and 8–12 m3 per shift, respectively. The lumber yield is 74% for both models. An important disadvantage of the DPU-600 over its 500 counterpart is its weight of 950 kg, which is 150 more than that of the less powerful specimen.
Thus, having 2 models with different characteristics, the consumer has the opportunity to choose between performance and dimensions. Of course, a lot depends on the price of the equipment. If we talk about whether the presented corner sawmills are of high quality and reliable, then it is worth mentioning that this equipment is used in a large number of enterprises and factories. This suggests that the manufacturers took care of the quality and proper operation of their products.
Band mini sawmill
Band sawmills do the best job of cutting boards. There are several methods for creating such a device. The driving force of such devices can be either electric or gasoline engines. There is no point in describing in detail a certain home-made design indicating specific parameters, because each master takes into account both the “scale” of such production and the availability of free space.
We will describe the general manufacturing procedure:
- room. Experienced craftsmen advise that for comfortable work with logs, choose a workshop space of at least 18 m2, for example 6 x 3 m
- the saw is positioned motionless during operation. The workpiece is placed on a special movable frame (trolley) and moved by hand. For this reason, you need to mount a metal frame to secure the saw. “Rails” from the corner are placed under it, along which the cart with the workpiece moves. The cutting is carried out in a horizontal plane. It is necessary to provide for a change in the height of the saw during the “dissolution” of the workpiece into boards. To do this, the frame is equipped with a special system that operates on the principle of a clamp, for example, a “lead” screw or something similar
- as a base you can take a metal corner or more serious structures, such as an I-beam or channel. Care must be taken to rigidly fix this frame to the installation site, because during operation it will be subject to high dynamic loads. Pay main attention to the evenness and horizontality of the upper beams - guides. The gap between the guides should be approximately 50 - 70 cm larger than the diameter of the largest log you are going to work with.
- Regardless of the thickness of the workpiece, it must be firmly fixed on the trolley. Wheels need to be attached to the bottom.
These are perhaps the most significant stages of creating a sawmill that you will encounter during its installation.
The disadvantages of homemade sawmills include:
- setup difficulties. Adjustment must be carried out continuously
- wide cut, which means a high percentage of waste
- The radius of waste scattering is quite significant
- The capabilities of the equipment are not high, both in terms of the dimensions of the logs and the time of continuous operation of the mechanisms.
Source: wood-prom.ru
Preparatory activities
At the preparation stage, the optimal design is selected, the necessary calculations are made and drawings are developed. After this, materials and tools are prepared and a place for installation of the sawmill is arranged.
Design work, drawings
The construction of a sawmill begins with the selection of a production site. It has been experimentally established that this will require an area of at least 3x6 m in size. In any case, when planning the length of the working area, it is necessary to take into account the maximum size of the forest being processed. It is best if the unit is installed indoors or under a large canopy. In this case, you can work in any weather.
Then the number of angles (channels, I-beams) and profile pipes required for the manufacture of rail guides, stock and saw frame is determined. The distance between the rails is calculated by adding gaps of at least 0.3 - 0.4 m on each side to the maximum diameter of the log. In addition, it is necessary to take into account transverse reinforcements, which are installed between the rails every 0.8 - 1 m. Supporting elements for timber can be mounted on the same reinforcements, raising the bed to a height of at least 0.2 m above the level of the guides.
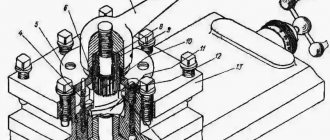
Depending on the design, drawings of components are drawn up that will need to be turned on a lathe - rollers, screws, shafts, bearing housings, pulleys, etc. The design of a homemade sawmill is taken based on financial capabilities, availability of materials and individual components, so the exact design of the unit everyone does it independently. However, we provide diagrams and drawings of the sawmill and its individual components as an example. They can be used in your own developments.
Preparing the base
A properly made foundation will ensure the equipment’s stable linear characteristics during operation.
Since building your own sawmill is a serious matter, you need to approach it responsibly. Perhaps in the future the equipment will become not only a good help in the household, but also a source of additional income. Such important factors as the durability and reliability of the sawmill, the ease of operation and the quality of the resulting lumber largely depend on how strong and level the base it has.
The construction of a base slab is no different from the construction of a shallow floating or simple strip foundation. A lot has been written about it, so there is no need to dwell on the construction process in detail. Let us only remind you that you will need a cushion of sand and gravel, the thickness of the base is made at least 10 - 15 cm, and its strength is ensured by an armored belt made of steel rod with a diameter of at least 10 mm. In this case, significant variable loads will not lead to cracks or subsidence of the concrete slab.
This is interesting: Band sawmills for wood - video, photos, drawings
How to make a band sawmill with your own hands?
[Do-it-yourself band sawmill] allows you to save significantly if there is a need for constant wood processing during the construction of houses, on the farm, or if you have your own small production.
Of course, you don’t have to rack your brains and buy a tool, but making it yourself, as mentioned above, will cost much less.
The band sawmill is better known to many as a band saw. Depending on the scope of work, the type of tool is selected.
The sawmill can be belt type, chain or disk type. We are considering tape type manufacturing.
What do we need?
- Welding machine, electrodes;
- Lumber, posts, screws, nails;
- Chainsaw, electric saw or just an electric motor;
- Extended tires with chains, if you cut wood with large diameters, more on that below;
- Material for making the case, preferably a corner, as it is quite resistant to vibrations;
- Rollers and guides;
- Cord, clothesline or cable for moving the saw while sawing;
- Roller bearings.
Another cheaper and more economical option for using wood can be considered as a material. With high-quality fastening with screws and self-tapping screws, the wood will easily withstand the load from thin wood.
How does a sawmill work?
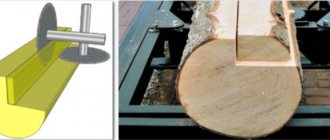
The principle of operation of a band sawmill is very easy to explain using the example of spools of thread.
The whole design resembles the rotation of two spools, between which a thread is stretched. This thread plays the role of a saw, and the distance between the coils is the maximum size of the log.
What a band sawmill allows you to do:
- Prepare logs, that is, adjust them to the same size and shape;
- Sawing logs according to a given pattern after setting up the equipment;
- After sawing, small defects remain that cannot be eliminated using homemade sawmills, so further processing of the wood is done manually.
The band sawmill works as follows: the log is fixed on the platform and remains motionless, the mobile cart begins its movement and cuts the tree, the saw is in a horizontal position.
In order to ultimately get a board of the desired size, it is necessary to initially set the parameters by the operator. The saw acts as a saw blade, which must be well tensioned.
How a homemade sawmill works, see the video.
Before work, you need to prepare the equipment: to do this, sharpen the saw and set the teeth.
Options for constructing a log cutting diagram using the Bars Optima program
Radial cutting of logs with a diameter of 59 cm with core displacement
Batch cutting of logs with a diameter of 60 cm for cutting on second-row machines
Radial cutting of logs with a diameter of 71 cm without core displacement
Radial cutting of the “RIFT” type without displacement of the core of a log with a diameter of 59 cm
Displacement of the log core along the Y axis by 100 mm
Displacement of the log core along the X axis by 90 mm
Classic radial cutting of logs with a diameter of 56 cm. Overall yield 62.7%, radial board yield 56%
Combined cutting of logs with a diameter of 36 cm into finished boards and beams, followed by sawing of the beams on second-row machines. Board size 95x31 mm
Combined cutting of logs with a diameter of 60 cm into finished boards and beams, followed by sawing of the beams on second-row machines. Board size 95x31 mm
What materials are needed to create a sawmill?
It should be noted that materials are selected depending on whether drawings are made or not, because it is the correct drawing that is the basis of a quality product, thanks to which the calculation of materials is made:
- Pulleys can be taken new or old in good condition;
- Pipes of different diameters;
- Rails - you can make it yourself from corners. It is better to place the corners edge up, this is necessary in order to extend the “life” of the wheels;
- Profile pipes for creating sleepers;
- Channel.
In addition to materials, you will need the following tools:
- welding machine;
- milling machine;
- Bulgarian;
- drill, it is more convenient to use an electric one;
- hammer;
- pliers;
- sets of screwdrivers and wrenches;
- clamp;
- bolts, nuts and other fasteners;
- rulers, tape measure, squares, etc.;
- hacksaw.
Sawmill design
The organization of work is based on the block principle.
It involves various variations of the device, starting from the basic one, where the saw is fed manually, to the most complex units, when the saw is fed automatically, the cutting thickness is set, the electronic system is programmed, etc.
Components of the structure:
- to organize the movement of the saw blade, a frame with two guides is used;
- screw mechanism for lifting the belt;
- hydraulic or spring unit for tensioning the tape;
- driving and driven wheels (pulleys);
- wheel guard casing;
- tape holder;
- V-belt transmission;
- electric motor;
- rail for carrying out the movement of the band saw;
- eccentric clamps for holding the block (log);
- emphasis;
- tank with liquid for wetting.
To create a smooth, reliable product, it is necessary to make drawings according to which the entire structure will be assembled.
At the same time, the drawing must be studied and understood, otherwise you can simply lose not only time, but also money.
First, the bed (fixed part) of the machine is made, which has a U-shape.
It can be made from two channels, which can be replaced with two rails (in the absence of the first materials). If you use rails, they need to be installed so that the sole is on top.
Necessary equipment
Such a tool is needed if there is a need to work with wood.
Although some models of band saws also allow you to work with synthetics, metal, and stone. The high density of the described materials requires the use of devices that contain components made of reinforced steel. A standard analogue will not be suitable due to the fact that when processing metal or any other of the mentioned materials, a disk with teeth very quickly becomes unusable. If we talk about the equipment that will be needed to make a band saw, then this is:
- welding machine;
- welding machine (it is better if it is semi-automatic);
- Bulgarian;
- sharpening machine;
- electric jigsaw;
- Sander;
- screwdriver
By the way, electric tools can be easily replaced with their manual counterparts. However, it is worth keeping in mind that this will significantly increase the assembly process time and require more labor.
Manufacturing recommendations
To make a homemade sawmill work more efficiently, you should pay attention to some recommendations:
- The structure must be stable and strong, since you have to work with logs of different weights and sizes;
- Equipment assembly work must be carried out directly at the site where it is planned to be located. This is due to the massiveness and heavy weight of the structure;
- It is necessary to constantly monitor the operation of the equipment and adjust the settings, since the design is done by hand, without the use of precise programs and computerization;
- Homemade sawmills are “scattered” with shavings, so you need to either build additional structures or clean up after the work is completed;
- A wide band cut affects the generation of a large amount of waste;
- To ensure efficient operation of the mobile cart, it is necessary to use gaskets and plates, and the gaskets must be 0.5 mm thicker than the channel;
- The electric motor can be easily replaced with a gasoline engine. This option will be simpler, because you can use a chainsaw, or rather its engine. The chainsaw blade will serve as a tape. How to make a gasoline band sawmill, see the video;
- All fastening elements must be securely fixed to ensure safe operation of the entire structure;
- To ensure efficient operation, the saw must be sharpened and the teeth set apart.
Firstly.
We pay attention to all the bends and bulges of the log - a perfectly straight trunk is rare. Therefore, we try to turn it so as to get as little waste as possible from it, such as croaker
When the log is laid and fixed, you should make sure that it passes freely between the guide rollers.
Set the diameter size on the ruler of the sawmill, and to this size add the greatest height of the convexity of the log. This is the bulge that is higher than the diameter of the top or narrowest part of the log.
Using a regular tape measure, measure the height of the highest part, and from this size you begin counting the dimensions of the required material, taking into account the size of the cut, which ranges from 2 to 5 mm.
Disc sawmill
Let's look at a simpler type of homemade sawmill.
In order to make a circular sawmill, you will need to find a circular saw. An electric motor will be used as a motor.
First you need to make a welded frame, on which you will need to place a metal plate with a slot for the disk. From below to the plate you need to attach the plate shaft on bearings and pulleys.
The electric motor wheel is connected to the saw by a belt.
To ensure good belt tension, it is necessary to use the weight of the engine itself, and you can also use weights. The circular sawmill is ready.
Source: rezhemmetall.ru
Making a sawmill at home with your own hands
When it is necessary to process a large number of boards and wood, it is best to use a self-made sawmill. Many people believe that it is best to purchase a ready-made unit, but making it yourself will not be difficult. The main thing is to decide what the volume of work ahead will be, as well as the wood, after which you need to choose the type of sawmill to successfully complete the task.
When assembling the unit with your own hands, special attention should be paid to safety issues , because such a device is considered a high-risk object. The manufacture of various types of sawmills is presented further in the video.
The principle of operation of the sawmill
explain how a sawmill works using the example of spools of thread. This device resembles the rotation of two spools with a thread stretched between them. It is this that acts as a saw, and the distance between the coils will be the optimal size of the log.
A DIY sawmill allows you to:
- adjust logs to one shape and size;
- saw logs according to a specific pattern after the equipment is set up;
- After sawing, small defects often form that cannot be eliminated, so the wood has to be processed manually.
The work of the sawmill is carried out as follows : a log is fixed on the platform, which remains motionless, and at this time the mobile cart starts moving and cuts the tree. The saw must be in a horizontal position.
In order to obtain boards of the required size, the operator initially sets the necessary parameters. The saw blade acts as a saw, and it must be well tensioned.
Cutting technology
When choosing a technology for sawing logs into boards, the characteristics and dimensions of the wood are taken into account. There are three ways to work on a band sawmill:
- Sawing into collapse. The tree is cut in a straight line to the end without turning over. The output is unedged boards. The downside is the low quality of the resulting material and a large amount of waste. The resulting boards must be further trimmed. During operation there is a high probability of cracking.
- Circular sawing. After the first cut, the log is turned over to the other side. Usually five revolutions are practiced. The method allows you to cut logs to size with a minimum amount of waste. The disadvantage of this method is the low production speed.
- Sawing timber. The main part of sawing logs is carried out in a circle. The central part is cut out in the shape of a beam. For these purposes, as a rule, the largest logs are used.
The technological process of sawing includes the size of the board and the rotation of the log.
Turning a log
After the sawmill blade has reached the desired height, the trunk is turned over. Unsawn material is measured and calculations are made for its use. Next, the log is rotated 900 and the measurements are repeated.
When making calculations, it is important not to forget to make allowances for cutting.
First cut
There are two options for starting to cut wood, depending on the selected edge:
- Start cutting from the worst part. In this case, there is no need to take into account the tilt of the barrel. When sawing this edge, boards of short length and a large amount of unedged material are obtained.
- Start cutting with the best part. In this case, the log must be installed so that the saw is parallel to the tree bark.
Since in the first option the best part of the trunk is hidden, errors are possible during further sawing. This method is more suitable when working with low quality wood.
Flipping the log
While working at the sawmill, the log is turned over according to the cutting diagram. The revolution is carried out in two ways:
- Turn 180°, in this case unedged boards are obtained.
- Turning 90° produces unedged and semi-edged boards.
Using the first method, you can get wider boards. The second method is more convenient, since it is easier to turn the log over at this angle.
How to make sawmills with your own hands
The most common types of sawmills are corner, band and chain , as well as devices assembled using a chainsaw.
Band sawmill
to assemble a band sawmill with your own hands at home. This is explained by the fact that it is difficult to achieve maximum coherence of all its constituent elements in the process of work. In addition, you will need the necessary components and special tools, but the main thing is that you have the necessary drawings at hand. The finished structure must work with material whose weight is about three hundred kilograms. In addition, it is necessary to adjust the adjustment of the threaded thickness and observe safety precautions.
Assembling the sawmill with your own hands is carried out on a site of the required size , which should be prepared in advance. The device will require special wheels and band saws. Then, in accordance with the drawings, the frame of the future unit is assembled. Work on the frame begins with the manufacture of special rails. To do this, you can pick up a corner and install one of the sides up. Then the wheels are installed, maintaining maximum strength.
Between two corners, set parallel, sleepers are made from a profile pipe, which are designed to ensure their reliable fastening to each other. Fasteners for logs that move freely in all directions are welded to this profile pipe. Then, according to the drawing, the cart is assembled and the wheels are attached to it.
Essential tips and tricks
Since the sawmill is considered a rather dangerous unit of impressive size, before assembling it with your own hands, you need to carefully consider where it will be used. Good for this:
- barn;
- garage;
- an ordinary utility room with a concrete base.
Such a place should be well ventilated, spacious and have sufficient lighting. A place for this device can also be found on the street, but a canopy must be equipped for it.
If the sawmill has an electric motor , then you need to carefully consider the installation of wiring and installation of the necessary switches and machines. If there is a warehouse for finished boards near the place of work, this greatly simplifies the whole process.
When assembling the unit with your own hands, special attention must be paid to its cutting and moving parts, which are considered the most dangerous elements. In general, safety precautions should be observed when operating the device.
After assembling the sawmill and before starting work, be sure to check all fastenings and components, as well as the stability of the structure. The first start of the device is carried out after following all the necessary recommendations.
Thus, making a sawmill with your own hands is not difficult . These devices come in different types and the process of their assembly is presented in the video. You should also definitely use the drawings so as not to make any mistakes. When operating a sawmill, it is necessary to observe safety precautions, because this is a rather dangerous device.
Source: nashgazon.com