Many of those home craftsmen who manufacture and decorate products from wood and other materials in their workshop have probably thought about how to make a laser engraver with their own hands. The presence of such equipment, the serial models of which are quite expensive, makes it possible not only to apply complex designs to the surface of the workpiece with high precision and detail, but also to carry out laser cutting of various materials.
Homemade laser machine in the process of wood engraving
A homemade laser engraver, which will cost much less than a serial model, can be made even if you do not have in-depth knowledge of electronics and mechanics. The laser engraver of the proposed design is assembled on the Arduino hardware platform and has a power of 3 W, while for industrial models this parameter is at least 400 W. However, even such low power allows you to use this device for cutting products made of polystyrene foam, cork sheets, plastic and cardboard, as well as perform high-quality laser engraving.
This engraver can also handle thin plastic.
Necessary materials
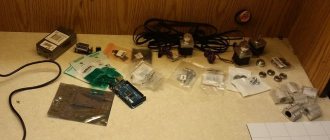
In order to make your own laser engraver using Arduino, you will need the following consumables, mechanisms and tools:
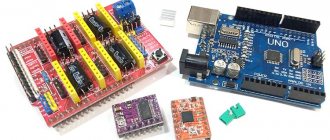
- hardware platform Arduino R3;
- Proto Board equipped with a display;
- stepper motors, which can be used as electric motors from a printer or DVD player;
- laser with a power of 3 W;
- laser cooling device;
- DC-DC voltage regulator;
- MOSFET transistor;
- electronic boards that control the laser engraver motors;
- limit switches;
- a housing in which you can place all the structural elements of a homemade engraver;
- timing belts and pulleys for their installation;
- ball bearings of various sizes;
- four wooden boards (two of them with dimensions 135x10x2 cm, and the other two - 125x10x2 cm);
- four round metal rods with a diameter of 10 mm;
- bolts, nuts and screws;
- lubricant;
- clamps;
- computer;
- drills of various diameters;
- a circular saw;
- sandpaper;
- vice;
- standard set of locksmith tools.
The electronic part of the machine will require the greatest investment
CNC device manufacturing
For large volumes of work, a conventional engraver will not cope with the load. If you will be using it frequently and a lot, you will need a CNC device.
Assembling the interior
You can even make a laser engraver at home. To do this, remove the stepper motors and guides from the printer. They will fire a laser.
The complete list of required spare parts is as follows:
- Laser diode from a recording device.
- Radiator for diode.
- 3 stepper motors.
- 6 round guides.
- Fasteners for guides.
- 3 double trolleys or 6 single trolleys.
- Power supply 5 V, 4 A.
- Arduino UNO.
- 2 stepper motor drivers.
- 2 switches.
- Sheet 50 x 50 cm and 2 mm thick (for the base).
- Large sheet of plywood.
- Corners for fastening plywood.
- Self-tapping screws.
- 2 furniture hinges.
- Wires with a cross section of 0.5 mm².
- Mobile cable channel.
- Plastic ties.
- Transistor IRFZ44.
- 2 pressure rollers.
- 5 gears.
- Metal rod (axle for gears and rollers).
- 4 bearings.
- Toothed belt.
- 2A DC-DC Buck Converter
- Four limit switches.
- Clock button.
- 2.1 x 5.5 mm connector.
- 4 rubber or silicone feet.
- Heat transfer adhesive.
- Epoxy resin with hardener.
Measure the length of the guides and divide them into two groups. The first one will have 4 short ones, the second one will have 2 long ones. Rails of one group must be the same length.
Add 10 centimeters to the length of each group of guides and cut the base according to the resulting dimensions. From the cutouts, fold U-shaped supports for fasteners and weld them to the base. Mark and drill holes for the bolts inside them.
Drill a hole in the heatsink and glue the laser there using heat-conducting glue. We solder the wires and transistor to it. Screw the radiator to the cart.
Install the rail supports onto the two supports and secure them with bolts. Insert the Y-axis guides into the fasteners, install the X-axis carriages on their free ends. Insert the remaining guides with the laser head installed on them. Place the mounts onto the Y-rails and screw them to the holders.
Drill holes at the mounting points of the electric motors and gearbox axles. Reinstall the stepper motors and slide the drive gears onto their shafts. Insert the pre-cut strips from the metal rod into the holes and secure them with epoxy glue. After hardening, put the gears and pressure rollers with bearings inserted into them onto the axles.
Install the timing belts as shown in the diagram. Tighten them before attaching. Check the movement of the X-axis and laser head. They should move with little effort, spinning all the rollers and gears through the belts.
Connect the wires to the laser, motors and limit switches and tighten them with cable ties. Place the resulting bundles into movable cable channels and secure them to the carriages.
Pull out the ends of the threads.
Electrical part of a homemade laser engraver
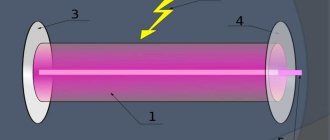
The main element of the electrical circuit of the presented device is a laser emitter, the input of which must be supplied with a constant voltage with a value not exceeding the permissible parameters. If this requirement is not met, the laser may simply burn out. The laser emitter used in the engraving installation of the presented design is designed for a voltage of 5 V and a current not exceeding 2.4 A, therefore the DC-DC regulator must be configured for a current of 2 A and a voltage of up to 5 V.
Electrical circuit of the engraver
The MOSFET transistor, which is the most important element of the electrical part of a laser engraver, is necessary in order to turn the laser emitter on and off when receiving a signal from the Arduino controller. The electrical signal generated by the controller is very weak, so only a MOSFET transistor can sense it and then unlock and close the laser power circuit. In the electrical circuit of a laser engraver, such a transistor is installed between the positive contact of the laser and the negative contact of the DC regulator.
The laser engraver's stepper motors are connected through one electronic control board, which ensures their synchronous operation. Thanks to this connection, timing belts driven by multiple motors do not sag and maintain a stable tension during operation, which ensures the quality and accuracy of the processing performed.
It should be kept in mind that the laser diode used in a homemade engraving machine should not overheat.
To do this, it is necessary to ensure its effective cooling. This problem can be solved quite simply: a regular computer fan is installed next to the diode. To prevent overheating of stepper motor control boards, computer coolers are also placed next to them, since conventional radiators cannot cope with this task.
Photos of the electrical circuit assembly process
Photo-1
Photo-2
Photo-3
Photo-4
Photo-5
Photo-6
Build process
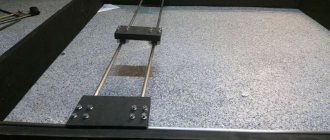
The homemade engraving machine of the proposed design is a shuttle-type device, one of the moving elements of which is responsible for movement along the Y axis, and the other two, paired, for movement along the X axis. For the Z axis, which is also specified in the parameters of such a 3D printer, the depth to which the material being processed is burned is taken. The depth of the holes into which the elements of the shuttle mechanism of the laser engraver are installed must be at least 12 mm.
Desk frame - dimensions and tolerances
Photo-1
Photo-2
Photo-3
Photo-4
Photo-5
Photo-6
Aluminum rods with a diameter of at least 10 mm can act as guide elements along which the working head of a laser engraving device will move. If it is not possible to find aluminum rods, steel guides of the same diameter can be used for these purposes. The need to use rods of exactly this diameter is explained by the fact that in this case the working head of the laser engraving device will not sag.
Manufacturing of a movable carriage
Photo-1
Photo-2
Photo-3
The surface of the rods that will be used as guide elements for the laser engraving device must be cleaned of factory grease and carefully ground to perfect smoothness. Then they should be coated with a lubricant based on white lithium, which will improve the sliding process.
Housing assembly
Installation of stepper motors on the body of a homemade engraving device is carried out using brackets made of sheet metal. To make such a bracket, a sheet of metal whose width approximately corresponds to the width of the engine itself, and the length of which is twice the length of its base, is bent at a right angle. On the surface of such a bracket, where the base of the electric motor will be located, 6 holes are drilled, 4 of which are necessary for fixing the engine itself, and the remaining two are for attaching the bracket to the body using ordinary self-tapping screws.
To install a drive mechanism consisting of two pulleys, a washer and a bolt on the electric motor shaft, a piece of metal sheet of the appropriate size is also used. To mount such a unit, a U-shaped profile is formed from a metal sheet, in which holes are drilled for attaching it to the engraver body and for the output of the electric motor shaft. The pulleys on which the timing belts will be placed are mounted on the shaft of the drive electric motor and placed in the inner part of the U-shaped profile. Toothed belts placed on pulleys, which should drive the shuttles of the engraving device, are connected to their wooden bases using self-tapping screws.
Installation of stepper motors
Photo-1
Photo-2
Photo-3
Photo-4
Photo-5
Photo-6
Final setup and preparation for work
Having made a laser engraving machine with your own hands and loaded the necessary software into its control computer, do not immediately start working - the equipment needs final configuration and configuration. What kind of adjustment is this? First of all, you need to make sure that the maximum movements of the machine's laser head along the X and Y axes coincide with the values obtained when converting the vector file. Also, depending on the thickness of the material from which the part is made, it is necessary to adjust the parameters of the current supplied to the laser head. This should be done so that the product does not burn on the surface you want to engrave.
A very important and responsible process is the precise alignment (adjustment) of the laser head. Alignment is necessary to adjust the power and resolution of the beam produced by your engraver's laser head. On expensive serial models of laser engraving machines, adjustment is performed using an additional low-power laser installed in the main working head. However, homemade engravers usually use inexpensive laser heads, so this method of beam adjustment is not suitable for them.
Test your DIY laser engraver first with simple designs
Sufficiently high-quality adjustment of a homemade laser engraver can be done using the LED removed from the laser pointer. The LED wires are connected to a 3V power source and attached to the working end of a standard laser. By alternately turning on and adjusting the position of the beams emanating from the test LED and the laser head, they achieve alignment at one point. The convenience of using an LED from a laser pointer is that adjustment can be made with its help without the risk of damaging both the hands and eyes of the engraving machine operator.
The video shows the process of connecting the engraver to a computer, setting up the software and preparing the machine for work.
Software installation
Your laser grower, which must operate in automatic mode, will require not only installation, but also configuration of special software. The most important element of such support is a program that allows you to create the contours of the desired design and convert them into an extension that is understandable to the control elements of the laser engraver. This program is freely available and can be downloaded to your computer without any problems.
The program downloaded to the computer controlling the engraving device is unpacked from the archive and installed. In addition, you will need a library of contours, as well as a program that will send data on the created drawing or inscription to the Arduino controller. Such a library (as well as a program for transferring data to the controller) can also be found in the public domain. In order for your laser homemade product to work correctly, and for the engraving performed with its help to be of high quality, you will need to configure the controller itself to the parameters of the engraving device.
Features of using contours
If you have already figured out the question of how to make a hand-held laser engraver, then it is necessary to clarify the question of the parameters of the contours that can be applied using such a device. Such contours, the inside of which is not filled even if the original drawing is painted over, must be transmitted to the engraver’s controller as files not in pixel (jpeg), but in vector format. This means that the image or inscription applied to the surface of the processed product using such an engraver will not consist of pixels, but of dots. Such images and inscriptions can be scaled as desired, focusing on the surface area on which they should be applied.
Using a laser engraver, almost any design and inscription can be applied to the surface of the workpiece, but to do this, their computer layouts must be converted into vector format. This procedure is not difficult to perform: special programs Inkscape or Adobe Illustrator are used for this. A file that has already been converted to vector format must be converted again so that it can be correctly processed by the engraving machine controller. For this conversion, the Inkscape Laserengraver program is used.
Homemade tool for cutting and processing plywood
Considering the high cost of factory equipment, more and more people are trying to make a plywood laser cutting machine with their own hands. However, before embarking on such a procedure, make sure that you have certain skills and are willing to invest a lot of time and effort into the task ahead.
When manufacturing laser equipment, a number of features should be taken into account:
Determine the power indicators of the future car. It is no secret that at the stage of creating a system it is necessary to use special expensive devices with high power ratings, so the total cost of the final model is at least $600.- Find the right batteries and cooling. As mentioned above, to cool the gas moving through the pipe, it is necessary to use water and a pump that will pump it to the most vulnerable components of the system. For normal operation, the machine requires at least 100 liters of fluid.
- Therefore, it is necessary to fine-tune all elements of the laser system. To perform such an action, you must have at least minimal experience and spend a lot of time. This suggests that sometimes it is much easier to purchase a ready-made invention than to try to create it yourself, but everything is ambiguous.
Laser cutting of plywood sheets remains a complex process, but with the right approach it can create real works of art and intricate patterns.