If you want to create more than 3D printed parts, or simply expand the range of materials you work with, laser cutting and engraving is a great choice. It allows you to work with other materials and does not require special experience.
But perhaps the best part is that this technology can be easily used by upgrading your 3D printer. The motion system of 3D printers far exceeds the requirements for laser cutting, and laser diode modules can be as small as hot-end units.
Converting a 3D printer into a laser cutter and engraver is a pretty big decision. In this article, we'll talk about laser technology in general and then discuss the basic steps to converting your 3D printer.
Necessary materials
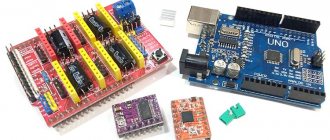
To make your own laser engraver using Arduino, you will need the following consumables, mechanisms and tools:
- hardware platform Arduino R3;
- The prototype board is equipped with a display;
- stepper motors, which can be electric motors for printers or DVD players;
- 3 W laser;
- laser cooling device;
- DC/DC constant voltage regulator;
- MOSFETs;
- electronic boards that control the laser engraver motors;
- stop switch;
- a case in which you can place all the structural elements of a homemade engraver;
- timing belts and pulleys for their installation;
- ball bearings of various sizes;
- four wooden boards (two 135x10x2 cm and the other two 125x10x2 cm);
- four round metal rods with a diameter of 10 mm;
- bolts, nuts and screws;
- lubricant;
- cable ties;
- computer;
- drills of various diameters;
- a circular saw;
- sandpaper;
- vice;
- standard set of locksmith tools.
The electronic part of the machine will require the largest investment
Laser for metal engraving and how the device works
There is no point in describing in words how to make a laser engraver with your own hands from an Arduino Uno or a 3D printer. It will be much more instructive to see everything with your own eyes. We invite you to see how to make a similar CNC laser engraver.
Watch this video on YouTube
After all, even a photograph can be engraved on a laser machine of this type by launching the desired program. Many people ask how to prepare a photo for engraving on a laser machine. It's simple: the photo is scanned and uploaded into the program.
Photogravure on metal
Best 3D MFP 2022
Multifunctional 3D printers are quite rare, with few manufacturers attempting to combine multiple tooling processes into one easy-to-use package. Some of these devices are only suitable for simple, small jobs, but there are also fully functional, professional-grade machines.
According to the rating of the magazine about 3D printing "AL3DP", the best compact 3D MFP for 2022, combining a 3D printer, laser engraver and CNC milling machine - Snapmaker. It's easy to use, whether you need 3D printing, laser engraving or CNC milling. Any beginner can handle it.
Final setup and preparation for work
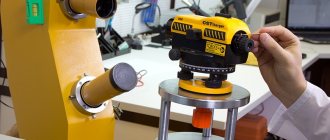
Having made a laser engraving machine with your own hands and loaded the necessary software into its control computer, do not immediately start working - the equipment needs final configuration and configuration. What kind of adjustment is this? First of all, you need to make sure that the maximum movements of the machine's laser head along the X and Y axes coincide with the values obtained when converting the vector file. Also, depending on the thickness of the material from which the part is made, it is necessary to adjust the parameters of the current supplied to the laser head. This should be done so that the product does not burn on the surface you want to engrave.
A very important and responsible process is the precise alignment (adjustment) of the laser head. Alignment is necessary to adjust the power and resolution of the beam produced by your engraver's laser head. On expensive serial models of laser engraving machines, adjustment is performed using an additional low-power laser installed in the main working head. However, homemade engravers usually use inexpensive laser heads, so this method of beam adjustment is not suitable for them.
Test your DIY laser engraver first with simple designs
Sufficiently high-quality adjustment of a homemade laser engraver can be done using the LED removed from the laser pointer. The LED wires are connected to a 3V power source and attached to the working end of a standard laser. By alternately turning on and adjusting the position of the beams emanating from the test LED and the laser head, they achieve alignment at one point. The convenience of using an LED from a laser pointer is that adjustment can be made with its help without the risk of damaging both the hands and eyes of the engraving machine operator.
The video shows the process of connecting the engraver to a computer, setting up the software and preparing the machine for work.
Design and principle of operation
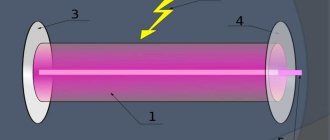
The main element of the engraver is a semiconductor laser. It emits a focused and very bright beam of light that burns through the material being processed. By adjusting the radiation power, you can change the depth and speed of burning.
The laser diode is based on a semiconductor crystal, on top and bottom of which there are P and N regions. Electrodes are connected to them, through which current is supplied. Between these regions there is a P-N junction.
Compared to a regular laser diode, it looks like a giant: its crystal can be examined in detail with the naked eye.
The values can be deciphered as follows:
- P (positive) area.
- P - N junction.
- N (negative) area.
The ends of the crystal are polished to perfection, so it works as an optical resonator.
Electrons, flowing from a positively charged region to a negative one, excite photons in the P-N junction. Reflecting from the walls of the crystal, each photon generates two similar ones, which, in turn, also divide, and so on ad infinitum. The chain reaction occurring in a semiconductor laser crystal is called the pumping process. The more energy supplied to the crystal, the more it is pumped into the laser beam. In theory, you can saturate it indefinitely, but in practice everything is different. During operation, the diode heats up and must be cooled. If you constantly increase the power supplied to the crystal, sooner or later there will come a time when the cooling system can no longer cope with heat removal and the diode will burn out.
The power of laser diodes usually does not exceed 50 Watts. Above this value, it becomes difficult to make an effective cooling system, so high-power diodes are extremely expensive to produce.
There are semiconductor lasers with 10 or more kilowatts, but they are all composite. Their optical resonator is pumped by low-power diodes, the number of which can reach several hundred.
Compound lasers are not used in engravers because their power is too high.
DIY laser engraver: materials, assembly, software installation
Many of those home craftsmen who manufacture and decorate products from wood and other materials in their workshop have probably wondered how to make a laser engraver with their own hands.
The presence of such equipment, the serial models of which are quite expensive, makes it possible not only to apply complex patterns to the surface of the workpiece with high precision and detail, but also to perform laser cutting of various materials.
Homemade laser machine in the process of wood engraving
A homemade laser engraver that will cost much less than a production model can be made even if you do not have a deep understanding of electronics and mechanics.
The laser engraver of the proposed project is assembled on the Arduino hardware platform and has a power of 3 W, while for industrial models this parameter is at least 400 W.
However, even such a small power allows this machine to be used for cutting products made of polystyrene foam, cork sheets, plastic and cardboard, as well as for high-quality laser engraving.
This engraver can handle even thin plastic
Necessary materials
To make your own laser engraver using Arduino, you will need the following consumables, mechanisms and tools:
- hardware platform Arduino R3;
- The prototype board is equipped with a display;
- stepper motors, which can be electric motors for printers or DVD players;
- 3 W laser;
- laser cooling device;
- DC/DC constant voltage regulator;
- MOSFETs;
- electronic boards that control the laser engraver motors;
- stop switch;
- a case in which you can place all the structural elements of a homemade engraver;
- timing belts and pulleys for their installation;
- ball bearings of various sizes;
- four wooden boards (two 135x10x2 cm and the other two 125x10x2 cm);
- four round metal rods with a diameter of 10 mm;
- bolts, nuts and screws;
- lubricant;
- cable ties;
- computer;
- drills of various diameters;
- a circular saw;
- sandpaper;
- vice;
- standard set of locksmith tools.
The electronic part of the machine will require the largest investment
Electrical part of a homemade laser engraver
The main element of the electrical circuit of the presented device is a laser emitter, the input of which must be supplied with a constant voltage, the value of which does not exceed the permissible parameters.
If this requirement is not observed, the laser may simply burn out.
The laser emitter used in the engraving installation of the presented design is designed for a voltage of 5 V and a current of no more than 2.4 A, so the DC-DC regulator must be set to a current of 2 A and a voltage of up to 5 V.
Electrical circuit of the engraver
The MOSFET transistor, which is the most important element in the electrical part of a laser engraver, is required to turn the laser emitter on and off when receiving a signal from the Arduino controller.
The electrical signal generated by the controller is very weak, so only the MOSFET can detect it and then turn the laser power circuit on and off.
In the electrical circuit of a laser engraver, such a transistor is installed between the positive contact of the laser and the negative DC regulator.
The laser engraver's stepper motors are connected via an electronic control board, which ensures their synchronization. Thanks to this connection, timing belts driven by multiple motors do not fall down and maintain a stable tension during operation, which guarantees the quality and accuracy of the work performed.
To do this, it is necessary to ensure its effective cooling. This problem can be solved quite simply - a regular computer fan is installed next to the diode. To prevent overheating of stepper motor control boards, computer coolers are also placed next to them, since conventional radiators cannot cope with this task.
Build process
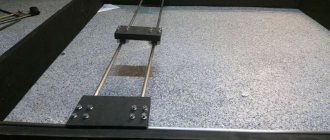
The homemade engraving machine of the proposed design is a shuttle-type device, one of the moving elements of which is responsible for movement along the Y axis, and the other two, connected to each other, for movement along the X axis.
The Z axis, which is also indicated in the parameters of such a 3D printer, is the depth at which the material being processed is fired.
The depth of the holes into which the elements of the shuttle mechanism of the laser engraver are installed must be at least 12 mm.
Aluminum rods with a diameter of at least 10 mm can serve as guide elements along which the working head of the laser engraving device will move.
If aluminum rods cannot be found, steel guides of the same diameter can be used for these purposes.
The need to use rods of this diameter is explained by the fact that in this case the working head of the laser engraving device will not go down.
The surface of the rods that will be used as guide elements for the laser engraving device must be cleaned of factory grease and carefully sanded to obtain ideal smoothness. They should then be coated with a white lithium-based lubricant, which will improve the sliding process.
Housing assembly
Installation of stepper motors on the body of a homemade engraving device is done using sheet metal brackets.
To make such a bracket, a sheet of metal approximately the width of the motor itself and twice as long as its base is bent at a right angle.
On the surface of this bracket, where the base of the electric motor will be located, 6 holes are drilled, 4 of which are necessary for fixing the motor itself, and the other two are necessary for attaching the bracket to the body using standard self-supporting screws.
A suitably sized piece of sheet metal is also used to mount the drive mechanism, which consists of two pulleys, a washer and a bolt, on the motor shaft.
To install such a device, a U-shaped profile is formed from sheet metal, in which holes are drilled for its attachment to the engraver body and exit from the motor shaft. The pulleys on which the timing belts will be attached are installed on the traction motor shaft and placed in the inner part of the U-shaped profile.
Toothed belts, which are mounted on the pulleys that are supposed to drive the shuttles of the engraving device, are connected to their wooden bases using self-tapping screws.
Software installation
Your laser cultivator, which must operate in automatic mode, will require not only installation, but also configuration of special software.
The most important element of this support is a program that allows you to create the contours of the desired model and convert them into an understandable extension for the laser engraver controls.
This program is available for free and you can download it to your computer without any problem.
The program downloaded to the computer that controls the engraving device is unpacked from the archive and installed. In addition, you will need a library of circuits and a program that will send data about the design or lettering created to the Arduino controller."
In order for your homemade laser product to work properly and the engraving performed with its help to be of high quality, you will need to configure the controller itself to the parameters of the engraving device.
Features of using contours
If you have already figured out the question of how to make a hand-held laser engraver, then you need to clarify the question about the parameters of the contours that can be applied using such a device.
Such contours, the inside of which is not painted over even when the original drawing is repainted, should be transferred to the engraver controller via files not in pixel (jpeg), but in vector format.
This means that the image or inscription applied to the surface of the workpiece using such an engraver will not consist of pixels, but of dots. The size of such images and inscriptions can be changed at will, focusing on the surface on which they will be applied.
Using a laser engraver, almost all drawings and inscriptions can be applied to the surface of a product, but to do this, their computer models must be converted into vector format.
This procedure is simple - special programs Inkscape or Adobe Illustrator are used for this. A file that has already been converted to a vector format must be converted again in order for it to be correctly accepted by the engraving machine controller.
Inkscape Laserengraver is used for this conversion.
Final setup and preparation for work
Having made a laser engraving machine with your own hands and loaded the necessary software into its control computer, do not immediately start working - the equipment needs final configuration and configuration.
What kind of adjustment is this? First of all, you need to make sure that the maximum movements of the machine's laser head along the X and Y axes coincide with the values obtained when converting the vector file.
Also, depending on the thickness of the material from which the part is made, it is necessary to adjust the parameters of the current supplied to the laser head. This should be done so that the product does not burn on the surface you want to engrave.
A very important and responsible process is the precise alignment (adjustment) of the laser head. Alignment is necessary to adjust the power and resolution of the beam produced by your engraver's laser head.
On expensive serial models of laser engraving machines, adjustment is performed using an additional low-power laser installed in the main working head.
However, homemade engravers usually use inexpensive laser heads, so this method of beam adjustment is not suitable for them.
Test your DIY laser engraver first with simple designs
Sufficiently high-quality adjustment of a homemade laser engraver can be done using the LED removed from the laser pointer. The LED wires are connected to a 3V power source and attached to the working end of a standard laser.
By alternately turning on and adjusting the position of the beams emanating from the test LED and the laser head, they achieve alignment at one point.
The convenience of using an LED from a laser pointer is that adjustment can be made with its help without the risk of damaging both the hands and eyes of the engraving machine operator.
Inexpensive and practical 3D printer He3D. Part 2
Good day. Today I present to you a review of the He3D brand 3D printer. The review will be interesting because it covers a period of more than five months of working with the printer. This is not just a story about the purchase, but also a fairly detailed guide on assembly, printing and upgrade options. The first part of the review contains: parsing the package, completing the kit, assembly with video, initial setup. The second part of the review contains: review of tools, printing, applicability. I will also show how I made a plotter and laser engraver out of a printer, and how I assembled a plastic washer and a print server. See the printer in action under a microscope. The first part of the review is here. There are a lot of photos and videos under the cut.
Printing and Operation
In my circle of friends, only a few knew the structure and operating principle of a 3D printer.
And after admiring the new product, the question usually arises: “Well, what else can you print on it?” Previously, I rushed to list the applications, but now I just say: “That’s it!” Literally everything. And what cannot be printed can be produced by using the printer indirectly. In the section, there are photos of not all printed models, but most of them. Especially a lot is given away during the holidays, and just like a present. During the entire time I have owned the printer, I have not printed and continue to print as much as I would like. A total of eight days of time and almost a kilometer of filament. Currently, I have two plastic PLA coils in my possession, which were included with the printer, and 3 kilogram ABS coils, red, green and black, purchased later. I only printed with PLA plastic at the beginning. I use it for certain projects. For example, I’m currently modeling a set of pastry attachments for a gift.
After purchasing ABS plastic, I switched almost completely to it. The low price ($7.5-8) compensated for the fastidiousness of printing. He3D extruder nozzle under a microscope. At the beginning of the roller, a small amount of superheated plastic (ABS) is squeezed out of the nozzle (diameter 0.4 mm) under the influence of gravity. Note the loose structure. Towards the end, I turn on the filament supply - the plastic begins to come out quickly and in an even stream - operating mode.
Bringing a USB microscope, with a short focal length, to a hot and fast-moving print head is still a hassle. Nozzle diameter 0.4 mm, layer thickness 0.2 mm, default speed in Repetier-Host and Cura. Video without acceleration. The model is a box with a wall thickness, if my memory serves me, 1.2 mm. Made for filming. Interestingly, even for such a narrow gap, the slicer coded the filling. In the second part of the video, short extrusions between the walls are clearly visible. One of the first seals is test cubes.
Another first step is attaching the filament to the reel. Which, apparently, didn’t even fit. There is a video of another mount being printed.
I printed several spinners for a friend. Preparation.
Assembled.
A quick and utilitarian plug for the fan.
I have a printer on my desktop, next to my laptop. Yes, this is convenient during setup and debugging, but for full-fledged printing for many hours in a row, it is not the best place. Since there are no layout options in the room, I am actively preparing a place on the balcony. Big frog.
A few words about marriage. In the process of setting up, fine-tuning and gaining experience, for reasons dependent and beyond your control, marriage will sometimes happen. Another thing is that for 3D printing the concept of “marriage” is quite arbitrary. Part of the waste (pieces, fragments) will be used to make jelly from plastic - universal glue and mastic. And the other part can be repaired or find new life in a different role. Below is a good example. Big frog. In the middle of printing the process was interrupted (I don’t remember why). It would seem - send it to a jar of solvent. But looking at it from a different angle, I saw an original soap stand for the bathroom. Everyone likes it, especially children. And the soap doesn't get wet.
Stand for filament spool. A convenient device for plastic spools, but not cardboard ones.
The ability to make 3D models yourself is not a required skill. But it increases the possibilities significantly. Of course, you can print hundreds of hours from just one thingiverse, and there are dozens of such model repositories. And besides, you can always ask or order a model from others. But believe me, anyone can master two dozen commands in a simple, free 3D editor (of which there are tons). Great effect with little effort. A great example is the blower model. I've never bothered with fine tuning, but blowing improves the quality by an order of magnitude. Plus, some parts simply cannot be printed without blowing. Although it requires experience in setting up different printing modes. I recently completed the latest edition. Effective, but still requires some minor improvements. You can download it here.
Mounting parts for the induction sensor, according to the model from the card.
Another big and small frog.
During the process of unpacking the parcel, I lost one end switch mounting plate. You can download it here.
Filament dust cleaner. Inside is a piece of foam rubber.
Another very utilitarian detail is the emergency stop button for the printer. Plus, experiments with borders.
How loud is the printer? It’s difficult to answer exactly - there are no noise meters on the farm. Of course, a working printer is not silent. Matter of habit. Someone will fall asleep a meter away from him, and someone will be annoyed by sounds from another room. But in general, any sounds can be significantly reduced by placing them in a closed box and using a damper. Useful on the farm. Drawer handle, in the style of one popular, transnational, furniture corporation.
One day there was an urgent need to accurately connect two PVC pipes. From creation of the model to the end of printing - 10-15 minutes.
Housing for Orange Pi Zero.
Interesting napkin stand. A universal gift and just a convenient thing.
The clothes dryer has been broken for a long time. Two plastic parts of the hinge of the folding legs broke. Attempts at makeshift repairs on the knee were only half successful. After which the model was created. You can download it here. Printed in two different ways.
Note – load-bearing parts are best printed with a high degree of infill.
Plastic smell and heat generation. Stories about the smell are exaggerated. A slight odor occurs only from ABS plastic. Interestingly, different plastics give off odors of different intensity: from weakly present to not strong. The printing time also has a noticeable effect - after 6 hours of extrusion, the smell will be noticeable. By its nature, the smell of plastic is specific, but not suffocating. To me, solvent vapors smell worse. Heat is generated when the printer operates. But on a room scale this is noticeable only after many hours of work. Example of application in modeling. A friend asked me to make track tracks for tank models. Having measured the sample
created the model. Printing with a 0.4 mm nozzle without blowing does not give the best results. With airflow, this is practically what you need, but a smaller diameter nozzle is still better. Hummer. Interestingly, the wheels and axle are printed in one piece inside the car body part. Print without blowing.
One of the first things printed. The famous tree frog (PLA).
Print test. There are some minor drawbacks. But considering the complexity of the test and the fact that I practically did not fine-tune the printing, the result is good.
Another popular benchmark. ABS, nozzle 0.4 mm, resolution 0.1 mm, temperature 230 ° C, speed about 50-60. Overall satisfied, although there is some work to be done.
The printer helps out in the most unexpected situations. For example, having bought a monocular, there was no suitable leather for the lens cap. I just modeled it and printed it out. .
I also created a mount for the monocular to a tripod. . The printer allows you to quickly solve problems. Good example. While reviewing the monocular for ease of photography, I quickly modeled the camera mount. As simple, functional and bolt-on as possible.
Application in leatherworking. I printed a tool for molding leather for a friend. More specifically, for cases for Zippo lighters.
It works like this.
Friend's photo. Prototyping. For one project, I modeled an exact copy of a nuclear warhead (Mini Nuke) from the world of the Fallout game series. To check the threads and proportions, I printed several pieces on a reduced scale.
Smartphone stand.
The famous gyroscopic relaxing keyring of four rings. Calms and develops fine motor skills. A good gift, souvenir, present. Back in the winter, preparing for the opening of the fishing season, I decided to print a float. I couldn't find any suitable ready-made models. It's easy to do. Total length 150 mm, diameter at the widest part 20 mm. Download here.
As soon as the ground dried out a little and the water warmed up a little, I went out into the pond with a fishing rod.
At one time I fell underfoot, broke down, and was repaired.
On the water. I thought I would have to weigh it down, it’s still quite large, but nothing like that. Sensitivity is good. Good for standing water. That day, small sebel was biting and not particularly caught, using maggots and mastyrka. To maintain order, I printed boxes for small spare parts and fasteners. Boxes.
When I was printing the box body, I missed the operating temperature of the extruder - the ends began to peel off a little. I made a mistake, it happens. However, he did not stop printing the almost finished part. And after completion I filled the cracks with putty. Media collector. An option for attaching a digital soap dish to clothing or a belt.
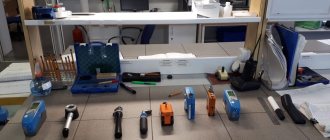
Printer support
A 3D printer cannot exist on its own. As a technical quantity, its performance and performance are supported by a whole retinue of tools, devices and parts. In this section I will write about them. The most commonly used are straight-point tweezers, scissors, a set of needle files, a Phillips screwdriver, and an old knife from a wood carving kit. A set of feeler gauges is a very useful tool. In addition to setting the required gap, it can be used to remove a part from a still hot table.
Small stationery knife. The size of an ordinary ballpoint pen. It brings a lot of benefits. An indispensable thing in post-processing. Small, convenient and extremely maneuverable and functional. A dental drill is a huge help for a 3D printer. And it doesn’t matter whether it’s Dremel-like or Foredom-like - it will allow you to quickly and efficiently use it for processing plastic and for related needs.
What use can there be from an object that is barely visible on the table? An object that fits freely into the hole of a medical needle? Answer: very big. This is a drill with a diameter of 0.27 mm found on the farm. Its purpose is to clean the nozzle. Later, I found in the open spaces sets of drills for cleaning nozzles of different diameters. And although the nozzle has never clogged during the entire period of operation, I still identified this problem as quite probable. As a result, I ordered four drills.
The thick handle of the base is impressive, allowing you at least not to lose the drill. Micrometer. The scope of use is wide, but mainly for measuring filament thickness and measuring before modeling. For example, the green ABS plastic I bought has a diameter of 1.8 mm instead of the promised 1.75 mm. It might seem like a small thing, but it can lead to printing deterioration. Frosted glass. Smoothing of temperature deformations, improving adhesion. Ideally, have 2-3 glasses. This will allow you to avoid waiting for the printed part to cool down. You can simply replace the glass.
Chemistry. Two organic solvents. Ethyl acetate - dissolves ABS well and methylene chloride - dissolves PLA well. These are from chemicals.
A little later, ethyl acetate was found in a hardware store. Surprisingly, the cleaner one bought at the chemical store was also cheaper.
Protective equipment when working with solvents is encouraged. Print defects, filament fragments, all sorts of pieces and scraps of plastic are not garbage, but valuable raw materials. Parts of plastic dissolved in ethyl acetate are converted into a useful substance. The best adhesion of plastic is achieved when printing on a table greased with such plastic jelly. This is also glue and mastic.
At one time I used BF-6 to improve grip, but gave up. Low efficiency and very dirty on the table.
During the entire period of using the printer, I had only one breakdown. While tightening, the nut crushed the insulation of the print head thermocouple. The printer comes with several spare ones. But after thinking about possible breakdowns, I decided to play it safe and started buying some printer parts in reserve.
Fan for blowing.
Spare heating elements. Spare limit switches.
Belt tensioners. The procedure for precise and uniform belt tension is described in detail. However, they don’t get around to it. For now I limited myself to a blind lift. More spare thermocouples.
Consumables. During this time, I bought 3 spools of ABS plastic 1.75 mm, weighing 1 kg, 400 meters long.
Washing plastic
For a long time I didn’t get around to washing it. For review, I assembled the simplest version from scrap materials found in the garage. Only a polypropylene box was purchased. The controller has been gathering dust for more than half a year, idle, as it was not suitable for the project for which it was purchased. Materials: temperature controller, small boiler, wires, plug, extension cord, polypropylene box and old aquarium filter. Assembly is very simple. We connect the sensor, power and load to the controller according to the diagram. It turned out something like this. As a load, I have a boiler and a circulation pump aka a stirrer. Principle of operation. Water is poured into the container, into which the boiler, pump and sensor are immersed, as well as a jar with ethyl acetate and the workpiece on a stand, pressed with tripods from laboratory stands. Work algorithm. We set the temperature and wait for it to heat up to the set temperature. Each element plays its role. The boiler heats, the pump stirs, the ethyl acetate intensively evaporates and condenses, washing away the unevenness. The device is assembled and working. Note. In this photo, the temperature sensor is immersed next to the heating element. But it is more correct to place it at a point farthest from the boiler.
The ceramic bowl protects the basin from melting.
The controller turns on again after the temperature drops by 3 degrees. At the first start, little solvent was poured, so I had to let the part sit for a long time. But in parallel with smoothing, the part is saturated with solvent and softens, which is fraught with defects. Therefore, washing should be done quite intensively, but not for long - no more than 15 minutes. The temperature was initially maintained at 50 degrees. then increased it to 55 degrees. Here's a rough and fast printed gecko before washing. And here's after. The difference is obvious. Interesting observation. When exposed to solvent vapor for a long time, the entire part becomes very plastic, almost like plasticine. This allows you to bend, twist, stretch it as you like - after hardening, the shape will be preserved. This allows you to cut a thread on soft plastic with a bolt, or adapt a plastic part to the desired shape. Very wide possibilities for fine-tuning and adjustment. \ There are plans to make a more convenient and serious washing - with forced circulation and under pressure, for a larger working volume. The technology of washing plastic with solvent vapors opens up a new level of product quality. Layering and small defects disappear in the sink. Smoothness and glossy shine are acquired, which allows you to perceive the object differently. In addition, I want to warn you. The vapors of the heated solvent evaporate more intensely. There are more of them in the container above the liquid phase than before heating; this should be taken into account before starting the process.
Print server.
As part of a project to set up a separate place for a printer, I decided to “raise” the print server. Of course, it seems obvious to use an SD card, but this is only at first glance. The difference in the minimum threshold for starting use is much less than the difference in the ceiling on the possibilities of using these two methods. In other words, the complexity is compensated by greater functionality. At the beginning, slowly, in the background, I collected everything I needed: a 2 GB micro SD card, a card reader, from Ali I ordered an Orang Pi Zero with 512 MB of memory, with a power supply (5V-3A),
there are also radiators,
We glue radiators
I printed the case. The router and cables were available. Having collected everything together, I started assembling. Power supply via micro USB (5V-3A). Low amperage causes system failures, so it is better to install a native or similar unit. Then I installed Armbian (Debian according to this wonderful instruction. The author describes the installation and configuration of Armbian step by step and in great detail.
Let's connect.
A little hint - pasting from the clipboard in Armbian is done using the Shift-Ins keys, and right-clicking on the selected text copies it to the active part of the command line.
Next came the question of choosing software—the print server itself. I couldn't figure it out with Octoprint - I got stuck. Things went much easier with Repetier-Server, which is installed with two commands. Below is an example for the current version: wget download.repetier.com/files/server/debian-armel/Repetier-Server-0.80.3-Linux.deb
sudo dpkg -i Repetier-Server-0.80.3-Linux.deb
By the way, delete with the command:
sudo apt-get remove RepetierServer
When, after installation, I tried to access the server page https://:3344 through a browser, nothing loaded. White window. In IE, however, some snippets still popped up. An attentive Google suggested that you should go to:
https://:3344/?lang=en
Everything worked out. Next, add and configure a new printer. Everything is simple and intuitive. We check - everything moves and heats up remotely - we are happy. Load the G-code and print.
In the near future, we will figure out Octoprint, connect a webcam and power management. In the end, I would like to note that the print server combines two iconic devices - a 3D printer and a miniature single-board computer. They are from different planes, but equally iconic and epochal in their fields. In the future, I will implement several other projects on the Orang Pi family of computers. But that is another story.
Plotter
I've seen an upgrade like this for a long time. I wanted it for myself too. I didn’t invent a plastic pen holder, but downloaded it from thingiverse. Although it doesn’t quite fit my carriage, it fits securely.
Next, we extrude a three-dimensional body from the vector pattern exactly one layer thick. And we send it to print.
Despite the slight play, the result is excellent.
You can adjust the pressure, density, accuracy, line width to make drawings, postcards, inscriptions, markings and much more.
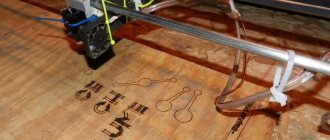
Laser Engraver/Cutter
The close relationship in design of the FDM 3D printer with laser engravers/cutters allows for simple transformation. There are dozens of projects of similar modifications and thousands of people who have already implemented them. Upgrade techniques vary from those in which the laser is turned on via a switch by a piece of filament pushed by a stepper motor, to completely separate control boards. But I chose the most, in my opinion, optimal. The author under the nickname Jakes workshop posted a project on instructables in which he converted a 3D printer into a laser engraver. A simple upgrade in my case was simplified even more. In He3D, the carriage design has a hole, initially for the needs of a second extruder. That is, I safely skipped the step of replacing the carriage. Ali ordered a blue-violet laser module of 500 mW, wavelength 405 nm with power supply and driver,
safety glasses (you don’t want to get vision problems due to negligence).
Then a simple laser stand was modeled and printed onto the carriage. I posted it on thingverse here (needs some more work).
We install and fix the stand, install and fix the laser module.
We connect the laser power to the blower power terminals.
That's all on the technical side. Install Inkscape 0.91. At the moment, the laser plugin works correctly only with this version. Download and install the plugin itself. Let's convert the image,
Let's go to print.
Everything is wonderful, but there is a fly in the ointment. When converting to G-code, there is some glitch that causes the carriage to not completely follow the pierce line. It’s hard to say what it’s connected with. I’ll look into it, but in the meantime I’ll write to the plugin developers. Although, on the other hand, when cutting paper, in one case (see below, the fractal) was burned correctly and twice. Photo of the lines at approximately 500x magnification.
It cuts paper in two passes at this speed. Fractal.
We engrave the skin.
Impression. Laser is good. But in order not to constantly wear glasses and risk injuring his family and friends, he really needs a box. And preferably with a hood. After 10-15 minutes of work, there is a distinct smell of burnt paper in the room. I'm silent about the skin. But glasses are a mandatory attribute in any case. Without glasses, even reflected light from a laser is perceived as micro-welding. Although a photograph cannot fully convey this, you can still see the difference very well. There are plans to install a more powerful laser module and fix the problem with underburning.
conclusions
I am very pleased with the printer.
This is my most significant purchase in recent years. Not in terms of money, but in terms of influence on interests and hobbies, worldview and opportunities. For example, thinking and capabilities have changed. When thinking about solving a problem, the question now always arises: “How can I use the printer’s capabilities?” And very often the printer becomes a key factor in solving this problem. And although the review was voluminous, it contains a lot of photos, videos and text, I cannot say that it is completely completed. There's a lot more you could add to it. For example, experiment with nozzles of different diameters, multi-colored printing, and setting the auto level. Print with different materials: from exotic plastics and PET from bottles, to clay and chocolate. Add another extruder or even two to the printer and increase the table. Upgrade the printer into a simple mini CNC machine. Make a cabinet for the printer with a hood, a bunch of drawers and simple automation. Create your own filament extruder. Build a simple scanner. And this is only the topic affecting the printer. There are many more other projects. The printer creates a chain reaction of possibilities.
I think the low price of He3D is an important point. The budget is not bottomless - you will learn to save. In turn, the printer itself can become a source of savings and profit, limited only by imagination: printing cheap copies, expensive branded parts (for a car, for example) and printing unique custom parts for yourself and others, to order.
I recommend the printer. Join us, I promise it will be interesting.
Electrical part of a homemade laser engraver
The main element of the electrical circuit of the presented device is a laser emitter, the input of which must be supplied with a constant voltage, the value of which does not exceed the permissible parameters. If this requirement is not observed, the laser may simply burn out. The laser emitter used in the engraving installation of the presented design is designed for a voltage of 5 V and a current of no more than 2.4 A, so the DC-DC regulator must be set to a current of 2 A and a voltage of up to 5 V.
Electrical circuit of the engraver
The MOSFET transistor, which is the most important element in the electrical part of a laser engraver, is required to turn the laser emitter on and off when receiving a signal from the Arduino controller. The electrical signal generated by the controller is very weak, so only the MOSFET can detect it and then turn the laser power circuit on and off. In the electrical circuit of a laser engraver, such a transistor is installed between the positive contact of the laser and the negative DC regulator.
The laser engraver's stepper motors are connected via an electronic control board, which ensures their synchronization. Thanks to this connection, timing belts driven by multiple motors do not fall down and maintain a stable tension during operation, which guarantees the quality and accuracy of the work performed.
It should be taken into account that the laser diode used in a homemade engraving machine should not overheat.
To do this, it is necessary to ensure its effective cooling. This problem can be solved quite simply - a regular computer fan is installed next to the diode. To prevent overheating of stepper motor control boards, computer coolers are also placed next to them, since conventional radiators cannot cope with this task.
Photo of the assembly process, connection diagram
Photo-1 Photo-2 Photo-3 Photo-4 Photo-5 Photo-6
Do you need to convert your 3D printer into a laser engraver?
Converting a 3D printer into a CO2 laser machine can be quite challenging, given the size of the tubes and the complex mirror system. For this reason, it is much better to use diode lasers.
However, keep in mind that these lasers can only cut certain materials, such as paper, cardboard, balsa and plywood between 3 and 5 mm thick. Due to the wavelength of the laser, it cannot cut or engrave transparent materials such as acrylic.
Also remember the safety requirements when using lasers. Class 4 lasers are hazardous to the eyes, so the use of safety glasses is mandatory. In addition, combustion products released during laser operation can be harmful to our health, so enclosure and proper ventilation are required.
Take all this into consideration before deciding to convert your 3D printer into a laser machine. Given the risks involved, it is especially important to take precautions.
Laser wood engraver: necessary materials and step-by-step instructions
Making a homemade laser engraver for wood processing is quite simple. Enough hands and a little imagination. By the way, with the help of such a device it will be possible to apply inscriptions not only on a wooden surface, but also on a plastic or leather surface, for example, on a belt.
And, to keep things simple, it will not be powered by a battery, but by a regular computer via a USB cable. However, if you need to make your DIY wood engraving device portable, you can use a regular power bank.
Power bank can be used as a battery
To make it you will need:
- 2 cartridges of depleted caliber 8 mm and 7.62 mm shortened (starter or gas pistol and TT);
- laser LED (about 250-300 mW), which can be removed from an old DVD drive;
- target from the same unit;
- USB connector;
- brass tube with an internal diameter of 10 mm;
- 3 resistors with a total resistance of 30 Ohms;
- 50 Ohm resistor;
- thin threads;
- power button.
Of course, you can’t do it without a soldering iron, a drill, a power drill, and your favorite hot glue. When everything you need is ready, you can start working. And how to do this will be described in step-by-step instructions with photo examples and detailed explanations.
The most used tool for everything
Making an engraver with your own hands at home - is it possible?
In fact, such work is not as difficult as it might seem at first glance. There are several options for how to make an engraver with your own hands using parts from various equipment that you may find at home.
For example, such a device can be assembled based on DVD drives, a printer, or used to make an Arduino Uno.
PHOTO: ugra.ru You can make a laser engraving machine with your own hands from a DVD drive
Homemade laser engravers can be designed for working on wood or metal. It is this parameter that we will dwell on in more detail.
Do-it-yourself CNC from CD-rom: arduino, laser engraver
There are no limits to the imagination of modern masters. Not only can I create a CNC machine from a CD, but I can also create a laser module that can then be used in a programmable engraver.
It's harder for them to experiment. Some have already managed to make a 3D printer using a CNC machine as a base and then install the print head.
If you wish, you can bring the coolest ideas to life.
Second life for old drives
Many people are interested in reusing obsolete equipment components. There are already interesting publications on the Internet about where to find a use for old CD or DVD drives.
One of the craftsmen made a CNC from a DVD-ROM with his own hands, although a CD-ROM is also suitable for testing. Everything that is available is used. The machine is intended for the manufacture of printed circuit boards in electronics and milling and engraving of small parts. The sequence of work can be formulated as follows:
- For precise positioning, three DVD drives are required to move the coordinate machine along three axes. The drives must be disassembled and unnecessary parts removed. Only the stepper motor and sliding mechanism should remain on the frame.
IMPORTANT! The chassis of the disassembled unit must be metal, not plastic.
- Since the DVD motor is bipolar, it is enough to ring both windings with a tester to determine its purpose.
- Does anyone doubt that the engine power is enough, has the working unit moved the required distance? To reduce motor effort, it is important to determine whether the table will be movable rather than gantry.
- The bed base is 13.5 x 17cm and the height of the machine's upright slats is 24cm, although manufacturer's DVD drives may vary in size.
- Next, you need to take the stepper motors to solder the control wires (it doesn’t matter whether these will be motor contacts or a cable loop).
- Since connection with screws is unacceptable here, wooden rectangles (future platforms) must be glued to the moving parts of the engine, which will move along three axes.
- The spindle will be an electric motor with two screw terminals. It must be very light, otherwise it will be difficult for the CD/DVD mechanisms to lift it.
You can also make a laser engraver
The creation of a laser module has a software goal: it must be easy to focus, have a fairly rigid structure, and be made only from available materials.
It's worth taking a look at this short tutorial from another home wizard.
You will need to stock up on the following components:
- electric motor from DVD drive;
- laser diode and plastic lens from DVD (up to 300 MW so that it does not melt);
- metal washer with an internal diameter of 5 mm;
- three screws and the same number of ballpoint pen clamps.
This engraver has two movement mechanisms; no vertical movement is required for the laser. The laser LED is used as a cutting or burning tool.
ATTENTION! You need to know the intricacies of working with a laser. Random reflexes can also damage your vision. Special care is required.
Since the diameters of the laser diode and the hole in the motor housing are slightly different, the smaller one will need to be enlarged. The conductors soldered to the diode must be insulated with heat-shrinkable tubing.
The diode is pressed into the hole so that good thermal contact is achieved between them. The top of the laser diode can be covered with a brass sleeve removed from this motor. The washer has three recesses for screws. The lens, inserted into the hole in the washer, is carefully glued so that the glue does not stick to it.
The target is attached to the body. After making sure that it can move freely along the bolts, the position is fixed. With the help of screws, the beam is focused as accurately as possible. This DVD laser drive is used in engraving technology.
CNC device manufacturing
For large volumes of work, a conventional engraver will not cope with the load. If you will be using it frequently and a lot, you will need a CNC device.
Assembling the interior
You can even make a laser engraver at home. To do this, remove the stepper motors and guides from the printer. They will fire a laser.
The complete list of required spare parts is as follows:
- Laser diode from a recording device.
- Radiator for diode.
- 3 stepper motors.
- 6 round guides.
- Fasteners for guides.
- 3 double trolleys or 6 single trolleys.
- Power supply 5 V, 4 A.
- Arduino UNO.
- 2 stepper motor drivers.
- 2 switches.
- Sheet 50 x 50 cm and 2 mm thick (for the base).
- Large sheet of plywood.
- Corners for fastening plywood.
- Self-tapping screws.
- 2 furniture hinges.
- Wires with a cross section of 0.5 mm².
- Mobile cable channel.
- Plastic ties.
- Transistor IRFZ44.
- 2 pressure rollers.
- 5 gears.
- Metal rod (axle for gears and rollers).
- 4 bearings.
- Toothed belt.
- 2A DC-DC Buck Converter
- Four limit switches.
- Clock button.
- 2.1 x 5.5 mm connector.
- 4 rubber or silicone feet.
- Heat transfer adhesive.
- Epoxy resin with hardener.
Measure the length of the guides and divide them into two groups. The first one will have 4 short ones, the second one will have 2 long ones. Rails of one group must be the same length.
Add 10 centimeters to the length of each group of guides and cut the base according to the resulting dimensions. From the cutouts, fold U-shaped supports for fasteners and weld them to the base. Mark and drill holes for the bolts inside them.
Drill a hole in the heatsink and glue the laser there using heat-conducting glue. We solder the wires and transistor to it. Screw the radiator to the cart.
Install the rail supports onto the two supports and secure them with bolts. Insert the Y-axis guides into the fasteners, install the X-axis carriages on their free ends. Insert the remaining guides with the laser head installed on them. Place the mounts onto the Y-rails and screw them to the holders.
Drill holes at the mounting points of the electric motors and gearbox axles. Reinstall the stepper motors and slide the drive gears onto their shafts. Insert the pre-cut strips from the metal rod into the holes and secure them with epoxy glue. After hardening, put the gears and pressure rollers with bearings inserted into them onto the axles.
Install the timing belts as shown in the diagram. Tighten them before attaching. Check the movement of the X-axis and laser head. They should move with little effort, spinning all the rollers and gears through the belts.
Connect the wires to the laser, motors and limit switches and tighten them with cable ties. Place the resulting bundles into movable cable channels and secure them to the carriages.
Pull out the ends of the threads.
Specifications
Equipped with a 1.8W 445nm laser module, this laser engraver is clearly nothing compared to industrial laser cutting machines that use lasers over 50W. But this laser will be enough for us. It can cut paper and cardboard, and engrave all types of wood and plywood. I haven't tested other materials yet, but I'm sure they can affect many other surfaces. I'll go straight ahead and say that it has a large working area of about 500×380mm.
Who can make such a laser machine? Everyone, no matter if you are an engineer, a lawyer, a teacher or a student like me! All you need is patience and a great desire to get a really high-quality car.
This engraving machine took me about three months to design and build, including about a month waiting for parts. Of course, this kind of work can be done faster, but I'm only 16 years old, so I could only work on weekends.
Homemade tool for cutting and processing plywood
Considering the high cost of factory equipment, more and more people are trying to make a plywood laser cutting machine with their own hands. However, before embarking on such a procedure, make sure that you have certain skills and are willing to invest a lot of time and effort into the task ahead.
When manufacturing laser equipment, a number of features should be taken into account:
Determine the power indicators of the future car. It is no secret that at the stage of creating a system it is necessary to use special expensive devices with high power ratings, so the total cost of the final model is at least $600.- Find the right batteries and cooling. As mentioned above, to cool the gas moving through the pipe, it is necessary to use water and a pump that will pump it to the most vulnerable components of the system. For normal operation, the machine requires at least 100 liters of fluid.
- Therefore, it is necessary to fine-tune all elements of the laser system. To perform such an action, you must have at least minimal experience and spend a lot of time. This suggests that sometimes it is much easier to purchase a ready-made invention than to try to create it yourself, but everything is ambiguous.
Laser cutting of plywood sheets remains a complex process, but with the right approach it can create real works of art and intricate patterns.
Laser module with wires and glass lens
In this article I will show you what you can assemble using a minimum of materials and spending virtually no money. I'm guessing you're already familiar with GRBL (an open-source Arduino design program for milling, engraving and laser machines), the Inkscape editor, and how to create Gcode files.
I will not describe the electronics in detail, this article will not contain comprehensive information, perhaps in the future I will cover some points in more detail - I fully admit that I did not give enough information to assemble the CNC engraver easily the first time.
I add:
- STL files ready for printing
- GRBL program for my configuration
- laser engraver plugin that I use for Inkscape
- file with calculation of the cost of parts. Almost all of them can be ordered on Aliexpress
- EAGLE files for creating a module with a mosfet diode to indicate the engraver on/off
For printing boards, I recommend the OSH Park service.
Files
- cable_through.stl
- Carriage Idler.stl
- Carriage Laser.stl
- Carriage Motor.STL.stl
- Fan Holder.stl
- Idler Puller Holder.stl
- Laser Holder.stl
- NEMA 14 mount.stl
- Xtensionner_part1.stl
- Xtensionner_part2.stl
- YBeltHolder.stl
- YTensionner.stl
- grbl.zip
- laserengraver_smoothie.zip
- BOM Instructable.ods
- Adaptateur MOSFET GRID eagle.zip
This is interesting: Drill attachments for cutting metal: types, features, application
Basics of assembling an engraver on Arduino
To begin with, I suggest you look at what the whole process of creating an engraver with a radio amateur looked like:
Powerful stepper motors also need drivers to get the most out of them. In this project, a special stepper driver is taken for each motor.
Here are some details of the selected components:
- Stepper motor - 2 pcs.
- Chassis dimensions are NEMA 23.
- Torque is 1.8 lb-ft at 255 oz.
- 200 steps / revolutions - 1 step is 1.8 degrees.
- Current strength - up to 3.0 A.
- Weight - 1.05 kg.
- 4-wire bipolar connection.
- Stepper driver - 2 pcs.
- Step digital drive.
- Chip.
- Output current: 0.5A to 5.6A
- Output current limiter: reduces the risk of motors overheating.
- Control signals: “Step” and “Direction” inputs.
- Pulse input frequency - up to 200 kHz.
- Supply voltage - 20 V - 50 V DC.
For each axis, the motor directly drives the ball screw through the motor connector. The engines are mounted to the frame using two aluminum angles and one aluminum plate. The corners and aluminum plate are 3mm thick and strong enough to support a motor (1kg) without bending.
Build process
The homemade engraving machine of the proposed design is a shuttle-type device, one of the moving elements of which is responsible for movement along the Y axis, and the other two, connected to each other, for movement along the X axis. For the Z axis - which is also indicated in the parameters of such a 3D printer, the depth of burning of the processed material is taken. The depth of the holes into which the elements of the shuttle mechanism of the laser engraver are installed must be at least 12 mm.
Workbench frame - dimensions and tolerances
Photo-1 Photo-2 Photo-3 Photo-4 Photo-5 Photo-6
Aluminum rods with a diameter of at least 10 mm can serve as guide elements along which the working head of the laser engraving device will move. If aluminum rods cannot be found, steel guides of the same diameter can be used for these purposes. The need to use rods of this diameter is explained by the fact that in this case the working head of the laser engraving device will not go down.
Making a mobile cart
Photo-1 Photo-2 Photo-3
The surface of the rods that will be used as guide elements for the laser engraving device must be cleaned of factory grease and carefully sanded to obtain ideal smoothness. They should then be coated with a white lithium-based lubricant, which will improve the sliding process.
Housing assembly
Installation of stepper motors on the body of a homemade engraving device is done using sheet metal brackets. To make such a bracket, a sheet of metal approximately the width of the motor itself and twice as long as its base is bent at a right angle. On the surface of this bracket, where the base of the electric motor will be located, 6 holes are drilled, 4 of which are necessary for fixing the motor itself, and the other two are necessary for attaching the bracket to the body using standard self-supporting screws.
A suitably sized piece of sheet metal is also used to mount the drive mechanism, which consists of two pulleys, a washer and a bolt, on the motor shaft. To install such a device, a U-shaped profile is formed from sheet metal, in which holes are drilled for its attachment to the engraver body and exit from the motor shaft. The pulleys on which the timing belts will be mounted are mounted on the traction motor shaft and placed in the inner part of the U-shaped profile. Toothed belts, which are placed on the pulleys, must drive the shuttles of the engraving machine of the device; they are attached to the wooden base with self-tapping screws.
Installation of stepper motors
Photo-1 Photo-2 Photo-3 Photo-4 Photo-5 Photo-6
Modular design
The innovative modular design allows for quick assembly, advanced additional functions, reduces production costs and, as a consequence, the final cost of the equipment. Using flat packaging ensures low shipping costs. The new type of linear module can be used in any of the X, Y, Z directions and is responsible for high precision linear movement.
Software installation
Your laser cultivator, which must operate in automatic mode, will require not only installation, but also configuration of special software. The most important element of this support is a program that allows you to create the contours of the desired model and convert them into an understandable extension for the laser engraver controls. This program is available for free and you can download it to your computer without any problem.
The program downloaded to the computer that controls the engraving device is unpacked from the archive and installed. In addition, you will need a library of contours and a program that will send data about the created drawing or inscription to the Arduino controller. This library (as well as the program for transmitting data to the controller) can also be found in the public domain. In order for your homemade laser product to work properly and the engraving performed with its help to be of high quality, you will need to configure the controller itself to the parameters of the engraving device.
Features of using contours
If you have already figured out the question of how to make a hand-held laser engraver, then you need to clarify the question about the parameters of the contours that can be applied using such a device. Such contours, the inside of which is not painted over even when the original drawing is repainted, should be transferred to the engraver controller via files not in pixel (jpeg), but in vector format. This means that the image or inscription applied to the surface of the workpiece using such an engraver will not consist of pixels, but of dots. The size of such images and inscriptions can be changed at will, focusing on the surface on which they will be applied.
Using a laser engraver, almost all drawings and inscriptions can be applied to the surface of a product, but to do this, their computer models must be converted into vector format. This procedure is simple - special programs Inkscape or Adobe Illustrator are used for this. A file that has already been converted to a vector format must be converted again in order for it to be correctly accepted by the engraving machine controller. Inkscape Laserengraver is used for this conversion.
Sources
- https://met-all.org/oborudovanie/prochee/lazernyj-graver-svoimi-rukami-iz-printera-dvd-player.html
- https://homius.ru/lazernyj-gravjor-svoimi-rukami.html
- https://tpspribor.ru/svoimi-rukami/izgotovlenie-lazernogo-gravera-svoimi-rukami.html
- https://electronicparts.ru/svoimi-rukami/lazernyj-graver-na-arduino-delaem-svoimi-rukami.html
- https://Gistroy.ru/article/lazernyj-graver-svoimi-rukami-1/
- https://tokar.guru/samodelkin/izgotovlenie-lazernogo-gravera-svoimi-rukami.html
- https://VseOChpu.ru/lazernyj-stanok-svoimi-rukami/
- https://SuTime.ru/pro-stanki/graver-svoimi-rukami.html
- https://zetsila.ru/%D1%81%D1%82%D0%B0%D0%BD%D0%BE%D0%BA-%D0%BB%D0%B0%D0%B7%D0%B5% D1%80%D0%BD%D0%BE%D0%B9-%D1%80%D0%B5%D0%B7%D0%BA%D0%B8-%D1%81%D0%B2%D0%BE% D0%B8%D0%BC%D0%B8-%D1%80%D1%83%D0%BA%D0%B0%D0%BC%D0%B8/
- https://3dradar.ru/3dmodels/50714/
- https://instanko.ru/drugoe/lazernyj-graver-svoimi-rukami.html
[collapse]