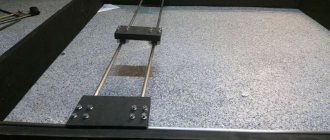
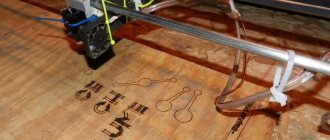
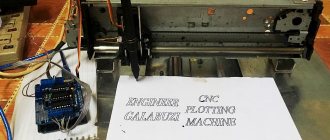
I believe that the project I want to talk about will be of interest to everyone involved in electronics. Namely, we are talking about a miniature laser engraver, with which you can apply images to cardboard, wood, vinyl stickers and other similar materials. I got the idea for the project from this tutorial, doing something my own way. Laser engraver in action and device assembly process
Materials and tools
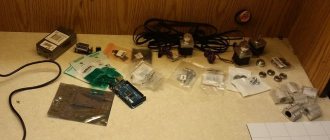
To create an engraver you will need the following basic components:
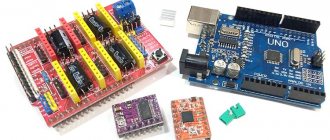
- Arduino UNO (with USB cable).
- 2 stepper motors from DVD drives.
- 2 controllers for A4988 stepper motors and a corresponding expansion board for Arduino.
- 250 mW laser with tunable optics.
- Power supply (minimum - 12V, 2A).
- 1 N-channel field-effect transistor IRFZ44N.
Here is a list of required tools:
- Soldering iron.
- Drill.
- Metal file.
- Sandpaper.
- Wire cutters.
- Glue gun.
Creating a laser engraver
For simple work, such as burning patterns on wood, complex and expensive devices are not needed. A homemade laser engraver powered by a battery will be sufficient.
Before making an engraver , you need to prepare the following parts for its assembly:
- Laser diode from a DVD-RW drive.
- Focusing lens.
- Aluminum U-shaped profile or non-ferrous metal tube with an internal diameter of 15-20 mm.
- Electrolytic capacitor 50 V, 2200 µF.
- Resistor 5 Ohm.
- Film capacitor 100 nF.
- Tact button.
- Switch.
- Thermally conductive adhesive.
- 18650 battery and holder for it.
- Shoe sponge box.
- Scotch tape, including double-sided tape.
- Hot glue gun with consumables.
- Charge controller.
- Jack 2.1 x 5.5 mm.
Remove the write head from the DVD drive.
Carefully remove the focusing lens and disassemble the head housing until you see 2 lasers hidden in heat-distributing casings.
One of them is infrared, for reading information from the disk. The second one, red, is the one who writes. In order to distinguish them, apply a voltage of 3 volts to their terminals.
Pinout:
Be sure to wear dark glasses before testing. Never test the laser by looking at the diode window. You only need to look at the reflection of the beam.
You need to select the laser that lights up. You can throw away the rest if you don’t know where to use it. To protect against static, solder all leads of the diode together and set it aside. Saw off a 15 cm section from the profile. Drill a hole in it for the clock button. Make cutouts in the box for the profile, charging socket and switch.
The schematic diagram of a DIY DVD laser engraver looks like this:
Tin the contact pads on the charge control board and holder:
Using wires to pins B+ and B- of the charge controller, solder the battery compartment. Contacts + and - go to the socket, the remaining 2 go to the laser diode. First, solder the laser power supply circuit by surface mounting and insulate it well with tape.
Make sure that the terminals of the radio components do not short circuit with each other. Solder a laser diode and a button to the power supply circuit. Place the assembled device in the profile and glue the laser with heat-conducting glue. Secure the remaining parts with double-sided tape. Reinstall the tact button.
Insert the profile into the box, bring out the wires and secure it with hot glue. Solder the switch and install it. Do the same procedure with the charging socket. Using a hot glue gun, glue the battery compartment and charge controller into place. Insert the battery into the holder and close the box with the lid.
Before using it, you need to set up the laser. To do this, place a sheet of paper 10 centimeters from it, which will be a target for the laser beam. Place the focusing lens in front of the diode. By moving it further and closer, achieve a burn through the target. Glue the lens to the profile in the place where the greatest effect was achieved.
The assembled engraver is perfect for small jobs and entertainment purposes such as lighting matches and burning balloons.
Remember that the engraver is not a toy and should not be given to children. The laser beam causes irreversible consequences if it comes into contact with the eyes, so keep the device out of the reach of children.
Specifications
Equipped with a 1.8W 445nm laser module, this laser engraver is clearly nothing compared to industrial laser cutting machines that use lasers over 50W. But this laser will be enough for us. It can cut paper and cardboard, and engrave all types of wood and plywood. I haven't tested other materials yet, but I'm sure they can affect many other surfaces. I'll go straight ahead and say that it has a large working area of about 500×380mm.
Who can make such a laser machine? Everyone, no matter if you are an engineer, a lawyer, a teacher or a student like me! All you need is patience and a great desire to get a really high-quality car.
This engraving machine took me about three months to design and build, including about a month waiting for parts. Of course, this kind of work can be done faster, but I'm only 16 years old, so I could only work on weekends.
Recommendations for work
Plasma cutting technology drawing.
When working with a plasma cutting machine, to achieve the best results, you must follow the following recommendations:
- regularly check the correct direction of the gas plasma jet;
- check the correct choice of equipment in accordance with the thickness of the metal product;
- monitor the condition of plasma torch consumables;
- ensure that the distance between the plasma jet and the workpiece is maintained;
- always check the cutting speed used to avoid dross;
- from time to time diagnose the condition of the working gas supply system;
- eliminate vibration of the electric plasmatron;
- Maintain a clean and tidy work area.
Scope of application
The mini drill is widely used to perform various tasks.
- Creating holes in plastic, circuit boards and other objects. Of course, the device will not be able to drill through thick iron, but it will be strong enough to make a hole in a sheet up to one millimeter thick.
- Screwing and unscrewing small head and thread screws. Such fasteners are found mainly on automatic machines (switches), electrical wiring panels, office equipment, as well as in small, low-power electric motors.
- Equipped with special attachments, it can be used as an engraver or grinder; for this purpose, spherical attachments with a rough working surface are placed in its cartridge. During rotation, the nozzle processes the part or applies the required pattern.
These are the main areas where a mini-drill is used, but, in addition to them, it has found extensive use in everyday life, for example, for processing (cleaning) two objects made of plastic or glass that are being glued together. When preparing the joints, both products are cleaned, after which the surfaces are adjusted so that the pieces are closely adjacent to each other.
Assembling an electric engraver with a tripod and flexible shaft
An electric engraver is the most common type of this type of tool at home. To make a functionally complete device yourself, capable of competing with industrially produced analogues, you will need an electric motor that runs on 220 V alternating current . Such electric motors can be taken from the following equipment:
- Soviet-style reel-to-reel tape recorders;
- DVD players;
- washing machines;
- angle grinders;
- electric sewing machines.
The last option is optimal because it is possible to adjust the speed over a fairly wide range using the built-in rheostat.
For domestic use, a drill with an idle engine speed of up to 6 thousand revolutions per minute is sufficient.
Holding an electric motor from any of the listed types of equipment in one hand is inconvenient, and in most cases it is simply impossible. Therefore, you will need a flexible shaft for the engraver. In this case, the general view of the future device will turn out approximately as in the photo below.
The functionality of the created engraving device will depend on the materials and mechanisms used during assembly. The motor can be placed on a table, but it is more convenient to make a tripod for the engraver, or rather something similar.
Manufacturing of flexible shaft
With a flexible shaft everything is relatively simple. It can be done in several ways:
- from an old drive shaft, for example, from a dental drill;
- using the speedometer cable of a motorcycle or car.
The working attachment on the shaft can also be used from a drill or made independently from different materials, for example, wood, textolite, plastic pipes. A device (handle) for holding the equipment is made from textolite as follows:
- cut 2 textolite platinums (sheet thickness should be about 1 cm) measuring approximately 2 by 10 cm;
- connect them together and grind them with a file or emery from the outside to form a cylinder;
- grooves are machined from the inside;
- metal rings secure the parts to each other;
- a tube is inserted into the front part of the handle, under a cartridge consisting of two separate halves connected with a bolt.
The end result will be a handle like the one in the photo below.
The internal hole made between the textolite plates should be of such a cross-section as not to interfere with the free rotation of the cable. It will be possible to insert nozzles with shank diameters from 2 to 5 mm into the chuck.
Assembling the engraving unit
It’s very easy to make a tripod (a base for installing an electric motor) from plywood or the same PCB. To do this, do this:
- cut out several pieces (4 are enough) from a sheet of material corresponding to the size of the electric motor;
- a motor is attached to one of the fragments using clamps;
- assemble the box;
- A hole is drilled in the front part for the flexible shaft.
The created structure is hung on the wall.
It is convenient to use a factory holder on clamps for an engraver, if the dimensions of the electric motor allow. The mount connects to any table. But such a device will need to be purchased additionally.
Further assembly of the engraving device is carried out in the following sequence:
- using a coupling made from a drilled bolt, connect the cable to the electric motor shaft;
- put a rubber hose of the appropriate diameter on the cable and attach a handle made to it;
- install a start button;
- connect equipment to the network;
- check the functionality of the device made.
A homemade drill will allow you to process wood, bone, metal, glass, plastic, ceramic workpieces, as well as various metals, natural and artificial stone.
When creating homemade straight grinders, you can also use electric motors designed for 380 V, but if they can be adapted for 220 V. In such cases, you will need to tinker a little more. There is a lot of information on this issue both on the Internet and in books on electrical engineering.
Software installation
Your laser grower, which must operate in automatic mode, will require not only installation, but also configuration of special software. The most important element of such support is a program that allows you to create the contours of the desired design and convert them into an extension that is understandable to the control elements of the laser engraver. This program is freely available and can be downloaded to your computer without any problems.
The program downloaded to the computer controlling the engraving device is unpacked from the archive and installed. In addition, you will need a library of contours, as well as a program that will send data on the created drawing or inscription to the Arduino controller. Such a library (as well as a program for transferring data to the controller) can also be found in the public domain. In order for your laser homemade product to work correctly, and for the engraving performed with its help to be of high quality, you will need to configure the controller itself to the parameters of the engraving device.
Shell options
If, in order to make a clamping device, you need to go to Aliexpress or another similar portal in search of a collet chuck, everything is much easier with a casing. To create it, you can use trash that is usually thrown away.
Let's look at several variations.
A bottle of antiperspirant deodorant. Individual plastic containers perfectly fit the dimensions of the motor from an audio recorder or CD player. In a situation where the engine is slightly larger in size, it should be inserted with slight tension. You need to cut a hole in the cap of the antiperspirant bottle to remove the collet cartridge. For greater practicality, at the very bottom you can put a socket for connecting a power source, and on the side there is an on/off button. This makes it possible to keep the drill away from the block.
Features of using contours
If you have already figured out the question of how to make a hand-held laser engraver, then you need to clarify the question about the parameters of the contours that can be applied using such a device. Such contours, the inside of which is not painted over even when the original drawing is repainted, should be transferred to the engraver controller via files not in pixel (jpeg), but in vector format. This means that the image or inscription applied to the surface of the workpiece using such an engraver will not consist of pixels, but of dots. The size of such images and inscriptions can be changed at will, focusing on the surface on which they will be applied.
Using a laser engraver, almost all drawings and inscriptions can be applied to the surface of a product, but to do this, their computer models must be converted into vector format. This procedure is simple - special programs Inkscape or Adobe Illustrator are used for this. A file that has already been converted to a vector format must be converted again in order for it to be correctly accepted by the engraving machine controller. Inkscape Laserengraver is used for this conversion.
Sources
- https://met-all.org/oborudovanie/prochee/lazernyj-graver-svoimi-rukami-iz-printera-dvd-player.html
- https://homius.ru/lazernyj-gravjor-svoimi-rukami.html
- https://tpspribor.ru/svoimi-rukami/izgotovlenie-lazernogo-gravera-svoimi-rukami.html
- https://electronicparts.ru/svoimi-rukami/lazernyj-graver-na-arduino-delaem-svoimi-rukami.html
- https://Gistroy.ru/article/lazernyj-graver-svoimi-rukami-1/
- https://tokar.guru/samodelkin/izgotovlenie-lazernogo-gravera-svoimi-rukami.html
- https://VseOChpu.ru/lazernyj-stanok-svoimi-rukami/
- https://SuTime.ru/pro-stanki/graver-svoimi-rukami.html
- https://zetsila.ru/%D1%81%D1%82%D0%B0%D0%BD%D0%BE%D0%BA-%D0%BB%D0%B0%D0%B7%D0%B5% D1%80%D0%BD%D0%BE%D0%B9-%D1%80%D0%B5%D0%B7%D0%BA%D0%B8-%D1%81%D0%B2%D0%BE% D0%B8%D0%BC%D0%B8-%D1%80%D1%83%D0%BA%D0%B0%D0%BC%D0%B8/
- https://3dradar.ru/3dmodels/50714/
- https://instanko.ru/drugoe/lazernyj-graver-svoimi-rukami.html
[collapse]
From a fishing reel
A simple and effective version of a mini-drill can be constructed using the reel mechanism of an ordinary fishing rod as a drive.
Such a tool will work like a drill, in which the torque of the handle is transmitted through a gear. The craftsman will only need to dismantle the line spool of the reel and trim the axle, and then in their place weld or glue a collet or chuck from a non-working drill in which the drill will be fixed.
How to make a drill for circuit boards:
Now it has become much easier to make a drill for drilling printed circuit boards. It is enough to find or buy for pennies a used inkjet printer with a power supply, as well as buy a special collet chuck for 0.7 - 1.5 mm drills, which is widely sold in all sorts of online auctions and online stores. These collet chucks can be sold in all kinds of construction and tool stores, auto markets, and hardware markets. The price is approximately 2 USD per piece (maybe cheaper).
What’s interesting is that these collet chucks come in two different shaft diameters: 2.3 mm and 3.2 mm. It is precisely these two types of motors that are used in printers. That is, when making this mini drill, you first need to decide on the motor and measure the diameter of its shaft. The motor from the printer itself is a 24-volt DC motor (the servo motor for the cross-feed of the printer carriage). They are the same type in almost all printers. It is necessary to disassemble the carriage drive, pull out the motor, remove the standard gear from the shaft and put on the collet chuck. It is fixed on the shaft with mounting screws.
In my case, the motor was removed from some old printer, it seems to be a Hewlett Packard Deskjet 640.
Drill start button - of any design, for the corresponding motor current. I used a button - a contactor from a Soviet reel-to-reel tape recorder.
It is also desirable that the donor printer have a switching power supply. It is compact, lightweight and very easy to use. Early models of inkjet printers had a transformer power supply - a very bulky device, weighing about a kilogram. In terms of operation, it is not very convenient, although this option is also possible. In general, a 24-volt power supply is connected to a 24-volt motor through a button secured to the motor body with electrical tape.
To store a mini drill, it is very convenient to use a bag - a wallet for laser computer disks, after carefully cutting out inserts for the disks themselves.
Me and Diode. yaidiod.ru.