DIY homemade items from a washing machine engine. SMA, like any other equipment, may one day fail. Impractical owners usually throw it away. In fact, you can use the machine to make various interesting homemade products.
- Making a concrete mixer
- Emery machine
- Feed cutter
- Lawnmower
- Making a generator
- Making a vibration table with your own hands
- Wood lathe
- A circular saw
- conclusions
What can an engine from an old washing machine look like?
If you are planning to make homemade products from a used engine, you need to figure out what it is and what it is capable of. In washing machines you can find three types of motors: asynchronous, brushless and commutated. Let's take a closer look at them:
- Asynchronous - can be two-phase or three-phase. Two-phase engines are found in older Soviet-made models. More modern machines are equipped with three-phase. The design of such an engine is extremely simple; it can reach speeds of up to 2800 rpm. The working engine removed from the machine just needs to be lubricated - and it is ready for new exploits.
Such motors are characterized by quiet operation. Their only drawback is their impressive dimensions.
- Commutator – you will find this type of motor in the design of most household appliances. Such devices can operate from direct and alternating current, have compact dimensions and a controlled speed. The only drawback of such an engine is the brushes that wear out, but these parts can be replaced if necessary.
It must be admitted that, in comparison with an asynchronous motor, such a motor is noisier. In addition, it often overheats and even sparks
- Brushless direct drive is the most modern motor from the Korean manufacturer. You will find it in modern washing machines from LG and Samsung.
Such models are the most compact. They are characterized by wear resistance, simplicity of design and high efficiency.
Now that you can determine the type of motor, all that remains is to decide where you can use the motor from the washing machine.
Checking the functionality of the mechanism
There are machines on sale only with inverter and commutator motors, so we will consider these two varieties, leaving out the asynchronous one.
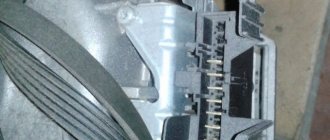
We are looking for a breakdown of the direct drive motor
The inverter is not intended for home repair. The best option is to try system testing, if your machine model is capable of this.
Self-diagnosis will display a fault code, its decoding and will help you understand where the problem is and whether the services of a specialist are needed.
The testing method and error codes are different for each machine. Before testing, you need to empty the drum of laundry and close the hatch tightly
If you still want to remove the inverter, follow the correct algorithm:
- Disconnect the device from the power supply. It is recommended to wait a few minutes until all elements are completely de-energized.
- Unscrew the bolts and remove the back panel.
- We find the screws under the rotor that secure the wiring and unscrew them.
- Before disconnecting the wires, we take photographs or sketch them, so that later we can correctly connect all power sources.
- Remove the central bolt that holds the rotor. During the process, you need to hold the rotor to prevent rotation.
- We remove the rotor assembly, and behind it the stator.
- Disconnect all wire connectors.
Now you can inspect the engine. It is unlikely that it will be possible to thoroughly test the operation of the inverter. What can be done? Check the integrity of the rotor winding.
The Hall sensor often breaks down in such engines. Whether it is operational can only be determined in a workshop if the part is replaced with a new one.
We carry out diagnostics of the belt drive
To check the collector, you must first remove it from the housing. To do this, remove the back panel, disconnect the wires and unscrew the bolts. It is permissible to pry with a screwdriver in the places where the bolts are attached, where dirt often accumulates and sticking occurs.
Now let's start diagnostics. We connect the wires of the stator and rotor windings according to the diagram. We connect it all to electricity. There is nothing wrong with the device if the rotor starts rotating.
This testing method has its own characteristics: it is impossible to test the operation of the engine in different modes, plus there is a risk of a short circuit from direct connection
To avoid a short circuit, you can connect a ballast in the form of a heating element to this circuit. We connect the ballast from the rotor side. It will begin to heat up, thereby protecting the engine from combustion.
The collector is a structure of several parts and they all require inspection. First in line are the notorious brushes. They are located on the sides of the body. We take them out and inspect them.
If they are worn out, they need to be replaced. A clear sign of such a need is that the engine sparks when rotating. To buy new brushes, take your old ones with you and write down information about the model of the washer.
The next element is the slats. They serve as current transmitter conductors to the rotor. These parts are glued to the shaft and if the motor jams, their detachment is possible.
If you have access to a lathe, it can be used to remove minor flaking. Don't forget to clean off the shavings with fine sandpaper.
Pay close attention to burrs and peelings on the lamellas; they are often the cause of unsatisfactory operation of the washing machine motor.
Now let's move on to the stator and rotor windings. If a short circuit occurs in them, the collector heats up, which causes the thermistor to operate. The result is that power is lost or the mechanism stops working altogether. We test the windings with a multimeter in resistance mode.
The stator is checked in buzzer mode. The ends of the wiring are tested one by one with probes. If there is no signal, the part is fine. You can determine the location of the short circuit by connecting one probe to the wiring and the second to the housing.
The probes are applied to the engine lamella. The display shows less than 20 Ohms - we have a short circuit, more than 200 Ohms - a break in the windings
If the device is silent, this is normal. If a breakdown is detected, you will need to create a new winding to repair it yourself, and this is difficult for a non-specialist.
If you still need to replace the engine, it is usually enough to simply install a new part in place of the old one. After all the manipulations, do not forget to turn on the machine and check its operation.
We properly disassemble and decide what can be made from parts of an old washing machine
Disassembling a washing machine is a leisurely task. After working with water, a salt build-up may remain on the parts; it must be carefully removed so as not to damage the parts during removal. What can be made from an old washing machine? A motor will be useful for homemade projects - it will become the basis for many devices. The drum will also come into play. It is usually made of stainless steel. All pipes must be disconnected from the drum. A loading hatch may also be useful. In addition to these parts, do not rush to throw away springs, counterweights and body parts.
For those who are versed in electronics, you may need a circuit board - it can easily be used to find spare parts for repair work if necessary.
Interior details
We have not listed everything that can be made from a washing machine if you have a lot of imagination and certain skills. If you don’t need a lathe, then there are many ideas for using parts from an old washing machine in the interior of an apartment or private house - all you have to do is choose the most suitable one.
Sealed door
The loading hatch door from a front-loading machine can be adapted to fit a window in a wooden frame - it looks unique and is actually practical. To do this, you just need to cut out the door along with part of the front panel of the household appliance - an original porthole is ready that fits into almost any interior.
If you live in the private sector in your own house, and there is a shaggy guard in the yard, then you can insert a machine door into his booth, through which in severe frosts he will see everything, but be in a warmer room. With the help of such a homemade product, you can isolate the formidable watchman when guests arrive - he sees everyone, but is not able to bite or tear clothes.
We must remember that the hatch is sealed, so make side holes to ventilate the booth.
Coffee table
Using a stainless steel drum with plenty of perforations, you can change the interior of your apartment beyond recognition: make a unique coffee table in a fashionable hi-tech style. You can decorate it with internal lighting from an LED garland to save energy - it’s simple, but it looks original and very unusual.
This is not difficult to do: you just need to attach a few steel pins to the drum body. Attach a table top made of plexiglass or MDF board on top. A piece of furniture made in this way will decorate the interior of your living room.
Unique poufs
Fantasy has no limits - with a certain skill and imagination, you can make various poufs from a drum for a children's room. We take a colored pillow and cut out a square of the same size from chipboard, then use a stapler to secure the pillow to the square.
We attach the halves of the card loop to the chipboard and the outer wall of the drum using self-tapping screws and self-tapping screws, paint the side surface of the drum with bright paint - a unique pouf with a hinged lid is ready, and inside children can store small toys and things.
Lampshade for the nursery
To completely change the interior of a children's room using an original homemade lampshade from a drum from an old washing machine, you need to do the following:
- from any non-flammable, non-conducting material (textolite, ebonite) we make a circle half the size of the drum diameter;
- then we cut out a hole for the cartridge and connection wire;
- insert the cartridge into the prepared hole, fix the circle on the back wall of the drum, take the wire out;
- We screw three special hooks into the ceiling, as shown in the photo;
- We attach special cables to the drum body on which the entire structure will hang;
- we hang the assembled structure;
- connect the wire from the chandelier to the socket terminals;
- We screw the light bulb through the receiving hole of the drum - everything is ready.
To dim the light and create a fabulous interior, you can attach multi-colored light fabric to the walls inside.
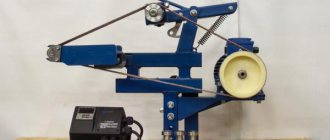
How to make a sharpener or grinding device from a washing machine engine
A sharpener is one of the most popular tools for the home. It can be used to sharpen garden tools, household knives and scissors. If you don’t already have one, buy it at any tool store or make a sharpening machine from a washing machine. The most difficult part is how to attach the sanding wheel to the motor. The easiest way is to buy a ready-made flange. It looks something like this.
Flange for motor
You can machine a flange from a metal pipe of a suitable diameter; most often, a tube with a cross-section of 32 mm is suitable. You need to cut a piece 15 centimeters long from it, this is quite enough to fix the emery. The flange is secured to the motor shaft by welding or a through bolt. The video describes in detail how a homemade washing machine sharpener works:
Let's get started
First of all, we cut off four pieces of profile pipe and weld a rectangular frame from them.
We weld another piece of profile inside the frame.
To control the 90 degree angle when welding fillet joints, you can use an angle welding magnet.
The author welds a piece of steel pipe to the profile welded inside the frame to mount the electric motor.
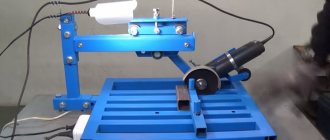
Making a wood lathe from a washing machine
What else can you do with the washing machine motor? One popular idea is a wood lathe. Let's look at the step-by-step process.
| Illustration | Description of action |
| To firmly fix the engine on the workbench, make fasteners from a metal angle. To do this, drill holes for fixing to the motor legs and table. | |
| To fasten a wooden part, you will need a flange fixed to the motor shaft, and these are the studs made from ordinary bolts with cut off heads. Screw these pins into the base. You will need 3 studs. | |
| The motor is fixed to the table with self-tapping screws and to the metal part with bolts. | |
| The opposite end of the wooden part is attached with such a device. It consists of a screw with a loop, two wooden stands perpendicularly fixed to the corners. | |
| This wooden part must be movable so that different workpieces can be used. For mobility, it is mounted on a threaded stud with bolts. | |
| To control the motor you will need a power supply. You can use one of the computer units. You will need to install switches to adjust the rotation speed. | |
| How to connect a motor to a power supply in animation. | |
| To guide your tools, make a tool rest. It consists of two wooden parts and a metal corner. All parts are movable due to fastening with one bolt. | |
| The lower part of the tool rest is rigidly fixed on the workbench using self-tapping screws and corners. | |
| The workpiece is fixed on the machine on both sides: on the left - on studs, on the right - on a bolt with a handle. To fix it in the workpiece, you need to drill the corresponding holes. | |
| To work, you will need sharpened tools - cutters. | |
| Final sanding of the workpiece is done using a strip of sandpaper. |
Do It Yourself (Ogonyok) 1998-03, page 66
from manual to electric
Many rural residents keep all sorts of livestock in their backyard, and to process meat products they simply need a good, productive electric meat grinder. Industrially produced food processors are low-powered, very noisy, and, importantly, nowadays, quite expensive. I managed to turn a simple meat grinder into an electric one. Although the unit turned out to be not very compact (1.5 times larger than the factory one), it was 3 times more productive.
This is a fairly simple design, very reliable, it is convenient to use in winter for processing meat, and in summer for chopping fruits and vegetables.
And one more important feature. The operating mode of my unit is long-term. I had to operate it continuously for 3.4 hours without any “technical” deviations.
To begin with, of course, you will have to find a power unit - a gearbox with an electric motor. For our purposes, an electric motor with a power of 400.800 W and a gearbox, the gear ratio of which ensures the output shaft rotation speed within 40.70 rpm, are suitable. And of course, you need to choose a regular meat grinder with a cast iron body.
The characteristics of my unit: a three-phase asynchronous motor with a rotation speed of 1400 rpm and a power of 0.8 kW, as well as a gearbox whose output shaft rotation speed is 63 rpm.
Having a power unit and a meat grinder in stock, we proceed to docking them. First, on the output shaft of the gearbox
Make a mark at a distance of 30 mm from the body wall (slightly marked with a file, needle file, etc.). Then we disassemble the gearbox, remembering the location of the gears, remove the output shaft and cut it on a lathe according to the marked mark. After this, again on a lathe, we drill a hole with a diameter of 18 mm to a depth of 30 mm at the end of the shaft.
Next, drill a radial hole with a diameter of 10.3 mm in the output shaft at a distance of about 12 mm from the edge of the shaft and cut an M12 thread in it. We make a “secret” screw from an M12 bolt, that is, we cut off the head from it with a hacksaw, leaving the thread for ourselves.
Connection unit for gearbox shafts and meat grinder:
Source: zhurnalko.net
How to make a simple feather removal machine for home use from a washing machine with your own hands
The time of slaughtering a bird is a troublesome stage. This is usually done in the fall, when the ducks and broilers have reached the desired weight, and it is no longer profitable to keep them in the winter. You need to pluck several dozen or even hundreds of carcasses very quickly. You can get rid of hard labor with the help of a feather removal machine, and it’s easy to do everything from the same parts of the washing machine.
The only thing that can cause difficulties is the search for rubber fingers with threads - beaters. You will have to order them, so keep in mind that you need to think about making the machine long before slaughter
The device does not require disassembling the washing machine. It is especially convenient to use machines with vertical loading. You just need to fix the beats in the drum so that they point inward. Before plucking, the chicken carcass must be scalded with boiling water and then simply thrown into a rotating drum. Here's what happens:
Important! To prevent water from getting on the engine of the feather removal machine, you need to protect it with a plastic casing.
And the last point - the feather removal device must be firmly fixed, since the vibration when loading the carcass will be very strong.
Other homemade products based on the sharpener circuit
The above work will have to be done if you want to get other, most diverse machines.
- Wood lathe. The 180 Watt motor from an old washing machine will allow you to process cylindrical workpieces with little effort and slowly. You will definitely need something like a tailstock to support the workpiece. This will protect the motor shaft from lateral loads.
- Drum grinder. For this, a large-diameter wooden cylinder is used, through the center of which a steel rod passes, one end of which is clamped into the engine cartridge, the other is attached to a bearing in a stand. The surface is covered with sandpaper, you can sharpen knives, plane blades if you have devices for maintaining the angle, and perform other operations.
Let us note right away that a sawmill cannot be made from a washing machine engine - there will not be enough torque.
But furniture makers and other home craftsmen will like the idea of making a horizontal drilling device for working with eccentric fasteners.
- The machine is made as described above, with a chuck on the shaft.
- A supporting, guide shelf is made, horizontal, at such a height that the axis of the shaft passes through the center of the end of the chipboard or wooden part.
- A drill is inserted into the chuck, the part is fed horizontally, and the drilling depth can be monitored visually.
To create a location for installing a circular eccentric, it is enough to use a drill, a vertical drilling machine and a milling cutter of the required diameter. This operation does not require high precision. The main, important task of accurately drilling a channel for a cylindrical pin will be performed by a machine made from an engine from an old washing machine.
Lawnmower from a used motor
We continue to look for the answer to the question of where we can use the motor from an automatic washing machine. Another original idea is making a lawn mower. For a small area, an electric model connected to a power source with a cord is quite sufficient. The design of such a unit is very simple. You will need to make a platform on four wheels with a small diameter.
The platform can be made of metal or OSB board, plywood and even the body of the same washing machine
The engine is fixed on top of the platform, the shaft is threaded into the hole below, and the knife is attached to it. All that remains is to attach handles and a lever to the cart to turn the power on and off. If you have an asynchronous motor lying around, you will be surprised at how quiet the unit will be, even compared to factory models.
Advice! To prevent grass from wrapping around the knives, you need to slightly bend their cutting edges down.
Video: how to make a lawn mower
How to build a generator from an old washing machine
We continue to look at homemade products from a washing machine motor, and the turn has come to the generator. You won't be able to assemble a powerful device, but in the event of an emergency shutdown, you can be well prepared. To turn the engine into a generator, you will have to disassemble it and partially cut off the core. In the remaining part of the core you need to make grooves for neodymium magnets.
The magnets must be placed in two rows with the same spacing
The gaps between the magnets are filled by cold welding. To operate the device, the kit must include a motorcycle battery, a rectifier and a charge controller. Details of the work in the video:
Homemade concrete mixer
If you have started a small renovation that requires, for example, plastering the walls, a concrete mixer will come in handy. Once again, washing machine parts will come in handy.
As a result, you will receive a compact device with low power, which you won’t mind throwing away after the repair work is completed.
As a container for concrete, you can use the same drum with pre-sealed holes for draining water. It is best to use parts from a front-loading machine; there will be almost nothing to redo. To strengthen the body, use a metal corner, and for convenient movement of the concrete mixer, equip it with wheels. The main difficulty in the design is the manufacture of a “swing” for the correct tilt and subsequent pouring of concrete. How to do it correctly in the video:
Homemade products from a washing machine engine: circular saw
You will be surprised, but a circular machine can also be built based on the motor from a washing machine. An important point in this matter is the additional equipment of the motor with a device that regulates speed. Without this additional module, the circular machine will work unevenly and simply will not cope with the task. Device assembly diagram:
Circular saw diagram
The principle of operation of the device is simple: the engine drives a shaft on which a small pulley is mounted. From the small pulley there is a drive belt to a large pulley with a circular saw.
Important! When working with a homemade circular saw, take care of your hands. All structural parts must be firmly fixed.
The resulting unit will not be very powerful, so it can only be used for cutting boards up to 5 cm thick. How this homemade circular saw works:
System Features
If the meat grinder shaft turns out to be somewhat conical (instead of the desired cylindrical), this is not a problem. You should take a tape (strip) of tin (for example, from a tin can) and install it in the gap between the shaft of the mechanical meat grinder and the pulley. This will prevent the belt from moving along the pulley and shaft.
The movement of the belt in planes parallel to the shafts is extremely undesirable for two reasons:
- if the belt does not move perfectly in one plane, longitudinal vibrations will arise (after all, due to the speed, it will try to align itself), the installation will enter into resonances and vibrate until the belt breaks;
- shifting the belt on one or both sides leads to noticeable energy losses, because the frictional force in the longitudinal displacements of the belt leads to heating and the generation of unnecessary useful work.
You should not be afraid of high loads on the meat grinder. There is an opinion that a meat grinder designed for 50-100 revolutions will begin to “crumble” at 200 revolutions. This is not so: the design of mechanical meat grinders is quite monolithic and much more durable than that of plastic electric ones.
If the load is excessive, the belt will take over the role of the damper, since it is the most flexible link in the structure that transmits rotational energy. Therefore, when overloaded, the belt will simply begin to slip somewhat.
It is important to choose the right belt: it should not be too narrow or wide. A belt from a VAZ car (even a worn one) will do: such belts rarely break, and their wear does not matter in an electric meat grinder.
Instead of a belt, you can also install a chain, but this may cause early combustion of the engine and grinding of the hub teeth
Many craftsmen install an additional gearbox between the second pulley and the meat grinder drill or connect the motor directly through it. This increases the power and efficiency of the device. However, the risks also increase.
If an object that is too hard gets into the grinder, the gearbox may burn out. In the case of a belt, it will begin to idle, slipping on a jammed pulley.
Using an electric meat grinder, which is made using this technology, you can easily grind not only meat, but also fruits and vegetables (even hard ones like zucchini). Homemade juicers and electric meat grinders show much more impressive results in both speed and quality. It is very convenient to wash and clean such a meat grinder: in fact, it all comes down to washing a regular manual meat grinder.
You should also remember that in order to install the knife, the meat grinder shaft must be modified - you need to drill a hole in it (about 2.5 cm deep) and cut a thread for M10.
Source: technosova.ru
What else can be made from a washing machine drum: original decor ideas
The drum with its correct perforation is a material for the manufacture of decorative objects. Here are some interesting ideas.
Ottoman with drum base. It’s easy to do – you just need to attach the wheeled legs and make a soft seat
Such a drum can also be turned into an original lamp. If you place a lamp inside, the perforated surface of the drum will cast glare on the walls. Such lamps will look good on the ceiling of the veranda or even on the floor
Bedside tables and tables. Drums with doors from top-loading machines can be used to hide small items.
This is how the drum turns into a cabinet or nightstand
Making a barbecue from a drum from a washing machine, photo examples
A metal grill is a temporary product. Sooner or later it burns out and requires replacement. You can buy a new one each time or use improvised material, for example, a drum from a washing machine. Making this craft from a washing machine drum takes a couple of minutes. The beauty is that oxygen easily enters the perforated container, which causes active combustion.
Kebab coals burn quickly, and the process of cooking meat is significantly accelerated
The metal of the drum can withstand a couple of seasons. Make a comfortable stand for it so you don’t have to bend over, and you’re done. Standard length skewers will fit comfortably on a small roasting pan. If necessary, you can lightly weld a couple of guides.