by Alexey | Tools | Wednesday, December 15, 2021
| Follow Make-Self.net on Facebook and be the first to read our articles. |
A router is a very useful tool in woodworking. It can be used for shaping wood, drilling various holes, cutting grooves, finishing edges and much more. It's hard to imagine any complex project without it.
A router table may be the most important tool a carpenter can use.
Most people use routers as portable tools. While this is a viable option, a table-mounted router is safer to use and can perform its functions on a whole different level. If you're looking to build your own router table yourself, you've come to the right place. We've rounded up 13 of the best DIY table designs.
Folding milling table
This briefcase-sized design transforms into a fully functional router in minutes and folds up for storage just as quickly.
A full-size router table can be a great solution—if you have the space. But if you only use the router occasionally or need a mobile solution, this might be a good solution. This benchtop tool provides all the precision and stability you'd expect from a full-size router table.
FAQ
What are the main elements of a milling table?
+
Despite the variety of models on sale, the design of such products usually includes several main parts. These include a stationary support in the form of a cabinet or adjustable legs, a table top, a mounting plate, and a panel for starting equipment.
How to extend the life of the table?
+
The conditions of maintenance of the structure largely depend on the materials of its manufacture. You should not install MDF tables in rooms with high humidity. And to prevent swelling, it is better to seal the open edges. Models made of phenolic plastic should be protected from sharp impacts. Metal elements simply need to be coated with anti-corrosion paint.
Spacious milling table on wheels
If you're a fan of Ana White, then you know that she has everything you could ever want to build.
It's no surprise that she has a great plan for helping you build a great router table. It has ample storage and work space. I hope you enjoy it as much as we do.
Professional milling table at half the price
This table includes all the best features found in store bought router tables at half the price! We have had the opportunity to study and use most of the router tables available on the market. Based on this experience, we developed our own fully functional and easy to assemble desk. The detailed project can be viewed here.
What is a circular saw?
In everyday life and in production, a circular saw is necessary for sawing various materials (wood, slate, plasterboard, soft metal, plywood, etc.). This hand-held electric tool (as standard) is designed to perform straight cuts with a depth of 40 to 140 mm (most models produced by manufacturers allow you to make right angle cuts up to 85 mm, but there is a line of more powerful equipment for construction sites). During the operation, the operator holds the device firmly in his hands and carries out sawing, moving along the workpiece. At the same time, there are no restrictions on the size of the workpieces in terms of length and width. It is possible to cut at an angle to the surface of the part.
Circular saw device
Saw models vary in power. The most budget devices have a power of up to 1.2 kW and are designed for sawing workpieces up to 4.5 cm thick. They are excellent for household needs, carrying out periodic work for short periods of time and are simple and unpretentious. If you need to make a cut up to 6.5 cm, and this needs to be done often and for a long time, you will need a semi-professional tool with a power of up to 1.8 kW . To carry out production tasks, professional equipment with a power of up to 2.2 kW , withstanding long-term loads and capable of cutting parts up to 8.5 cm thick. In addition, tools are produced intended for use in woodworking enterprises, capable of sawing workpieces up to 14 cm thick. 1 cm. Its power reaches 5.5 kW , and weight - up to 100 kg.
A circular saw
Important! For home workshops, devices with a power of about 1 kW are usually sufficient. Before purchasing a model, it is important to take this point into account, since overpaying for the saw itself and for the electricity it consumes, as a rule, is not justified by necessity.
Choosing a modification based on purpose
When choosing disks for a tool, you need to pay attention to their technical parameters.
- Tooth sharpening angle . Soft materials are sawed with discs that have teeth inclined in the direction of rotation of the disc. To work with metal, models with a negative sharpening angle are required.
- Number of teeth . For sawing different materials, you should select discs with different numbers of teeth: for soft ones - models with a large number of teeth, for hard ones - with a small number. For example, for wood, the minimum number of teeth is 24.
Disc marking includes data on its diameter and seat size
To use a circular saw for a long period of time, it is important that it does not weigh too much, is ergonomic, and has well-sharpened blades. Holding the unit in your hand for a long time is not at all easy. Operator fatigue can lead to poor sawing quality. Therefore, many craftsmen who work with saws practice placing them on a table.
Circular saws are often mounted on a table
The point of such a device is to secure the saw body under the tabletop so that only one sawing disc is above the table. The workpiece moves along the tabletop and is sawed by a rotating disk. Such a stationary device greatly facilitates work and allows continuous work without loss of quality and quickly. Manufacturers offer a large number of models of saws placed on tables. The cost of structures varies from 8 (equipped with the most primitive saws) to 140 thousand rubles. Self-manufacturing of the structure allows you not only to save money, but also to have a unit at your disposal in accordance with your own requirements.
Making a table for a circular saw is easy
Wall cabinet for router
This compact storage cabinet does double duty as a top-notch router table while also holding all your accessories.
With plenty of storage and a built-in desk, this cabinet allows you to knock two important items off your list. And here's what's interesting: it takes up very little space. The secret to its compactness is that it folds out when you need it and retracts when you're done.
Milling small parts
Several router table accessories make it easy to achieve safe and accurate results.
The problem with small workpieces is that there are large holes in the tabletop, and the stops can cause small parts to get stuck. This can ruin the project and be unsafe. This router table attachment holds small parts and allows the workpiece to be pushed past the router bit for precise and safe cutting.
Follow us on Pinterest for more interesting articles.
Useful short videos from Make-Self.net
DIY table for a router with drawings and manufacturing tips
Below are step-by-step instructions “in pictures” on how to make a milling table for a manual router with your own hands, using available materials:
- MDF board, chipboard or plywood 19 mm thick, dimensions 1000x1800 mm - 2 pieces;
- steel plate size 30x30 mm (depending on the router model), thickness 2...3 mm;
- aluminum guides, approximately 2.3...2.5 m;
- matching wheelset with brake – 4 pieces.
A diagram of the tabletop and stops with a pipe for a vacuum cleaner is presented below.
The following parts are cut from MDF sheets (chipboard, plywood):
1. work surface; 2. support base; 3. stop wall; 4. headscarf (4 pieces); 5. drawer (2 pieces); 6. side bar (2 pieces); 7. connecting strip (4 pieces).
Next, markings are made on the main part (working surface) for the future support plate. The dimensions of the plate are chosen so that the sole of the router can be placed on it freely (with gaps of at least 20 mm at the edges) and there is room left for resting on the tabletop.
First, the internal contour is cut out (for installation of the router), then a selection is made for mounting the plate “flush” with the tabletop.
Accordingly, the sampling depth is equal to the thickness of the plate. Before installation on the tabletop, the attachment points for the router and the hatch for the working cutter are marked on the plate; the sole of the tool is used as a template.
Additionally, holes are made in the corners of the plate for fastening to the tabletop. As shown in the diagram, the places for attaching the plate in the tabletop are reinforced with nuts.
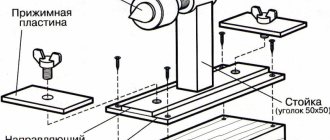
Taking into account the position of the mounting plate on the tabletop, select a place to install guides and stops, assembling them according to the diagram.
1. side bar for fixing to the base; 2. drawer; 3. guide holes, they need to be countersunk; 4. front wall of the stop; 5. self-tapping screws with a countersunk head; 6. headscarves; 7. support base.
Do-it-yourself parts for the base of the table for the router are made and assembled.
1. outer side stand; 2. internal side stand; 3. rear support; 4. bottom of the table.
The video will help you understand in more detail how to make a table for a manual router with your own hands according to this diagram.
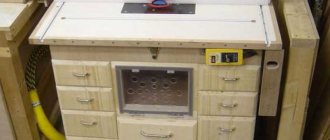
This is roughly what a finished homemade table looks like from the side with a connected rigid pipe for a dust collector/vacuum cleaner.