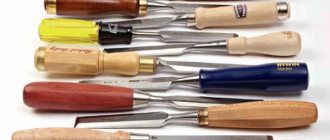
Purpose
The large number of operations performed indicates versatility:
- sampling of recesses;
- chamfering;
- cleaning of grooves;
- thread;
- planing.
The purpose of the tool is indicated by the sharpening angle. With a large value, the cutting edge is stronger. For this reason, under conditions of rough work, the chisel is sharpened at an angle of 27-40 degrees. Chiselling is done with a chisel. This tool is gradually being replaced by electric machines. Its features: a narrow, thick blade, tapering towards the end. The power of the working part allows it to be used as a lever to remove chips from deep holes.
For work on a workbench, the cutting edge of chisels is sharpened more intensely. Its angle is 20-31 degrees. Considered optimal for maintaining strength while maintaining maximum sharpness.
For delicate work and removing small volumes of chips, scoring models with a razor-like blade are used. They have the greatest sharpness, allowing for delicate carvings. Hammer strikes are contraindicated. Only hand cleaning is possible. The length of the blade is 200-270 mm, the angle is sharpened to 15-22 degrees. They dull much faster than other types, especially when processing hard wood (oak, walnut, larch, maple).
Universal chisel
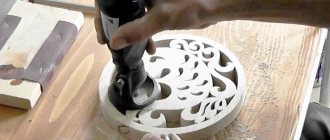
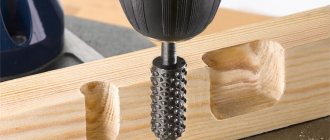
Just a few years ago, work with wood was carried out using hand tools, but today there are devices, for example, an electric chisel, that make it possible to significantly facilitate the work of the master, as well as increase the speed of work while maintaining high quality.
An electric chisel is called universal because it allows you to carry out a wide range of work. High-power chisel models can cope with the removal of old parquet boards or rough processing of a large piece of wood, removing knots and other hard inclusions. It is impossible to cope with such work using only hand tools.
This tool is considered universal because it has many attachments of different shapes and sizes. For example, small semicircular and straight 4 mm bits will help you make patterned carvings or engrave the master’s initials, while more massive tools, up to 5 cm wide, are designed for removing wide chips and roughing.
Design
Consists of a steel blade with a sharp blade. The wedge-shaped shank, located on the reverse side, is inserted into the wooden handle. The connection point is reinforced with a metal cap. It accepts wood fibers, maintaining the integrity of the instrument under physical pressure.
The handle is made of impact-resistant plastic or viscous wood:
- maple;
- oak;
- hornbeam;
- ash.
Plastic handles are made of two or three components. In addition to the base, there are rubber inserts for comfortable holding, and an iron or leather butt pad at the end for striking.
Expert opinion
Levin Dmitry Konstantinovich
Features of fixing the handle indicate functionality. There are chisels with a shank, as well as those equipped with a conical skirt. The strength of fixation varies. In the first case, the shank is inserted into the handle, in the second, the handle is placed in a special recess.
A tool with a skirt is better suited for impact, is less susceptible to destruction, and is durable. Tools of this type process hard wood and create deep recesses.
The presence of a shank indicates the need for more delicate handling. The main advantage is ease of production. A number of models have a long shank that extends across the entire handle and ends with a flat extension at the end. This is the most efficient design.
What methods of using the instrument exist?
Working with a wood chisel is distinguished by different positions of the tool towards the plane being processed.
There are the following methods of processing wood with a chisel:
- The cutting method involves moving in the direction of the wood grain, the working surface without sharpening is facing the ceiling, you hold the handle and at the same time hold the blade, with your thumb facing the handle. This method of work gives good control over the work process, while movements are performed accurately.
- Cutting with the side edge of the blade - for this, tools with a flat blade section are used. In this case, the cutting edge is not necessarily straight; it can also be beveled. In any case, the model has only one sharpened side. Instances with a cutting edge in the shape of a half circle are used for circular cuts.
- Perpendicular cutting
How to hold a chisel correctly when working: the handle is held with one hand, the blade is held with the other hand, using the thumb and index finger.. You make small cutting movements, gradually selecting thin layers of wood. The method requires the greatest endurance and, accordingly, time.
Chisel techniques do not allow cutting thick layers of wood in one go. The layers of wood are removed gradually, one after another, following their own markings on the workpiece. If you remove a lot of material, you can start the work again, not to mention the fact that such an attitude ruins the instrument.
When working, use reinforcement with your hands and with a mallet/hammer. Impact tools are used for quick work and knocking out recesses and holes of various shapes. Of course, doing this manually would take a long time and would not be effective.
For decoration, only controlled manual effort is used; it eliminates strong impacts and haste.
We hope that this text will be useful to you and now it will be easier for you to navigate the variety of chisels.
Source: viratools.ru
Material
It is made from a durable alloy. Tool steel 9ХС, ХВГ and 9ХФ is suitable. Its mechanical properties are optimal.
Material composition
According to GOST 1184-80, production is carried out from tool steel with the markings “chrome-vanadium”, CrV, drop forged. The manufacturer's mark, carried out using the electrographic method, is evidence of quality.
You should not trust such inscriptions as “Hardened steel”. As a rule, the manufacturer indicates the composition of the material, recording the designations of the elements in the labeling.
Master's hands and direction of wood fibers
The correct position of the tool and the carving technique used by the master will depend on whether the wood fibers are cut along, across or along the wood fibers with a chisel. When a chisel is used along the grain, this is called trimming, at an angle to the surface - side threading, and across the grain - cutting ends. Let's look at this in more detail.
- Trimming . When the need arises to quickly get rid of the uneven edge of a wooden part or workpiece, take a chisel. The tool is held with the unsharpened side up - it is controlled with both hands and if you grab the sharp edge, you can get serious injury. When performing trimming, one hand rests on the handle, and the other one grasps the tool blade so that the thumb is directed towards the handle. This hand position provides better control over the movements of the tool and allows you to apply more force. There is a little secret to the craft: to ensure that after processing the surface is perfectly flat and smooth, when the wood is cut along the grain, the chisel is slightly turned so that the flat side always points in the direction of the master’s movements.
- Side thread . One of its varieties is the selection of grooves. To create a rectangular groove, use flat chisels. Their blade is straight with a flattened cross-section. A sharpened cutting edge can be either straight or oblique. Typically, flat chisels are sharpened on only one side, but it is said that a properly sharpened chisel blade should resemble a razor blade. To select round grooves, semicircular chisels are used. Their canvas has a cross section in the form of half or one of the segments of a circle. But no matter what kind of chisel you use for cutting grooves, you need to work with it across the wood fibers. Hold the chisel in the same way as when trimming. In this case, the cutting edge of the tool should be at an angle to the surface, so several cuts are made. After this, the groove is completely selected using the cuts. These steps can be repeated several times, gradually increasing the depth to the desired level.
- Trimming ends or perpendicular threads requires a different hand position on the tool. The handle is grasped with one hand, and the chisel blade is clamped between the thumb and index finger of the other hand. This is necessary to enhance control over the movement of the tool and to give greater precision to each movement of the chisel. In this case, the part of the blade closest to the master will serve as a guide. Trimming the ends of a wooden part or workpiece begins from the far corner. In this case, the tool is directed so that it goes forward and down. If you press down on the chisel blade with your thumb and at the same time lower it down by the handle, you will get a very smooth sliding cut. This work requires a lot of force and very thin cuts of wood are made at a time.
Note! When using a chisel by hand, they do not try to remove a lot of material at once. It is necessary to remove excess wood gradually along the marked line.
Classification
By method of use
Impact chisels
Immersion is ensured by light blows on the end part. The handles are equipped with metal rings on the back. It prevents the handle from breaking.
Hand chisels
Immersion into the tree is done by hand effort.
According to production method
- Stamped.
- Forged, having a thickened blade.
- Cutting, from less hard and dense steel.
By shape
The purpose and appearance are determined by the name:
| Name | Working part width (mm) | Handle size (mm) | Longitudinal section type | Cross-sectional shape |
| semicircular | 12 | 145X25 | smooth | ͝ |
| semicircular | 16 | 145X25 | smooth | ͝ |
| semicircular cerasic | 4 | 145X21 | smooth | ᴗ |
| eismus | 8 | 145X21 | smooth | ˅ |
| cranberry | 12 | 145X25 | spoon | ͝ |
| curved cranberry | 4 | 145X21 | spoon | ᴗ |
| cranberry-cerasic | 4 | 145X21 | spoon | ᴗ |
| semiclucarza | 12 | 145X25 | curved | ͝ |
Among classifications, national traditions can be taken as a criterion. For example, Japanese craftsmen proposed their own unique form of chisel. It is equipped with a shorter blade with a thick, long cone-shaped neck. This makes the tool comfortable, easier to hold and control while carving.
Thanks to a special recess on the back side, sharpening is more economical and faster. The combination of the shank and the conical cup makes the connection to the handle the most durable.
Thanks to two layers of the metal part (soft iron and high-strength steel), the sharpness is maintained for a long time, the blade is easily and quickly sharpened.
According to work purpose
- Plotnitsky . Allows rough processing of workpieces of different types.
- Carpentry . Used for neat, delicate work. Suitable for carving linden, spruce and poplar.
- Lathes . Cutters used for working on a lathe.
- Klukarzy . Thanks to the curved working part, they allow material to be removed from deep grooves.
- Multifunctional . Combines a nail puller and a frame lifting device. It's called "European".
- Looped . They have a special device. Used for rounding corners, preparing hinges and locks.
- Scrapers . Made from plastic. Needed for cleaning irregularities, repairing wheels, removing burrs and protrusions.
- Pocket . They have a folding blade.
- Mini chisels . Purpose: fine thread. These include rivets (miniature models with a narrow blade similar to a sharp leaf, allowing you to create a neat, high-precision design), marigolds (designed for cutting out thin elements with rounded shapes).
- Chisels . Used when knocking out unnecessary elements in the material.
- Shoals . Cutters equipped with an oblique blade for decorative work on relief. Used for sculptural carving.
- Shtiheli . They are distinguished by mushroom-shaped handles and an oblique cutter. Used for preparing grooves.
By type of longitudinal section
- Direct . The most common. The blade and blade are completely smooth.
- Curved . A special feature is the noticeable bend of the blade and blade.
- Klukarzy . They are distinguished by a sharply curved blade along the entire length. Used for punching wide pieces of wood.
- Reverse . The presence of sharpening on the other side of the blade and a notch on it allows you to create relief elements above the main surface. Such specimens are called “reverse cranberries.”
By cross section type
. The difference is the straight profile. Available in many sizes.
Flat- Angular cerasics . The cross section resembles the letter "V". Its angle is 60-90 degrees. Convenient for three-dimensional carvings, for example, images of hair.
- Radial . The cross section resembles a semicircle. Allows you to carefully and smoothly bury the tool into the wood. Used for contour carving. The working part can be sloping or flat.
- Bracketed . The smooth cutting part is equipped with sides of various sizes, placed at certain angles. Gives a narrow, even sample.
- Cerasics are round . Similar to the radius version, with a smaller thickness. Purpose – figured carving.
According to the shape of the working part
- Straight (the blade is perpendicular to the blade, used for rough processing in even stripes).
- Oblique (the beveled blade makes it easier to penetrate the wood).
Making blanks on a machine
Turning chisels are divided according to their functionality into the following groups:
- Rough processing. The chisel has 2 cutting blades located at an angle relative to each other.
- Meisel finishing treatment. Meisel is a smooth flat cutter with an angular sharpening on one side.
- Semicircular chisel for processing non-standard products.
- Cutting blade for removing excess wood when making patterns.
- Round chisel for processing round parts. Its blade can be either smooth or serrated.
- A file that processes the ends of workpieces.
- Cutter limiter that regulates the turning depth.
Prices
The cost of different products does not vary much. On average, it is 300-700 rubles per unit. Depends on the material, manufacturing method and manufacturer. The author of the article enjoys using Belarusian chisels made by hand forging and hardening. Their retail price does not exceed 300 Russian rubles.
Expert opinion
Levin Dmitry Konstantinovich
There are models costing more than one and a half thousand. Brand has a significant impact on pricing. In addition, it is more profitable to buy individual copies than to purchase an expensive set.
Sharpening procedure
A sharp blade on any tool is much safer than a dull one. Such tools include a chisel. The frequency of sharpening depends on the frequency of operation of the tool, but in any case, the chisel must be sharpened at least twice a year.
Even a purchased chisel is not sharp enough to perform woodworking. Therefore, before starting work, it must be sharpened.
Used chisels develop irregularities and burrs on the chamfer, which are corrected on a grinding wheel. The damaged chamfer is held near the circle, thereby removing irregularities, chips and rust. The sharpening stone, which has three levels, allows you to achieve maximum sharpness of the chisel.
Features of choice
When choosing a tool, you should consider the following criteria:
. It must be hardened, clean, smooth, and have the appropriate thickness.
Blade quality- Features of the handle . Wood is the best option, providing ease of holding in the hand. Plastic ones must have rubber inserts. The blade should fit snugly into the handle.
- Price . Often a cheap product does not meet most requirements. Sometimes it is beneficial to purchase a separate blade and make the handle yourself.
- Options . The optimal length is considered to be 100-150 mm.
- Proposed work . Die-cut models are suitable for high-precision carving; stamped chisels can be used with thrust washers.
- Each type has its own area of use . Often, to create any kind of relief you need at least 10 different tools.
The best shank is forged. It has an optimally distributed hardness and is distinguished by characteristic stains on the surface.
Common patterns
The most common type is considered to be “bench” chisels. They are universal, used by all masters. Just a few types allow you to do almost any job.
Their blades are 150-170 mm long. Blade width – 3-50 mm. The sharpening angle is 20-31 degrees. The parameters allow for fine pruning and chiselling of the tree. The presence of chamfers on the edges of the blade allows you to work in hard-to-reach places.
What kind of chisel do you use?
ManualPunch
Another popular type is stripping chisels. Features - shortened blade, small handle, chamfers, sharpening angle - 25-30 degrees. Allows you to create miniature transitions and replace the cutter. Used for inserting locks and cleaning hinge recesses. An indispensable tool for repair work.
Interesting fact! Many pocket tools have evolved from common carpenter's chisels. Their reduction occurred as a result of frequent sharpening and adjustments.
Famous manufacturers
Reputable companies:
- Bahco;
- FIT;
- Hardax;
- Hart;
- Narex;
- Sandwik;
- SANTOOL;
- Stanley;
- TOPEX;
- Truper;
- Unipro;
- VIRA;
- Irwin;
- COBALT;
- Sturm;
- Anchor.
Content:
- 1. Master's hands and direction of wood fibers
- 2. If you take a hammer to help
Professional carpenters and carvers, as well as those for whom working with wood is more of a hobby, use chisels according to the same pattern. First, a pencil drawing is applied to a wooden blank or part—drawing. Then the outline is deepened using a wood carving knife. Only after all the contours have been cut, are clearly visible and are not erased, do they begin to work with a chisel.
The method of using the tool is chosen depending on what kind of processing needs to be performed. There are two most common:
- Pressure by hand, when the tool is set in motion only by the force applied by a person, for example, as when trimming the edge of a piece of wood.
- With a mallet blow when additional force is needed to gouge grooves or holes in wood.
It is worth noting that for all its apparent simplicity, this is a rather complex and time-consuming matter. Largely because you need to use the tools very carefully and with extreme precision. After all, in some places you don’t put enough pressure on the chisel, and in others you squeeze it too hard, it’s very easy to ruin the part. One awkward hand movement or a not-so-successful blow with a mallet - and all the work will go down the drain. We'll have to start everything from scratch.
If you want to avoid such failures, we recommend reading this article. Here you will find some useful tips for working with chisels and mallets.
Work safety
- Durable and stable work table.
- Use of fasteners and clamps.
- Sufficient natural and artificial lighting.
- Use gloves, glasses, and a respirator when working with tools.
- It is forbidden to cut towards yourself.
- It is forbidden to clutter the desktop.
- Clean the workplace only with special brushes.
- The tool must be laid out and secured.
- The power tool must be in good working order and tested.
- If the power tool is connected to a three-phase network, it is necessary to equip it with grounding.
Sawdust and shavings should not come into contact with heating devices and heated surfaces. Heating oil or nitro coatings is allowed only on closed heat sources. The work area must be equipped with a complete first aid kit.
Caring for whetstones
Store sharpening stones so that dust does not collect on their surface. When using a whetstone, the surface eventually becomes clogged, clogged with a mixture of oil and metal dust. As soon as it stops sharpening normally, rub it with paraffin and treat it with coarse burlap.
Impregnation of stones with water wetting
Before using such a stone, it should be soaked in water by immersion. A coarse-grained stone will need 4 to 5 minutes to saturate, and a hard, fine-grained stone will need a little less. Store such stones in special vinyl boxes so that moisture does not evaporate from it and it is always ready for use. Another storage method is to keep the stone in water. Under no circumstances should such a stone be allowed to freeze—it will almost certainly crack.
Restoring whetstones
After a certain period of work, a groove appears on the grindstone - a depression from which its particles have been erased. Level oil-wet stones by grinding with carborundum powder mixed with water or oil on the glass. The surface of water-wet stone can be restored by sanding with 200-grit silicon carbide sandpaper attached to the glass.
Leveling the surface of the whetstone
Carver's workplace
Wood carving involves working with sharp objects, so it must be done at a workbench that meets the necessary requirements for stability and strength. If you don't have a workbench, you can use a tabletop of any size. At the same time, its height should not exceed the level of the carver’s belt. During operation, nicks often form and must be removed. The board on which the ornament is cut must be firmly secured with clamps.
Lighting is also important. For a lot of natural light, the table should be placed near a window. When there is only one light source, dull dark shadows are observed, making it difficult to make a clean carving. Professionals advise installing 2-3 more lamps above the table. They need to be installed in such a way that they illuminate the table from different sides. Light sources should be located above the carver's eyes. Comfort and safety are the result of high-quality lighting.Manufacturers
You can always purchase a set of all the necessary tools. The most popular are Bahco, as well as Sandwik or Narex. Good models can be found from Japanese companies. Among Russian products, it is worth highlighting the tools from.
Below is a rating of the most popular tool manufacturers.
Ashley Iles
The instrument is perfectly sharpened and retains its edge for a long time. The chamfers are quite high quality. The handle is made of bubinga wood and is comfortable (those with large and small hands can handle the tool equally well). However, the edges of the brass loop where it meets the handle are too sharp. The brand produces sets of 11 and 4 tools that do not include a roller or box.
Narex
The tools are of average quality, but the set has good technical characteristics. The handles are made of beech, but they suffer from unbalance. The bases of the blades require additional alignment, but they are easy to sharpen. The brand produces sets of 10, 3 and 4 tools. The wooden case or roll is not included in the set.
Blue Spruce
Each tool is created by hand; during testing, these chisels showed one of the best results. The handles are made of maple and impregnated with resin. The device can easily withstand impacts and is not susceptible to mechanical damage. The incisor rims are too wide and their edges are pointed.
This option is well suited for making corner joints, but the edges will have to be blunted a little (this is necessary to protect against possible injuries). The steel is of excellent quality and is labeled A2. It is better not to use an electric sharpener or pierce it with a mallet for such a high-quality tool. Despite the high cost of the products, the set does not include a roll or case.
Irwin Marples
Before us is a representative of a very popular brand. The difference between the new models is the handle, which is very well suited for using a mallet. However, it is difficult to change the trajectory of the tool during operation. The blade quickly loses its original sharpness, as does almost all inexpensive tools. The assortment includes sets of a mallet and 3 chisels.
Lee Valley
The blades of such models are very easy to sharpen, and they retain their sharpness for a long time. However, some samples require leveling the base, which takes about 30 minutes. In addition, the tools have too sharp edges, the handles have a ribbed structure and cannot be called very comfortable to use. However, the cost is reasonable, and in the middle price segment you can find tools of different sizes and types.
Lie-Nielsen
The tool handle is attached with a “skirt” mount. If the connecting element becomes loose, then the handle spike will need to be adjusted to the mounting recess. You should hit part of the joint several times with a mallet, and then you can work with the tool again. The chisels are created by hand and can be purchased in sets of 9 or 7 models. The set comes with a leather roll.
Pfeil
The Swiss brand is quite famous among domestic consumers. The chamfer is polished to a mirror finish. Models are equipped with a mini-bevel. The cutters are easy to sharpen, durable and made of premium steel. The faceted handle is very comfortable, but the transition at the ring is not as smooth as we would like.
Robert Sorby
The handle of the model is made of boxwood and perfectly withstands working with a mallet. However, some users note inconvenience in operation; the ring clips quickly weaken. The blades turned out to be the smallest when compared to other models from other brands. Because of this, the incisors quickly become dull.
Robert Sorby Sheaf River
The model has an unusual handle design. The handles have an octagonal shape, are made of ash and are quite comfortable to use. The blade becomes dull quickly. Traditional handles are approximately 32 mm longer than these models, and tools from this manufacturer have a tapered shape. Their configuration is designed for a smooth transition from ring to blade, which is very convenient for manual work.
From the history of terminology
The word "chisel" is borrowed from the German - Stemmeisen. The German word Stemmen translates to “chiseling, chiseling, gouging.” This term in German is used to refer specifically to a chisel, but a thin one, pushed forward by hand without using a mallet. To designate this particular type of cutters, it was borrowed by Russian craftsmen.
This term most likely came into use by craftsmen during the era of the reforms of Peter I. Interestingly, a chisel most often meant a flat hand tool, which today is called a chisel. Here is a fragment from A. A. Pchelnikov’s book “Conversations with Children” (1858): “With this flat one, which is called a chisel, sawn spikes or hollowed out holes, etc. are cut out and cleaned. With a semicircular chisel, semicircular recesses are removed and cleaned. Using slotting tetrahedral chisels, wide and narrow, they gouge out holes, take out grooves for inserting thin planks into frames, etc.” And in the Dictionary of Church Slavonic and Russian Languages (volume 4, 1847) a chisel is defined as “... a kind of chisel. Carpentry chisel, flat and tenon.” A more detailed definition is given by the authors of the Desktop Dictionary for reference in all branches of knowledge (volume 3, 1864): “A chisel, a carpentry tool, is used for gouging out holes and replacing a chisel. It is made of steel, 4 inches long, up to one inch wide” (1 inch = 4.45 cm).
It is not known exactly when the term “chisel” began to be used to refer to semicircular incisors. But in the publications we found before the end of the 19th century, this term is used specifically to designate a chisel, while the word “chisel” refers to cutters of various shapes, including semicircular ones. In the 30s of the XX century. Several editions have been published in which the chisel comes in different shapes, including a semicircular one. In the current linguistic tradition, including in the professional vocabulary of woodworking masters, a chisel is a common name for cutters of a similar design (most often semicircular), and a chisel is a straight cutter with a profile in the form of a hexagon or trapezoid, intended for creating grooves and splitting material and other operations.
Read about the types of chisel handles, recommendations for choosing chisels and other features of working with this type of hand tool in other specialized articles on our website.
Control of sharpening results under a microscope
We sharpened several chisels using our jig and sandpaper, followed by a belt polish with an abrasive paste, and then sent them to the lab where we took photographs of the cutting edges using a scanning electron microscope.
| A section of a chisel blade that was sharpened on a homemade jig, at 150x magnification. Under a microscope you can see traces of scratches that have not disappeared even after finishing and polishing. | This chisel is sharpened using special expensive equipment with a magnification of 150 times. Scratches are located perpendicular to the cutting edge and are less noticeable. The sharpness of the chisel is almost the same. |
One of these samples is shown in the left photo. For comparison, we sharpened another chisel using special high-precision equipment and also polished the cutting edge. This sample is shown in the right photo.
Conclusion: Our primitive sharpening method provides very similar results at significantly lower cost.