A router, or manual milling machine, is a universal tool suitable for various types of wood processing. It can be used to drill holes, cut grooves, grooves and chamfers, and process the edges and edges of a wooden product. It is very convenient for installing locks on doors, assembling floors and furniture, and other work with this material. Carving on pre-prepared wood using a router can be mastered quickly with your own hands if you immediately choose the type of manual machine for yourself.
There are several types depending on the work performed. So, they distinguish:
- A vertical milling cutter is used both for making through holes and for cutting blind grooves in the rock
- Edging is useful for processing the edges of wood. Has low power, the big advantage is low weight
- The combined one serves both of the above purposes and has two bases for them.
Peculiarities
Artistic cutting with a jigsaw is a unique opportunity to show your creative talents and find a hobby you like.
Even a child can master the simplest cutting patterns. However, there are some peculiarities here that you should be aware of before getting started. Carving can be done on the simplest materials, such as plywood or small wood planks. Later, when you gain work experience, you can begin more complex forms of work - cutting out patterns on interior items.
There are several basic types of jigsaw carving. You should master the technique from the simplest of them.
Another feature of artistic wood carving with this tool lies in the fact that when performing it, it most often requires the use of several jigsaws at once. Some are designed for cutting small parts, others for large ones. Therefore, it is necessary to have at least two types of such tools in your arsenal.
Carved frames for mirrors: an interesting idea
Lovers of Art Nouveau style interiors will appreciate carved frames that frame paintings or mirrors.
Such interior items not only look rich and unique, but also add a special “zest” to the interior of the room. When cutting out mirror frames, experts recommend using a few basic styles to work with.
- The double baroque style contains two contours inside and outside, represented by openwork curls. The craftsmen included a feather profile in this style; it reflects some of the lightness and grace of the rectangular-shaped product.
- For mirrors, the feather profile with a back is ideal, providing a dense back part where the mirror is attached.
- The refined profile also has a dumbbell style, despite the somewhat massive frame. It is these frames that hold a heavy and massive mirror well.
Lovers of Art Nouveau style interiors will appreciate carved frames that frame paintings or mirrors.
Let’s just look at the option with an oval background (outline)
Handmade carved wooden furniture
To perform this type of carving, grooves are cut along the outline of the sketch, which are then ovalized (rounded) both from the background and from the ornament side.
First, make cuts with a blunt knife along the contour. On curves, cuts are made using semicircular chisels of suitable width.
The background of the picture is also removed with a knife or a straight chisel, maintaining a 30-degree inclination of the cut to the plane of the workpiece.
On the side of the image of the ornament, the contour should be steeper, on the background side it should be sloping, this will allow the pattern to look more convex. After finishing the rounding, you can use cutters to sand the product with fine sandpaper.
With a selected background.
The difference between a carving with a selected background and a flat-relief carving with an oval background is that the background around the ornament is removed with one inclination angle to the workpiece plane selected for the entire product (30-45°) and is not further processed (rounded) with a cutting tool and not sanding.
With pillow background.
Cushion carving is a type of carving with an oval outline. The only difference is that the background does not remain flat and may be lower than the plane of the product’s ornament. Raising the ornament above the background has its advantages, but also its disadvantages. Cutting the entire background to the same height takes quite a lot of time, especially with large volumes. In addition, this work requires skill and accuracy so as not to damage the product.
With a selected and trimmed background.
This type differs from others in that depressions are created around the main picture, which is why the image seems to rise above the background to a different height (usually within 5-7mm), turning out to be deeper and more interesting in appearance.
It is very difficult to see and feel the difference between different types of carving. Often many types are combined in one product, because of this it is not worth giving clear definitions and starting any disputes on this basis.
What is a milling cutter and why is it needed?
A router is a device for processing wood or metal. They process flat and shaped surfaces, and also form technological recesses - grooves, ridges, recesses for installing hinges, etc. According to the installation method, there are stationary machines (there are different types to perform different operations), and there are manual milling machines. Hand-held electric milling machines are a universal tool that allows you to carry out any operation. To change the operation, you only need to change the attachment - the cutter and/or its placement on the part differently.
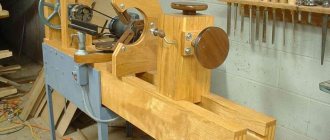
Machine tools are used mainly in mass production. Here the cutter is installed motionless, and the workpiece moves along a certain trajectory. When working with a manual router, the situation is reversed - the workpiece is fixed motionless and the router . When processing large volumes of similar parts, it is more convenient to mount a hand router on a horizontal surface, making something similar to a milling machine.
Homemade milling machine - a horizontal plane with a hole in the middle, to which} {worked from below a manual milling cutter is attached
There are many different types of milling machines, but for the DIYer or semi-professional use, the universal ones are not just suitable. They have various cutters and special devices installed, which allows them to perform any operations. It’s just that performing them requires more than just time and skill than on a special machine.
What is done with a hand router:
- grooves and recesses of any shape (curly, rectangular, complex shapes);
- through and blind holes;
- process the edges and ends (make them straight, or curly);
- cut out complex parts;
- apply inscriptions, patterns, drawings to the surface;
- copy details.
Copying parts is one of the capabilities of an electric milling machine
Similar operations are used in carpentry, during the production and assembly of furniture. A hand can even cut into a lock or, in other words, a hinge on a door . At the same time, it will do it more quickly and elegantly than similar operations, but performed with hand tools.
You're lucky: there's no warping
Wood engraving: technology features
If the selected board falls into this category, you can consider that the deal is in the bag. Regardless of the length of the board, you can quickly get a straight edge using a planer and jointer. If you don't have one, use a circular saw to file down the rough edges of the board.
A straight edge on this type of board can also be achieved using a router. If the face of the board is not planed, use a guide board that has a smooth face and a straight edge, attaching it to the top of the workpiece, as shown in the photo below. Use a guide cutter with a top bearing. Install the guide board with a slight indentation from the edge of the workpiece - this distance corresponds to the volume of material that will be removed during processing. If necessary, make two passes.
When using this method, press the straightest edge of the board against the rip fence to avoid kickback. Having filed the opposite rough edge of the board (photo on the left), move the longitudinal fence, turn the board over so that its new edge faces the fence, then file the second rough edge (photo on the right).
If the sides of the board are planed, fix the guide (it can be a flat board or a homemade or purchased tire) on the workpiece so that when moving along it, the router removes a layer no more than 1.5 mm thick in one pass (photo below) Make as many passes as required to obtain a straight edge.
With the router sole on the guide board, guide the cutter bearing along its edge. Remove no more than 1.5 mm of material in one pass. Use a cutter with an upward or downward helix, or a straight cutter whose blades are longer than the thickness of the workpiece.
Grind a small chamfer on the edge of the face facing the cutter - this will prevent the workpiece from getting stuck when it is fed.
A straight edge can be made on a router table, but it requires a little more advanced setup. First, clamp a straight or spiral cutter into the collet of a router fixed to the table and set the cutter overhang to be slightly larger than the thickness of the workpiece. Adjust the front of the rip fence so that no more than 1.5 mm of material is removed in one pass. Place the back of the rip fence flush with the cutter blades. If the rip fence does not have separate front and back parts, use a clamp or double-sided tape to attach a piece of laminate plastic to the back half of the fence with a thickness corresponding to the layer of material being removed (photo on the right).
Guide rail
When processing wood, it is important to control the position of the tool used. The guide rail, like the previous equipment, is designed to ensure that the router moves along a strictly straight path. What remains for our client to do? Wood milling devices are made in such a way that they can be used when performing certain jobs. The distinctive features of this device are the following:
- Guides for a manual router can be positioned at any angle relative to the edge being processed. For this reason, the device ensures precise movement of the tool in each direction within the horizontal plane.
- Plywood is often processed with a router with the goal of obtaining holes that are located relative to themselves at a certain pitch. The design under consideration contains additional elements that make it possible to obtain holes with these parameters.
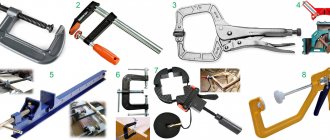
- To fix the device, a special clamp for a milling machine is used. If the delivery set does not include clamps, then there is an option to replace them with ordinary clamps.
- Some models come with a special adapter for the router table.
Guide rail for router
The usual homemade design you will like is made of a long beam, which will be attached to the workpiece using clamps. To make it comfortable to use, there is an option to equip the beam with additional side supports.
The above suggestion is occasionally comfortable during the implementation process. The following homemade design is more popular:
- The device is represented by a combination of two boards, which are located parallel to themselves and the plywood sheet.
- The design in question is used only when milling cutters of a similar diameter are used.
- Due to the introduction of two boards, the processing accuracy and stability of the template during milling significantly increases.
READ Handheld Circular Saw with Stationary Installation Possibility
If the passage involves using cutters of different diameters, it is advisable to use a slightly different design. It is characterized by the presence of a folding board, which is attached using hinges. The purpose of this structural element is to fix the template. After fixing it, the board tilts back, you can use cutters of various diameters.
They directly provide reliable fixation of the equipment. During operation, the device will be pressed against the surface of the template, which ensures the accuracy of processing.
Common Techniques
Choosing wood varnish for external and internal use
The most widely used techniques for routing wood are leveling the surface, making grooves, routing the edge and working from a template. More often than others, working according to a template is used. This technique involves precisely sliding the copy sleeve along the edge of the stencil. This method of work makes it much easier to make keyways, trims, figured cuts, cutting parts, and making decorative elements. The template is made from plywood 8-12 mm thick. A design is applied to it and cut out with a jigsaw. Using a template, you can make any intricate pattern, carve out small details, and copy the required number of identical fragments of a product. The router moves along a fixed template with high precision, which allows you to reflect the desired high-quality result on the wooden surface.
Edge milling can be done with or without a template. For this purpose, straight edge cutters are used. The template can be any flat board longer than the workpiece being processed. This is necessary to prevent the formation of irregularities along the edges of the edge.
To make a curved edge, you need to prepare the surface. First of all, you need to level the edge of the workpiece to be processed using a straight edge cutter. Otherwise, it will repeat the curvature of the edge along the edge of which the roller will move. After this, you need to make a template with the desired pattern. It is fixed on the working surface and cut along the contour. If you need to remove a large layer to obtain the required pattern, then use a jigsaw, and the finishing work is done with a milling cutter, otherwise it will quickly become dull.
Using a figured (fillet) cutter, you can make a longitudinal pattern on a wooden workpiece. This can be done using a template or a special stop.
By studying the milling device and learning how to use it correctly, you can greatly simplify and speed up carpentry work, while simultaneously increasing its quality. And wood carving, made by hand using a router, will decorate the interior and become an object of pride for the work done.
Rip fence
To perform straight and curved cuts, a parallel stop is used. This device is in great demand today and is included in the supply of many tools. This milling device contains several structural parts:
- Guides, made in the form of rods for niches formed in the body of a wood router.
- A locking screw is used to fix the device in a suitable position.
- A screw designed for precise spacing between the axis and the surface of the workpiece.
- Contact jaws. They are required so that the stop for the router is based on.
The side support for the router is suitable for various types of work. There is an option to prepare it at work like this:
- As previously noted, in the base of the woodworking device there are holes designed to accommodate a rod. It is inserted there and secured in position using a locking screw.
- After fixing the device, the locking screw is loosened slightly, and the position of the stop is changed using the adjustment tool.
Knowing the design features of the device, you can make it without the help of others. For this purpose you will need bars and steel elements, as well as screws. There are quite a few different models of rip fences on sale, which are selected directly to the characteristics of the router designed for working with wood workpieces.
Typical case: slight bend
Most boards in this category warp when they swell or shrink, adapting to environmental humidity. Plan the future straight edge in such a way as to obtain an effective textured pattern on the front surfaces of the product. Boards belonging to this category are processed differently depending on their length.
Boards less than 0.3 m long are processed quickly
For short boards, use the simplest options: a planer, circular saw or band saw. Planers are usually faster, even if it takes multiple passes to get a straight edge. The same technique is used when sawing on machines: the board is sawn longitudinally, while its concave edge moves along the parallel stop. The edges obtained in this way, being straight, have sawing marks that can be quickly removed in one pass on the planer. A router table will produce the same quality as a planer, but it will take more time to set up.
Choose the right tools for straight edges
The tools and techniques used to straighten edges vary depending on the degree of curve and length of the board. Use this decision tree to select the best tools and techniques for use in each situation. Additional options are described in the article.
Boards 0.3-0/9 m long: many possibilities
With boards of this length (the thickness and width of the board can be any) you have the largest number of options to choose from. On a planer, such boards can be processed in two ways. The first is a conventional planing of a concave edge, removing a small amount of material each pass until the edge is straight. The second option involves preliminary planing in several passes, first one edge of the board and then the other, as shown in the figure above. This is repeated until the bend disappears almost completely, after which the entire edge of the board is planed. A band saw and circular saw will also do the job, but with one major addition.
To ensure that the concave edge of the board contacts the rip fence when cutting boards longer than 30 cm, add a long trim as shown in the photo below left. The length of the overlay is equal to twice the length of the workpiece, increased by 300 mm. Center the pad relative to the saw blade and secure it to the longitudinal stop of the machine using clamps or double-sided fabric-based tape.
The auxiliary stop ensures the linear movement of the workpiece, thanks to which the sawn edge will be straight.
When making an auxiliary longitudinal stop for a milling table, make a cutout in its middle so that the cutter rotates freely.
How to use a hand router
The easiest way to start learning is with a plunge router. Visually, such a tool is the most bulky and complex, but it is easier to work with, since the direction of the cutter is fixed by the design of the machine perpendicular to the surface being processed.
Step 1. Secure the cutter shank in the collet.
You need to insert the shank into the chuck and tighten it with the wrench provided for this purpose.
At this stage, it is important to correctly calculate the tightening force. Over-tightening is undesirable and insufficient fixation is also undesirable.
https://youtube.com/watch?v=vA4UZ-nf2XQ
Attention! If you are planning a deep recess, it is better to take a cutter with an extended shank. Step 2
Setting the excavation depth
Step 2. Establishing the excavation depth
If the work is carried out according to the drawings and the groove is shallow, you just need to set the appropriate depth on the limiter and set the fine adjustment (if the model has fine tuning). If milling is done “by eye”, you need to estimate the depth of the tool by placing the milling cutter against the end of the product. The depth can also be selected in stages - when producing more than 3-8 mm (depending on the diameter), precision work or at the training stage.
https://youtube.com/watch?v=-TxLEB_7NUY
Step 3. Testing the operation of the router
For those who have no milling experience, have purchased a new tool, or are working with an unfamiliar type of wood, it is advisable to use a “draft” - the same piece of wood as the future product. You need to test the operation of the cutter, changing the speed, direction (towards you, away from you, turning clockwise and counterclockwise) and the depth of the notch, and monitor the accuracy. Adjust settings.
Step 4. Determine the rotation speed
When operating a cutter, an important indicator is the peripheral speed - the rotation speed not of the shank, but of the surface of the cutting tool in its widest part. If the cutter rotates too quickly, it will tear out wood fibers and leave gaps; if it rotates too quickly, the material will get burnt. If the rotation is too slow, the surface of the product will be rough, as if covered with “ripples”.
When adjusting, the rule applies: the larger the diameter of the cutter, the lower the speed on the shank (shaft revolutions) should be. Some manufacturers provide tools with instructions: wood/diameter/speed. If there is no such data, you need to experiment.
1 — too low speed; 2 — too high speed; 3 - uneven movement of the cutter at high speeds; 4 - good result
Step 5. Fixing the product
The wood being processed should not wobble. The result of your work will be spoiled and you may injure yourself. The workpiece must be laid on a reliable base and secured, for example, with clamps. When using a template, it is also fixed.
Step 6. General rules for preparing for work
Markings must be applied to the workpiece (when working without a template). The milling operator's movements should not be sudden. A smooth start and smooth, uniform movement along the calculated trajectory, a correctly selected number of revolutions is a recipe for an ideal and beautiful result.
When working, you should not lean your whole body on the router or let it float freely. The pressure should be tight, confident, and uniform throughout the entire stage.
Attention! The instructions for the machine will indicate how to hold the router correctly. Each model has handles for safe operation
Step 7. Milling the finished product
The start of work can be from the edge of the product (open groove) or in its mass (blind groove). In the first case, you must first install the router and then turn it on. In the second, turn it on and then move the cutter to the desired point. Upon completion of milling, you need to turn off the tool after removing it from the wood.
When making deep grooves and step cuts, you should always turn off the tool for adjustment. The maximum single depth must correspond to the diameter and material of the cutter, and the density of the wood. To obtain a smooth surface, the last removal should be no thicker than 1.5 mm.
It is important to correctly determine the speed of movement of the router along the line being processed. Too slow will cause overheating and burns
If you move too quickly, sawdust will not be removed in time, the work will be difficult, and it may look sloppy.
The basic rule when choosing the direction of movement of the router is: in the direction of the approach of the cutter blades (cutting edges). This applies to both free milling and tooling.
To process edges and obtain a certain edge configuration, sometimes the router is fixed under the table, with the router rising above the tabletop, and woodworking is performed by moving the workpiece relative to the router. Thus, from the category of a hand tool, it moves into the category of a mini-machine.
Straight edges start in the shop
When purchasing lumber, select the best boards possible, paying particular attention to the grain pattern and how it will look on the finished product. You can purchase unplaned material, either having two planed faces or planed on both faces and on both edges
The latter option, being more expensive, often solves the problem of obtaining a straight edge. However, even such boards can warp. Warped boards, although difficult to work with, can also be a good material. A flat board with curved edges (photo on the right) can easily be processed to straight edges by following the decision diagram.
Materials and tools
To begin to master this type of creativity and even make the simplest product, you need to prepare the necessary materials and tools. Both ordinary ones, which are used in any work, and professional ones, without which it will not be possible to create a clear and high-quality pattern, can be useful.
The following tools should be prepared for work:
- saw;
- drill;
- file;
- blunt knife;
- chisels - flat, semicircular, corner, bracket;
- cranberries (a special type of chisel that helps make indentations).
It is wrong to think that the simplest and cheapest specimens will do for the first experiment. A completely different rule applies here. The better the quality of all the devices, the more successful the first experience will be. So, perhaps, there will be a desire to continue creating beautiful things with your own hands and master other types of wood carving.
The choice of material is no less important. Not every type of wood is suitable for creativity
Here are the materials wood carvers recommend using:
- Linden;
- alder;
- birch;
- oak;
- pear.
Alder is also considered a good option, despite the fact that this type of wood is denser. But it is not always possible to find it. Birch is considered a harder wood, but it is also suitable for beginning carvers. You just need to take into account that after drying, birch is subject to deformation.
Oak allows you to do perfect work, but only with a sharp tool and some experience of the craftsman. But pear, due to its density and uniformity, allows you to do the most delicate work. Materials, like tools, must be selected carefully to make the work easy and enjoyable. First, blanks are cut out of wood, then they are dried, processed, and then designs for carving are applied.
A few words about the main thing
A router is a universal tool that is used for processing wood. Experts often use it during repairs. For example, drill holes, install locks on the door, etc. In carving, the tool is designed for processing the edges of products.
Not all craftsmen are able to work with a router. Very often in educational books you can find a quote: “Learn to work with a jigsaw and chisels. Try doing the work with your hands. Once you gain experience, it will be easier to handle the router.” When choosing, you should consult with specialists so as not to buy a low-quality tool.
To get started with the tool, you can sign up for courses. Unfortunately, they can be expensive or not everyone will want to attend them. Nowadays, it is quite easy to find tutorials. There are video tutorials that will help you learn the basics of working with a router. Examples of some of them are listed below.
A milling cutter is a difficult tool, so before watching the video you need to read the instructions on how to use the tool. Many sites and books offer the basics of assembly, settings, and tell you about the purpose of each cutter. In specialized stores you can find additional attachments for the router.
The router diagram for beginners is shown in the photo:
Types of wood carving
Modern woodworking techniques do not have a clear classification. One product can combine several types of wood carvings. Artistic processing of wood can be divided into the following types:
- Flat grooved carving
, where the background is a flat surface, and the pattern is created from recesses of various shapes. - Flat-relief carving
, where the pattern is created by sampling the background. - Relief carving
, where there are no flat surfaces, there is a deep drawing of the background and a detailed selection of elements. - Slotted carving
, characterized by the absence of a background. The pattern is openwork, lace. - Sculptural carving
, characterized by a three-dimensional image. This technique is used to make toys, figurines of people and animals, wooden columns in architecture, and so on.
Flat wood carving
In this type of wood processing, the background is the flat surface of the product, and the pattern is created by notches of various shapes. Decorative wood carving using the flat-notch technique, depending on the nature of the notches, can be contour and geometric:
- Contour
wood or plant carving is similar to metal engraving, but is performed with different tools, and the lines are wider and deeper. This technique is easy to perform and can be done on plywood. - Geometric carving
gets its name due to the ornamentation that is depicted using this technique. These are mainly geometric elements: rhombuses, triangles, circles.
Flat relief wood carving
This technique of decorative wood processing is one of the most common. Manual processing of wood in this case consists of background sampling around the pattern, and as a result the pattern is uniform in depth for the entire composition. This technique depicts animals, people, and plant ornaments. It is used in applied arts and architecture.
Relief wood carving
Expressive and painterly technique. It is distinguished by an abundance of light and shade and three-dimensionality of the image; the details of the elements are worked out to the point of being sculptural. Depending on the height of the elevation of the picture above the background, the following are distinguished:
- Bas-relief carving
, when the pattern rises to half the thickness of the entire composition. - High relief carving
, when the pattern protrudes more than half.
Geometric shapes, images of plants and animals, and symbols can be used as a subject for relief carving. The expressiveness of the product depends on the wood material. Beech, birch and oak are most suitable for this technique. Openwork wood carving (or in other words, slotted carving) in combination with contour, geometric and relief techniques gives extraordinary airiness and tenderness to the product.
Wood carving
In this type of woodworking, the background is completely removed from the canvas with a file or chisel. In another way, this type is called through wood carving. Mainly used in the furniture industry. Large-scale products are used to decorate building facades: in the decoration of balconies, platbands, cornices and are referred to as “house carvings”. For slotting techniques, pine, alder, birch, or aspen wood is used, usually 1-2 mm thick. Nowadays, this carving technique is used to decorate gazebos and country houses.
Sculptural wood carving
This technique for making products differs from all those listed by processing the workpiece from all or several sides. Various tools can be used, but the main ones are blunt knives and chisels. This type of wood carving is used in architecture (when creating columns, balusters, carved balcony posts), and in the manufacture of legs of expensive furniture. This technique is very beautiful and realistic - sculptural wood carving produces figures of animals and people.