Advantages of a homemade tool
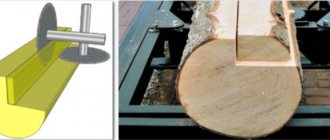
On the farm, very often there is a need to cut boards, chipboard, fiberboard, plywood and other similar materials. It is most convenient to perform such manipulations using a stationary machine, which is popularly called a circular machine. You can even cut firewood on such a machine, so you don’t have to think long about the rationality of its manufacture.
An angle grinder or grinder has gained wide popularity as it is a universal tool for cutting metal, stone, concrete, plastic and even wood. However, wood processing requires not only special skills, but also caution. After all, it is when processing wood that an effect such as a reverse blow occurs. That is why experts recommend using the tool only as a circular saw, which eliminates the possibility of a kickback and also increases the efficiency of using power tools.
Making a stationary machine from a grinder for sawing wood has a number of advantages:
- Savings on the purchase of a stationary machine, which consists of a frame and a powerful electric motor. The cost of such a machine is at least 10 thousand rubles, while a grinder can be used to make a circular saw without additional investment
- Ease of manufacture - to create a machine you only need a power tool and a base, which can be made from a wooden workbench or boards
- High efficiency - the angle grinder develops a rotation speed of over 9000 rpm, which has a positive effect on the speed and quality of sawing material
- The ability to use an angle grinder at any time by removing it from the machine
If you came to the site, then you are probably wondering about the purpose of making a homemade circular saw from an angle grinder. There is no doubt about the rationality of such an idea, but we will find out later how to make a stationary machine for sawing wood.
Should I buy or not?
Finding a ready-made machine on store shelves that at first glance satisfies your needs is a fairly simple task. But it is unlikely that there will be a design made entirely in accordance with your requirements, and they are different for everyone. In such cases, owners of machine tools try to improve or remodel them, but are faced with very serious obstacles - either the manufacturers made the machine from alloys that are very difficult to work with by welding, or they did not take into account the little things that you need specifically - for example, an accurate ruler or a more elastic spring. Remaking someone else's is much more difficult than making your own.
What you will need to convert an angle grinder into a circular saw
The principle of manufacturing a stationary machine for sawing wood from an angle grinder is that the power tool must be rigidly fixed, securing it to the base of a table or workbench. Implementing this will not be difficult, but for this you will need the following tools and consumables (depending on the scheme):
- Angle grinder or grinder. Moreover, for this it is recommended to take a powerful power tool, since the capabilities of a stationary machine will depend on this parameter. If you use a small grinder, then you can only saw thin materials with it, so this should be taken into account at the stage of manufacturing the device
- Drill - needed to make holes that will be used to fix the brackets holding the power tool
- Welding machine for joining metal plates
- Chipboards
- Clamps and fastening connections
You need to install a special disk for cutting wood on the grinder. It will not work to use a disk from a circular saw on an angle grinder, since it will not fit the outer and inner diameters. The disk installed on the grinder for cutting wood must correspond to the diameter of the mounting hole. In addition, the outer diameter must have protrusions - teeth, the number of which directly depends on the tool itself.
There will be no difficulties in choosing a suitable disc for an angle grinder, since they are sold for the corresponding models of angle grinders. In addition to an angle grinder with a circle for cutting wood, you will also need to prepare a table on which the power tool will be fixed. Even a frame or workbench is suitable as such a table, the main requirement for which is stability.
This is interesting!
An angle grinder creates vibrations during operation, so to increase safety, the base or bed must be highly stable.
If you have a ready-made table, then you only need to attach a power tool to it. If there is no table, then you can make one from available materials. You can use boards or fiberboard as a tabletop. The tabletop also acts as a stop.
To ensure the immobility of the power tool, it is necessary to make an appropriate fastening using bars, boards or metal plates. The bracket for an angle grinder can be movable or fixed, which affects the quality of use of the tool. The movable mount allows you to adjust the size of the cutting wheel. If the bracket is stationary, then it will not be possible to adjust the cutting depth. As clamps, you can use clamps, metal plates and other materials that securely and effectively secure the angle grinder to the base.
After the grinder is installed on the base, the only remaining action is to check the operation of the homemade tool in action. To do this, a short-term test run is performed, which identifies all the defects and shortcomings of the design. If there are none, then you can perform a test cut of wood.
Step-by-step instruction
To assemble the system, there is no need to create even a diagram, since the procedure is quite easy.
How to make a circular saw from an angle grinder - instructions:
- Make a small tabletop from available materials. The supports must be long enough so that a grinder can be placed under the frame. They are attached to the stiffeners - small boards that are mounted at the corners of the table at intervals of approximately 125 mm from the bottom angle.
- It is recommended to make the external working platform from laminated chipboard. When the table is completely ready, it needs to be turned downwards with the front part in order to make marks for mounting the cutting disk (in the future, the gap is determined by this unit of the grinder - it should be greater in length and width of the cutter itself). Using a drill, 2 forming marks are made.
- Using a ruler, connect the joints of the gaps, drawing 2 parallel strips across the entire width. Then the markings are removed using a grinder. The slot for the disc is made.
- You need a fresh disc that locks into the angle grinder. The best solution for interaction with wood is 125 mm. The disc must have carbide teeth. The interval is selected by the specialist personally.
- At the bottom of the functional platform it is necessary to attach a plate for mounting the grinder. You can't do without a clamp here. The unit is installed using clamps and tightened with nuts.
- You can insert a fresh disc into the gap. It should be placed so that the central area is slightly higher relative to the coating.
- It is recommended to make fastenings for the protective canopy. It is available in every specialized retail outlet.
- The thrust bar is made from any steel angle. It needs to be attached to plywood or chipboard. The dimensions of the plate must correspond to the parameters of the tabletop. Installation is carried out at intervals of approximately two centimeters from the disc teeth. At the ends of the rail you need to make several gaps for installing screws or screws - for good fastening to the tabletop.
- Place a clamp for an electrical outlet on the inside of the structure. As a rule, fastening is carried out from the outside (on the stiffeners), but it can be arranged in a way that will be comfortable for the specialist.
After assembly, you need to organize a test run and try to cut a small beam.
How to quickly and easily make a circular saw from an angle grinder
It should be noted right away that there are many options for making a homemade circular saw from an angle grinder, and it all depends on the imagination of the master, as well as the availability of consumables. Initially, we will consider the simplest option for making a circular, using a sheet of chipboard and other consumables. The principle of making such a circular is as follows:
- Take a sheet of chipboard measuring 1x2 m, to which the legs are attached. The result is a table to which you need to attach the grinder. The tool must be fastened exclusively from below
- A bracket is made to secure the power tool. For this purpose, metal plates with a thickness of more than 1 mm are used.
- The plates are attached to the tabletop using threaded connections
- To be able to adjust the cutting depth, the bracket should be made of a movable type. To do this, the movable and fixed parts of the bracket should be connected using a bolt with nuts
- To fix the tool in the appropriate position, you will need to make an additional bracket. It is based on a long bolt or pin. The nuts on the stud will ensure the fixation of the angle grinder in the appropriate position, and the sleeve welded to the movable bracket is responsible for the connection
- It is necessary to make a slot in the tabletop through which the saw wheel will protrude. For this, a drill with a drill is used. You need to make holes along the edges of the future slot, and then straight-line sawing along them with thin blades
- Additionally, a stop for the table top is also made, due to which the sawed workpieces are aligned
As a result, we get a stationary machine for sawing wood, made with our own hands at home. Now, knowing how to make a circular grinder from an angle grinder, you can get down to business. Video instructions for making a homemade machine are presented below.
It's important to know this in advance!
Operating rules
The use of such a design as homemade saws with discs when processing wood imposes certain obligations on tool owners. In addition to the excellent table fixed to the floor surface and the protective casing on the surface of the disk, it is also necessary to organize the supply of sawmill material on both sides - from left to right and vice versa. It is impossible to move slats and boards by hand along the frame when using a hand-held circular saw, and for this it is better to use a block or its analogue made of wood.
It is better not to be close to the rotating disk at a distance of less than 0.250.3 meters. Do not keep your hands close to the saw to avoid damaging your fingers. The circular hand saw from the grinder should be turned off and on using the button located on the side or front of the device. When the disk is rotating, you should under no circumstances stand in front of it or behind it.
Precautionary measures
To avoid getting fine dust from wood during sawing, as well as splinters, into your eyes, you should make sure in advance that all work is carried out wearing safety glasses. You should think through everything so that sawing is carried out in a well-lit room or the circular saw is placed in an open area exposed to sunlight. When working with material to be cut, make sure that there are no large knots or nails in it. The fact is that this can cause a disk failure or even change the direction of movement of the bar/rack. At best, the electric motor may be damaged and the disc may be dull.
In the worst case scenario, material that escapes from the hands can cause injury directly to the operator or people nearby.
Do not turn on a tool such as a hand-held circular saw with wet hands. It is strictly forbidden for anyone to carry out work while intoxicated, and scraps of sawn material can be removed from the working surface of the bed only when the cutting disc has completely stopped. It turns out that anyone who has worked with construction tools and has the skill of creating structures from metal or wood can make a circular saw at home.
Such a saw will be an excellent assistant in the future and will help to significantly reduce labor costs for processing the lumber that you use in the household.
Manual circular grinder
When making a homemade machine, you need to take into account that they can be stationary and portable. The angle grinder is not large in size, so there are no difficulties with its transportation. However, if it is necessary to transport a homemade circular saw, then this can only be done if it is portable. If a metal or wooden workbench is used as a basis, then transporting the tool will be quite difficult. This factor must be taken into account at the design stage of the circular saw. Before you start work, you need to prepare drawings that will help you understand what exactly needs to be constructed.
So that the tool can be transported, it is recommended to make a mini-circular from a grinder. The principle of its manufacture is simple, and consists of the following steps:
- A sheet of metal 1-2 mm thick is prepared, which will be used as a base. Sheet size 80x80 cm
- A bracket of metal plates is welded on the back side of the sheet, which will serve as the basis for installing the power tool.
- You need to make a slot in the steel sheet for the protrusion of the cutting disc
- Attach the grinder and test it in action
The principle of manufacturing a machine for sawing wood is simple, and everyone can cope with the task of arranging a circular saw from an angle grinder. There are a large number of options for making homemade products, and which one to choose depends on the preferences of the master, as well as the work that is planned to be performed.
Table saw
Sometimes there is a need to change the width of the board or the thickness of the block. The best option for such work is a circular saw, especially if there are a lot of boards. For cutting boards of short length (1-2 m), a tabletop version of a circular saw is very useful. It is not necessary to buy such a machine; you can make it yourself from the same grinder.
The design of a circular saw is much more complex than a miter saw. The contact time of the saw blade with the wood is quite long, therefore the reliability of attaching the grinder body to the frame should be higher.
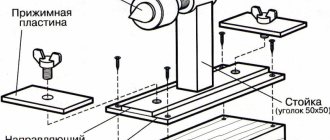
This is what one of the options for a tabletop circular might look like.
The photo shows that the desktop consists of two planes:
- the upper table is designed to advance the workpiece;
- The lower one serves as a stop for the sander.
The disc passes through a groove in the top surface. If the angle of contact of the two planes is provided with rotary hinges, then it will be possible to adjust the working height of the saw blade to reduce the area of rubbing surfaces.
The head of the bolt with which the angle grinder is secured is clearly visible on the top surface of the table. The protruding bolt limits the width of the board being processed. You can cope with this problem by laying another layer of plywood.
Turning the angle grinder on and off using the key on the body is quite inconvenient. If the key can be fixed in the working position, then it is worth installing a socket with a switch on the outside of the machine.
The stop angle must have the maximum possible length to prevent the board from deviating from the cutting direction. It is better to fasten the corner in such a way that you can change the working distance between it and the disk: then the width of the cut part will also change.
Which grinder should I use to make a circular saw?
There are no special comments here, since you can use both low-power and powerful angle grinders, which differ in size, weight and diameter of saw wheels. The greater the power and size of the blade, the higher the efficiency and productivity of the sawing machine. If you use a small and low-power angle grinder, then in the end you can use the machine exclusively for cutting chipboard, thin boards and plywood.
If a household tool is used as a drive mechanism on a sawing machine, then the features of its temporary operation must be taken into account. If a household grinder overheats, the motor will quickly fail. When planning to frequently use a sawmill for wood, it is necessary to purchase an appropriately powerful power tool.
Compliance with additional safety measures
A powerful engine and working parts that rotate at high speed are very dangerous not only for the person working at the machine, but also for others. Sloppy work and thoughtless actions can lead to the workpiece being easily torn out. Such a flying product becomes an unguided weapon. At the same time, such a failure can lead to the destruction of the saw blade. The scattering of small fragments entails dangerous injuries. To minimize risks, when creating a machine, mandatory rules should be taken into account.
- Do not place the on/off button on the work table of the bed. It should be placed on one of the side surfaces.
- Provide a protective cover.
- It is prohibited to operate such equipment without securely fixing it on a stable surface.
How to make a power button for a circular saw
After making a stationary machine, you will need to perform one more modification - this is a push-button station. It is necessary to make a button to turn the saw on and off, as this will allow you to quickly interrupt the operation of the tool at the right time. In addition, it is almost impossible to operate a stationary circular saw by pressing a button on the body of a power tool, so you need to take care of installing a push-button station at the design or completion stage.
To make a power button, you will need to remove the wires from the body of the instrument and connect them to the switch located in the structure of the manufactured base. If you do not plan to use the grinder on the machine, then you can use a simpler method - fix the button in the pressed position using a clamp, and turn on the tool by connecting the plug to the socket.
Electrical part
Since the grinder will be fixed from below, we will no longer be able to turn it on in the usual way. It is necessary to provide for the installation of the following elements:
- a clamp that will constantly hold the control key in the “on” position;
- socket for connecting an angle grinder;
- control station that turns the electricity on and off at that outlet.
It is very good to use an industrial control station in such a design. This unit has two keys. The “Start” button is quite tight, which prevents accidental activation. The large and soft “Stop” key allows you, if necessary, to quickly turn off the device by reaching it with any part of the body.
How to work correctly and tips for use
Using an angle grinder as a circular saw does not at all make this tool safer, which is why work must be carried out strictly in protective clothing and safety precautions must be observed. When working on a homemade circular saw, you need to consider the following recommendations:
- Work should begin only after the tool reaches the operating spindle speed
- The duration of continuous operation should not be more than 15-20 minutes to prevent the motor from overheating
- The grinder should only be used with a protective cover, even though its main part is located under the tabletop
- If the spindle speed of a power tool is higher than 10,000 rpm, then this speed will cause wood smoke in the cutting line, and as a result, damage to the appearance and even fire. To eliminate the occurrence of such a drawback, the spindle rotation speed must be reduced using a special voltage reduction device. Reducing the voltage, the number of revolutions drops
- If during the sawing process there is a decrease in speed or a complete stop of the cutting wheel, then you must quickly remove the workpiece, freeing the disc from contact. If you neglect this recommendation, the motor on the angle grinder may burn out.
Making a circular grinder with your own hands is not difficult, and to achieve the result you will need a minimum of investment and a maximum of imagination. The finished tool can be used for sawing boards, beams, logs, fiberboard, chipboard and plywood. With such a household assistant, you can quickly eliminate the need to use a hand hacksaw.
Scope of application of a homemade saw
The main task of this equipment is to make a perfect long cut in wood. In order to guarantee the quality of a cut with a circular saw, several conditions are necessary: high speed of the cutting edge, its sharpness, the rigidity of the disk-working surface system, safety, strength and convenience.
The small dimensions of the circular saw do not make it possible to use it during the construction of a house, when wood is required in large quantities, because the functionality of homemade equipment is not so wide.
But during repair work, such a machine will become a savior, an indispensable assistant. A circular saw will allow you to quickly and efficiently obtain all kinds of wooden blanks (blocks, planks, slats), and cut sheet material into slabs of the required sizes.
Self-refinement to a cutting machine
The simplest homemade machine is a machine made from a small angle grinder. The work will be accompanied by a minimum of costs, and manipulations will take a few hours. The exit structure will be a long metal pipe that serves as a handle and frame.
A metal transverse strip with two holes for fastening the tool is welded to one of the ends. On the same side, the pipe is fixed to a piece of angle on a movable shaft. The first one can be fixed to the desktop or to the floor in the workroom. If you are faced with the question of what can be made from an angle grinder, you can use a cutting machine using the described algorithm. According to it, on the opposite side of the fastening it is necessary to fix a spring, which will ensure the return of the structure to its original position. After completing this stage, you can use your homemade product. You just need to install the device correctly.
This version of the machine is the simplest solution for metal processing, while complex work will require precision, so the design for solving such problems must be made more stable, which means the work will have to be approached more thoroughly.
Assembly of a pendulum machine
The design of the pendulum machine consists of three main components:
- The bed is the simplest element of the machine for an angle grinder. The unit is made of a steel plate with a thickness of at least 10 mm with supports at the bottom. You can weld a frame from a profile pipe and sew 3 mm thick sheet metal on top. A bracket with a pendulum mechanism hinge is fixed to the frame.
- The pendulum is the main working mechanism of the machine. The structure in the shape of the letter “T” is welded from a profile pipe. A clamp for an angle grinder is fixed to one end, and the other side of the pendulum is attached to the hinge mechanism.
- The clamp for the grinder is made of metal brackets. The structure is firmly fixed to the pendulum through the console.
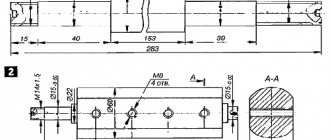
To make a machine, you will need a drawing or at least a simple diagram. One of the options is shown in the photo. The dimensions of the machine will have to be calculated according to the dimensions of the available grinder.
To correctly calculate the size of the machine components, first measure the dimensions of the angle grinder, and then the distance between the holes on the gear housing
When designing a pendulum, it is important to reduce the distance between the cutting disc of the grinder and the hinge mechanism to a minimum. This will stiffen the machine, allowing for smoother cuts. After developing the drawing, we begin manufacturing all machine components:
After developing the drawing, we begin manufacturing all machine components:
- According to the dimensions of the diagram, metal blanks for all components are cut. First, the frame is made. It is necessary to take into account that during the cutting, the grinder disk will be buried in the slot of the slab. If you weld a rectangular frame from a profile for the bed, and sew a steel sheet on top, then a niche will form below. There will be enough space for the cutting disc to enter. When making a frame in the form of a plate of steel 10 mm thick, you need to weld supports from below.
- Next, we begin to manufacture the pendulum. An axle for the swivel bearings is welded to the end of the profile pipe workpiece. On the other side of the pendulum you need to make a clamp for the grinder. To do this, a bracket is bent from a steel strip in the shape of the letter “P”. The grinder gearbox should fit into it. Holes for bolted connections are drilled in the side shelves of the bracket.
- The second part of the clamp is bent from a steel rod. You should get a clamp in the shape of the letter “P”, into which the body of the angle grinder fits. A thread is cut at both ends of the clamp. The clamping strip is cut from a steel strip 5 mm thick. Holes are drilled along the edges of the strip at such a distance that the threaded ends of the clamp fit into them.
- Both U-shaped fastenings, that is, the clamp and the bracket, are fixed to the console. The part is a rectangular steel plate, which, together with the clamps for the angle grinder, is subsequently secured to the second end of the pendulum.
- The next step is assembling the hinge. Two bearings are mounted on a shaft welded to the pendulum. Nests for them can be made from a piece of pipe of the appropriate diameter. The cut rings are placed on the bearing races. Now this unit must be secured to the frame.
- The sockets will only have to be welded to the plate without removing the bearings. The knot is placed at a distance of 5–6 cm from the edge of the bed. During welding, the bearings are covered with a wet cloth or watered to avoid overheating.
The pendulum lever with the hinge is ready. Now it’s time to secure the console with clamps to its second end. The grinder itself can be fixed on the pendulum so that the rotation of the disk is carried out “from itself” or “toward itself”. Here each master chooses at his own discretion.
- To prevent the pendulum and angle grinder from lowering arbitrarily, a return spring is provided. It should act in tension and be very elastic. The spring is secured with loops welded to the frame and pendulum.
- The machine is almost ready. All that remains is to make a slot in the plate for the disk to enter. You don't even need to measure anything here. The grinder clamped in the pendulum is turned on and the slab is cut with a cutting disc. Initially the slot will be thin. To expand it, a thick disk is placed on the grinder, and then the procedure is repeated.
While making a slot on the bed, a test of the machine occurred. The only thing missing is the last component – the clamp for the workpieces. There are many options here. You can simply attach small pieces of wood to the stove. As an option, a stop is welded from a piece of profile pipe onto the frame, and a nut and screw are fixed opposite it. It turns out to be a good screw clamp. If you fasten a metal ruler on top of the stop bar, it will be convenient to cut the workpiece to the required size.
Manufacturing.
First of all, I found the components for the hinge on which the angle grinder will turn.
For a high-quality cut, the hinge must be powerful enough and without the slightest play. I found an old shaft and flange from a Volga pump and several bearings, including dead ones. I assembled such a sandwich in order to push the bearings apart as much as possible.
I found a piece of pipe for the outer ring of the hinge.
It was a little large in diameter, so I made a longitudinal cut to clamp the bearings like a clamp.
I welded a couple of corners and drilled holes in the right places
The second component of the rack is a pendulum with a mount for an angle grinder. The angle grinder mount was bent out of a 2.5 mm strip.
The rest is made from a 20 x 20 mm profile pipe.
I welded the mount, trying to keep the angle grinder parallel to the plane of rotation of the lever as much as possible. To do this, when I was cooking, I inserted rods into the mounting holes and used them to control the parallelism.
The third component is the foundation. It is welded from angle 3 2x 32 mm.
Two 20 x 20 profile pipes in the middle are guides for an adjustable stop that should fix the workpiece.
The table was made from a 30 x 30 cm plate, 3 mm thick, sawn into 2 parts. Attached to the base with M5 screws.
In continuation of the table, a 3 mm plate is welded to the base. It is for attaching the return spring, and to align the table level further along the guides.
After all the fittings and adjustments, I assembled the stand together.
This is how the grinder is attached.
It is screwed on one side with a standard handle, and on the other with an M8 bolt.
Adjustment of the angle grinder vertically is done at the top and bottom using two stops (furniture legs).
The bearings are clamped into the cage with an M6 bolt.
The cage is screwed to the base with two M6 bolts.
The right hole is oval so that the position of the clip can be adjusted.
The return spring is from Volgov brake pads.
To prevent it from jumping off the mount, I made a galvanized clamp.
About adjustment:
In order to accurately mark the plane of rotation of the disk, I clamped two calipers into the grinder instead of the disk. Using them you can accurately and clearly adjust the position of the angle grinder.
First, I aligned the plane of the disk parallel to the longitudinal groove in the frame. To do this, one of the hinge mounting holes is made oval (marked with an arrow).
Then I set the plane of the disk perpendicular to the table.
This adjustment is made using two stops that secure the grinder.
When everything was smooth, I made a cut in the table with a grinder attached to a lever.
Now you need to make a stop to fix the workpiece at the desired angle. The blank for the stop was a piece of angle 32 x 32 mm, the same one from which the frame was made. I welded a 2 mm plate to it.
In order to cut a semicircular groove for the clamping bolt, I made a jig from the trim and drilled 3 mm holes in a circle.
Then go over them with a 6mm drill.
The jumpers between the holes were cut off with a hacksaw.
And he smoothed it out with a file.
Then I sawed off the excess in a circle.
From an already unnecessary jig and 2 M6 bolts I made a clamping strip for the stop. It is inserted from below into a groove on the frame.
The result is this emphasis.
It can move along the entire length of the guide groove and be fixed at the desired angle.
I haven’t figured out the design of the clamp yet, while I’m using a clamp.
The cut is smooth, neat, at the right angle - exactly what I was looking for.
Author of the homemade product: Gleb from Minsk. Belarus.
To make a cutting machine, you will need the following materials:
- profile pipe 40 x 20 mm – 0.32 m;
- profile pipe 20 x 20 mm – 1.38 m;
- profile pipe 15 x 15 mm – 0.34 m;
- strip 40 mm – 0.14 m;
- strip 20 mm – 0.16 m;
- bearings 100 series – 16 pcs.;
- M10 bolts for hexagon 75 mm – 8 pcs;
- nuts M10 – 12 pcs;
- washers 10 mm – 32 pcs;
- long nuts M12 – 3 pcs.;
- long nut M10;
- M12 bolt with full thread 200 mm;
- bolts M10 40 mm – 2 pcs.;
- 70mm full thread hex bolt;
- plugs for profile 20 x 20 mm – 6 pcs;
- plugs for profile 40 x 20 mm – 1 piece;
- profile pipe 50 x 50 mm, for a guide – 2 m or more.
The following photo shows the process of making a homemade product.
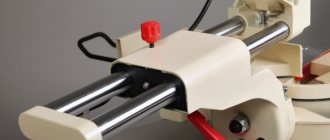
First of all, let's make a roller carriage for the linear guide. A profile pipe with a cross section of 20 x 20 mm will be used as its basis. You will need 4 blanks 300 mm long.
Then, in the workpieces, you need to drill through holes for the future connection of parts. Their centers are located 25 mm from each edge of the profile pipes. You will need a drill with a diameter of 11 mm.
We turn the coated profile over to the other side, and having retreated 50 mm, we drill similar through holes on each side. To hide the bolts used later when assembling the carriage, the through holes in the workpieces need to be completed. To do this, one wall of each profile needs to be drilled using a drill with a diameter of 17 mm. In this way, all 16 holes are completed, the remaining 16 adjacent to them remain untouched.
Let's make a shoulder for attaching the grinder, cut a profile 40 x 20 mm, 300 mm long.
You will also need to make a knot to adjust the cutting depth when cutting. It is made from a profile pipe 20 x 20 mm, 160 mm long. Its ends are cut at an angle of 45 degrees. From a profile pipe with a cross-section of 15 x 15 mm, you need to cut small spacers 40 mm long. A total of 8 pieces are required.
We assemble the structure. An M12 bolt with a solid thread 200 mm long will be used as a connecting loop. 3 long M12 nuts are screwed onto it. Having secured the bolts with nuts with clamps to the table, you need to attach blanks from a pair of profiles 20x20 mm, and one 40 x 20 mm. The pipes must be welded to the nuts.
Then, from a strip 40 mm wide, you need to cut 2 pieces 50 mm long. In the center, closer to the edges, we drill a hole with an 11 mm drill.
These plates will serve to fasten the grinder into the standard holes used to attach the handle. In some tools, these holes can be made for M8 bolts, which will need to be taken into account. For reliability, the M10 40 mm clamping bolts must be equipped with nuts. The bolts are screwed into the gearbox through the plates and tightened with nuts.
Now, stepping back a little from the fastening of the plates, the previously made workpiece from a 20x20 profile with a length of 160 mm is boiled down. A plug is welded onto its free end from the same strip as the mount for the grinder. A hole is drilled on the protruding ear of the plate, and an M10 nut is welded onto it. To strengthen the structure, an additional steel strip 160 mm long, also sawn at 45 degrees, must be welded onto the side of the profile.
After painting the parts, we assemble the carriage. To do this, you will need M10 hex screws 75 mm long. It is necessary to tighten the 20 x 20 mm profile pipe blanks together. At the same time, a pie is formed between them: washer, bearing, washer, spacer, washer, bearing, washer. By repeating this 7 more times, the result is a finished carriage.
Assembling the mount for the grinder.
On the table, install the guide and roller carriage. Its height is adjusted by lining it with wooden blocks. The tool is attached to the edge of the table. The workpieces for cutting are pressed with a pair of metalwork clamps. For convenience, you can carry out cutting in several passes, each time adding the depth of the cut.
Homemade cutting machine from a grinder, ready for work.
The machine makes smooth and precise cuts.
The result is a convenient cutting machine for metal.
We also recommend watching a video that shows the process of making a cutting machine from an angle grinder and testing it.
Option No. 2
These stationary models are more complex, but provide more accurate cutting of the material.
What you need to do:
- Desktop. Its frame is easy to weld from a channel or corner. Sheet metal is suitable as a tabletop, although chipboard, MDF or FSF are often used. It all depends on the purpose for which the installation is being assembled and what workpieces the master intends to work with.
- Frame design. One part is motionless and serves as a support. It is installed on the countertop and secured with bolts or welding. The second one is connected to the first one using a swivel joint. The “grinder” is installed on it, the position of which can be easily changed manually. Springs are provided to return the tool to its original position.
- Ruler. It will help you set the required sizes of cut samples. As an option - a strip of iron or a tube with marks and a movable marker.
In principle, there is nothing particularly complicated here. If the idea itself is clear, then making your own drawing, having decided on the linear parameters of the component parts of the machine, is not difficult.
What to consider:
- There are various models of machines. In some, the “grinder” is located under the tabletop, in others – above it. From a safety point of view, the second option is more reliable.
- It is necessary to make a cutout in the tabletop along the line where the angle grinder disk adjoins it.
- If you have basic knowledge of electrical equipment, then it is better to turn on the machine through a magnetic starter, and combine the button with a pedal. In this case, even if your hands are busy, the angle grinder can be stopped at any time with your foot.
On a note! We should not forget about basic safety requirements. After completing the assembly, the machine should be “driven” at idle speed and make sure that there is no beating of the abrasive disk - it should not touch the protective casing.