The ignition coil in a car plays the role of an element that provides high voltage for the spark to form by a spark plug. It works on the principle of a step-up transformer. The operating principle determines the answer to the question of how to check the ignition coil for preventive purposes to avoid failure of automotive equipment or in the event of malfunctions.
How does an ignition coil work?
It is a connection of two windings.
One consists of a small number of turns of thickened wire, the primary winding receiving low-voltage electrical impulses (12V). The secondary one is densely entwined with small-section wire, generating a high-voltage current (up to 35000V). Through high-voltage wiring, this current is supplied to the distributor, then to the spark plug electrodes. There an arc-shaped discharge is formed and a spark appears. In the first winding, the electric current is constant. In the dead position of the piston, the breaker opens the circuit in winding No. 1. A current (of high voltage) is induced in adjacent (secondary) turns and is transmitted to the spark plug electrodes.
All the time that the breaker is closed (the engine is at low speed), electricity flows through the primary coil, heating it up in vain. Therefore, a resistor is included in the coil circuit, which reduces the current (by increasing the resistance). When the breaker is in the open position (at higher speeds), the heating is very small. When the engine is first started, to increase the spark energy of the spark plugs, the resistor is blocked by a breaker (reducing the resistance, thereby increasing the current).
By the way, when you need to start the engine when the battery is dead, you just need to block the resistor with a jumper wire.
Oscilloscope testing
The most extensive information is obtained after testing the ignition system with an oscilloscope, the results of which are displayed on the monitor of a personal device (PC or tablet).
It records, in the form of an oscillogram, changes in parameter values not only of the coil, but also of the entire group of engine systems. Distortion of the graph occurs under the influence of certain characteristics by which one can judge the serviceability of a particular section:
- Advanced ignition (angle);
- Number of revolutions per minute (crankshaft rotation);
- Throttle position (travel angle);
- Pressure;
- Proportions of the fuel mixture (lean or rich);
- Others.
Using a motor tester based on a digital oscilloscope, the following problems are identified:
- Opening the high-voltage circuit connecting the sensor to the spark plugs. The spark gap may decrease, which will negatively affect the transistor and insulation;
- An increase in resistance in this area, accompanied by a drop in voltage. This happens when wires that are too long oxidize and age. The graph clearly shows how the voltage at the beginning of the spark is greater than at the end of the spark;
- A break in the wire between the sensor and the coil. An additional spark gap (between the ends of a broken wire) leads to an increase in voltage and damages the winding;
- Interturn breakdown. It also absorbs some of the energy, especially when the load on the engine increases. Therefore, the engine loses power during acceleration and increasing speed;
- Spark plug electrode gap. A change in its value leads to a voltage drop and misfire;
- Reduced compression in cylinders. They focus on reducing the sparking voltage due to a decrease in the discharge pressure of the pistons in the cylinder chambers.
All of the above changes are accompanied by an insulation breakdown and a voltage drop in the ignition system circuit. These explain the misfires, over-gassing and failures of ignition.
What types of ignition coils are there?
Based on their purpose:
- Having no contact.
- Contact.
If your car does not have a distributor, the spark plug coil is 100% contactless. For customized coils, only this type is provided. But if the distributor has special equipment - in the form of breaker contacts - you use a contact-type ignition system.
If the criterion is the number of spark plugs available, they are divided into:
- Are common.
- Individual.
There are also differences in winding insulation options . They are:
- Filled with oil. The housing contains metal; transformer oil is used to insulate the windings. If the housing loses its seal, this device will simply stop functioning. The leakage of such oil leads to interturn electrical breakdown of the windings (since they are absolutely not protected).
- Dry (filled with compound).
Resource
Each mechanism has its own service life. Solenoid valves are designed for a certain number of opening and closing cycles. This parameter is about 300-400 thousand. It must be said that the resource does not always depend on the mileage of the car. In some operating modes, the solenoids turn on more often, and in others less often. But on average, the valve life does not exceed 400 thousand kilometers. Also, this parameter depends on the quality of the oil used (the presence of dirt significantly affects the service life). Breakdowns can also occur due to mechanical damage. These are cracks in the housing, a break in the electrical winding, or insufficient elasticity of the spring. All this entails unstable operation of the automatic transmission.
Symptoms of a problem
Ignition coil malfunctions can be identified by the following symptoms:
- Unstable engine operation (sometimes at specific speeds).
- Heating the element itself.
- Burning smell coming from the coil.
- Problems starting the engine in rainy weather.
- A drop in power when you press the gas pedal sharply.
- Illuminating the Check Engine light on your car's dashboard.
Malfunctions of this element of the ignition system most often result from overheating. Lack of recommended current or short circuit may cause the coil to burn out.
Malfunctions in the operation of the device can also be caused by breakdowns in the wiring insulation. In this case, regular oil or raindrops getting on the wire can cause problems. To avoid such troubles, it is recommended to apply a special dielectric grease. If you find a gap in the insulation, replace the wire and the problem will be fixed.
Similar symptoms can be caused by a faulty spark plug, so before repairing the coil, check the condition of the spark plugs, at least visually.
Poor quality spare parts can cause malfunctions of this element. To avoid breakdowns for these reasons, buy proven parts, if possible original ones.
What it is?
First, let's look at what solenoids are. These are electromagnetic control valves that perform the function of opening and closing the oil channel. The operation of the solenoids is controlled by an electronic control unit. Thanks to this valve, the pressure of ATP fluid on specific clutch ligaments is controlled. The solenoid allows you to quickly change gears or remove the automatic transmission torque converter lock.
Where is this valve located? It is located in the hydraulic plate. The element is inserted into the channel, where it is fastened with a special pressure plate or with a bolt. The other end is connected to the ECU using a plug or cable cable. The number of solenoids may vary. On modern boxes their number can be from four to seven on average.
Causes of ignition coil failure
Let's look at the reasons why the ignition coil fails.
Natural wear and tear
Like all electrical and electronic units, the reel has a certain trouble-free operation life. The average service life of ignition coils is approximately seven to ten years of operation or 150,000 - 200,000 thousand mileage. The device is operated in extreme conditions with large differences in temperature, humidity, and the possibility of ingress of moisture, dirt, and foreign liquids. In this case, large currents flow through the primary winding, and a high-voltage pulse is formed in the secondary winding.
Electrical breakdown
Let's figure out why the ignition coil breaks. Firstly, over time, as a result of high temperature changes, the dielectric insulation cracks, and salty moisture, which is a conductor, can enter microcracks. For voltages of more than 15,000 volts generated in the secondary winding, even pure undistilled water acts as a conductor. Secondly, during operation, the physical properties of the dielectric and rubber insulation of the tips of high-voltage wires, especially those of dubious production, change. High-voltage breakdown can be caused by the installation of non-standard high-voltage wires in which there is no distributed current-limiting resistance. A breakdown can occur as a result of severe contamination or waterlogging. Even in the event of a single breakdown, irreversible changes occur in the structure; further operation is not recommended.
Overheat
Some vehicles have ignition coils installed directly at or near the top of the engine. If there is no air access to their structure for natural ventilation (this is possible when installing additional equipment), the device may overheat and fail.
Spark testing
Checking functionality using a spark is very simple. This can be done even on the go, but it does not guarantee that the problem is in this device.
How a spark is formed
Initially, the current flows through the closed contacts of the breaker or through the open switch of the switch along the turns of the primary winding. This creates a magnetic field. Its lines of force pass through the core and close in the space around the turns. When the contacts are opened or the key is locked, the flow of current through the primary winding stops. At the same time, the magnetic field also disappears. At the same time, its power lines cross the turns of the primary winding, as a result of which an electrical impulse with a voltage of about 300 V appears in them. Thanks to induction, it induces another electrical impulse in the secondary winding. Its voltage can be calculated if the voltage of the first is multiplied by the transformation ratio.
Source: AutoLirika.ru
Tools and materials
To carry out a spark test, you do not need special equipment; it is enough to prepare the following tools and materials:
- spark plug key;
- pliers;
- a working spark plug.
You can't do without this tool. In addition, it is advisable to have an assistant on hand.
Procedure
During the test you need to get a spark. To do this you need to follow these steps:
- Before the test, you need to turn the ignition key to position “0” to avoid electric shock. Then you need to check all connections, including those on the coil and spark plugs, that is, ring the entire electrical circuit.
- Next, you need to remove the tip from the spark plug on the 1st cylinder and connect it to a working spark plug.
- Then you need to use pliers to take the tip and massage the candle.
Massaging the spark plug In this case, the spark plug skirt should be pressed against a metal surface that does not have any coating in the form of paint or other material. The motor can be used for massaging. - An assistant must turn the ignition key to the start position to turn the crankshaft a few revolutions using the starter.
- At this moment the coil will receive voltage and start working. At the same time, it will produce high-voltage pulses, manifested in the form of a spark jumping between the contacts of the spark plug. A bright purple spark indicates the device is working properly. A weak orange spark indicates a possible problem with either the coil or the wiring. If there is no spark, then the module may be faulty or there may be an open circuit in the wiring.
If there is no spark plug that is known to be in good condition, you can unscrew the spark plug from the engine. This can be done using a spark plug wrench and follow the steps described above. But in this case, the spark plug used may be faulty, so you will need to carry out a test with several spark plugs, also changing the tip. This will increase the likelihood that the problem is in the coil.
If individual modules are installed on the engine, to check it is enough to swap them. For example, a module from the second cylinder is placed on the first, and from the first - on the second. Only the modules need to be swapped, leaving the wiring in the cylinder.
Checking the secondary winding of a coil with a diode
If a high voltage diode is built into the ignition coil to suppress the spark, it is impossible to measure the resistance of the secondary winding.
In this case, it is useful to do the following. Switch the multimeter to measure direct voltage (DC). Connect it in series between the secondary winding of the ignition coil and the battery. If the battery is connected in the diode direction, the multimeter should show voltage.
After changing the polarity of the connections in the diode blocking direction, the voltage should not be displayed. If there is no voltage in any direction, we can assume that there is a break in the secondary winding. If there is voltage in both directions, then the high-voltage diode is faulty.
Three diagnostic methods
Next, consider three proven methods for checking the ignition coil.
Visual testing method
The strength of the visual testing method (known as the “spark test”) is its ease of implementation. It does not require any equipment and can be performed even on the road. The main disadvantages are reasonably considered to be low accuracy, high labor intensity, and the risk of electric shock.
This method will require a working spark plug and pliers, and you may need a socket wrench.
It is advisable to start work no earlier than a quarter of an hour after turning off the engine, so that it has time to cool down.
First, the wire of the first spark plug is removed and the control spark plug is connected to it. Holding the spark plug by the insulator with pliers, we touch the threaded part of the skirt to the uninsulated metal section of the engine housing. When the engine is running and the coil is working properly, an intense purple spark jumps between the electrode and the housing. To minimize risks, you can not start the engine, but turn on the starter for a couple of seconds.
The conclusion that the coil is faulty is made if the spark is weak or has a pronounced yellowish tint. The absence of a spark indicates a coil failure or a complete lack of contact.
If the engine has several coils, the control procedure is performed for each of them.
If there is no spare working spark plug, a spark plug that is unscrewed from one of the engine cylinders is used as a visual indicator.
A voltage of several kilovolts is applied to the spark plugs. Taking this feature into account, when using the visual inspection method in any form of its implementation, be careful and do not touch unprotected parts of your body to uninsulated parts of the on-board electrical wiring.
Second
This method of identifying problems is similar to the “scientific poking” method. This test of the ignition coil involves disconnecting the terminals one by one while the engine is running. Although this method may seem barbaric to many, it helps to quickly identify a faulty coil.
By disconnecting the wire from the coil, the discharge will stop flowing into the fuel combustion chamber and engine operation in this cylinder will be disrupted. A failure can be easily determined by the sound and rhythm of the motor. If there is no change in engine operation when the next coil is turned off, this is a faulty part.
The third is the scientific way
To check the ignition coil, you will need a multimeter. Remove all coils and check the resistance using a tester. The resistance value is affected by corrosion on the contacts, so before checking, clean the elements from dirt, oil residues and other formations that interfere with accurately determining the characteristics of the element.
To measure the resistance on the primary winding, the probes of the device must be installed on both contacts. In this case, the multimeter must be set to 20 ohms.
Depending on the car models and the type of coil, this value can range from 0.4 to 2 ohms.
However, all four coils (assuming your internal combustion engine has 4 cylinders) should have approximately the same resistance.
To measure the secondary winding, connect the first probe of the device to one of the contacts, and the second to the spring that goes to the coil. Since the resistance value on the secondary winding can be from 6 to 10 kOhm, the multimeter flag should be set to 20 kOhm. Thus, you can easily identify the faulty coil and replace it.
It is worth noting that the resource of this element is 60-70 thousand km. According to the experience of many car enthusiasts, original spare parts installed on a car by the manufacturer can withstand more than 100 thousand, so purchase quality parts from reliable suppliers.
Video: How to identify a faulty ignition coil
What is it for?
The main purpose of the ignition coil is to convert a low-voltage electrical pulse coming from a breaker, ignition amplifier (switch) or engine control unit into a high-voltage pulse necessary to produce a spark in the spark plug.
The spark plug has a one-, two- or three-lobe electrical breakdown gap with a distance of 0.4 to 1.1 mm, depending on the characteristics of the engine. It is believed that in an air environment, to form an electric spark between two conductors, an impulse of at least 6 kilovolts per 1 millimeter of gap is required.
Thus, the electrical impulse generated by the ignition coil must be at least 10 kilovolts to ensure reliable ignition. Taking into account the voltage drop across the limiting resistance and high-voltage ignition wires, the electromagnetic pulse voltage is usually chosen to be about 12 - 20 kiloVolts.
The voltage pulse coming from the ignition coil can cause serious electric shock(!)
Such lesions are especially dangerous for people suffering from heart disease; they can lead to heart rhythm disturbances. Ordinary rubber electrical protective gloves do not protect against impulses greater than 15 kV; their standard breakdown voltage is only 6.3 kV.
You must be extremely careful when working and monitoring the performance of the ignition coils. Even when measuring the resistance of the primary winding, you pass a multimeter current through it, which transforms the high-voltage pulse into the secondary winding.
Where is the ignition coil located?
In cars of earlier years, the ignition coil (or bobbin, as it used to be called) was easy to find. She was always in plain sight. As a last resort, its search could be carried out starting from the central wire of the ignition distributor.
Individual ignition coils are also easy to find: they are located above the cylinder spark plugs. But in some car models, especially with a V-shaped engine, in order to provide access to it, even to remove spark plugs, it is necessary to dismantle the intake manifold, part of the engine structural elements.
Dual ignition coils are usually located on the engine compartment bulkhead. But sometimes manufacturers can place them in places that are difficult to access for replacement and, even more so, for performance monitoring.
For example, in some Rover 200 series models the ignition coil is located under the exhaust manifold in the engine compartment between the engine and the passenger compartment. It is possible to measure its parameters when monitoring performance only from the connector of the engine control unit.
Sometimes ignition coils are mounted on the engine cylinder head (for example, some GAZ models). Although this is convenient for checking, during engine operation they heat up to a temperature of more than 100 degrees Celsius, the insulating compound dries out and cracks, which leads to a decrease in their durability.
In some cars, individual ignition coils are combined into a common, non-separable housing. Even if one coil fails, it is necessary to replace the entire expensive unit.
How does a reel work?
If we consider the general principle of operation of the ignition coil and its design, a high-voltage pulse step-up transformer has a primary winding and a secondary winding.
The primary winding with several turns of thick wire is designed for low voltage. The secondary winding of the coil has many more turns of thin wire. Due to electromagnetic induction on the secondary winding, it is possible to create a high output voltage.
Next, the voltage is transmitted through high-voltage wires to the breaker-distributor (distributor) in a car with battery ignition. As for models with transistor or electronic ignition, in this case the voltage is supplied to the ignition control unit, after which it is supplied to the spark plugs.
We also note that a resistor may be present in the primary winding of some coils. In short, this is a steel alloy spiral with a high resistance coefficient. When the current on the winding is high, then the resistance increases, which allows automatic regulation.
This is interesting: What happens if you pour oil into the engine?
By the way, when starting a motor with a dead battery, you should forcefully short-circuit such a resistor (you can use a screwdriver or wire). This will allow the engine to start easier and faster.
- Another thing that can be highlighted is that there are several types of ignition coils, although the design of the ignition coil is often not very different. The first type is a general coil, which generates high-voltage voltage. Installed in front of the distributor-distributor or electronic ignition control unit.
The second type is an individual cylinder, which operates on only one cylinder. This solution is placed in front of the spark plugs and is considered more reliable due to the fact that if one coil fails, the engine will still be able to operate. We also note that on different cars, ignition coils have different characteristics, which depends on the type of vehicle, class of car, engine power, etc.
Types of ignition coils on a passenger car
Depending on the car model and engine brand, different ignition coils (IC) are installed; they can be of different designs:
- cylindrical shape;
- double;
- monolithic (four cylinders);
- in the form of a separate module for each cylinder of the internal combustion engine.
Cylindrical short circuits were mainly installed on cars of previous years; now such coils are considered an outdated design. There is one cylindrical short circuit per four cylinders; it is used on engines with a distributor ignition system. There are engines with a different number of cylinders, but in this case we are not considering them.
The common module is a short-circuit unit combined into one housing; this device supplies a spark to four cylinders. Recently, separate ignition modules (IMs) have been increasingly used, where each coil is installed on its own cylinder, and if the engine is 4-cylinder, then there should be four short circuits. The MZ is mounted directly on the spark plug, so there are no high-voltage wires in such a system.
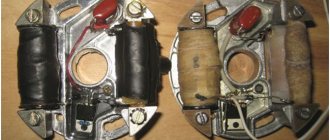
Classic reel
The first type of coil, the classic one, consists of primary and secondary windings. But, it is designed so that the second winding is located inside the first. The difference in the windings is the thickness of the winding wire and the number of turns.
There is a core inside the two windings. The core material is ferromagnetic alloy. (Fe-iron). Each winding has 2 outputs. The primary winding has input terminals (receives voltage). And the secondary winding has: one terminal is a connection to the primary winding, and the second terminal is an output terminal (outputting voltage).
All these components of the device are housed in an ebonite housing. The housing is completely sealed. The leads go to the ignition coil housing cover.
Double coil
This coil has two cores. One core, as in the first option, is located inside two windings. The second is external, located above the windings. The secondary winding has two high voltage terminals.
Custom coil
The high-voltage output of such a coil is connected to a special tip, the second end of which is put on the spark plug. The secondary winding of this coil is located on top.
What the different coils have in common is that they are not dismountable, that is, in mechanical terms, they are not repairable.
How to check the ignition coil with a tester
Checking the ignition coil is a lengthy process consisting of external inspection and tests using measuring instruments. Reels are usually tested on special stands in service workshops or dealerships. If you need to take measurements in artisanal conditions, you usually use a multimeter - a universal device with a wide spectrum of action.
The ignition coil is located in the switch, so for testing you should bend the latched retainer and remove the cables from the switch. Then take a multimeter and set the settings necessary to check the voltage. Now you should attach one of the cables to the output of the reel, and the second to the car body.
The result of this measurement should be 12 V. If the machine has a malfunction in the electronic control system or the electrical circuit of the switch, then the multimeter will display a reading of 0 V.
Preparing for the test
Before testing the bobbins itself, a little preparation should be done. You need to purchase a multimeter (a device that can measure voltage and electrical resistance) and find the machine's user manual. Different cars may have different types of bobbins built in, and the indicators for a specific car are indicated in the passport. If the vehicle was purchased on the secondary market, it is worth trying to find the necessary data via the Internet.
To check the ignition coil you will need a multimeter with the ability to measure resistance and voltage
The indicators that should be looked for in the specified book are the resistance of the primary and secondary windings. If you couldn’t find them in the manual, then during the test it is better to be guided by the average data described in the article.
What resistance should be on the ignition coil
To determine the voltage of the device handle, it is set to a level of 200 Ohms. After this, the resistance of the primary winding is measured. The probes are applied to the “+” and “K” terminals.
For a working bobbin, numbers in the region from 0.2 to 3 ohms are considered normal. The exact numbers may vary depending on the specific type of reel and the accuracy of the multimeter. Contacts “+” and “K” allow you to get indicators in any situation.
For the primary winding, a resistance in the range from 0.4 to 2 Ohms is considered acceptable
Now the device is switched to settings of 20 kOhm. In this position, it is necessary to measure the resistance between “K” and the middle terminal of the high-voltage cable. To do this, poke the probe into the contact area (made of copper) inside the round hole for installing the high-voltage wire. Indicators on the device of a working bobbin will display from 2 to 4 kOhm.
Visual inspection
Typically, the external appearance of the reels differs in each specific model, but on each of them you can find the main parts - the box, contacts, cover and central clamp. To carry out a visual inspection, you only need to carefully look at the reel and determine its condition. If there are small cracks, chips, or scratches on the surface, then the reel is damaged. The outer box of the device is made of ebonite, which is unable to conduct current. Therefore, interruptions in the functioning of this part are usually associated with internal flaws.
Checking the primary winding
To perform testing, you need to set up a multimeter to measure electrical resistance. The contacts are then connected to the cables with plus and minus signs on the ignition bobbin.
Diagram for checking the primary and secondary windings of the ignition coil
If, after testing is completed, the multimeter displays numbers from 0.4 to 2 Ohms on the display, then the bobbin is in order and working properly. If the indicators differ from those indicated above, then the bobbin winding has broken.
Selecting a multimeter
As a rule, in specialized services the device model MAS 838 is often found. It has the ability to measure a regular microcurrent of 200 µA. The display is backlit, so when carrying out this process in an unlit garage, you do not need to use a flashlight.
To run the process itself, specific accuracy is not required. Therefore, there is no point in purchasing an expensive model. It’s better to just buy the basic package, which is included in all standard devices.
What faults cannot be diagnosed with an ohmmeter?
An ohmmeter can only diagnose an open or short circuit in the winding. An interturn short circuit in a winding will be barely noticeable when measuring resistance due to the small resistance of one turn and, as a consequence, a slight change in the total resistance when a short circuit between turns. An insulation breakdown between the turns of both one and different windings reveals itself only when this place is exposed to high voltage. It cannot be detected at all using a multimeter.
Therefore, if, as a result of checking with a multimeter, it was not possible to identify a defect, you need to resort to another proven method of detecting a faulty unit. You should replace all coils one by one with a known good one.
Why does contamination interfere with sparking?
The ignition coil, like any other transformer, increases the voltage of an electrical pulse, reduces its current. Contamination of the insulators of coils and spark plugs with oil and carbon deposits conducts electric current, and therefore can be represented in the form of a resistance connected in parallel to the spark gap and shunting it. The current flowing through this shunt from dirt and moisture greatly reduces the power of the electrical pulse applied to the spark gap. Therefore, the pulse voltage on the electrodes of the spark plug also drops, and it is not enough for a reliable breakdown of the interelectrode gap. Consequently, the higher the sparking voltage, the lower the pulse current, and the ignition system is more sensitive to various contaminants.
Conclusion
Checking the health of the coil is a fairly simple task if you have some experience and some equipment. The simplest and most effective way for home use is to check the resistance of the coil windings using a multimeter. To improve convenience during operation, the coil should be removed from the machine.
If the coil turns out to be faulty, it is better to replace it with a new one. Repair, namely rewinding the windings, is a very expensive, time-consuming and thankless task. It is much easier and faster to buy and install a new one.
Replacement
Individual ignition coils should be replaced with similar models, otherwise there may be problems with ignition timing. It is also advisable to install dual and common ignition coils in accordance with reference data and equipment catalogs, especially since there are not many standard sizes of ignition coils.
Experienced auto electricians often replace the ignition coils of imported cars with domestic Zhiguli ones, and quite successfully. This does not in any way affect the driving performance of the car.
A factory coil from Lada costs two to three times less than a second-hand original or a new Chinese one. If there is a problem with the ignition coil, you can scour the Internet and find what can replace it. Only in this case, in most cases, you have to reconnect the connector to the coil. It is better to entrust this to a specialist.
To make the ignition coil last longer, follow these rules:
- Wipe high-voltage wires regularly (preferably at the end of the seasons);
- Make sure that the reel does not get wet or oily liquids;
- check the quality of the coil connector, it should not spark or get hot;
- change spark plugs regularly;
- it must be firmly fixed in place, and not dangle;
- at the slightest suspicion of a malfunction of the ignition coil (misfire, etc.), it should be tested immediately.
Remember, a faulty ignition coil leads to uneven operation, increased loads, and mechanical beats, which ultimately reduces engine life.
Video - VAZ ignition coil and its possible malfunctions:
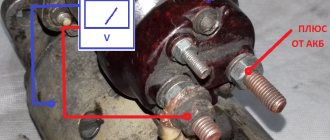
Checking the supply voltage
To check the supply voltage to the ignition coil, we will need to turn off the fuel pump. This is necessary to ensure that the engine does not start during the test. To do this, find and turn off the fuel pump fuse.
Next, disconnect the power connector from the ignition coil. We take a paper clip, make two conductors out of it and insert it into the power connector chip. We connect the multimeter, it is better to use alligator clips. Multimeter in constant voltage (DC) mode.
Now just turn on the ignition. The multimeter should show 0 volts. Next we try to start the engine, it will not start because the fuel pump is turned off. At this time, a pulsating voltage of 0-12 V will be supplied to the ignition coils. This should be displayed in the multimeter readings.
If voltage does not come to the connector, you need to check the wiring and connectors for damage and corrosion. After all measurements, reconnect the fuel pump fuse.
Once you find the faulty ignition coil, simply replace it with a new one. No additional action is required.
Previous entry Electronic gas pedal Next entry Combiloader 2.1.8 - program for flashing VAZ, GAZ, UAZ Like 5 Add a comment Cancel reply
Name
A comment
- guesto 04/18/2021 at 14:44
It's simple. If you have an old burnt, preferably badly burnt, ECU, then you need to make an artificial landscape. Or an artificial landscape. Take silicone sealant and mix it with crystalline potassium permanganate. Cast a plate with a thickness of 2 meters and an area with the ECU - burnt. He does the same with copper sulfate or, better yet, with shavings of various metals. It turns out two plates of 2 meters each. Now take yours (only your burnt ECU) and do this: put the plate with metals down above it, put the ECU microcontroller on it - burnt, and put the next manganese layer above the ECU. On the contrary, you can swap layers. You can seal the groove under the ICU contacts. So now you place a metal plate from the very top on which the ECU is attached with the ears down. That is, it’s as if you can slide a pencil under the plate like a pagoda. The very top part of the landscape design. It's simple. So now peel off the ECU cover into 4 parts with a cross and 4 quarters that cover the grooves above the contacts. And place them in the same order over the metal bottom. If you don’t want to chaff, then place it under the landscape. And from the top, take a paper packet from you and roll it in glue and put metal shavings on the glue; the bag is straightened and dried. Place it bottom to top with a muffler-filter on top. The landscape is ready. The landscape is called UMP, well, at least not UAC, that’s for sure (verified). Everyone like and like, write letters, respect the rights on the roads. Listen to nootk just AASIS!Answer
- Pavel 03/13/2021 at 23:15
Thank you for the important information on the impossibility of measuring resistance in the secondary winding with a high-voltage diode. It is strange that almost all Internet users claim that the secondary coil with a built-in high-voltage diode is checked in resistance measurement mode, as a result of which the resistance of the secondary coil is determined. Based on this information, I had to buy four individual coils. And in vain. Since it was not possible to determine the resistance of the secondary winding of the new coils either.Answer
You may also like
Error P0322 - engine speed sensor, weak signal Explanation of P0322 Code P0322 indicates that the unit is 02.5k.
Error P0120 - Throttle/Pedal Position Sensor, Circuit Malfunction Explanation of P0120 Error P0120 means that there is a malfunction 03k.
Error P0089 - Fuel Pressure Regulator 1 Malfunction Error code P0089 is defined as "Performance02.1k.textarea>textarea>
Removing the module
To remove a faulty unit, you will need:
- Disconnect the battery from the on-board network and remove the air filter housing.
- Disconnect the high-voltage cables and wiring harness.
- Remove the 3 nuts that hold the assembly to the mounting pad.
Read, it may be useful: Links to electrical circuit diagrams.
Replacement features
You can install the coil without using a special tool. The ignition system of injection engines does not require any adjustments. The throttle position is adjusted in idle and maximum gas modes. In case of malfunctions, it is necessary to check and align the crankshaft position sensor to the marks on the drive pulley of external units.
Summarizing
Any malfunction in the ignition coil always has a bad effect on the functioning of the entire vehicle as a whole. Ultimately, this leads to a reduction in its service life. To properly care for your own car, you need to know a lot. We need to treat this with full responsibility. And it is imperative to carry out a diagnostic procedure for checking the ignition coil, because almost the entire operation of the vehicle depends on this element. From our article you learned how to check the ignition coil with a tester or multimeter.
If the owner does not have any knowledge and experience (or has it, but not enough to carry out serious checks), it is best to entrust the solution to this problem to a specialist. Although today you can find a lot of information on literally any issue on the Internet. Therefore, if you have basic knowledge and have read the video and instructions for it, you can try to check the ignition coil manually. Moreover, all the main points of the process are described in detail in the video. If you still have doubts, you can order a service from a professional. The choice is always yours!
The reel is a very interesting transport component. Even the slightest deviation from normal performance can cause engine problems.
Sources
- https://elm327.club/diagnostika-avto/diagnostika-katushek-zazhiganiya.html
- https://instanko.ru/izmereniya/kak-prozvonit-katushku-zazhiganiya-multimetrom.html
- https://uremont.com/publications/articles/kak-proverit-katushku-zazhiganiya
- https://tolkavto.ru/remont-i-obsluzhivanie/elektrooborudovanie/osnovnye-simptomy-neispravnosti-katushki-zazhiganiya.html
- https://prometey96.ru/obsluzhivanie/kak-proverit-katushku-zazhiganiya-multimetrom.html
- https://topmekhanik.ru/kak-proverit-katushku-zazhiganiya-iskroj-i-multimetrom/
- https://msmetall.ru/instrument/prozvon-katushki.html
- https://autolirika.ru/remont/kak-proverit-katushku-zazhiganiya-multimetrom.html
- https://voditeliauto.ru/poleznaya-informaciya/to-i-remont/proverka-katushki-zazhiganiya-multimetrom.html
Professional testing
You will need professional grade equipment.
The optimal solution would be to designate a separate stand for checking coils. This way it will be possible to set different speed modes for the rollers, simulating different types of work. When interacting, you need to ensure that a spark is constantly maintained, regardless of the operating mode. Before carrying out the test, you need to make sure that this power supply is connected correctly, otherwise you may receive unreliable data, which will prevent the determination of problems.
A reel is a small component of vehicles. Even small deviations from normal performance can lead to serious engine problems.
Author of the article Shamraev Nikolay Pavlovich Rate the article (votes: 41, average: 4.8 out of 5) We recommend reading How to check a thyristor with a multimeter How to check a thyristor and triac Ku202N with a multimeter How to make a sword How to make a sword out of wood with your own hands Comments on the article
detailed instructions
To check the solenoid, it must be switched to “ohmmeter” mode. You can find the solenoid in a car using the technical documentation that comes with each vehicle. The solenoid must be connected to the on-board computer. Pay attention to the condition of the valve. It can be closed or open.
- The next step is to check the electrical resistance of the solenoid. In your work, you will need to use an ohmmeter, which should be connected to the terminals of the component. The resistance the solenoid should have in hot and cold states is indicated in the technical documentation. Check the component circuit for short circuit. It is necessary to close each contact through the car body. Over a long period of operation, a large number of contaminant components accumulate in the solenoid. If possible, wash the solenoid in gasoline. It is possible that you have to deal with a non-separable component. Then you will have to replace the old solenoid with a new one, and you can be sure that the problem is fixed.
- The solenoid is a source of a powerful magnetic field. As a result, a large number of metal microparticles accumulate inside. They settle on the walls of the channels and soon begin to interfere with the normal operation of the valve. Moving parts work intermittently. Metal microparticles can be removed using a compressor. High air pressure will remove all the debris that has accumulated over several years or months of use. Don’t forget to pay attention to what state the valve should be in in normal condition.
- If the solenoid is closed in the normal position, then perform a simple test. Disconnect the device from the power source. After this, direct a stream of air, which should be retained inside and not exit through the outlet channel. Apply voltage to the solenoid. In this situation, the air stream should begin to exit through the outlet channel. If the conditions are met, then the component can be said to be in a suitable state.
- A different situation will have to be encountered in the case of a normally open solenoid. Once the component has been de-energized, air should begin to escape through the outlet valve. When current is applied, the channel is closed and the air remains inside.
The solenoid valve of the geyser does not work.
The guest wrote: the gas water heater stopped turning on, the gas simply does not light up. Water flows, there is pressure in the system, the gas is open - it doesn’t light up and that’s it. The column is completely automatic, you can do it as the master explained - you don’t need anything, it works by itself, lights up and turns off. After my wife washed herself, the speaker stopped turning on.
I also don’t agree that “90% is due to dead batteries.” The reason for “Gas is open - does not light up” could also be the flow sensor; the automation simply “does not see” that there is water flow through the column. Or there could be a problem with the gas valve. You can guess for a long time.
The solenoid valve of the geyser does not work.
There is a solution when the solenoid valve does not open. Apparently there is a weak current on the coil, and even the gas pressure “holds” the valve in the closed state, so the valve needs help (if the stem moves freely with the valve removed, it should work). You need to attach a not very strong magnet to the back wall of the valve, so that it does not open the valve on its own (in my case, it was a curtain magnet). The valve stem will be in a magnetized state, and a minimum of effort will be required to move it; it will work even with dead batteries. You can experiment with the power of the magnet.
An electromagnetic gas valve with a filter cleans the liquid phase of gas from suspended matter and tarry deposits (coarse filter) and shuts off the gas supply when the engine is running on gasoline and when the ignition is turned off.
LPG gas valve is used to supply gas fuel and to stop it. In addition, it purifies the gas mixture from all kinds of impurities. The LPG gas solenoid valve is used for all cars when installing gas equipment.
Check valve disassembly
The check valve is disassembled in the following sequence:
First you need to unscrew the nuts, remove the flanges and washers. Then remove the shut-off valve, unscrew the cap and remove the casing, compress the diameter of the pipe and pull it out, remove the casing from the flanges.
The check valve is assembled, respectively, in the reverse order: a shell is put on the shut-off element and screwed on with a lid, the pipe is compressed and inserted into the body, then the shut-off element is installed in the body, the shell is put on the flanges, and they are also inserted into the body, then screwed studs, the valve is installed on the studs and the nuts and washers are tightened.
Disassembling the check valve installed in the water heater
Many people have water heaters in their homes and cottages; let's also pay attention to removing the check valve from the boiler. First you need to turn off the power to the electrical appliance. After unscrewing the nut, turn the cold water pipeline, unscrew the nut from the valve block, remove the sleeve, spring and the valve itself, clean the seat in the valve, and if necessary, replace the valve.
If the check valve cannot contain the flow of the working fluid, then the best option would be to call a specialist who is guaranteed to fix the problem. If a normal blockage occurs, you can handle it yourself: clean the valve with detergents and put it back. What is important is that safety precautions must always be followed.