Types of trimmer heads for reels
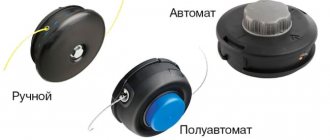
The main element of the trigger is the mowing head, which is a cylindrical body with a reel (spool) inserted inside. The fishing line (cord) is tucked into it. The heads differ from each other in the method of feeding and threading the cord. There are three types of heads in total:
- Automatic. The line is fed after this as the user reduces the engine speed. Automatic cord feeding is very convenient when you need to do a large amount of work. The disadvantage of such a head is the high thread consumption.
- Semi-automatic. The use of such a head does not require the user to perform any complex manipulations. The principle of its operation is designed in such a way that the fishing line begins to automatically lengthen while the trimmer is operating at full speed. You just need to lightly hit the head of the device on the ground (this will remove the blockage of the fishing line), and the cord will move out of the bobbin due to centrifugal force. Then the fishing line is cut to the required length with a knife, which is located on the protective casing.
- Manual. To lengthen the cord, you need to stop the machine. After this, the line will need to be pulled out manually.
Types of trimmer reels
Which fishing line to choose
Before stocking up on this material for refilling the trimmer, you need to make a choice. After all, the usual so-called round fishing line is far from the only existing type. How to choose the most suitable one? First you need to determine the working conditions.
Select by type. Round fishing line is the most common. It will fit any reel with rare exceptions. This type of consumable is suitable for mowing fresh, juicy grass. But this type may no longer cope with mowing the so-called dead wood. There is no point in even mentioning attempts to mow shrubs with this thread.
In addition to the usual type, there are others that have sharp edges. Usually they are made with an “asterisk” or “square”. The presence of sharp edges is the main feature and key difference between these threads.
It is thanks to this feature that threads of these types are able to mow dry weeds. But sharp-edged threads are not without disadvantages, the main ones of which are rapid wear and strength, which is noticeably inferior to the round type.
In addition to the types of fishing lines already mentioned, there are also interesting and frequently encountered varieties. Particularly noteworthy among them are fishing lines, inside of which there is a metal wire. Threads of this type are often used in tools that run on gasoline and have an engine more powerful than one and a half horsepower.
Threads with a metal core can be either round or sharp-edged. Regardless of the type of section, such threads are ideally suited for overcoming difficult-to-mow plants. Threads of this type easily mow not only dry grass, but even small shrubs.
Threads with wire inside compare favorably with other types of consumables due to their incredible wear resistance. But unfortunately, this feature has a more than noticeable impact on the price of this type. The cost of threads with a core significantly exceeds the cost of other types of threads.
Line selection
In order for threading the fishing line into the trimmer head to be successful, it is important not to make a mistake with the choice of consumables. The thicker the cord you set, the thicker and tougher the grass it will be able to cut. A universal fishing line with a diameter of 2 mm is often used. You can select the diameter suitable for the mower in the following ways:
- Check the instructions that came with your trimmer for line thickness information.
- Pay attention to the bobbin itself. Sometimes it contains information about possible fishing line diameters.
- Another option is to try inserting the cord into the outlet hole. If it fits through it without difficulty, then the selected fishing line diameter is suitable for use.
Trimmer reel
You can select the cord thread according to the type of engine. If the line is too thick, the resistance to rotation will increase - in this case, the engine will overheat greatly and will soon fail. Useful tips:
- For an electrical device with a motor less than 500 V, a thread with a thickness of 1.3 mm is suitable. If you can’t find one, then you can use a 1.6 mm fishing line. If the power is more than 1 kW, then choose a cord with a diameter of 2 mm.
- With a gasoline trimmer, the shaft mower matters. For the bent version, a 2 mm cord is often used. If the shaft is straight, then install a thread of 2.4-2.5 or 3 mm. The thickest fishing line is installed on powerful devices - from 1.3 kW.
Pay attention to the type of cross-section of the cord thread. Some popular options:
- The most common fishing lines are with a round cross-section. They mow down fresh grass well, but cope less well with shrubs and dead wood.
- Twisted (spiral) cord is not very strong, but is well suited for thin young grass.
- The jagged thread with sharp edges is ideal for large weeds in neglected areas.
- You can mow your lawn more evenly with a rectangular, star or square trimmer line, but they are not very strong.
- The strongest is a two-component cord with an internal core and a round cross-section.
Types of trimmer line
Please note that you cannot use wire, metal strings and cables, or regular fishing thread instead of fishing line. The device will be dangerous both for the user and for others. So the cable or similar products will gradually begin to work, as a result of which their ends will unravel and small pieces will fly apart at high speed.
Fishing line - varieties and the possibility of replacement with other material
The cord for the trimmer can be of different diameters (from 1.2 to 4 mm), and it must be chosen depending on what kind of vegetation needs to be mowed - the thicker the line, the coarser the grass it will handle. Experienced users advise using a fishing line 2 mm wide, which is universal.
The shape of the fishing line can be round (for juicy grass) or with sharpened edges in the form of a square or star (for mowing dry grass). Type 2 is the least durable and wears out more quickly compared to round cord.
One of the favorite questions regarding the operation of trimmers is whether it is possible to replace the special cord for mowers with other materials, for example, iron or iron cables and strings, wire, etc. You need to know that installing such items is not recommended, since together with them the trimmer turns into a terrible technique. During the mowing process, pieces of wire or metal will constantly break off and fly in different directions, risking injury to the worker. And if you accidentally touch your limbs while working, severe injury is guaranteed.
For owners of trimmers who are interested in whether it is possible to use fishing line, we answer - this is allowed, but it will tear and wear out even faster, which means that it will require frequent replacement.
Removing and disassembling the coil
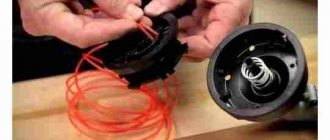
The mowing trimmer head consists of a casing, a spring (not available in every model), a bobbin with cord, and a cover. Before you begin disassembling the coil of the electric unit, be sure to unplug the trimmer from the mains. The method of disassembly depends on the mounting of the mowing head. First option:
- To remove the cover covering the inside of the head, press the latches (latches) located on both sides of the head.
- Remove the cover, under which you will see the bobbin - remove it from the housing. Some trimmer reels have a spring under the bobbin, which should also be carefully pulled out.
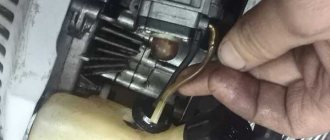
- After removing the bobbin, you will see a screw in the center of the case. Unscrew it using a screwdriver.
- After removing the fasteners, take the body of the part and, rocking it in different directions, remove the gearbox from the shaft.
In the second option, the trimmer head is screwed onto the gearbox shaft. To remove it, you need to fix the shaft. To do this, such devices have a hole through which a thin screwdriver or metal rod is inserted. Brief instructions:
- Insert a screwdriver into the special hole, then lock the shaft.
- Grasp the body of your head and begin to twist it. This should be done clockwise, since the thread on the shaft is left-handed.
Winding fishing line onto a reel
Winding line
Threading fishing line into the trimmer reel is a relatively simple procedure, provided you follow a certain algorithm of actions. When you need to determine how many meters of consumables are enough, wind it onto a bobbin so that the skein does not exceed the diameter of the sides. Once you have decided on the length of the cord, follow these instructions:
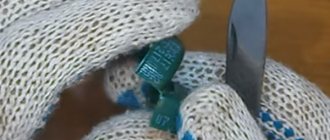
- Fold the consumable in half so that one end of the fishing line is 10-15 cm longer than the other.
- Charging should begin from the central side, which divides the trimmer bobbin into 2 parts. Find the groove where you should insert the cord. Bend the last one in half.
- Determine in which direction you need to wind the line. To do this, take a closer look at the bobbin, which may have an arrow or inscription on it. It indicates the winding direction. If there are no marks on the reel, then look at the arrow on the mowing head - wind in the opposite direction.
- The consumables should be washed carefully, turn to turn. Try to maintain the maximum thread tension.
- Once the cord has been laid, fasten the short end of the material first. To do this, insert it into a groove on the side of the reel that matches the diameter. Attach the second end (longer) to the groove on the other side of the trimmer bobbin.
- Having fixed the fishing line, trim its ends. Don't forget to leave allowances of approximately 10 cm.
- Install the threaded reel to the mowing head of the device. To do this, you need to alternately insert and pull the thread into the outlet holes of the head, in order to then place the bobbin of the device into the skin.
- Applying the required force, pull the cord out of the fixing grooves and tighten the material. Once this step is complete, put the cover back on and secure it with the latches.
Step-by-step winding of fishing line onto a reel
You can wind the cord on the trimmer in another way, in which two pieces of material are charged instead of one. Replacement is done as follows:
- Bend one end of the cord into a hook.
- There should be a hole at the bottom of the bobbin that is designed to secure the fishing line. Insert the bent end of the thread there.
- Wind the cord material in the direction of the arrow to the desired level, which does not exceed the diameter of the trimmer spool.
- The same steps must be done for the second bobbin cell.
- Assembling the device head is similar to the first method.
TrimCut mowing head
Such models are considered two-string and are designed for mowing and clearing space. The main difference of this design is the presence of a reel for the cutting string and manual length adjustment. This adjustment must be made with the engine turned off. To do this, you need to loosen the screw on the head and pull the ends of the cord in different directions with your hands.
Threading fishing line into a trimmer with a TrimCut head begins with the fact that you need to prepare two strings of maximum length (8 m, 6 m or 5 m). It depends on the type indicated on the packaging.
- Hold the trimmer drum in your hand with the wide part facing down: the warning labels on the housing will be upside down. There will be a fixing screw in the recess at the top. Unscrew it with your second hand in a clockwise motion until the nut comes loose and can be pulled out. If absolutely necessary, you can use a large hexagon.
- Remove the coil itself from the head housing. Its winding part is divided by a partition into two compartments. Start with the bottom compartment. Each of them has a small depression. It is into this eye that you need to tuck the end of the fishing line all the way. Having bent the string almost 360°, begin to wind it evenly and tightly onto the reel, circle after circle. The arrows on the body will show you the direction of this action. Try to wrap the cord around the bobbin row by row, avoiding overlaps in a criss-cross manner - this may weaken the tension later. Finally, hook the last 7-10 cm of strings to the notch on the outermost ring of the drum.
- Now you know how to wind the cord onto the trimmer reel. In the same sequence, repeat the steps for the second part of the spool and, accordingly, the second string. Do not forget to also follow the hint with the arrow. Pass the end of this cord first through the notch in the ring separating the compartments, and then through the outer ring so that both cutting segments protrude from the reel in opposite directions.
- Now hold the coil directly above the body and insert it gradually. In this case, both fishing lines must be carefully threaded through the main holes of the head located on its sides. Pull both trimmer cords out towards you. Then insert the bobbin all the way and turn the screw back counterclockwise.
- If necessary, shorten the ends of the strings with pruning shears so that they protrude by about 12 centimeters.
How to wind line on a trimmer reel: key points
A gasoline or electric trimmer is an indispensable assistant in the arsenal of a modern summer resident or owner of his own home.
Thanks to these garden devices, you can easily mow even a large garden plot. After purchasing this tool and doing several mowings, many people think about how to properly wind the fishing line onto the trimmer reel. For an inexperienced user, the first operation to replace it will seem problematic and time-consuming, since developers often do not fully reflect the instructions for replacing fishing line in the instruction manual.
Final point of instructions
Typically, the process of replacing fishing line on a trimmer of a particular model is popularly described in the accompanying documentation. Another issue is that this documentation is often supplied in a foreign language, since the notorious lawn mowers for the most part are imported products.
Meanwhile, there is a much simpler, more economical and beneficial way for human health and nature - tidying up lawns with an ordinary peasant scythe. Scythe Blade:
- does not “tear” grass stems,
- does not uproot plants,
- cuts carefully
which is subsequently accompanied by abundantly growing greenery, and not the formation of dead wood as a result of the work of a trimmer.
Using materials: SGS-Engineering
Preparing to wind the fishing line
Before the winding process, you must first remove the reel with fishing line from the housing. Depending on the manufacturer, power and type (electric or gasoline), there are three design types of trimmers:
Compact trimmers with electric drive.
Straight trimmer
This model provides the ability to install a knife. Removing the coil in such models is done using two keys recessed into the coil body. To install the trimmer knife, you need to align the hole of the reel and the rod, and then insert a device in the form of a steel pin (screwdriver, iron rod). After fixing the coil, the housing can be easily unscrewed clockwise by hand.
Winding fishing line onto the trimmer
Measured and careful removal of the spool from the braid reel makes it possible to proceed directly to winding the fishing line. The design features of the head, the number and location of the fixing holes dictate the sequence of actions when performing this operation, and also determine the methods used. Today there are several types of reels, depending on the number of tendrils of the fishing line and the methods for threading it:
- Trimmer head with one working tendril;
- A reel with two tendrils of fishing line;
- Reel with automatic winding.
Trimmer reel with one tendril
Brush cutter reel with one tendril
Many owners and specialists note the ease of operation and threading of the reel with one mustache. Depending on the manufacturer, the length of the threaded fishing line can range from 2 to 5 meters. The end of the fishing line is inserted into the head into a special technological groove or hole, and winding is carried out in the direction opposite to the working rotation of the reel. Most reels have arrow marks on the outside of the housing that indicate the direction in which the trimmer spool moves.
After winding, you need to leave a free end of 15-30 cm to enhance the centrifugal force, which is decisive when removing trimmer line in automatic and semi-automatic reels. We pass the remaining end through the working hole of the coil and assemble the head.
Trimmer head with two antennae
Double flute head
After removing the spool from the reel body, we determine the number of streams for winding the fishing line (1 or 2). There is no fundamental difference between reels with one and two grooves, but if carelessly threaded into a double groove, problems with operation may occur. Due to the possibility of intertwining of adjacent tool lines, a situation may arise when, after wear of the working antennae, it is impossible to remove new ones.
Regardless of the number of streams, a fishing line with a length of 1.5 to 3 meters is taken for refueling. Winding must be done in the direction opposite to the rotation of the head, since winding in the direction of movement will lead to the fact that the fishing line will not be removed from the reel. After the fishing line is tucked into the trimmer reel, we thread the free ends (15-30 cm) into special holes. Next, we assemble the head in the reverse order of disassembly and check its functionality. Don’t worry if the ends of the two antennae are very different in size, because when you start the trimmer, the knife installed on the guard will cut off the excess.
Trimmer head with automatic line threading
Types of trimmer heads
Some models on the market have a reel with an automatic winding mechanism. The owner only needs to correctly thread and fix the ends in the head, and the winding operation will be performed by the tool itself when switched on in operating mode. It is almost impossible to wind the fishing line incorrectly into a trimmer with such a head, since the reel independently determines the position of the tendrils. The advantages of an automatic trimmer head include ease of threading of fishing line, but the disadvantages include frequent breakdowns of the mechanism due to the complexity of the design and high cost.
Winding process
If your reel is designed to work with only one antenna, then everything is very simple. It is necessary to unwind 2-4 m of fishing line (depending on the size of the reel), find a hole on the inside of the reel that secures the fishing line, insert one end of the fishing line into it and begin to wind the fishing line in the direction opposite to the direction of rotation of the reel on the trimmer
. On the inside of the reel there is usually an arrow indicating which direction to wind the line. Having wound the fishing line, we leave a small piece of it unwound in order to expose it outside. We fix this piece in a special groove located on the inside of the reel and created so that the line does not unwind when the reel is assembled. If there is no such groove, then you will have to hold the line with your finger to prevent it from unwinding during the upcoming assembly of the reel. Next, take the outer part of the reel and thread the outer piece of fishing line into the existing hole, assemble and put the reel back on the trimmer.
If the coil is designed to work with 2 antennae, then do the following. On the inside of the reel we look at how many grooves there are for winding fishing line. There may be one or two. If there is only one groove, then both tendrils are wound along this one groove. If there are two grooves, then each tendril is wound along its own groove. A reel with one groove must have a through hole through which the line
.
We unwind 2-4 m of fishing line, thread it through this hole so that the fishing line sticks out identically on each side. And we wind both tendrils of the fishing line at once in one direction, the opposite direction of rotation of the reel on the trimmer
and coinciding with the direction shown by the arrow on the inside of the reel. We leave a little of the fishing line unwound, secure the resulting ends in special grooves, and if there are none, hold them with our fingers. We thread both ends into the existing holes on the outer body of the coil. We assemble the coil and attach it to the trimmer.
If there are 2 grooves, fold a piece of fishing line 2-4 m long in half, insert the resulting loop at the bend into the groove between the 2 grooves, and immediately wind both ends of the fishing line, each along its own groove. Subsequent actions are similar to the previous version.
There are also reels in which the line is threaded through a through hole on the inside. After that, the ends of the fishing line, without winding, are threaded one hundred percent through the holes on the outer body of the reel, assemble the reel and begin to twist the button, which is usually pressed, so that during operation the fishing line is released as it wears out. You turn the button and the fishing line winds itself inside. With all this, you won’t be able to spin it in the “wrong” direction, because it can only spin in one direction. If you get used to it, you can wind it
line, without even disassembling it - you just need to combine the through hole of the inner drum with the holes on the outer body of the reel, and then thread the line into them.
READ How to properly wind wire on a lawn mower
That's all on this issue. Happy winding!
String breaking
Constant line breaks are caused by:
- the presence of hard objects in the mowed grass: branches, pebbles, etc., contact with which breaks the string;
- mowing the grass close to the fence, and if it is mesh, then the fishing line
breaks even faster; - low-quality cord - needs to be replaced with a new, reliable consumable;
- wear of the outlet holes in the mowing head, as a result of which the fishing line breaks due to friction against the sharp edges of the bushings - the part needs to be replaced with a new one.
Preliminary preparation
First of all, to wind the fishing line, you need to remove the reel (spool, spool) from the trimmer - specific actions will depend on the complexity of the configuration and the type of the product itself:
- small electric trimmers with a working arrangement of the motor and coil in the lower part, as a rule, have side keys on both sides of the reel. By pressing them simultaneously, the upper part of the reel, along with the internal contents for winding the fishing line, is disconnected, while the lower part remains on the trimmer. It is advisable to disassemble the bobbin on a flat, smooth place so that the spring included in the structure does not jump out and get lost;
- electric and gasoline trimmers with a curved rod without the ability to install a knife, as a rule, have reels with a special wing: in such designs, you should hold the spool in a stationary position with one hand, and with the other, rotate the wing nut that secures the reel on the rod counterclockwise. After disconnecting the nut, the entire reel is removed.
- electric and gasoline trimmers with the ability to install a knife on a straight rod (for example, Stihl trimmers) have a hole under the reel. To keep the rod stationary, a screwdriver or other suitable object is inserted into this hole and, with slow rotation, such a relative position is achieved when the screwdriver enters the hole and the reel is fixed. After this, the coil body is rotated clockwise (with a left-hand thread) and removed from the trimmer.
For the second and third cases, the coils, depending on the design, are disassembled in different ways. In bobbins with a wing, the wing is unscrewed; in bobbins with latches, the latches are pressed and one part of the bobbin is released from the other. If the halves of the spool are connected by thread, then it is enough to turn them by hand in opposite directions until they are completely unscrewed.
Remove the coil from the trimmer
On small electronic trimmers with a bottom-mounted motor (when it is located near the ground when operating), the coil usually has two buttons on the edges. Click on them and disconnect one half of the coil body from the second, which remains on the trimmer . Together with the first half, the inner part is also removed, onto which the fishing line is wound. When disassembling, be careful: there is a spring inside that can fly out and get lost.
On electronic and gasoline trimmers with a bent rod (on such trimmers there is still no ability to place a knife), you need to grab the coil body itself with one hand, and with the other hand you need to start turning the thumb on it counterclockwise. Specifically, he attaches the coil to the trimmer rod. Having unscrewed the thumb, carefully remove the entire coil, trying not to lose the spring inside.
On electronic and gasoline trimmers with a straight rod and a gearbox at its end (on such trimmers, in addition to the fishing line, you can also install a knife), look for a hole under the coil, insert, for example, a screwdriver into it, quietly rotate the coil until the screwdriver gets even deeper , and the coil will lock. Now we twist the entire coil clockwise (because the thread is left-handed) and remove it from the trimmer. Next we disassemble the coil. It can be assembled using latches or twisted with a lamb. If the coil is on latches, then press along the edges on the base of the latches so that they bend and release one half of the coil body from the other. We just twist the lamb. There may also be a third type of connection of two halves of such a coil: with it you need to grab the lower part with one hand, and the upper part with the other, and begin to turn them in the opposite directions. When disassembling such a coil, you must also ensure that the spring inside is not lost.
We wind the fishing line
Slowly completed disassembly of the spool reel without losing its spare parts allows you to move on to the main task - winding fishing line into the reel. The technological features of the spool design and the number of working antennae determine the sequence of actions.
Reel with one working antenna
The simplest option and simple sequence of actions:
- The dimensions of the reel and the length of the original factory winding determine the recommended length of fishing line for winding - 2...5 m.
- One end of the fishing line is inserted into the fixing technological hole located inside the spool.
- The fishing line is wound onto the drum in the opposite direction to the rotation of the spool on the trimmer product - as a rule, on the inside of the reel there is an arrow indicating which direction the winding is going.
- A small section of the fishing line is left free to be brought out - it is fixed in a specialized groove on the inside of the bobbin, designed to hold the winding when assembling the spool into working condition.
- The remaining end of the line is passed through the hole in the outer part of the reel.
- The reel halves are assembled and put on the trimmer rod.
Reel with two working antennae
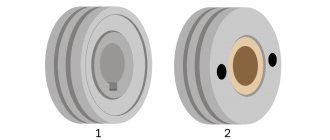
In this type of spool, you should determine the number of grooves for winding line lying on the inside of the reel:
- one groove - both tendrils are wound together along one groove;
- two grooves - each tendril is wound along an individual groove.
For both cases, a fishing line 2-3 m long is taken. In single-groove reels, the fishing line is pulled into a through hole, its ends (tendrils) are folded together and aligned, after which they are wound in the direction opposite to the direction of rotation of the reel on the rod - the inside arrow usually indicates the correct winding direction. If there are locking grooves, the ends of the fishing line are threaded into them or held with the fingers of your free hand, threaded through the through hole of the outer half of the reel, the spool is closed and attached to the trimmer rod.
The difference between winding line in two-groove reels is that initially a piece of line 2-5 m long is folded in half (to determine the middle fold), and the fold loop is inserted into a special groove between the grooves. Both antennae of the fishing line are wound each along their own groove; fixing the antennae and assembling the reel is similar to the option discussed above with one groove.
The first implementation of this procedure may seem lengthy and quite labor-intensive, but with time and experience this task will be solved much faster and easier.
The video below will clearly show how to thread the fishing line into the trimmer reel and wind it correctly - this operation is not difficult and, with some patience, will definitely be successful:
Existing types of Stihl mowing heads
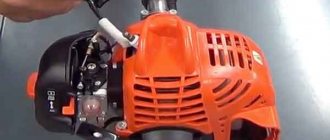
Trimmers are purchased and used to maintain a neat appearance of lawns in the country, in private gardens and in public parks. Powerful and expensive units use special knives and discs that can withstand heavy loads and cope with the toughest vegetation. And in more affordable and widespread models, a different design is implemented. The mechanism is based on a drum into which the trimmer line is tucked.
This Stihl walk-behind mower is usually required to deal with heavily overgrown areas in small areas and quite successfully mows down perennial grasses and other shoots of vegetation. Cord (aka fishing line) is a consumable material; it wears out quickly as you work and requires regular replacement. Before we talk about how to thread a line into a trimmer reel, let's name all the types of heads that are used in Stihl brush cutters:
- TrimCut
- AutoCut
- SuperCut
- AutoCut C
- DuroCut
- FixCut
Despite the list of six items, they have 4 main types of design. In each case, the methods for threading the line into the trimmer reel are slightly different. Let's take a closer look at each of the coils.
Automatic winding of line onto reel
There is a type of reel in which an automatic mechanism produces the winding itself - the user only needs to thread the line correctly. The fishing line is passed through a hole on the inside of the body, its tendrils are threaded through the hole on the outer body without winding, the bobbin is assembled, and when the winding button is rotated, the fishing line inside is wound on its own. In such a spool it is impossible to wind incorrectly: the mechanism itself will determine the correct direction, since it can only spin in one direction.
Sources:
https://tytdacha.ru/sadovaya-tehnika/gazonokosilki/kak-namotat-lesku-na-trimmer/
https://yotools.ru/trimmeri/kak-namotat-lesku-na-katushku-trimmera-klyuchevye-momenty.html
https://proinstrument.ru/kak-zapravit-lesku-v-katushku-trimmera-pravilno-video/
Types of trimmer heads for reels
The main element of the trigger is the mowing head, which is a cylindrical body with a reel (spool) inserted inside. The fishing line (cord) is tucked into it. The heads differ from each other in the method of feeding and threading the cord. There are three types of heads in total:
- Automatic. The line is fed after this as the user reduces the engine speed. Automatic cord feeding is very convenient when you need to do a large amount of work. The disadvantage of such a head is the high thread consumption.
- Semi-automatic. The use of such a head does not require the user to perform any complex manipulations. The principle of its operation is designed in such a way that the fishing line begins to automatically lengthen while the trimmer is operating at full speed. You just need to lightly hit the head of the device on the ground (this will remove the blockage of the fishing line), and the cord will move out of the bobbin due to centrifugal force. Then the fishing line is cut to the required length with a knife, which is located on the protective casing.
- Manual. To lengthen the cord, you need to stop the machine. After this, the line will need to be pulled out manually.
Types of trimmer reels
Line selection
In order for threading the fishing line into the trimmer head to be successful, it is important not to make a mistake with the choice of consumables. The thicker the cord you set, the thicker and tougher the grass it will be able to cut. A universal fishing line with a diameter of 2 mm is often used. You can select the diameter suitable for the mower in the following ways:
- Check the instructions that came with your trimmer for line thickness information.
- Pay attention to the bobbin itself. Sometimes it contains information about possible fishing line diameters.
- Another option is to try inserting the cord into the outlet hole. If it fits through it without difficulty, then the selected fishing line diameter is suitable for use.
Trimmer reel
You can select the cord thread according to the type of engine. If the line is too thick, the resistance to rotation will increase - in this case, the engine will overheat greatly and will soon fail. Useful tips:
- For an electrical device with a motor less than 500 V, a thread with a thickness of 1.3 mm is suitable. If you can’t find one, then you can use a 1.6 mm fishing line. If the power is more than 1 kW, then choose a cord with a diameter of 2 mm.
- With a gasoline trimmer, the shaft mower matters. For the bent version, a 2 mm cord is often used. If the shaft is straight, then install a thread of 2.4-2.5 or 3 mm. The thickest fishing line is installed on powerful devices - from 1.3 kW.
Pay attention to the type of cross-section of the cord thread. Some popular options:
- The most common fishing lines are with a round cross-section. They mow down fresh grass well, but cope less well with shrubs and dead wood.
- Twisted (spiral) cord is not very strong, but is well suited for thin young grass.
- The jagged thread with sharp edges is ideal for large weeds in neglected areas.
- You can mow your lawn more evenly with a rectangular, star or square trimmer line, but they are not very strong.
- The strongest is a two-component cord with an internal core and a round cross-section.
Types of trimmer line
Please note that you cannot use wire, metal strings and cables, or regular fishing thread instead of fishing line. The device will be dangerous both for the user and for others. So the cable or similar products will gradually begin to work, as a result of which their ends will unravel and small pieces will fly apart at high speed.
How to thread line into a trimmer
The method for winding thread onto a spool depends on the model of gasoline trimmer. In devices with a fishing line and in a sample with the ability to change the cutting element, the algorithm of actions is different. Let's look at each option separately. The diameter of the fishing line is indicated on the side of the reel or in the instrument’s passport. For winding, choose the fishing line specified by the manufacturer.
A fishing line with a diameter of 2 mm is considered universal. It is used for cutting grass of any hardness. The thicker the working thread, the harder the vegetation it cuts. But if you insert too thick a line into the reel, the engine will begin to overheat, as the resistance to shaft rotation will increase.
Removing and disassembling the coil
The mowing trimmer head consists of a casing, a spring (not available in every model), a bobbin with cord, and a cover. Before you begin disassembling the coil of the electric unit, be sure to unplug the trimmer from the mains. The method of disassembly depends on the mounting of the mowing head. First option:
- To remove the cover covering the inside of the head, press the latches (latches) located on both sides of the head.
- Remove the cover, under which you will see the bobbin - remove it from the housing. Some trimmer reels have a spring under the bobbin, which should also be carefully pulled out.
- After removing the bobbin, you will see a screw in the center of the case. Unscrew it using a screwdriver.
- After removing the fasteners, take the body of the part and, rocking it in different directions, remove the gearbox from the shaft.
In the second option, the trimmer head is screwed onto the gearbox shaft. To remove it, you need to fix the shaft. To do this, such devices have a hole through which a thin screwdriver or metal rod is inserted. Brief instructions:
- Insert a screwdriver into the special hole, then lock the shaft.
- Grasp the body of your head and begin to twist it. This should be done clockwise, since the thread on the shaft is left-handed.
Winding fishing line onto a reel
Is it possible to make a coil for a trimmer with your own hands?
- Take a piece of plywood or PCB and draw a circle on it with a diameter of about 14 cm.
- Cut out the disc using a jigsaw or hacksaw.
- Drill a hole in the center of the disk that matches the diameter of the gearbox shaft. Do not forget to put a washer on it before installing the disk on the shaft.
- You can screw small corners along the edges of the disk or make 1-2 holes on opposite sides. They will serve to thread fishing line into them.
- To secure the fishing line, you can screw several screws into the plywood.
This homemade mowing attachment is secured to the shaft with a nut. It is impossible to tighten or unscrew the nut without fixing the shaft. To replace the cord, it will be enough to loosen the screws, insert a piece of fishing line of the required length and press it again.
Also, the mowing attachment for attaching the fishing line to it can be made from a metal sheet. You can understand how to do this from the following video.
Sources:
https://crast.ru/instrumenty/kak-pravilno-namotat-lesku-na-trimmer https://seventools.ru/oborudovanie/kak-pomenyat-lesku-na-trimmere.html
Winding line
Threading fishing line into the trimmer reel is a relatively simple procedure, provided you follow a certain algorithm of actions. When you need to determine how many meters of consumables are enough, wind it onto a bobbin so that the skein does not exceed the diameter of the sides. Once you have decided on the length of the cord, follow these instructions:
- Fold the consumable in half so that one end of the fishing line is 10-15 cm longer than the other.
- Charging should begin from the central side, which divides the trimmer bobbin into 2 parts. Find the groove where you should insert the cord. Bend the last one in half.
- Determine in which direction you need to wind the line. To do this, take a closer look at the bobbin, which may have an arrow or inscription on it. It indicates the winding direction. If there are no marks on the reel, then look at the arrow on the mowing head - wind in the opposite direction.
- The consumables should be washed carefully, turn to turn. Try to maintain the maximum thread tension.
- Once the cord has been laid, fasten the short end of the material first. To do this, insert it into a groove on the side of the reel that matches the diameter. Attach the second end (longer) to the groove on the other side of the trimmer bobbin.
- Having fixed the fishing line, trim its ends. Don't forget to leave allowances of approximately 10 cm.
- Install the threaded reel to the mowing head of the device. To do this, you need to alternately insert and pull the thread into the outlet holes of the head, in order to then place the bobbin of the device into the skin.
- Applying the required force, pull the cord out of the fixing grooves and tighten the material. Once this step is complete, put the cover back on and secure it with the latches.
Step-by-step winding of fishing line onto a reel
You can wind the cord on the trimmer in another way, in which two pieces of material are charged instead of one. Replacement is done as follows:
- Bend one end of the cord into a hook.
- There should be a hole at the bottom of the bobbin that is designed to secure the fishing line. Insert the bent end of the thread there.
- Wind the cord material in the direction of the arrow to the desired level, which does not exceed the diameter of the trimmer spool.
- The same steps must be done for the second bobbin cell.
- Assembling the device head is similar to the first method.
SuperCut mowing head
This two-string design is also designed for mowing and clearing space and is used around obstacles and processing large areas. For the cutting cord, an automatically maintained optimal cutting length is implemented here. Can only be used with a universal or special protective mowing guard.
We will explain how to thread the fishing line into the trimmer reel of these two modifications. To begin, prepare two strings of maximum length (7 m or 10 m), depending on its type. You can find this information on the packing slip.
- Take the head in your hand so that its cover with the bulge in the center is on top. With your other hand, feel the two notches located on the sides of the structure - they are exactly opposite each other. Press your fingers into these recesses simultaneously or one at a time until the lock is disengaged, and then press the other one. Turn the lid clockwise: it can now be removed and set aside.
- Take out the coil itself. To do this, twist it slightly to release the plastic hook. Using rotational movements, remove it from the holding position and lift it up. A free drum with two compartments will be in your hands.
- Find the eyelet that is adjacent to the dividing wall in the middle of the bobbin. Take the trimmer line and insert the end of it into this recess until it stops. Having bent the string, wrap it around the spool in the opposite direction so that the fixed piece of trimmer cord does not fall out of the eye. With quick and confident movements, continue to wind the line turn after turn, trying to distribute the layers evenly and tightly. When the segment ends, hook the other end of the string to one of the two notches so that the remainder of about 10 centimeters comes out.
- Do the same actions with the second string. It is necessary to wind the fishing line into the second compartment in the same direction. Fix the free end of the same length to the notch located on the opposite side. After this, the coil can be inserted back into the housing.
- Rotate the bobbin to align the strings and the bushings inserted into the head so that they are next to each other. Take each of the fishing lines, carefully unhook it from the notch and place it in a special groove for exiting out. Now the ends are sticking out of the bobbin channels and the lid can be closed. Put it on according to the position of the latches and press firmly until it clicks.
- Pull one string firmly so that the reel body moves slightly upward. You will hear another click, and part of the fishing line will come out a couple of centimeters.
- The next step is to cut off the ends of each string with pruning shears to the desired uniform length, if necessary. Stihl recommends that the line protrudes from the hole approximately 10 cm.
Line adjustment
It also happens that sometimes you don’t need to worry about how to thread the fishing line into the trimmer, since it is enough to just adjust the fishing line as necessary, thereby increasing work productivity. Alternatively, the cutting element can be trimmed with a knife if it protrudes too much. But the length can also be adjusted directly in the process of mowing vegetation, by carefully touching the head of the fishing line to the floor. But this can only be done if the material extends beyond the coil by at least 3 centimeters.
One of the main rules when replacing and adjusting equipment is that any manipulations with the mechanism must be carried out exclusively with the engine turned off and the device plug disconnected from the mains.
Perhaps these tips will tell you how to thread the line into the trimmer as correctly as possible and, accordingly, give your area a neat and aesthetic appearance. All that is required is to correctly select the cutting material required by type and, of course, decide on the category of the trimmer used.
Near the house he always looked well-groomed and neat, he needs to be cut regularly. Fortunately, modern technology allows you to solve this problem without excessive physical effort. Electric trimmers are so easy to operate and maintain that even a teenager can mow the grass with them. The main thing is to figure out first how to insert it into the trimmer.
AutoCut C
The next type of mowing head is also equipped with a reel for the cutting line, and its feeding occurs during operation of the tool, as in the AutoCut version without the letter C. However, in this modification, replacing the trimmer cord is especially quick and easy. When installing it, there is no need to open the mowing head and prepare two identical sections.
- Before threading the line into the trimmer spool, set the handle to a position where the arrows on the head are next to each other, opposite the round indentations.
- Take a cutting string of maximum length - 8 m - and insert its ends into the opposite holes of the drum. You need to make sure that the ends of the lines are cut with a bevel. After this, rotate the coil in the direction indicated on the cover - clockwise. This way the trimmer line is completely wound around the bobbin.
- Cut the protruding loop in the middle. The resulting ends of the string should protrude from the drum by about 12 centimeters.