Assembling a cutter for a walk-behind tractor: tips and instructions
Auto mechanic, specializes in agricultural equipment.
Soil tillers can be called the most popular type of attachments for walk-behind tractors used in farms and household plots. They are indispensable for cultivating soil, chopping weeds, mixing and leveling soil, and are actively used on land with heavy and waterlogged soils. Often, working with a walk-behind tractor using cutters is initially envisaged when purchasing the unit.
However, while some devices come with cutters included, others do not, and this has its own advantage. Many experienced users of small agricultural machinery prefer to independently determine which cutters are needed for their farms. In such cases, cutters for a walk-behind tractor are purchased separately and of the desired type, or they are assembled with your own hands. Often additional cutters are required to the existing ones. The quality of land cultivation depends on the choice of equipment, so it is important to understand its features as best as possible.
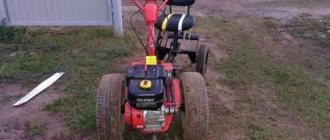
Motoblock cutters will help you in cultivating the soil
User manual
Instructions are also supplied with Tselina walk-behind tractors. This document must be retained for the entire period of operation.
Construction of the Tselina walk-behind tractorUsing the instructions, the walk-behind tractor is assembled and started for the first time. Next - more details about the launch and operation of the walk-behind tractor.
First launch and run-in
The first start-up of the Tselina walk-behind tractor is carried out after assembling the unit. For assembly, use the tool kit (if included). After assembly, the walk-behind tractor should be filled with gasoline, and oil should be poured into the gearbox and engine crankcase. Turn on the walk-behind tractor and let the engine idle, without load. After 15 minutes you can start working with attachments.
After running-in, you can use the walk-behind tractor for heavy work, for example, plowing virgin soil or transporting heavy loads. Do not exceed the maximum lifting capacity for your equipment model.
Maintenance
The manufacturer fills some models of walk-behind tractors with oil while still in production. Ravenol oil for gasoline/diesel four-stroke engines is indicated as recommended.
For the gearbox: a little TAD17 or similar viscosity. Gasoline AI-92 or AI-95, like other gasoline walk-behind tractors. You should not use cheap gasoline, such fuel will negatively affect the quality of engine operation and increase the likelihood of breakdown.
Conservation
If the walk-behind tractor is not used in winter, winter storage is called “mothballing”
Please note that Tselina walk-behind tractors, according to the operating instructions, are designed to operate in temperatures ranging from minus 5 to plus 35 degrees
Also, at temperatures below zero, you can start the walk-behind tractor in a warm room, for example, in a garage, and only then go outside to work.
Basic malfunctions and their elimination
Classification of cutters
A rototiller is a soil knives fixed on an axis, which, rotating around it as the walk-behind tractor moves, crushes the soil and weeds. The designs of cutters vary, so in order to choose the best option, it is worth understanding their varieties. First of all, cutters are classified according to the type of aggregation:
- with side installation;
- with installation using a hinge.
Side cutters, installed as a running gear, essentially replace wheels and operate from their drive shafts. Thus, they simultaneously set the unit in motion and cultivate the soil.
Mounted cutters are distinguished by their rear location - they are installed at the back of the walk-behind tractor, operate from the power take-off shaft and perform only the cultivation function. These are the cutters that are equipped with the Neva (MB 1 and MB 2), Tselina and some others units.
In addition to the type of installation, cutters also differ in types of knives:
- active sabers;
- crow's feet.
In this video we will look at cutters for a walk-behind tractor:
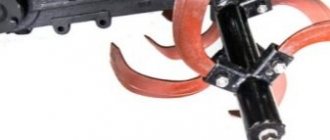
Active sabers
The name of the cutters is determined by their appearance - the knives are large in size and have an elongated curved shape. On cutters of this type there are several sets of four knives located relative to each other at right angles.
Typically, two or more sets of knives are placed on one axis. This rather powerful design of the equipment is highly durable and copes well with processing heavy soils and virgin soil, and is not afraid of stones and roots.
"Crow's Feet"
“Crow’s feet” on a walk-behind tractor is another version of the equipment, the name of which is also determined by the shape of the knives - triangular, similar to crow’s feet, and located at the ends of the racks of the cutting elements. As in the previous option, the number of knives determines the quality of cultivation and varies depending on the power of the unit.
There are three-row and four-row crow's feet with different axle diameters. Three-row tillers on an axle with a diameter of 25 mm are installed on walk-behind tractors Texas, Neva, Krot, Cayman, and four-row ones are suitable for units of the Salyut, Farmer, Favorit brands. Equipment on a 30 mm axis is compatible with Cascade, Master Yard devices, some models of Neva walk-behind tractors and a number of others.
“Crow’s feet” are cutters for walk-behind tractors that show high efficiency when processing heavy, clayey soils and virgin soil, but can become clogged when working in areas full of roots.
Installation
If the user purchased cutters without assembly, they must be assembled correctly. Today this is not difficult, since the buyer has at his disposal not only detailed instructions from the manufacturer, but also a wide range of video materials that can be obtained on the Internet
When assembling the product, it is important to ensure that the active part of the unit enters the soil during operation. Side options are installed on both sides of the walk-behind tractor; they operate from drive shafts and wheels
In this position, the cutters are a practical replacement for the wheels of a motorized cultivator; they are the ones that set the motorized equipment in motion.
The cutters, whose operation is carried out by the power take-off shaft, are located behind the cultivator. They do not take part in the movement of the device.
To install the cutters on the cultivator, you need to use special wooden trestles with a height of about 50 cm. Also, in this case, the equipment must not only be lifted, but also rested on the coulter, and also tilted at an angle of 45 degrees. Then the wheels are removed from the cultivator and cutters are placed in this place. Next, special plates should be installed on the outer ends on both sides, due to which the movement of the device will be smooth and stable.
Additional sections are installed to the main ones through the use of pins. The restrictive metal disk is connected to the frame using bolts. In this case, the number of blades should be selected for the cultivator, based on its power. To assemble cutting blades, it is possible to use one or more axes
When assembling a four-blade cutter, it is important to consider the sequence of the right and left blades that are placed on the mounting plate
Which cutters are better for a walk-behind tractor: saber or crow's feet?
When choosing a rototiller option for your unit, you should proceed from the characteristics of the soil. Of course, saber knives can easily cope with the cultivation of previously cultivated soils. When it comes to processing virgin areas or lands densely overgrown with grasses, basic factory cutters sometimes do not cope with the load very well due to insufficiently high quality materials and workmanship (bolted and welded joints). Processing heavy soil with such cutters is a rather heavy load both on the walk-behind tractor and on its operator. It is much easier for purchased or homemade cutters with knives made of high-quality metal to cope with their task.
As for the “crow’s feet” cutter option, you can install the desired number of sections on a walk-behind tractor, adjusting its performance to suit the needs of your own farm and the power of the unit. This type of equipment copes more easily with hard soils and vegetation debris and ensures easier controllability of the device during operation. Many users note this particular design as optimal in terms of practicality and reliability.
snow blower
Many owners do not lay up their walk-behind tractor in winter. With its help, you can clear large areas of the estate from snow cover. Snow removal devices mounted with it can be divided into several groups:
- dump shovels;
- rotary throwers;
- brush mechanisms.
The simplest and most affordable is a dump-type device. The width of the shovel fixed to the front of the walk-behind tractor can be from 0.8 to 1.5 meters. The choice of its size depends on the power of the motor. The design of the blade allows for adjustment of the tilt and rotation angle.
Where a shovel is helpless, and this often happens with high snow drifts, a rotary snow blower will do the job. It is connected to the power take-off shaft of the walk-behind tractor. The rotary auger design has high performance and confidently clears the area of snow cover up to 50 cm high.
The brush attachment is used for cleaning areas with expensive decorative coatings that require the most careful work.
Motor pumps have been created to irrigate plots located far from power lines and close to water bodies. This type of attachment for walk-behind tractors is connected to the power take-off shaft. The average productivity of motor pumps is 20-40 m3 of liquid per hour. The created pressure reaches 4-5 meters with a suction depth of up to 10 meters.
Assembling crow's feet with your own hands
If for some reason the existing rotary cutters are not satisfactory or have become unusable, home-made rotary cutters for a walk-behind tractor can be an alternative to purchased devices. This task is not particularly difficult and at the same time has advantages in the form of the desired degree of reliability of the structure and its features, increasing the efficiency of land cultivation and, of course, saving money on the purchase of a ready-made device.
The easiest way to make it is to study the design of industrial cutters and diagrams of how to assemble a cutter, and then create an analogue, making the desired adjustments if required. It makes sense to draw drawings for assembly that take into account the necessary parameters and requirements for the device.
About the elements
They are needed when cultivating the soil. Therefore, the quality of processing and the complexity of the procedure itself depend on the model: load on the motor, ease of control and labor intensity.
How to assemble cutters?
As a rule, the cutter is included with the walk-behind tractor. But this may not be enough. Sometimes it is necessary to increase the depth or width of processing, so the device can be supplemented with other products. This solution also makes it possible to improve the process of moving the walk-behind tractor forward. In addition, this will increase the service life of the mechanism.
If the soil is clayey, then it is better to use two pairs of cultivators. And even if the soil is light and has already been cultivated previously, additional elements will not become a hindrance.
Changing the depth is possible due to the adjustable coulter. It is a durable element located vertically in the walk-behind tractor coupling. And the final loosening depth is influenced by the diameter of the cultivator cutter.
Manufacturing an active cutter
Now let's look at how to make saber-shaped tillers. Assembly of this option is also not particularly difficult. As with the previous option, you should first carefully study the design and create a drawing.
The set of parts from which the device is assembled includes:
- rotor axle (solid or split, length is determined individually);
- fixing component;
- knives;
- fasteners (bolts, nuts).
When assembling, it is important to take into account that the movement of the cutting elements occurs counterclockwise. In general, the process is similar to making crow's feet. The only issue that requires special attention is the technology of creating knives. They should be bent after heating at an angle of 90 degrees. The length of the knife part after bending should be about 8 cm. After manufacturing, it is necessary to harden and install it on the flange.
Plows
The evolution of swing devices is embodied in the following types of devices:
- The plow is standard. A wide knife - a ploughshare of such a device - loosens the ground when plowing, cutting off the roots of weeds. A bent sheet - the blade turns over the layer of earth.
The method of attaching a standard plow to a walk-behind tractor is illustrated in Figure 1. The main parts of this device: ploughshare, blade, stand, heel, field board are visible in Figure No. 2.
- Reversible (rotary, double-revolved) plow. Two plows are mounted on a common frame at an angle of 90 or 180 degrees. Their dumps are directed in different directions. In the working position, one of them plows the ground, and the second is located on the side. After passing the furrows, they are swapped by pressing (or removing) the latch and turning to the side. Thanks to this, the operator does not have to return to the beginning of the section each time, making an idle run.
- Zykov's plow. An improved version of the classic plow. It differs from it in the modified geometry of the plowshare-mouldboard surface. Thanks to the modification, it turns over the soil layer well and crumbles it.
In a double-turn design and fully equipped - a beam, a wheel and a hitch bracket (price in the Russian Federation for 2022 is 17-18 thousand rubles)
Designed and produced in Ukraine, the Zykov plow is still rare in Russia. Only a few DIY enthusiasts are trying to reproduce it in home workshops.
How to sharpen cutters
First of all, we note that sharpening rotary cutters is not necessary in all cases. For example, if heavy soil is being processed with a powerful unit on which reinforced cutters are installed, there is no point in sharpening - you will not notice a difference in the quality of cultivation, you will only waste your efforts on sharpening.
At the same time, when working with lighter equipment, sharpened cutting devices can temporarily increase the efficiency of cultivation. But you need to be prepared for the fact that sharpening is not enough for a long time; after a few hours of active use, the knives become dull, and you will have to sharpen them again, which is quite labor-intensive. In addition, too sharp knives crush the root systems of weeds, which does not help fight them, but, on the contrary, accelerates their reproduction.
However, if desired, you can sharpen soil knives. To do this, remove the cutter from the walk-behind tractor, clean it of dirt and carefully sharpen each knife using sandpaper.
Useful tips
In order to optimize the load and increase the service life of the cultivator, the loosening width is selected by changing the number of mounted soil cutters.
The adjustable coulter allows you to adjust the depth of the blade. It does all the work, no effort is needed on the walk-behind tractor. The steering handle is slightly pressed to the ground, the coulter penetrates the soil more strongly and slows down the progress of the equipment, thereby increasing the depth of cultivation.
To prevent the gearbox from resting on the uncultivated ground, the equipment is rocked a little.
When working with a cultivator, the user must keep his back straight and his hands at waist level. This body position contributes to longer operation of the unit and will not cause harm to health.
If the blades become dull after long use, they must be sharpened using a grinder. For ease of maintenance, choose self-sharpening knives. The type of soil has a big influence on the cutting edges. In wet or heavy soil, blades wear out faster.
For more comfortable work and high-quality soil cultivation, the rotation speed of the cutter for the console walk-behind tractor should reach 275 rpm, and for the cultivator - 140 rpm.
If mechanized equipment does not work well with a soil cutter, it is necessary to find out the cause of the malfunction and eliminate it in a timely manner. If it is impossible to carry out repairs, turn to specialists for help.
How to properly plow with a walk-behind tractor with cutters
As mentioned above, one of the important factors in the efficiency of soil treatment with rotary cutters is the level of depth of the coulter. The second no less important point is the correct choice of unit speed. Experienced users recommend using second gear, as this increases the number of revolutions and improves the quality of crushing the soil and diving to the desired depth.
“I’ve been working on a walk-behind tractor for over 30 years. I made the cutters myself, because everything that is on sale does not suit me. I use the “crow’s foot” type, modified it four times to suit my requirements. After switching to a modern walk-behind tractor, I see the same excellent results.”
“I assembled the rotary cutters myself, but I paid insufficient attention to the recommendation to follow the drawing exactly - I thought that I could get the desired result “by eye.” Because of this, I had to disassemble and reassemble several times, I had to tinker. I highly recommend that everyone who assembles cutters on their own not repeat my mistake and neglect accuracy.”
Auxiliary equipment for walk-behind tractor
- wheels with lugs for working on loose soil;
- lift;
- mounted bucket-blade for snow removal.
To do this you need:
- 2 steel wheels from a car;
- corners 25x25 cm;
- electric welding;
- Bulgarian;
- tape measure and pencil.
The corner is cut into segments of 35-40 cm. The rims of the disk are marked into equal segments. It's best if there are . Marks are made and corners are welded at the marks.
It is better to make a do-it-yourself lift for a walk-behind tractor from a piece of pipe with a diameter of 100 mm. The lift itself is made in the form of a roller on a bracket. If necessary, it changes its position and makes it possible to lift the walk-behind tractor onto a support. In its normal position, the lift shaft is located in front of the unit and is used as a support roller when overcoming ditches and ruts.
It is recommended to assemble a bucket for a walk-behind tractor with your own hands if you plan to use it as a snowblower.
The ladle can be made:
- made of sheet metal 1.5-2 mm thick;
- hard plastic with a knife at the bottom made of a metal strip;
- from plywood 8-10 mm thick or OSB board 10-12 mm.
In order for the bucket to work for a long time, a support ski is placed in front on a bracket. This will make cleaning safer. The cutting surface will be at a certain height above the ground and will not touch the ground.
You can improve your home motorcycle equipment to suit your requirements without high costs. After all, you can assemble attachments for a walk-behind tractor yourself, doing everything yourself.
How to choose and use crow's feet for a walk-behind tractor?
The walk-behind tractor is an excellent assistant in cases where it is necessary to constantly cultivate the soil in a field or summer cottage. There are a large number of models on the modern market, so everyone can choose the best walk-behind tractor for themselves.
To improve the functionality of the device, you need to use additional attachments, which are also available in a wide range. One of the most effective is considered to be “crow’s feet”.
What do walk-behind tractors come with?
The walk-behind tractor itself represents only a power unit with wheels. In order for it to perform useful work, it must be turned into an agricultural machine, supplemented with attachments. Only then do the positive aspects of this energy-rich device begin to appear.
A small list of basic attachments and attachments:
- The lugs will allow the walk-behind tractor to move across the arable land.
- Plow and cutter. Since ancient times, deep cultivation of the land with the rotation of the layer was carried out by plows. A soil mill is a device capable of loosening the fertile layer.
- A potato planter will make the work of villagers and summer residents easier when planting potatoes.
- A flat cutter is one of the ancient tools that is experiencing a rebirth with the emergence of the ideas of organic (ecological) farming.
- Hillers. An increase in the yield of root crops, as well as an increase in the efficiency of the plant root system, is achieved by using hillers.
- The trailer turns the walk-behind tractor into a vehicle that can transport cargo on the site and on public roads.
- The snow blower extends the period of use of the walk-behind tractor; in winter it is actively used for clearing snow.
This is not a complete list of attachments for a walk-behind tractor.
It is not necessary to purchase the entire set of attachments for the walk-behind tractor at once. Additional tools are purchased or manufactured as needed.
Purpose and features
“Crow's feet” are one of the most popular types of cutters, which are designed to ensure high-quality plowing of the land on the site. This element is a small axis on which knives are placed. It is they who create the effect of cutting the earth, plowing it in a similar way. It should be noted that when using a walk-behind tractor with similar cutters in a dacha area, not only the soil can be processed, but also the plants on it. Therefore, many summer residents use this unit to control weeds.
The peculiarity of “crow's feet” is that they do not come apart into parts, but are distinguished by a cast construction. During the production process, exclusively carbon steel is used, which ensures the reliability and durability of the unit.
Another advantage of the element is its triangular shape, which guarantees excellent soil mixing. This configuration is extremely relevant, given the strength of solid soil.
Crow's feet are simply irreplaceable when cultivating areas where the soil lies in a large lump.
Most summer residents use walk-behind tractors with similar cutters to cultivate the area where potatoes will be planted. Some believe that such finishing can even protect the future harvest from the Colorado potato beetle.
If you plan to use the attachment not only for cultivating the ground, but also for destroying weeds, then the edges of the knives will need to be sharpened first, since initially they are quite dull.
Potato planter and potato digger
The main crop of our fields and summer cottages - potatoes - requires significant labor input during planting and harvesting. To mechanize these operations, two mounted units are used: a potato planter and a potato digger.
The first is equipped with a small plow that makes a furrow. Immediately behind it, a hopper is installed on the frame, from which the potatoes fall into the ground at regular intervals. Two inclined hiller discs attached to the back of the frame fill the bed. So, three operations are performed at once in one pass.
The KSM-1A trailed potato planter makes a furrow itself and places potatoes in it
Anyone who has dug potatoes with a shovel at least once will certainly appreciate the usefulness of this simple device. The potato digger, mounted on the hitch of a walk-behind tractor, consists of a plow with steel rods welded to it. Lifting the soil under the bushes, he carefully removes the tubers to the surface. Collecting them in a bag or box after such processing is not difficult.
Fan potato digger
In addition to fan type diggers, there are more efficient vibrating screen type diggers. They are designed for processing large areas. Such equipment is connected through a power take-off shaft, which transmits torque to the potato digger pulley, causing the working elements of the mechanism to vibrate.
Vibrating potato digger (prices for devices start at an average of 12 thousand rubles)
Selection rules
The choice of crow's feet attachment must be approached with all responsibility, since this determines whether the model is suitable for cultivating the land at your summer cottage. In the selection process, first of all, you need to pay attention to the size of the nozzle. The element must be selected so that its diameter fully matches the size of the landing shaft. The peculiarity of the latter is that they have three rows of knives. Similar “crow’s feet” are perfect for walk-behind tractors from the “Texas” or “Neva” series .
In addition, when purchasing crow's feet cutters, you need to carefully study the outer diameter of the element. This is an extremely important indicator, because it directly affects the depth of plowing.
Of course, the quality of the knives is also an important indicator. If these are Chinese cheap fakes, then after the first treatment they will begin to bend and break. It is best to give preference to models that were produced using carbon steel.
Main advantages and nuances of assembly
The widespread use of such cutters began in the second half of the last century, when the process of mechanization gained great momentum. Immediately after their appearance, crow's feet showed effectiveness in use. The main advantage is that the design is divided into several parts, which can be created separately. In addition, if a certain element fails, you can simply replace it , then the device will again become suitable for use.
Before assembling the crow's feet, you need to decide on the type of structure. This is extremely important, since each walk-behind tractor has its own suitable options. Only after selecting the optimal type can you begin to select the materials used.
When assembling such a cutter, it is extremely important to take a responsible approach to the installation of all elements, regardless of their purpose and other features. Under no circumstances should any deviations or errors be allowed. This can not only cause complete failure of the walk-behind tractor, but also have a negative impact on human safety.
During the installation process you will have to use a hexagon, which will significantly simplify the work and allow you to correctly install the elements. The dimensional characteristics of crow's feet may vary, however, most models on the market differ in dimensions of 300x400x23 mm.
Most users are interested in the question of whether it is worth sharpening knives when installing these cutters. There is no clear answer today. There are several factors to consider. First of all, the manufacturer’s recommendations are of great importance in this matter.
Some companies that specialize in the production and sale of crow's feet do not recommend additional sharpening , as this may negatively affect the efficiency of the cutters. Others advise sharpening before the start of each season so that the knives can cope with their task without problems.
The main advantage of sharpening is that the cultivation process will become simpler, since it will be much easier to process the soil with such knives . However, each time you sharpen you will have to dismantle and install new equipment, which takes a lot of effort and time.
Thus, “crow’s feet” are one of the most popular options for cutters for walk-behind tractors. High quality, durability and efficiency of use set these cutters apart from others.
You will find out more information about “crow’s feet” for walk-behind tractors below.
All rights reserved, 14+
The use of any materials without our prior written consent is prohibited.
We assemble the cutters on the walk-behind tractor correctly
Most of the components of the models come in disassembled form. Not every agronomist can collect them correctly. Here are the instructions. For small-sized equipment, assembling knives is not difficult. Place and bolt the blades into the mounting holes. When assembling, position the cutting part in the correct direction. They have factory markings. L – turned to the left, R – to the right. Fasten the next part to the previous one using a pin and a pin. Use the bolt to secure the cutting disc. Since the equipment differs in power, the number of sections varies from 24 to 40. Sets consisting of four petals are assembled in stages. To simplify the installation process, distribute them into right and left parts. To assemble mechanisms consisting of three blades, it is necessary to fix the first blade with a bolt on the axis. To attach the next one, you will need to remove the bolt. Install the first plate on the outer edge, the remaining two should be fixed on the inner one. Each edge is marked R and L. The quality of the work performed depends on the correct assembly of the cutters for the walk-behind tractor. Will dwell in more detail on the assembly of three-blade mechanisms.