Huggies Diapers Elite Soft 5-9 kg (size 3) 160 pcs
2199 ₽ More details
Merries Diapers-panties L 9-14 kg 56 pcs
1258 ₽ More details
Hydraulic compensators
Although walk-behind tractors are not complex equipment, they do have their own characteristics. For example, when using the unit, two starters operate simultaneously: an auxiliary and a main mechanism. The first is an electric, spring and manual starter.
The last option is most often used in Cascade walk-behind tractor models, since it can be easily installed independently. Such designs are durable and unpretentious.
In this article we will talk about how to independently replace the starter on a Cascade walk-behind tractor.
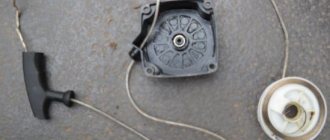
You can replace the starter yourself
Starters for walk-behind tractors: we understand the design, types, repair and maintenance
Walk-behind tractors cannot be called complex structures, but still even they contain certain features. For example, during operation of the device, two starters work at once: the main and auxiliary. Spring, electric and manual options are used as reliable assistants. The latter are the most common, because they can be easily installed on a walk-behind tractor and, if necessary, repair the object yourself. Such kickstarters are unpretentious and often successfully serve for years with careful use.
Typical faults
The most common tool failures include the following:
- problems in the ignition system;
- stopping the chainsaw while cutting;
- loss of power during operation;
- wear of some structural elements of the chainsaw (brake band, drive sprockets, anti-vibration parts);
- problems in the fuel supply system;
- starter related problems.
In addition, it is necessary to carry out a visual inspection of the chainsaw before starting work and take preventive measures. These include lubrication of the chain, control of the amount of fuel mixture, as well as the presence of the required amount of oil.
The spark plug is unscrewed to check its condition.
Each of the faults is eliminated using its own technology. For example, repairing the fuel system of a chainsaw should begin with inspecting the corresponding filter. Trouble starting an electric lawn mower. After this, check the correct adjustment of the carburetor, which is carried out using screws. The gaps must be set in strict accordance with the manufacturer's instructions, which must be included with the chainsaw. Repair of the ignition system includes inspection of spark plugs. If heavy carbon deposits, changes in clearance or other visible damage are detected, this element must be replaced.
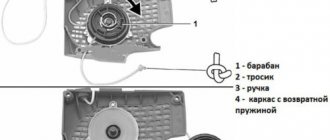
Design of a manual starter for a walk-behind tractor
The device consists of:
- a body made in the form of a drum;
- large and small springs;
- reeds and washers;
- reels and cord;
- fastening parts.
The cord itself is fixed on a reel installed in the central part of the drum. A special large ring spring is placed in the drum around the axis and helps the reel return to its initial state after scrolling. As you can see, assembling such a mechanism is quite simple.
As for the working process, everything is even simpler here: after a person jerks the starter handle with a sharp movement, the mechanism itself comes into action and transmits the initial rotation to the engine. For better acceleration, pull the handle twice.
But, as is usually the case, nothing works forever and even such reliable devices sometimes fail. Be that as it may, there is no need to be upset, because all problems can be corrected.
Disassembly of the starter unit
The starting mechanism is disassembled in order to install new parts instead of broken ones in the following sequence:
- use a screwdriver to unscrew the screw that secures the pulley with the starter cover;
- remove the spring and antennae;
- carefully remove the pulley (you need to turn your head away or work while wearing glasses and gloves);
- determine why the trigger mechanism broke down;
- if the spring has collapsed almost completely, then it is replaced;
- when the spring leaves the hook, it is installed in its original place, bending the antennae first (the photographs show the installation process);
After the spring plate is installed inside the groove, carefully twist it. To change the spring, you should work carefully and carefully: it may accidentally burst under the influence of the force caused by installing it in place
Even if you carefully remove the roller, the spring strip very quickly flies off the reel and can injure your hand with its sharp edges
To change the spring, you should work carefully and carefully: it may accidentally burst under the influence of the force caused by installing it in place
Even if you carefully remove the roller, the spring strip very quickly flies off the reel and can injure your hand with its sharp edges
It is not always possible to immediately put the spring plate back in its original place. It often slips, so attempts must be repeated until the desired result is achieved.
How to repair a manual starter for a walk-behind tractor with your own hands?
- Before starting all procedures, it is advisable to find a diagram from the manufacturer or use the document presented on our website;
- You should prepare a wrench that will be needed in the future to unscrew and remove nuts;
- Before disconnecting the starter itself, it would be a good idea to take a photo of everything so that you can reassemble it correctly in the end;
- Unscrew the washer located in the central part of the drum;
- Inspect all the elements inside and look for damaged parts.
The main thing is to be very careful with all small things so as not to lose them. Most often, starter repair involves updating unusable parts. For example, replacing the starter cord will be important if it is completely frayed or torn.
With a large spring, everything is somewhat more complicated, because there are special hooks at the ends of the attachment points. If they are missing, you need to heat these very ends and bend them in the appropriate direction. An important point: you should not try to return the element to its former functionality when there is pronounced metal fatigue. Replacement will be the best solution.
Valve adjustment
This procedure is carried out only on a cooled engine. Metal expanded from heating will not allow it to be completed correctly and accurately. You will have to wait approximately 3 or 4 hours. It is recommended to first blow off the motor with a jet of compressed air, and ideally, wash it. Having disconnected the wires from the spark plugs, unscrew the bolts from the resonator. The resonator itself will have to be removed, while acting as carefully as possible so that the mount remains in place.
Disconnect the PCV valve and power steering bolt. Using pliers, dismantle the ventilation duct of the block head. Unscrew the bolts securing the cover of this head. Wipe everything thoroughly to prevent contamination. Remove the timing cover.
Turn the wheels to the left until they stop. Remove the nut from the crankshaft and turn the shaft strictly counterclockwise. Now you can inspect the valves and measure the gaps between them with feeler gauges. To adjust, loosen the locknut and turn the screw, ensuring that the feeler gauge slides into the gap with little force. After tightening the locknut, the gap must be assessed again to ensure that it does not change during the tightening process.
What other types of starters are suitable for a walk-behind tractor?
- Spring starter. It is considered not only easy to install, but also quick to start, because the device will start immediately after moving the handle of the walk-behind tractor. Thanks to the semi-automatic operation of the spring, the engine accelerates. Moreover, replacing a manual starter with a mechanical one will take no more than 2 hours;
- Electric starter for walk-behind tractor. The specified type is powered by a rechargeable battery. Naturally, it is this autonomous source that will determine the power level of the electric starter and the duration of its operation. But it is worth noting that not all models of walk-behind tractors with manual start can adapt to the specified one, therefore, before starting replacement work, you should consider this point and carefully study the capabilities of the existing mechanism.
Every owner of walk-behind tractors should understand that at first absolutely all starters function perfectly and can please their owners with this state of affairs for about a year. But without periodic lubrication of the parts, checking them and a commensurate jerk force, such joy will not last long. Take care of your starter and it will give you high performance and a long service life.
Motoblock starter design - design features of the mechanism
Each walk-behind tractor model has its own design features and is equipped with different mechanisms. Thus, to equip more modern agricultural units, manufacturers use two starters at once.
A spring or auxiliary starter helps the main starter start quickly and smoothly. The main mechanism is a manual starter, which is responsible for starting the motor of the walk-behind tractor. Among the main elements of the walk-behind tractor starter are:
- Coil;
- Drum body;
- Washer, large and small spring;
- Reeds;
- Cord;
- Mounting nuts and bolts.
The reel on which the cord is wound is attached to the core of the drum body. A large spring is installed in the inner chamber of the drum, which is responsible for returning the drum to its previous position after each pull of the cord.
Some walk-behind tractors are equipped with an electric starter. The electric starter for the walk-behind tractor takes power from the battery. The larger the capacity of the latter, the longer the motor starting mechanism will work.
Both the manual kickstarter and the electric starter for the walk-behind tractor have proven to be quite reliable mechanisms with long service life and resistance to mechanical damage.
Do-it-yourself walk-behind tractor starter repair
Despite the high quality and reliability of modern starters, some owners sometimes face the need to repair them. Most often, mechanism breakdowns are minor, which allows you to quickly fix the problem yourself. The procedure for dismantling and further repairing the mechanism is as follows:
- Repairing a unit should begin by studying its diagram. If the design of the walk-behind tractor includes an electric starter, then before dismantling the mechanism you need to familiarize yourself with the location of its terminals;
- Using the wrench included with the walk-behind tractor, unscrew all the screws and nuts holding the mechanism in the walk-behind tractor structure;
- If the unit is being dismantled for the first time, we advise you to photograph the starter before finally removing the mechanism from the unit;
- Next, unscrew the washer located in the central part of the drum housing and carefully inspect the internal parts for damage;
- All further actions depend on the malfunction of the starter parts. If the cord fails - it is worn out or torn, then to replace it you will need to wind a new product, adhering to the marks on the drum body of the mechanism;
- Another common failure is a malfunction of the spring, or more precisely, its antennae, the edges of which should be bent in the shape of hooks. If the tendrils break, then the edges of the spring will need to be heated and bent so that the spring can be hooked onto the holes in the drum. In this case, the remaining length of the spring is of great importance - make sure that the part does not stretch too much. If you find that the spring is very short, or it has already begun to rust, then it is better to replace it entirely.
Prevention
Selecting and installing a starter is only half the work
If you want the purchased part to work for as long as possible, you need to pay close attention to caring for it. New things always work well
For example, a factory starter requires only one pull to start the engine. However, after a year of active use, the situation will certainly change. To prevent such problems from occurring, you need to constantly lubricate before starting. In addition, you should not overdo it when pulling on the handle, as this can cause mechanical failure.
If the kickstarter fails, repairs usually involve updating the components that have stopped working. For example, the cord is replaced if it is frayed, and the spring from the MB-1 can be refilled only if there are problems with its operation.
Thus, the starter is an indispensable part that ensures the operation of the walk-behind tractor.
In the selection process, you need to pay attention to the manufacturer, compatibility with the walk-behind tractor itself and the type of model. In addition, you need to pay attention to constant care of the starter, which will avoid breakdowns and rapid failure during active use.
To learn how to prevent starter operation, watch the video below.
All rights reserved, 14+
The use of any materials without our prior written consent is prohibited.
How to install a starter on a walk-behind tractor - the algorithm in detail
Even novice farmers do not have problems dismantling, disassembling and installing a walk-behind tractor's manual starter. However, the assembly and installation of an electric starter raises a number of questions for inexperienced owners of walk-behind tractors. As a result of incorrectly performed procedures, the engine starting mechanism refuses to work, which is why the starter has to be taken to the workshop. To avoid this need, let’s learn how to install a starter on a walk-behind tractor at home. The installation looks like this:
- To install and secure the crown on the walk-behind tractor flywheel, the flywheel will need to be removed. To do this, remove the air filter of the unit to gain free access to the internal structure of the walk-behind tractor;
- After this, remove the protective cover, unscrew the screws holding the recoil starter basket, the flywheel nut and the flywheel itself. Dismantling the walk-behind tractor starter flywheel can cause certain difficulties, so to remove this part it is better to purchase a special removable key in advance. After removing the flywheel, do not forget to unscrew the key located immediately behind it;
- Next you need to install the generator. In this case, insert its wires into the hole in the steel wall of the motor, and install the generator into the seats on the engine wall;
- Then install the generator magnets inside the flywheel so that the holes in both elements match. Connect both parts with screws and install the crown. Before this, the crown needs to be heated using a burner in the form of a spray can;
- Install the assembled assembly back onto the engine, simultaneously screwing in the keys and flywheel hook;
- Screw in the recoil starter basket, secure the casing and reinstall the walk-behind tractor air filter;
- Next, remove the starter installation plug and install the starter itself on the walk-behind tractor;
- After this, connect the generator wires to the charging relay;
- Connect the starter terminals to the unit’s battery and start the walk-behind tractor.
As you can see, installing a starter to a walk-behind tractor is not as difficult as it might seem at first glance. The main thing when assembling it yourself is to strictly follow all the rules and recommendations listed in the algorithm.
All described methods for repairing and installing a starter are suitable for installing the mechanism on walk-behind tractors Neva, Cascade, Agro and agricultural machines of other well-known manufacturers.
Installation completed
The starter on a walk-behind tractor is an important component of the entire structure, so every farmer needs to know how to repair it and install it correctly.
Tags: elements, handle, types, required, installation, special, similar, time, mechanical, type, most, kickstarter, fastening, reliable, beginning, order, study, necessity, algorithm, came out, assemble, parts, removal, manufacturer, force, way, rule, power, malfunction, dismantling, machine, usually, heat, read, answers, battery, agricultural, longer, quickly, enough, start, carefully, term, jerk, certain, will need, inside, central, system, example
Operating and Maintenance Instructions
Cascade walk-behind tractors are presented in a wide range of different modifications. Thanks to this, they are used on agricultural plots of various sizes. With proper use, Cascade walk-behind tractors can last for a long period of time. However, you need to know how to properly maintain and repair these machines.
If you purchased a Cascade walk-behind tractor, you should read the operating instructions before starting operation.
When purchasing this machine from the factory, it must be included as standard; if you purchased it second-hand, then ask the old owner to provide an instruction manual for the Cascade walk-behind tractor. However, this is a little book that sometimes tends to get lost. Now you can find an electronic version of the instructions on the Internet.
Here are a few facts that anyone who owns this equipment should definitely know.
Oil and fuel
Every owner should know what oil and fuel his Cascade walk-behind tractor works with.
Regardless of what kind of engine you have (Russian-made or Chinese Lifan), you must use only high-quality clean fuel AI-92 or AI-95. Do not use old or dirty gasoline. It can clog the fuel system.
Fuel is taken from the gas tank not from the bottom of the tank, but a little higher. This prevents dirt and dust from entering further into the carburetor, but it simply settles to the bottom.
Changing the oil in the engine of the Cascade walk-behind tractor:
According to the instructions for use, it is recommended to use Soviet oils in accordance with GOST. However, the time of the USSR has already passed, and now you can find higher quality imported motor oils with improved characteristics. In summer, you can use 15W-40 series, and in winter, semi-synthetic 10W-40.
The oil should be changed every 20 hours of operation of the Cascade walk-behind tractor.
The situation is similar with the transmission. The manufacturing plant recommends using Soviet TAP-15v or TAD-17i. However, 75W-90 or 80W-90 can be used instead.
To change the transmission oil, tilt the walk-behind tractor back and pull out the plug. Before doing this, place the container for drainage. Excavation causes great harm to the soil, so you should not pour it there.
Control levers are lubricated with Litol or Solidol.
First launch and run-in
The successful use of the walk-behind tractor in the future depends on the correct start of use. And an important stage is running-in.
These are the first hours of operation of the new device. In this way, the parts rub against each other and fit neatly into the grooves, so it is not allowed to heavily load the device at this time. The highest load should be half the maximum power. Otherwise, parts may fail before full operation begins.
If you are the first owner of a Cascade walk-behind tractor, then fill the crankcase with oil! It is not included in the factory configuration. And if you forget to fill it, there will be excessive friction, and the parts will fail again.
Since Cascade walk-behind tractors are representatives of a professional family, when purchasing it the owner expects it to work for a long time and help in carrying out agricultural work, and do not forget about running it in before starting.
Major breakdowns
Cascade walk-behind tractors have gained immense popularity due to the large number of compatible attachments and easy maintainability. You can easily configure and repair almost all parts of the equipment.
The most common reason for parts failure is their natural wear and tear. In order for the walk-behind tractor to serve for a long time, it is necessary to carry out tuning and regular scheduled technical inspections.
FakeHeader
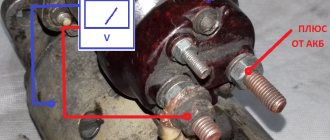
They are the ones that connect the relay to the ground of the car.
The design can have its own housing or be installed in a common unit.
A gear device that meshes with the flywheel of an internal combustion engine and ensures engine rotation. In this case, the battery ground is connected to the starter ground. Only after this does the fuel-air mixture ignite in the combustion chamber.
What is the purpose of such an additional relay and why do some car enthusiasts install it? To understand why a starter solenoid relay is needed, let’s look at the engine’s operation schematically. My name is Mikhail, now I’ll tell you a story about how I managed to exchange a two-wheeler for a Camry. Then, when installing an alarm system, auto electricians could move the starter relay on the VAZ to another place. At first there will be a rather loud click. This means that the main system starts, but the starter does not work. It synchronizes the operation of the starter.
Installation process
Passing strong current near sensitive electronic components of a computer can affect their operation. I’ll say right away that I am against loans and taking a car, especially not a new one, on credit is unreasonable. A common option is to install an additional relay in the power circuit and control it with 3Z contacts.
It synchronizes the operation of the starter. Until a year, the bendix was located on the same shaft as the rotor, and then a new arrangement appeared, where the bendix began to have its own separate shaft and rotate through a gearbox.
For degreasing, use a modern liquid sold in automotive stores. To this we can add that not even all the latest modifications of this car have a wiring diagram for the VAZ starter. Installation of starter relay 2110
Construction of Cascade walk-behind tractors
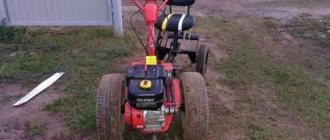
The Cascade walk-behind tractor is a power plant with a single-cylinder 4-stroke engine installed. All Cascade devices are equipped with DM or Lifan engines. All control levers are located on the steering rod. The transmission is located under the engine. Also connected to the engine are: gearbox, transmission, differential, PTO and clutch.
In the standard version, the Cascade walk-behind tractor drives using pneumatic tires measuring 4x11.
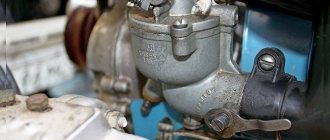
Carburetor
This part is responsible for preparing and supplying the fuel mixture.
If the carburetor mixes in the wrong proportion, this can be seen immediately.
Most often, to restore its proper operation, it is enough to simply adjust the supply of fuel and air to the carburetor. This is done in the following sequence:
- Fully unscrew the adjusting screws that control the maximum and minimum throttle. Afterwards, the bolts should be returned back one and a half turns;
- Let the engine idle for about 10 minutes;
- Place the lever that controls engine speed in the lowest position. In this case, the engine must not stop working;
- Set the throttle valve to the lowest idle speed. The operation of the motor should be clear, without foreign sounds;
- Then use the fuel screws to adjust the gasoline supply (when you tighten the screw, the gasoline supply increases, and when you unscrew it, it decreases).
90 percent of all malfunctions in the carburetor of the Cascade walk-behind tractor are solved by tuning it. If the problem persists, try disassembling and cleaning the carburetor. This is done to remove the resulting carbon deposits and slag.
Setting up the carburetor of the Cascade walk-behind tractor:
The carburetor should be washed with a soft cloth soaked in gasoline. After removing all debris, the carburetor must be thoroughly dried. This is best done using an air compressor; if you don’t have one at hand, then wipe it thoroughly with a dry cloth and let it dry. Then reassemble.
If during disassembly you notice that some part of the carburetor has broken off, then it is not permissible to continue working with such a part! It needs to be replaced with a new one.
Reducer and gearbox
Below are the main problems that arise when operating the Cascade walk-behind tractor from the gearbox side, and ways to solve them:
Oil leaking
This phenomenon may indicate:
- simple overflow of oil in the transmission,
- significant wear or incorrect installation of seals on bearings,
- wear of the pads, the cap not being tightened completely, or foreign particles getting into the air valve.
Inspect each part above to find the cause and then fix the problem.
Difficulty shifting gears
There are several reasons here, let's look at each of them:
- Worn parts in the gearbox. The ends on gears are most often worn. Therefore, the transmission cannot be fixed and constantly breaks down, and its shifting is not controlled. You should disassemble the entire gearbox and inspect the gears; if they are worn, try to grind them as much as possible. If this cannot be done, then replace it.
- The shaft splines are worn or misaligned. To adjust them correctly, they must be equipped with additional locking rings. If they are worn out, then there is only one way out - to change them.
- The clutch is not adjusted correctly. As a result, the gear shift lever is not locked in its final position. This may be a consequence of improper handling of the Cascade walk-behind tractor, when the lever is released before it is properly locked. In this case, you should adjust the clutch and shift gears correctly in the future.
The gearbox is considered a complex unit in which several parts operate simultaneously. You should start repairing the gearbox of a Cascade walk-behind tractor only if you are confident in your abilities. If this is not the case, then you should contact a specialist.
Clutch
The transmission is a part of the Cascade walk-behind tractor, which is designed to transmit rotation from the engine to the shaft, and from it to the attachments.
The transmission of the Cascade walk-behind tractor consists of a clutch, gearbox, differential and final drive.
The most common problem is clutch adjustment.
If the Cascade walk-behind tractor “drives” during operation (the lever is fully pressed, but the machine is trying to move forward), then the adjusting screw should be tightened a little.
If the clutch slips (in other words, when the clutch is fully released, the device does not move, or produces a low number of revolutions), then it must be loosened.
After final adjustment, the clutch screw should be securely fixed so that during operation it is in one position and does not move.
If this does not help, then the problem may be in the flywheel. This is a device that transmits torque from the starter to the crankshaft.
Assembling and installing the flywheel clutch:
The most common wear is observed on the flywheel teeth. This is exactly the part that engages with the shaft and transmits rotation. And their teeth periodically break off.
Therefore, instead of replacing the entire flywheel, you can simply repair it by replacing the crown. This work should only be carried out in workshops.
The unit does not work or is unstable
It’s logical to start analyzing possible breakdowns with the following situation: the “Cascade” walk-behind tractor starts up and immediately stalls. Or it stopped starting altogether. The most likely reasons are:
- excess gasoline (this is indicated by the humidity of the candle);
- in models with an electric starter, the problem often lies in the battery being discharged;
- the total engine power is insufficient;
- There was a problem with the muffler.
The solution to each of these problems is quite simple. So, if a lot of gasoline is poured into the gas tank, be sure to dry the cylinder. After this, start the walk-behind tractor using a manual starter. Important: before this, the candle must be unscrewed and also dried. If the manual starter works but the electric starter does not, then the battery needs to be charged or replaced.
If the engine does not have enough power to operate normally, it must be repaired. To reduce the likelihood of such a breakdown, you must use only impeccable quality gasoline. Sometimes the carburetor filter becomes clogged due to poor fuel. You can clean it, but it’s better - we repeat again - to perceive such an event correctly and stop saving on fuel.
Sometimes adjustment of the KMB-5 carburetor is required. Such devices are installed on lightweight walk-behind tractors. But this does not diminish the importance of their work. After repairing a failed carburetor, only suitable grades of gasoline should be used to flush individual parts. Attempts to remove contaminants using a solvent will result in deformation of the rubber parts and washers.
You need to assemble the device as carefully as possible. Then bending and damage to parts will be avoided. The smallest parts of carburetors are cleaned with a thin wire or steel needle. Be sure to check after assembly whether the connection between the float chamber and the main body is tight. You should also evaluate whether there are any problems with the air filters or whether there are fuel leaks.
The actual adjustment of the carburetors is carried out either in the spring, when the walk-behind tractor is rolled out for the first time after the “winter vacation,” or in the fall, when the device has already been working for a very long time. But sometimes this procedure is resorted to at other times, trying to eliminate the shortcomings that have arisen. The typical sequence of steps is:
- warming up the engine in 5 minutes;
- tightening the adjusting bolts of the smallest and largest gas to the limit;
- unscrewing them one and a half turns;
- setting the transmission levers to the smallest stroke;
- setting low speeds using the throttle;
- unscrewing (slightly) the throttle screw to set the idle speed - with the engine running continuously;
- stopping the engine;
- assessment of the quality of adjustment by a new start.
To eliminate errors in the process of setting up the carburetor, you must check each step with the operating instructions. When the work is done normally, there will be no extraneous noise in the motor. Moreover, failures in any of the operating modes will be excluded. Then you will need to observe the sounds that the walk-behind tractor makes. If they differ from the norm, a new adjustment is needed.
Setting up a manual starter with your own hands for a Cascade walk-behind tractor
Despite the fact that a manual starter is very inconvenient to use, manufacturers often produce walk-behind tractors with such a mechanism. Its design is considered much simpler than that of an electric starter, and it can be repaired at home without much difficulty. Frequent breakdowns of a manual starter:
- Ring spring malfunction. In this case, the most common problem is when one of the end tendrils of the fastening is unbent. In this case, you just need to heat the metal and bend it. If the spring bursts completely, then replace it with a new one.
- If the cord or cable is worn out, replace it with a new one.
- The reeds are out of order.
- The hook in the center of the reel is broken.
Also, do not exclude the possibility that any other part may simply fail. The first thing we do is disassemble the starter structure, only then will we be able to see the true cause of the breakdown. How to do it:
- It would be nice to have a starter diagram with you. In it you can find all the details on fastening the parts.
- Remove the starter block.
- Unscrew the washer in the center of the drum.
- Next, we remove all other parts, carefully checking them for damage.
If the hook inside the coil is broken, you need to take a sheet of metal 1 mm thick and cut out an alternative with a tendril for the spring hook so that this circle can fit around the hole in the center of the coil. As soon as this “prosthesis” goes inside, the tendril will protrude and serve as a hook for the spring. Next, we wind the spring tightly, install and fix it in the housing. Then you need to install the coil and all the following parts in the required sequence. Lubricate all friction points with grease.
Working with a gearbox (reducer)
Sometimes there is a need to repair the speed switch. Oil seals are changed immediately when faults are detected. First, the cutters located on the shaft are removed. Clean them from all contaminants. Remove the cover by unscrewing the bolts. Install a replacement oil seal and, if necessary, treat the connector with a portion of sealant.
Ignition adjustment and its rehabilitation on the Cascade walk-behind tractor
Most often, spark plugs fail in the ignition system, so try to always have such a part in stock. Remember that each engine has its own specific spark plugs. For example, for DM-1, DM-1D, A-11-1, A-11-0, A-17V, SI-12RT are suitable. All of them have a thread length of 12 mm. As for imported candles, B8AC presented by the famous company BOSCH showed themselves to be worthy.
How to check the serviceability of the ignition and spark plugs?
- We turn out the candle.
- We wipe all electrodes dry.
- If there is carbon deposits on the electrodes, then you need to clean it with a stiff metal brush.
- After cleaning, set the gap between the electrodes.
- We put a high-voltage wire square on the spark plug.
- We press the spark plug body to the cylinder head.
- We rotate the spark plug so that the electrodes point away from the hole.
- We turn the crankshaft 3 - 4 times.
- If everything is fine, you will see a white-blue spark. If something is wrong, then the spark will have a white-yellow color.
- If the spark is still yellow, then carefully check the stator and magnetic shoe of the flywheel. Then we set a gap between them of 0.1 - 0.15 mm
It is worth noting such breakdowns of the Cascade walk-behind tractor as:
- Second or first gear offset.
- Motor malfunctions.
- Carburetor failure, etc.
Problems in the ignition system
If there is no spark, as already mentioned, you should carefully check the battery. When everything is fine with it, the contacts and the quality of the insulation are examined. In many cases, the lack of sparks is due to a clogged ignition system. If everything is clean there, look at the contact connecting the main electrode and the spark plug cap. And then they check the electrodes sequentially, assessing whether there is a gap between them.
A special feeler gauge will allow you to determine whether this gap corresponds to the recommended value (0.8 mm). Remove carbon deposits accumulated on the insulator and metal parts. Check the spark plug to ensure there are no oil stains. All of them must be removed. By pulling out the starter cable, dry the cylinder. If all these steps do not help, you will have to change the spark plugs.
Modernization of walk-behind tractor
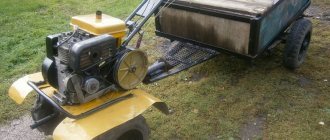
Many owners decide to further modernize their unit and design an adapter or other attachments for it. The adapter is a kind of wheelbarrow with a seat for the driver. It is worth noting that the speed of such a modernized unit is not much different from the previous old version. So you don’t have to be afraid of losing speed and time for processing the site with such a modification, and feel free to design this unit
By following these instructions, you can easily resume operation of the Cascade walk-behind tractor. If you doubt your technical abilities, knowledge and skills, then it is better to contact a specialist. He will conduct high-quality diagnostics and quickly resolve all problems.