Homemade hand cultivators, types and features Cultivators are indispensable helpers in a summer cottage. Different designs are used for work, but they are united by one goal - loosening the soil without turning over the layer and removing weeds.
Cultivating the area with a cultivator can improve the condition of the soil and increase the yield of cultivated plants.
For small summer cottages, a hand cultivator is quite sufficient. The tool is compact in size, but at the same time allows for high productivity.
A cultivator is a universal device. With its help, you can not only loosen the soil, but also remove weeds and even harvest crops.
In this article we will talk about the popular varieties of this country helper, and also share with you different ideas on how to make a manual cultivator with your own hands.
It is clear that the lightweight “version” of the tool (both home-made and factory-made) will not be able to compete with walk-behind tractors in terms of performance. However, it has its own strengths.
Firstly, a manual cultivator is excellent for cultivating the soil in small summer cottages. There is no point in overpaying and spending money on buying a walk-behind tractor.
Secondly, this tool allows you to perform soil cultivation (including weed removal) in hard-to-reach places where it is very difficult or even impossible to reach with a walk-behind tractor.
Do-it-yourself cultivator for walk-behind tractor, drawings and dimensions. How to make a cultivator for a walk-behind tractor
Before making a cultivator for a walk-behind tractor with your own hands, it is necessary to treat all metal elements with a special anti-corrosion compound to prevent the premature appearance of rust after frequent contact with the ground.
Simple models can be made without drawings. To make and correctly assemble more complex devices, it is necessary to plan the work, calculate the dimensions of the module and parts.
A homemade cultivator made from a pitchfork is a simple way to reprocess (remake) products. To do this, the teeth of the mechanism are bent with a hammer like a corkscrew and placed on the handle. A shovel handle is used as a handle. Electrical tape is used for fastening.
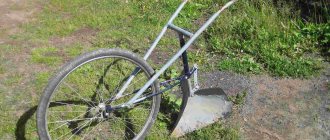
Some craftsmen manage to make a cultivator with their own hands from a bicycle frame with a wheel. A steel rod is welded or bolted between the 2 base blocks. The head is mounted to the crossbar. For this design, it is recommended to take a medium-sized wheel.
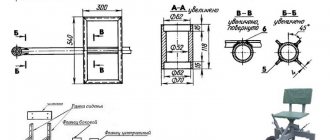
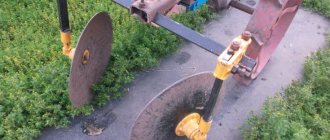
In order to correctly assemble a disc cultivator and work correctly with cutters, it is necessary to design diagrams of components and individual parts. Taking into account the deformation of the discs, special adjusting nuts are used. The discs are welded to bushings located on a rotating axis with brackets. It is necessary to provide a protrusion on the bracket where the pipe will pass. The cultivator handle is attached to the pipe surface.
Important nuances when working
When performing any work in the workshop, it is necessary to comply with all safety measures. It is very important to protect your eyes when welding, regardless of the type of welding.
When using arc welding, the danger can come not only from the light from the arc, but also from the breaking off steel at the site of the newly formed seam. Moreover, the seam can break off on its own and be thrown over a long distance.
Tapping a hot seam is also a bad idea, since hot steel can get not only into your eyes, but also into your collar or hair. Therefore, these places need to be closed first.
When working with electric welding, you must have gloves and a protective helmet, since the work takes place at high temperatures. You should also avoid combining oxygen and oil, since this is an explosive mixture and a spark is not needed for detonation.
Making a manual soil loosener with your own hands will cost much less than its factory-made counterparts. The cost will be higher when the design includes mechanized and additional means and “gadgets.”
By making an inter-row homemade product, you can not only save money, but also get the opportunity to design it for your personal needs. This will allow you to achieve maximum convenience when working with such a tool.
Therefore, even such simple products as a “hedgehog” or a cultivator made from a bicycle can significantly reduce labor costs during work. This process will be unique and very convenient.
Originally posted 2021-04-18 12:10:44.
Source
Do-it-yourself cultivator for a walk-behind tractor, drawings. DIY hand cultivator
The simplest option for making a cultivator at home. This is a small design, the capabilities of which are enough to grip a strip 20 cm wide. The basis of the device will be a handle in the form of a metal pipe with a diameter of 2.4 cm. The length of the element is selected specifically for the height of the user. A strong wooden axle must be installed on the bottom of the pipe. The processing organs will be attached to it. Despite the simplicity of the design, homemade hand cultivators can be equipped with wheels. They can be cut from a metal sheet 0.3 cm thick and secured with nuts.
There is another design option, which involves a base in the form of a strip of springy metal. In this case, the parameters of the workpiece should be as follows: length - 5 cm, width - 2 cm, and thickness - approximately 2 mm. A wooden handle is attached to this part, through which processing will be carried out. The tape is folded, so it can be shaped into a loop, and then the edges can be turned on both sides with a file. The diameter of the loop can be any; this parameter is calculated based on the area of the garden.
From the trimmer
There are different attachments for a brush cutter that turn it into a potato digger, a device for making furrows or plowing the soil. Homemade cultivators based on a trimmer are especially in demand for hard-to-reach conditions, where it is impossible to work with a large walk-behind tractor with a trailer.
In order for the device to move normally around the garden, it must be equipped with good wheels. To do this, you can take old pancakes and equip them with metal spikes. Spikes are made from reinforcement sharpened into a cone shape. Ready-made cutting elements are attached to the axis, then it is inserted into the bracket and fixed on both sides.
A fastener is welded to the ends of the bracket and inserted into the handle. All that remains is to check the unit for any malfunctions, eliminate them (if any) and start weeding the rows.
Homemade cultivator for a walk-behind tractor with your own hands. For mini tractor
To make a homemade cultivator for a mini tractor or for a walk-behind tractor with your own hands, you will need metal plates, square, 15*15 centimeters in size, rectangular - 25*4 centimeters and a steel pipe. You need to start making a cultivator with cutters.
In order for the cutters to be reliable and suitable for processing all types of soil, and not just loose black soil, they must be assembled using bolts - holes must be drilled in the workpieces, the number of which depends on the size of the metal strips that will serve as blades.
For mini tractor
The longer they are, the more holes are needed to secure them securely. Next, the strips are fixed to the workpieces, overlapping each other in a circle, and clamped with bolts.
Welding can also be used for these connections, but in this case they will not be strong enough, and repairing and replacing knives will be a complex process. Welding is used here to connect the cutters together. To do this, holes are made in the blanks, the diameter of which must correspond to the outer diameter of the pipe.
The cutters are put on top of it and secured with tacks or short seams. This product can now be put on the shaft of a mini tractor and used for its intended purpose.
From the Bulgarian
A burnt grinder can be successfully converted into a cultivator. Of course, such a tool will not be able to process large areas, but it will help to cope with a summer cottage or even a greenhouse. The main advantages are its environmental friendliness, low weight and ease of use. This device runs on electricity.
To assemble the unit, you will need a welding machine, as well as at least minimal skills in working with it. Materials for manufacturing will be:
motor from a washing machine or drill;
gearbox from a grinder;
chain and sprockets from a small bicycle;
cultivator cutters, which are made from car springs;
cable approximately 50 meters long;
tin to protect the motor from earth getting into it.
The structure will be a metal frame with two wheels. In its center there will be a motor, which must be connected to the cutters. Rotation will be ensured using bicycle sprockets and a chain. As for the cable with the trigger, it is attached to the handles.
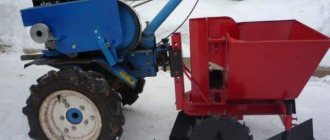
Cultivator for walk-behind tractor
Cultivator for Motor Sich walk-behind tractor photo
Attachment for walk-behind tractor, cultivator for walk-behind tractor.
A cultivator for a walk-behind tractor is an attachment for cultivating land.
Cultivators are used for continuous tillage of the soil before sowing and for cultivating crops, loosening, weed control, moisture conservation, and hilling are carried out.
The difference between a cultivator and a plow is that a cultivator performs loosening without turning over the soil layer.
Cultivators consist of a cultivator stand and a cultivator arrow photo.
From left to right:
- Flat-cutting pointed cultivator share
- universal cultivator share
- loosening rigid cultivator share
- loosening spring cultivator share
The arrows of the cultivator paws are made of steel grade 65G; when sharpening the cultivator arrows, the metal must not be overheated.
It is also possible and necessary to harden and heat treat the cultivator pointer. For hardening, the paw is heated to 820° (light cherry-red color of heat), after which the pointer is cooled by immersing it in an oil bath. After cooling, the cultivator needle is released, that is, it is again heated to 400° (gray tarnish) and slowly cooled in air.
After such operations, the file does not leave any mark on the cultivator arrows and the cultivator tines normally perform their job of cultivating the soil.
Necessary materials
Let's start by finding spare parts for the future homemade walk-behind tractor. Every walk-behind tractor is equipped with the following technical components:
- engine;
- transmission;
- Control block;
- creeper (reducer);
- aggregation system.
The motor is removed from an outdated or faulty motorcycle. When choosing an engine, preference is given to two-stroke engines, but this does not mean that four-stroke engines are not used when creating a walk-behind tractor. A suitable option is a motor removed from the IZH PLANET motorcycle.
There are several types of transmission in walk-behind tractors:
- gear (standard tractor transmission);
- gear-worm;
- belt-gear-chain;
- hydrostatic (a new, expensive technical device that has recently appeared on the market).
The control unit consists of a set of levers that switch speeds, a button that increases or decreases the fuel supply to the engine, and brakes.
It is required that the structure be equipped with an aggregation system, which is an important design element, connecting a homemade walk-behind tractor and the attachments created for it with your own hands. Therefore, the bracket must be firmly attached to the supporting frame of the structure and equipped with a power distribution device when the load on it increases.
https://www.youtube.com/watch?v=qvPAIzQU5Uo
: Stone-effect wallpaper in the interior: let’s analyze it thoroughly
DIY cultivator for walk-behind tractor. DIY flat cutter for walk-behind tractor
In recent years, many land owners are increasingly using new technical developments that can make life much easier and spend much less time on certain tasks. Walk-behind tractors, cultivators, mini-tractors and other devices have a tangible impact on the life of an agronomist.
If traditional hoes were previously popular, which forced them to cultivate heavy soil in a half-bent state for several hours, today they have been replaced by innovative flat cutters designed for operation together with a walk-behind tractor.
Flat cutters for a walk-behind tractor: advantages and disadvantages of using the device
Flat cutters can be safely called a kind of hybrid of a harrow and a knife. They are mounted parallel to the ground or at a slight angle. As a result, the device sinks into the soil to a shallow depth and cuts off the roots of weeds, thereby turning the soil itself, promoting better preservation of moisture and nutrients.
In addition to the above positive aspects, flat cutters:
- improve soil condition;
- destroy crusts and lumps formed after heavy rain;
- repel pests;
- prepare the soil for long-distance planting;
- perform inter-row cultivation of crops;
- saturate the top layer with oxygen.
Naturally, in some cases, owners purchase flat-cutters with a ripper for a walk-behind tractor, which not only perform the mentioned tasks, but also remove excess load from a person, are easy to operate, do not require lifting, and are characterized by excellent productivity. Such devices often have a fairly affordable price, but some craftsmen manage to create flat-cutting rippers for walk-behind tractors with their own hands.
Do-it-yourself flat cutter for a walk-behind tractor: a simple manufacturing method
If the walk-behind tractor has quite impressive characteristics, it is advisable to make several flat cutters and place them on the device. Thus, you will get an even more productive unit that will not only save time, but also energy.
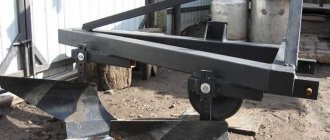
For excellent maneuverability of the created flat cutter, you need to take care of the appropriate wheels. Almost any materials are suitable for them. An iron tube would be an excellent choice for an axle.
Then, it is advisable to weld two circles on both sides of the concrete cutting. According to the diameter, you need to attach several wires (using a welding machine), the diameter of which does not exceed 8 mm.
On the inside of the axle, it is necessary to leave space for placing the bearing and further installation of a homemade plane cutter. Since the walk-behind tractor body is not always made of very durable material, the main emphasis is on the axle. After the bearing is attached, a plate should be welded to it.
Flat cutter blades can be created from separated mower parts. Their lightness and compactness make them ideal cutting element components. It is important to make sure that they are securely fastened, otherwise the structure will move from side to side and will not perform its task efficiently.
To limit the depth of immersion, small wheels are often used. A standard children's car can be an excellent “donor”.
The wheels themselves can be supplemented with iron parts so that the plastic does not deteriorate while driving. The immersion depth must be at least 5 cm.
To increase the weight on the flat cutter for the cultivator and increase the pressure for entering the soil, you can weld a weighting agent in the form of any part. If the necessary components are missing, you can use a basket of bricks, but such a solution is not convenient.
For a better understanding of the design features, it is suggested that you familiarize yourself with the drawings. Featured videos
can also become a guide, because on these materials many craftsmen share their experience with users and reveal the secrets of creating truly durable and reliable attachments for walk-behind tractors.
It is worth noting that the created flat cutter is suitable for both Neva walk-behind tractors and equipment from the brands Centaur, Salyut and others. The versatility of the product allows you to create a truly excellent assistant at home and without any special financial costs!
Plow design
The following types of plows are popular today:
- single-hull;
- rotary;
- negotiable.
The first type is the most widespread. On the Internet you can easily find many diagrams and drawings of a single-body plow. This is the most preferable solution for those who do not have experience in making such structures on their own.
To create it you do not need any special tools. A standard set that can be found in any garage or outbuilding will be sufficient.
The difference between a reversible plow is the presence of a curved feather in the upper part of the structure, which allows you to immediately turn over the earthen layer when it is lifted. This is the best choice if you have to work on hard ground. Due to the complex design solution, only a specialist can make it.
The most labor-intensive is the rotary plow. Its design is similar to that of a cultivator, since it is equipped with several plowshares mounted on one axis. During plowing, the axis rotates, which causes the soil layer to turn over.
Cultivator for MTZ walk-behind tractor. Description
The active growth and development of small farming in the 90s provoked industrial enterprises to produce compact units to facilitate agricultural work. These machines were significantly superior to tractors, which the average farmer could not afford to maintain. They were not only compact in size, but also highly maneuverable and productive.
However, by this time the Minsk Tractor Plant (MTZ) had already introduced small-sized models Belarus-05, MTZ 082 and MTZ 112 to the agricultural market, which immediately gained popularity due to their reliable design and ease of maintenance. Serial production increased and it was decided to move further production to the Smorgon Aggregate Plant, which was a branch.
The MTZ model range was expanded with walk-behind tractors with different characteristics and, accordingly, they had different indices in the name 05, 06, 07, 08, 09, 10 and 12. But only some 05, 06, 08, 09 and 12 gained popularity thanks to a successful combination functionality and reliability. Today, the main focus at MTZ enterprises is on the production of models 06 and 09.
Advantages of MTZ models
- Versatility, thanks to which you can connect any attachments to the walk-behind tractor to facilitate agricultural work. The design provides not only for the use of plows, cutters, harrows, and other things, but also brushes, blades and snow blowers for cleaning the area.
- Small dimensions allowing the walk-behind tractor not to take up much space when stored.
- Maneuverability, which is achieved through a well-thought-out design despite the significant weight of the unit.
- Easy to maintain.
- Possibility to repair without resorting to service centers.
- Low requirements for the quality of fuel and lubricants.
- Availability of spare parts.
Disadvantages of MTZ walk-behind tractors
- High cost compared to analogues from other manufacturers;
- Unclear gear fixation (as noted by owners);
- The need to apply effort to switch the differential;
- Mandatory running-in before use.
- Weight. It can be considered as advantages and disadvantages at the same time, because such walk-behind tractors are quite difficult to control on wet soil.
Operating principle
Cultivators for manual tillage are divided into two groups: rippers and rotary models. Representatives of the first variety are shaped like a hand equipped with three or five metal “fingers.”
Cultivator for the garden
In essence, this is a highly modernized hoe, which requires a lot of physical effort to operate. Therefore, this option is more suitable for working in greenhouses. The working element of rotational models is made in the form of stars, with a large number of rays.
During operation, the stars literally “bite” into the ground, loosening the soil and at the same time cutting and crushing weeds.
How to use a rotary cultivator with stars? Due to the simplicity of the design, this device is quite easy to handle.
The unit is installed vertically in the ground, the standard position of the cultivator: the stars are located between the rows, the connecting axis passes over the bed. The cultivator is driven by applied forces.
Even taking into account the fact that the driving force is a person, cultivating the land is much faster than when performing similar actions with a shovel or hoe.
This point is very important for pensioners who often suffer from radiculitis; in fact, they are the main buyers of this type of gardening equipment.
Important How to make a plow or snow shovel for a walk-behind tractor with your own hands: drawings, video
Cultivator for the Neva walk-behind tractor. Equipment for plowing land
Most often, a motor unit is purchased to be used as a motor cultivator to perform the hardest work on earth: autumn plowing and cultivation of the fertile layer. Thanks to the very large torque output from the gearbox, the power is 7-10 hp. enough to process even loamy or saline soils in several passes.
To restore the soil structure, the manufacturer offers the following tool options for work:
- A plow for a Neva walk-behind tractor with a coupling device is most often equipped with a standard or universal design of a coupling device with a frame. The walk-behind tractor allows you to plow medium-heavy soil, roots and young growth of trees;
- Cultivators and cutters for the Neva MB 2 walk-behind tractor allow you to more deeply and thoroughly fluff up the soil, chop the roots of weeds, turn vegetation debris into mulch, and use the walk-behind tractor as a multi-cultivator.
In addition to the single design, there are paired plows that allow processing with a pair of cutting edges with soil dumping in two rows, as in the photo. But it is recommended to work with such serious devices on the Neva MB 23 or Neva MB23SD motor units.
You should not expect to plow virgin soils with a walk-behind tractor; medium-heavy soil with a lot of roots and weeds is usually too tough for even the heavy MB 23 walk-behind tractors. The Neva was created to work on already plowed soil. In this case, cutters, cultivators, and plows work great.
On salt marshes and clayey soils, the rotational power of the lugs and their weight are not always enough to plow the compacted layer of soil. Often, the hooks are welded with additional weights, for example, flywheels from trucks, which lowers the center of gravity of the walk-behind tractor, makes it more stable and makes it heavier by 20-25 kg. The width of one lug wheel is 210 mm with a diameter of 460 mm.
Using the attachment on the hiller's motorized unit, you can quite successfully loosen the soil, both before planting and to remove weeds in the rows between plants. But working with such a device is quite difficult; knowledge of the specifics of setting up the tool is required.
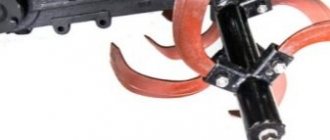
Rotary or star
Making such a device is not a difficult task. To make the structure, you need 5-7 stars, which will serve as knives, strung onto the axle. These knives can be either straight or curved to the sides. After cultivating the soil with such a tool, it is recommended to walk between the rows and a flat cutter. A combination of two models is also possible, when the stars are first used in the design, and then a flat cutter is used for the final stage. This can significantly save the worker’s strength and energy. Since the stars perform the function of wheels in the design, an additional axle is not needed.
Working with such a tool is quite difficult, so only a physically trained person can handle it. In such a garden structure, you can install wheels of the same diameter instead of stars. In this case, you will get a good weeding hiller.
The cultivator up to the walk-behind tractor is self-propelled. What is a walk-behind tractor
A walk-behind tractor, or motor-cultivator, is a self-propelled two-wheeled unit that is equipped with an internal combustion engine. The device moves freely forward, and the summer resident walks behind it, holding handles with various components and controls. Many available models have multiple forward and reverse gears. In order for the operation of such an invention to be as productive as possible, it is equipped with additional tools, including a plow, which allows plowing and cultivating the land.
The average weight of a walk-behind tractor reaches 100 kg, and the engine power often exceeds 8 horsepower. Due to such features, such a tool can become indispensable for plowing a garden area.
You should pay attention to the fact that all walk-behind tractors are equipped with a special drive for attachments, which allows you to transfer part of the engine power to a suspended mower. Basically, such a universal mechanism allows you to cope with various agricultural work, including:
- plowing the land;
- cultivation;
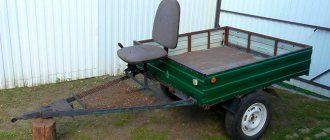
- transportation of the crop (in this case, you need to get a small trailer);
- cutting the grass.
With the help of such miniature trucks, residents of our regions transport firewood, fertilizers and crops. In winter, it can be used as a snow removal tool. Even the weakest model can easily pull a load weighing up to 400 kg.
What elements does a homemade unit consist of?
To make a motor cultivator with your own hands, you need to study the design of any unit offered for sale. It is the “store version” that should become a kind of layout that you need to focus on when assembling a homemade product. A homemade design should consist of the following elements:
- Internal combustion engine or electric motor. The electric drive can be borrowed from an old industrial compressor or ventilation system. A moped engine is ideal for an internal combustion engine. There are often cases when a homemade motor cultivator was assembled using a chainsaw. In any case, you will need to take care of an effective cooling system so that the motor does not overheat;
- Gearboxes are an essential part of any agricultural unit. The high speed observed on the shaft turns out to be too high for a small motor, so a reduction gearbox will help reduce the speed and increase the force on the working shaft;
- Handles for controlling the unit. They serve as organs for holding the cultivator. Also on the handles you need to place the speed shift levers and clutches. In any case, the device should be as comfortable as possible.
Having found all these elements, you can begin assembly. To make as few mistakes as possible, we advise you to prepare an approximate drawing in which you need to indicate the connection sequence of each of the nodes.
How to assemble crow's feet
The main element of the soil device is the drive sleeve, the parameters of which must be at least five mm of the wall length, and the optimal indicator is considered to be approximately seven mm. Next, you need to machine the inside so that it fits easily onto the shaft, and make a special hole for the axial pipe, thirty or forty mm deep.
As for the axial pipe itself, it is usually made on the basis of the standard model AE25-32, but other similar parts can also be used. There are two types of finished pipe: collapsible and non-dismountable, it all depends on your expectations.
But if you believe the reviews of farmers, the collapsible option is still considered the most effective, since it is always possible to add or remove knife installations.
It is impossible to predict how the walk-behind tractor will behave in a certain area, and for this reason it is better to have a backup modification option just in case.
Be sure to read:
Motor cultivator Mole
Having chosen the appropriate type of axial pipe, it is necessary to install a special flange on it for further fastening of the knife units. The total length of such a device will depend on the width of the knives and their distance from each other.
The optimal width of triangular knives is approximately 60-80 mm, since larger sizes significantly increase the resistance of the unit to the ground and impair its performance. The knife inserts themselves should be made of dense steel and have a thickness of 3-5 mm.
Next, you should assemble the cutting element stand, which consists of a curved strip and a sharpened edge.
By connecting the blade unit and the axial tubes, you get the overall design of a modular element. Actually, this is the final stage of creating “crow’s feet” and you can carry out the first “run-in” of a homemade installation.
Also, before starting the cutter manufacturing procedure, you should first make a small drawing to reduce the risk of damage to parts.
The necessary drawing can be found in many automotive publications or on the Internet; if you have a technical education and understand the design of the cutter, you can make a rough plan yourself.
The need and rules for sharpening during operation
When operating a walk-behind tractor, the working surface of the knife will inevitably wear out. To restore the cutting ability of the tool, it must be sharpened periodically. The timing of the procedure is purely individual. The rate of knife wear depends on the following points:
- intensity of use of the walk-behind tractor;
- hardness of the cultivated soil;
- the presence of plant roots or stones in the ground;
- strength of knife material.
Manufacturers of agricultural equipment supply cutters with sharp blades. Therefore, when buying a walk-behind tractor, it makes no sense to sharpen knives. However, the procedure cannot be avoided during intensive use of the unit. To restore the sharpness of the knife, you will need an angle grinder (angle grinder or grinder), a sharpening wheel or a diamond wheel with a diameter of 12.5 cm.
The working edges should be sharpened at an angle of 45°. Remove the metal layer from the factory pointed side. At the same time, you shouldn’t get too carried away: just grind off 1-2 mm. Over the course of a season, it may be necessary to restore the cutting ability of the cutter several times, and excessive metal removal reduces the strength of the knife.
When using a cutter in wet soil, it is necessary to thoroughly clean the surface of the blades. When rubbed against the ground, the metal surface is cleared of the oxide film and becomes chemically active. This process is accompanied by increased corrosion, which entails the formation of pockmarks, chips, and microcracks. To prevent such phenomena, the blades should be treated with special inhibitors or automotive oil.
Choice for rotary cultivator
When choosing a cutter for a cultivator, you should take into account how the knives mounted on the shaft were assembled. For example, models can be curved in one direction or in different directions. Options with one direction are convenient because in this way it is possible to prevent damage to plants during the loosening process. However, such modifications have a smaller working width of the cultivated soil.
To cultivate fallow lands covered with dense vegetation, you need reliable cutters. The working bodies of such cutters are plate knives mounted on rotating shafts.
Vertical cutters with four rotors, as well as lateral displacement and hydraulic drive, are good for cultivating tree trunks in conditions with small row spacing. In addition to the fact that they are relevant for removing weeds with a shallow working depth, they are good for inter-row cultivation without creating furrows with lateral displacement.
To choose the right option, you need to take into account the type of cultivator itself. In addition, you need to choose a product taking into account the upcoming work and technical characteristics. However, in any case, the device should be immersed in the ground smoothly
It's also important to do this slowly, as rushing can cause the knives to break.
How to properly assemble a cutter on a walk-behind tractor.
| MILLS FOR MOTOR BLOCK. REVIEW AND ASSEMBLY |
| How to assemble a cutter on a walk-behind tractor |
| HOW TO CORRECTLY ASSEMBLE THE CUTTER FOR MOTOR-BLOCK "CENTAUR" MB 2021B-3 |
| MILLS FOR MOTOR BLOCK. ASSEMBLY FOR 4 KNIVES |
| Milling cutters. How to assemble correctly? Motoblock Hopper 900MQ |
| Milling cutter assembly for FM 643, FM 653 |
| Assemble cutters for walk-behind tractor |
| Correct placement of rototiller teeth knives. |
| How to assemble cutters for the SK-1400 and SK-1600 cultivators |
| How to assemble soil tillers-cultivators on a NEVA walk-behind tractor |
| How to assemble a cutter for a walk-behind tractor, laughter and sin |
| Instructions for assembling cutters for walk-behind tractors and cultivators |
| Plates for cutters for walk-behind tractor |
| Assembly instructions for cutters for walk-behind tractors and cultivators Aurora |
| How to set up a tiller on a walk-behind tractor |
| How to plow a garden with cutters |
| Modification of standard cutters for the OKA walk-behind tractor and a little about everything. |
| A few tricks for cultivating a vegetable garden |
| TEST - cutter - rotovator and legs with weights (walk-behind tractor) |
| My light walk-behind tractor. Soil milling. |
| How to assemble cutters on a walk-behind tractor |
| Secrets of assembling soil cutters for a cultivator and walk-behind tractor |
| How to assemble cutters on a ron angel gt90m3 favorite walk-behind tractor |
| How to assemble cutters? Correctly assembled cutter video for the Tatra Garden HT 100, HT 80, HT 68 cultivator |
| MILLS for walk-behind tractors 105/135. Correction of factory errors. |
| Nothing extra: just assembly of cutters for walk-behind tractor and motor-cultivator |
| ASSEMBLY OF AN ACTIVE MILL OF A HEAVY MOTOR-BLOCK |
| Mirror symmetry when assembling cutters for a walk-behind tractor |
Boat motor based on a gasoline saw engine
Making a boat motor from a chainsaw is not difficult. The modification is performed as follows:
- remove the bar from the saw;
- instead, a self-made or factory-made boat propeller is attached to the motor using a special adapter;
- the entire structure is then secured to the boat so that the propeller plunges into the water at an angle.
Instead of an adapter, some craftsmen install a gearbox. The possible result of the work is demonstrated in the photo below.
For fishing enthusiasts, a homemade boat motor is an economical option that can significantly speed up movement across the water surface of lakes, rivers, and ponds.
Option #4: a production meat grinder to help us
All of the above equipment is quite simple. But in your own workshop you can make a homemade electric cultivator. This once again proves that the possibilities of home craftsmen are almost limitless. To implement this idea, you will need an old industrial meat grinder. On its basis, an effective electric gardener’s assistant will be built.
An electric cultivator can be made on the basis of a meat grinder for industrial purposes: you get a fairly powerful unit that will last for several years
Everything is not as difficult as it seems if you have a welding machine and a master who knows how to use it for its intended purpose. Two corners should be attached to the gear housing. Bent pipes are welded to the corners, which will be used as handles. Another piece of pipe is welded between the resulting handles - a spacer, which gives the structure the required strength.
The main structural part is the shaft. It will have to be turned out of ordinary scrap. The connection is carried out as in the original: in a slot. The meat grinder attachment is chipped off with a sledgehammer, after which a bushing with thick walls made of cast iron remains. A blank machined from scrap is placed into it, to which lugs in the form of a screw are welded. They are cut from car springs. Other lug material options were used, but these proved to be unviable.
The lugs are located at an angle of 120 degrees. They need to be screwed out as they rotate, then it will be easier for them to enter the ground, and the cultivator itself will be easier to control. The engine of the device is connected according to the “triangle” circuit, the start is capacitor. For ease of operation, the engine switch is installed on the cultivator handle. The device will last a long time if, before starting work, you lubricate the mating of the homemade shaft in the cast iron bushing with any used oil.
Take a good look at what the lugs should be and how they should be positioned: the efficiency of the device and its durability depend on this
Assembling an auger snow blower
Snow blowers that use an auger are the most powerful and can handle even icy snow. In addition, the auger is most often used in self-propelled snow removal machines.
Based on a chainsaw
Making this snowblower with your own hands is quite simple. Since it will be powered by a chainsaw engine, several additional parts will be required for the chain drive. For these purposes, you can use the front and rear sprockets from a motorcycle, as well as a chain from it.
How the frame and auger are made was described above. A long handle is attached to the frame. A large sprocket from a motorcycle is installed on the auger shaft on the right side, and a small one is installed on the chainsaw engine shaft. Next, the chainsaw is installed on the frame, after which the chain is put on the sprockets and tensioned. To control the engine, the throttle cable is routed to a handle attached to the frame.
Below are drawings of a homemade chassis, where a chainsaw is used as the main part of the drive.
Trimmer based
To make an auger snow blower from an electric trimmer or from a lawn mower, you will need to install a gearbox: it will serve to transmit rotational motion from the trimmer shaft to the auger shaft.
But there is one nuance here. The gearbox for this type of unit is quite expensive, and it is not practical to buy it to make an attachment for a trimmer. Therefore, based on the latter, rotary-type snow blowers are manufactured, which will be discussed below.
Based on a motor cultivator (motor block)
The simplest addition to a walk-behind tractor is a snow blade.
A homemade snow removal attachment (shovel) on a walk-behind tractor is screwed to the frame of the unit, after which it turns into a small bulldozer.
Advice! Instead of a blade, you can attach an auger to the front of the frame of a walk-behind tractor or cultivator, resulting in a self-propelled snowplow. When not needed, this attachment for a walk-behind tractor can be easily disconnected from the main unit.
Below is a diagram that clearly shows the design of a snow blower based on a cultivator.
The scheme is deciphered as follows.
- A snow blower drive that connects the engine to the auger.
- Caterpillar drive.
- Drive belt.
- Roller (parasitic) to provide reverse gear.
- Intermediate shaft.
- Belt tension roller. Thanks to it, the unit moves forward.
A self-propelled snow blower greatly facilitates snow removal, especially in large areas where using the machine on skis, pushed by the operator, requires a lot of physical effort from the operator.
Device
Lightweight hand cultivators are in greatest demand among farmers and summer residents. As a rule, they weigh about 20 kilograms, are small in size and have high productivity. The cultivator is capable of loosening the soil, removing weeds, and thinning out plants. It is even used to apply fertilizers. This unique device simplifies not only planting, but also the process of caring for plants.
The work of cultivators largely depends on what cutters come with it, because they are the ones who perform loosening and a number of other operations. Among the working attachments for hand-held models, the following are quite often used:
- for loosening the earth;
- for cutting;
- for hilling;
- for making furrows for sowing;
- for breaking a strong earthen crust (special needle disk);
- for feeding plants (with dispensers).
When it is clear which cultivator is needed for certain tasks, you can choose what parts it will consist of. Drawings of a homemade device can help with this. The main part of the cultivator is the engine, which can be electric or internal combustion. It is best to give preference to reliable and durable installations. If necessary, you need to provide a cooling system, since it is not always built-in.
The gearbox is responsible for controlling engine torque. This part reduces the speed and also facilitates the operation of the power take-off shaft. As for the frame and portal for attachments, they can be made from what is at hand. Even the simplest two-wheeled wheelbarrow will do for this. The main thing is to think about the diagram in advance in order to have a good idea of how and where the individual elements will be placed.
Comfort and adjustability are important parameters for a control lever. It should not only be comfortable, but also adjustable.
How to work
After the cutters are installed, start the walk-behind tractor. At first speed, right on the cutters, we approach the beginning of the section. If there is only one speed for moving forward, then we do it at the lowest engine speeds. To operate a motor cultivator with a cutter, select the speed as high as possible. We turn on the second speed and, having set the engine speed to maximum, engage the clutch.
Use the coulter to set the desired cultivation depth. First, put it on the second division from the top. The shorter the part of the opener facing the surface, the finer the processing. With its help, we create a load and slow down the forward movement of the equipment.
If the area is large, then it is more convenient to move in a circle. If it is possible to turn the steering wheel to the side, it is advisable to turn it. Then the operator will walk on solid ground and not trample the already cultivated soil.
A properly adjusted walk-behind tractor will not jump or twitch.
It happens that the soil is heavy and the cultivator is light. Then you need to hang additional weight in the area of the cutters. Select the load in separate “pancakes”, 6-7 kg each.
Cultivation is carried out with a slight overlap of the treated area. We make the second pass so that one of the cutters goes along half of the processed strip. We focus on the depression that the opener leaves behind. Thus, all the soil will be processed twice. This way we will achieve uniform soil treatment throughout the entire area.
When cultivating row spacing, we install protective guide discs on the edges of the assembly. They will not allow the plant roots to be cut and will not allow the unit to deviate from the specified trajectory.
A few words about installing attachments
After assembling the knives, all that remains is to install the assembled cutters on the walk-behind tractor using stoppers. For convenience, it is better to lift the special equipment and fix it in this position. Next you need to remove the wheels. Carefully place the boot on the support shaft, secure the structure on the left and right with a stopper. Check the connection is secure.
The final result of the build
If the cutter design is completely prefabricated, then installation can be performed sequentially section by section.
Installation sequence
It is recommended to put the motor cultivator into operation only after the correct assembly and installation has been checked. There should be no play caused by weak tightening of nuts or distortions when hanging equipment. High-quality work guarantees a long service life of machinery and equipment.
Option #5: child of a bicycle and a washing machine
Don’t rush to throw away your old bicycle or used washing machine. These things may also come in handy if you want to make a cultivator with your own hands, spending a minimum of money on it.
Now you know how to make a cultivator yourself. All that remains is to apply your knowledge in practice.
Important The best homemade two-wheeled all-terrain vehicles
A hand cultivator is a tool for gardening work related to cultivating and loosening the soil. We will talk about several design options for this tool, starting with the simplest manual version and ending with the version with an electric motor.
Traction wheels
Designed for use of walk-behind tractors in different conditions. They will cope perfectly with the load when transporting heavy objects, and are simply useful for driving on roads and flat surfaces.
Thanks to the special herringbone tread pattern, pneumatic traction wheels can also be easily used for heavier work - plowing, cultivating, hilling, etc. This type of tread allows you to work on sticky or loose soil without much difficulty, without fear of that the unit will get stuck.
Typically, this type of wheel has fairly wide tires (more than 20 cm) and a large rim diameter (40 cm or more).
Special types of traction wheels for walk-behind tractors are solid and lug wheels.
Solid wheels are characterized by increased strength and a more powerful tread.
Lugs are a special type of wheel, consisting of steel rims and special teeth, which are shaped like the same herringbone tread. Although this type of wheel is not large, its weight and design allow it to perform work even on the most difficult soils.
Special cases
Mills for a motor cultivator with 2-3 sections usually have a solid shaft. But often there are models with collapsible or additional bushings, hung in sections. The diagonal principle of assembling knives in all of these cases will be identical to that described above. The process is complicated only by the need to perform additional steps - to assemble the entire cutter together.
Stoppers for mounting a group of knives
The structure is installed using steel stoppers. They reliably fix all elements of attachments and prevent loosening of connections under dynamic loads.
Hanging an additional section
How to properly assemble knives on a walk-behind tractor with 3 cutting blades?
The main mistake when assembling the cutting tools of a motor cultivator is installing left-sided blades on the left section, and right-sided blades on the right. This knife mounting scheme is functional, but has a number of shortcomings:
- the increased distance between the right and left mounted parts (from 20 to 25 cm) reduces the quality of tillage - after the passage of the equipment, a wide strip of uncultivated land remains;
- the cutting blades do not overlap each other, which reduces the quality of soil loosening;
- wear of cutting parts increases;
- the comfort of using special equipment is reduced - the motorized cultivator will bounce when passing the strip due to the asymmetrical entry of the cutting tools into the ground.
Correct assembly diagram for a 2-section cutter
To correctly assemble the knives on a walk-behind tractor, you must adhere to the principle of diagonals and carry out all installation steps symmetrically. Some models of special equipment are equipped with a left and right cutter with a removable last section. Their number does not affect the installation principle of knives.
Installation of the first knife 2 sections
If the diagonal (offset) assembly is observed, the blades of the sections will cut the soil sequentially one after another. The rotation of the left and right cutter will be symmetrical. With correct installation of prefabricated elements, uniform operation and load distribution are guaranteed.
Types of cutters
The active tool can perform rotational movement in different planes:
- Perpendicular to the direction of movement of the mobile unit, the axis is parallel to the ground. In this case, translational movement occurs due to the capture of a new section of soil.
- The axis is located along the axis of movement. The rotors rotate clockwise or counterclockwise. Such tools have not become widespread, since their operation results in the formation of stall or camber furrows. It is necessary to carry out leveling after grinding the soil layer.
- The axis is perpendicular to the ground. Increased soil resistance has to be overcome, so this type of treatment is used for local loosening.
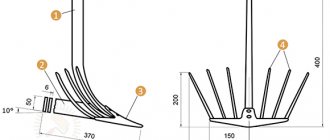
Types of milling cutters for soil cultivation: a – spring; b – flat ripper; c – hook; g – straight foot; d – saber-shaped; e – screw hiller
When developing cutters, the designers proceeded from the need not only to crush the soil, but the second task was to comb the layer in order to separate the long subsoil roots that form in perennial weeds. Various patterns of movement of cutting and combing edges inside the soil are proposed.
Designers are faced with the question of which cutters are better.
Before 1990, many manufacturers offered the use of spring tools. It is effective in cultivated areas. The main task is to remove rhizomes. Despite all the advantages of such developments, manufacturers have failed to provide high performance. The unit moved at a speed of less than 0.2...0.3 m/s, which did not suit most users.
The flat ripper shows high working speed, but there are untreated areas between the plates. It is necessary to carry out several repeated loosening, which reduces the efficiency of work.
Spring hooks are useful when using passive tools. They are equipped with harrows. Combing is possible at a depth of 15...20 cm.
Straight profile legs turned out to be quite effective, but the saber type turned out to be more technologically advanced in production. Therefore, most manufacturers of equipment for walk-behind tractors focus on the production of this particular type of tool.
Screw cutters are used not for deep processing, but for active hilling of beds. Some crops require powdering of the root part, so such devices are in demand only for such an operation.
Another interesting design is the drum cutter. Usually two of them are installed at once. The main advantage of this installation is the simplicity of the device. As users note, similar working parts can be installed on walk-behind tractors “Oka”, “Salyut”, “Patriot”, MTZ or “Hoper”.
Unfortunately, this development has certain disadvantages:
- The rigidity of the drum's constituents is low. It is necessary to install intermediate supports in the internal space.
- For normal operation, it is necessary to load the walk-behind tractor with additional weight, otherwise it is quite difficult to keep it at a certain depth.
- The increased weight makes the unit difficult to operate. The operator has to expend great effort when turning.
Useful tips
Before you start manufacturing a device or modifying it, you need to decide why it is needed. For example, units for removing weeds and simply loosening beds can be very different. For greenhouses, you should choose lightweight models with manual control only. If the areas being processed are quite large, then you should opt for options that run on fuel or electricity.
The stages of manufacturing a cultivator are important, but do not forget about the operating rules of this unit. The most important thing is to keep the driving mechanism in working order.
When the cultivator will not be used for a month or more, it must be stored. To do this, you need to remove fuel from it, clean the engine surface and all other elements. It is not advisable to clean parts of the device using strong water pressure. Metal parts must be lubricated with oil to avoid unwanted corrosion. The unit must be stored in a dry and dust-free room.
To learn how to make a cultivator with your own hands, see the following video.