Petrol cultivator Hyundai Mechanical. It is no secret that hand cultivators are very easy to use, they do not take much time and effort, and are also low in cost. There are several types of designs of hand cultivators, starting with a simple “Tornado” cultivator, which is an ordinary fork with curved fingers on the bottom, and ending with a flat cutter.
Hand cultivator
The advantages of hand cultivators also include the fact that they are easy to make yourself. This does not require special skills, just follow the recommendations. To make a particular design, you need the correct drawing of the product, a little free time, patience and, of course, some tools and materials.
Hand cultivator "Gnome"
DIY flower pots
In our new article, we share the best flower pot ideas! The most original and beautiful options, step-by-step manufacturing instructions, useful tips - all this can be found in this article!
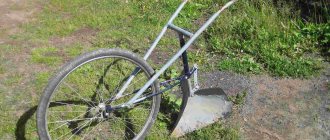
Cultivator from an old bicycle
One of the most common options among gardeners. It is easy to install; parts do not need to be welded. The design is considered a little more complex than a tornado.
For assembly you will need:
- the front part of a bicycle frame with a wheel;
- working surface of a two-handed saw;
- tools.
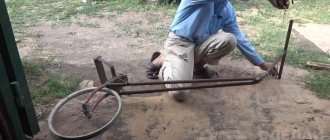
- The cutting surface of the saw is attached to the part of the frame cut off by the grinder at the bottom. Its role can be played by a plow or a surface with sharp spikes, made independently.
- The handles of the device should be longer than the bicycle handlebars. They are constructed from pipes and attached to a frame.
- The fastenings must be stationary, each of them is tightly bolted.
- The wheel must also be secured to the frame.
The result is a convenient homemade loosening device. If desired, you can attach a motor to it.
Making a tornado cultivator
The tornado garden tool looks like a large corkscrew with handles. Several of its blades are located at an angle to each other. When working, they are screwed into the ground, making the work of the summer resident easier, because there is no need to bend down. The Tornado is ideal for digging ripe potatoes. The bushes of the plant are simply scrolled clockwise and pulled out of the ground along with the tubers. The tool can remove weeds along with the roots and hill up the beds using rotational movements.
To assemble a tornado you will need:
- pitchfork;
- plastic nozzle for the handle;
- half a meter of pipe of such diameter that it fits onto a plastic handle-nozzle.
- The pipe is cut to length and put on the handle so that it protrudes 25 cm in both directions. That is, the top of the handle takes on a T-shape. Secure the pipe with electrical tape.
- The fork teeth are shaped using a hammer. That is, they simply twist them in a spiral.
- Connect the handle and forks. The tool is ready.
Composition of the substance
The basis of the drug is glyphosate, a pesticide used to destroy unwanted vegetation, as well as trees and shrubs. "Tornado" contains a high concentration of isopropylamine salt and is guaranteed to destroy more than 155 plant species. Thanks to its liquid form, the substance dissolves in water without residue and easily penetrates into plant cells.
How to make a miracle shovel with your own hands
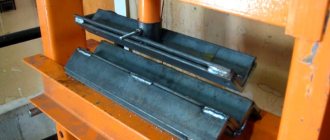
Making a miracle shovel for personal needs is quite simple if you have the skills to work with electric welding: it is with its help that you can weld all structural elements. The sequence of actions is as follows:
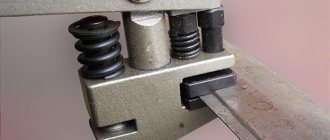
- Make 15 identical sections, each 30 mm long. Sharpen 8 of the 30 segments on one side using a sharpening machine (they are shown in the photo below).
- To construct the base of a miracle shovel fork for digging, you will need to take a metal corner 60 cm long and mark 8 identical parts on it (there will be 8 pins).
- On a 50 cm corner, mark 7 parts. You will need 7 pins.
- Weld the rods to the corners. To the smaller of them (50 cm) also attach metal corners (length 35 cm).
- Make round holes and loops at the edges. 14
- 2 identical fragments (length 125 cm) are cut from a metal pipe (Ø15 mm). They are slightly bent at the edges.
- Then you will need to weld the pipe sections. Secure them to the edges of the top corner.
- Weld the handle to the pipes.
The homemade shovel is ready. All that remains is to experience it in action.
Forks can also be made using a ready-made tool by simply straightening the pins. But this option is less durable, since the metal can be very thin, and the diameter of the rod must be at least 8 mm. Another option is to design forks based on suspension springs (straighten) or car springs (cut).
Important! When carrying out welding work, you must strictly adhere to safety requirements. If you don’t have the skills, it’s better to buy a ready-made miracle shovel: it’s not worth the risk
If you don’t have the skills, it’s better to buy a ready-made miracle shovel: it’s not worth the risk.
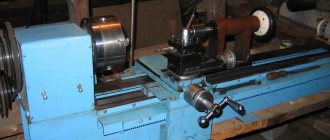
Electric version based on a meat grinder
At home, you can make not only hand tools, but also an electric cultivator with your own hands.
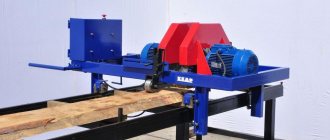
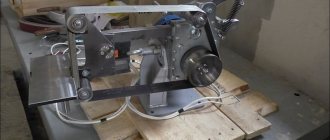
The photo shows a cultivator made on the basis of a production meat grinder. This design is quite simple to make. Two corners are screwed to the gearbox housing, to which two pipes are welded, the ends of which are bent to obtain comfortable handles. Another piece of pipe is placed between them for strength. Wheel axles are also welded to the corners. It is advisable to use medium-sized wheels, since too large ones will be inconvenient, and small ones will sink into the soil when moving.
The shaft of the structure is machined from ordinary scrap. The attachment of a production meat grinder is chipped with a sledgehammer and a cast iron bushing remains. A workpiece machined from scrap is placed in it and a grouser screw is welded. The engine switch is located, for user convenience, on the handle.
When moving quickly with such a cultivator, the screw breaks the earth into large clods - the result is rough plowing. If you move slowly, the loosening is more accurate - the soil turns into dust.
Here is another interesting video that tells you how to make an electric cultivator with your own hands, using a frame, chain and sprocket from a bicycle, and a motor from a washing machine.
There are many more ways to make units for plowing land at home, for example, you can make a homemade cultivator from a chainsaw. All you need is the ability to understand technology and a little imagination.
The hard physical labor of a farmer can be facilitated by such a gift of human genius as a cultivator. You don’t even need to buy it; any gardener can easily make a tool with his own hands. Step-by-step instructions for creating an electric cultivator, a Tornado cultivator and other options are in this article. Plus a list of necessary parts, drawings, tips and reviews from experienced inventors.
Fork
Your weed control, anywhere, will not be complete without this tool. The tool has the appearance of a curved metal attachment, which significantly increases the strength of the handle. And this, in turn, allows you to easily cope with weeds that have deep and well-developed roots. Forks with teeth bent at an angle of 45 degrees can do shallow loosening, simultaneously removing weeds that are loosely sitting in the ground.
It should be added that the tool is easy to use, highly reliable, and does not take up much space. In addition, it is easy to use on small pieces of land and where weeds are difficult to reach.
Types of "Tornado"
- Continuous action herbicide. A base product containing glyphosate in an amount of 360 g/l. Not suitable for destroying hogweed and cow parsnip. After a week, seedlings can be planted in the treated area.
- "Tornado 500". Contains glyphosate in an amount of 500 g/l. The chemical copes with the overwhelming number of annual and perennial weeds.
- "Tornado 540". Glyphosate content increased to 540 g/l. The pesticide successfully copes with the growth of fruit trees and shrubs.
Operating rules
When working with any electrical device, safety precautions must be observed. The grass cutter is no exception! To prevent the device from deteriorating, you need to know the basic operating rules:
- The mechanism will jam if damp branches or grass are placed in the device.
- You cannot store raw materials in large quantities. Everything should be in moderation.
- The device must always be supervised when it is switched on.
- The mechanism has piercing and cutting elements, so children should not be allowed near the device.
- To prevent the device from getting wet in the rain, it is installed under a canopy.
- Do not allow foreign objects such as glass or metal to get inside the device.
- If something is stuck inside, the device is disconnected from the network and only then the stuck part is removed.
- Electrical wires must be insulated.
The first launch of the device is done very carefully, since it is the most dangerous. https://www.youtube.com/embed/HoCh_HLO-Vc
What do you need for work?
To make various devices for soil treatment at home, you need to prepare special materials for this. First of all, you need to take care of getting steel. The more different pipes, sheets or metal rods you have, the better. You can’t do without a set of tools, but they are present in any garage, so you don’t have to bother finding them.
When working with metal pipes, you cannot do without special tools.
A welding machine is one of the most important tools for working with metal products. With it, you can connect different parts made of metal in just a few seconds. Of course, in most cases you can do without a welding machine by connecting the parts using self-tapping screws. But the quality of such connections cannot be compared with the quality of welds.
Inverter welding machine
Saltpeter will help remove stumps
The prepared holes are filled with saltpeter and filled with water, after which the stump is covered with plastic wrap so that the saltpeter is not washed away by the saltpeter. This procedure is performed in the autumn, because it is desirable for the stump to stand with saltpeter throughout the winter until spring. This period will be sufficient for the wood and roots of the stump to become saturated with saltpeter.
Get rid of an old stump using saltpeter.
As soon as spring comes, the stump is set on fire - it burns well and burns out completely. This method gets rid of stumps that are located on clay or sandy soil. However, using this method is very dangerous if the soil on the site is peaty.
Instructions for use
- Spraying of vegetation is carried out at temperatures from +5 to +25 degrees. At low temperatures, life processes in plants slow down or stop completely, which is why the toxic substance may not get into their root system. In hot weather, the aqueous solution evaporates too quickly from the surface of the leaves, which reduces the concentration of the chemical.
- Treatment is not carried out during rain, because... water will wash the herbicide off the leaves and shoots. It is better to perform the procedure early in the morning, after the dew has dried, or in the evening in dry weather.
- When treating weeds, crops should be protected by covering the rows with film or spunbond.
Features and design options
A miracle shovel is a convenient device for digging earth that you can make with your own hands. The device allows you not only to dig up the soil, but also to loosen it. This saves a lot of effort, since when working with a regular shovel you have to periodically break up large clods of earth.
Principle of operation
The miracle digging shovel is a ripper consisting of two forks:
- The workers (the main ones) stick into the ground under the pressure of their feet. They are mobile, so they can enter the ground at any angle.
- The front support forks are stationary and run parallel to the surface. They produce additional loosening, due to which the earth is crushed, becomes uniform in density and is well saturated with oxygen.
The body is a metal frame with front and rear stops that contact directly with the ground surface. The main forks are equipped with a lever mechanism, which allows you to press them at a convenient angle when digging and then pull them out of the soil.
The schematic diagram of a miracle shovel for digging will allow you to easily make it yourself
Thanks to the presence of two forks, the device, along with its main task, also performs a number of other functions:
- Loosening the soil, saturating it with oxygen.
- Breaking up clods.
- Removing weed roots.
- Digging various root vegetables - potatoes, beets, carrots and others.
The described design is not the only one. There are several types of equipment, the most common are a ripper without a front stop, a digger and a light digger.
Ripper without front stop
The design is completely identical to the one described above, but it lacks the front stop. On the one hand, it provides reliability during operation - the tool lies well on the ground when digging, so all that remains is to press with your foot and stick the forks into the ground. On the other hand, due to the absence of a front stop, the design becomes noticeably lighter.
A miracle shovel without a front stop is less stable when digging, but not as bulky and heavy as the basic one
Digger
The digger is another “light” version. These are wide-spaced forks that are connected to the body. By pressing them, you can loosen the soil, but not so finely.
Digger - a simplified version of the miracle shovel
This design has its own advantage - with the help of bolts you can raise or lower the main axis to any height, focusing on the height of a particular person.
The stop is movable, since the shovel is not rigidly connected to the body. Therefore, first they press on it, and after the pins enter the ground, they turn it out. This device is suitable for digging light soils, for example, sandy or loamy soils. But it is not suitable for heavy, lumpy soil - in this case it is better to use the classic design with a front and rear stop.
Lightcop
A lightweight shovel is the simplest version of a miracle shovel. The design features a lighter, rounded stop. At the same time, it will not be possible to adjust the height of the handle, so when making it you need to immediately focus on height. The device is smaller in size and quite lightweight, but its stability (compared to the basic design) is less.
The lightweight digger is suitable for working on non-clayey soils
With extended and shortened bayonets
When drawing up drawings, special attention is paid to the length of the pins of the miracle shovel for digging. It depends on the density of the earth:
- 10–15 cm – for loose sandy soils that are easy to dig and loosen. Such an instrument is called “Plowman”;
- 15–20 cm: universal shovels for digging medium-density soil (loam);
- 25 cm or more - for heavy, rocky (clayey) compounds. This tool is called “Mole”.
“Plowman”, “Mole” and a universal shovel can be made of any design: classic, without a front stop, in the form of a light digger and others. They differ only in the length of the pins, and in all other respects they are completely the same.
Option #3: disc rotary cultivator
Making a rotary cultivator with your own hands is not at all easy. This requires special skills and good physical preparation. If you have all the listed qualities, you can try to build this tool, which will be much more effective than all the previous ones. With its help, you can not only cultivate, but also harrow the soil, deftly breaking large clods.
The rotary disk cultivator consists of: 1 - disk, 2 - axis. 3 - sleeve, 4 - large bracket, 5 - small bracket, 6 - rod, 7 - pipe, 8 - handle
The working parts of this cultivator are convex disks, which must be welded to bushings placed on the axle. The axial ends are secured with cotter pins, which are secured in a large bracket. After which a hole is cut in the upper part of this bracket. Handles with a crossbar are attached to it. A rod 25 cm long and 24 mm in diameter will have to be welded to a small bracket. A rod of 16 mm diameter is screwed into it. Part of the rod protrudes above the crossbar.
It is not so easy to give a 4 mm thick disk the desired spherical shape. To do this, you need to be able to deftly handle a hammer. A strong and precise blow to the center of the disc transforms it into a bowl. This is the work that will require the main physical effort. Special wing nuts located on the crossbar regulate the angle of inclination of the spherical disks relative to the direction of movement of the cultivator itself.
Fork
Your weed control, anywhere, will not be complete without this tool. The tool has the appearance of a curved metal attachment, which significantly increases the strength of the handle. And this, in turn, allows you to easily cope with weeds that have deep and well-developed roots. Forks with teeth bent at an angle of 45 degrees can do shallow loosening, simultaneously removing weeds that are loosely sitting in the ground.
It should be added that the tool is easy to use, highly reliable, and does not take up much space. In addition, it is easy to use on small pieces of land and where weeds are difficult to reach.
Weed removal tools
Any work on the site takes a lot of time and effort. But the most tedious task, which requires attention all season long, is weed control. If you tear them with your hands, the remaining roots will begin to grow even more in the fertilized soil. Therefore, it is better to use special equipment that will help remove weeds with roots.
Photo from the site: https://fermilon.ru
Rake
A rake is usually used for collecting mown grass. But they can also help in the fight against weeds, especially on lawns. They are excellent at removing creeping plants and those with shallow roots. The sharp ends of the rake pick up such weeds, but the lawn is not damaged, since the grasses have a strong root system. Rake is useless against thistle or dandelion.
Rake, types of root remover
Root remover
A root remover, as its name implies, allows you to extract the roots of weeds that go deep into the ground. It has many modifications, such as:
- an elongated blade - its end is pointed, blunt or forked - with the help of a handle, press on the ground close to the root of the weed being removed, then, by picking it up, it is removed from the soil;
- v-shaped fork - allows you to grab the root more firmly;
- corkscrew - screw under the plant and roots, pull out.
How to remove stumps using chemicals
Using special chemicals in your garden will help not only to grow plants, but also to remove them.
A distinctive feature of the chemical method is its low cost, targeted effect and high efficiency. This allows you to get rid of large and medium roots, regardless of the original size of the stump.
The disadvantages of this method include:
- the removal process is delayed for a long time (from 1 to 3 years);
- Soil pollution.
Considering the variety of chemical compounds and elements, when choosing a stump remover, it is necessary to give preference to products that do not pose a danger to humans and the environment. Remember - chemistry does not have the best effect on soil fertility.
Stumps can be removed using saltpeter, urea, spores of wood-decaying fungi, etc.
Method 1
A large amount of sodium or potassium nitrate is introduced into the hollow or specially made holes, after which the stump is covered with a film. A year later it is set on fire. Fire and chemical reactions destroy even the underground part of the old plant.
Holes are drilled in the stump into which saltpeter is poured.
Method 2
Ammonium nitrate or urea are used as in the previous method. However, the need for arson disappears by itself. A few years after the procedure, not a trace remains of the stump.
Method 3
Place the mycelium of edible mushrooms on the stump; the vital activity of their colonies will lead to the gradual decomposition of the wood. This option is just a godsend for lovers of mushroom dishes. It is worth noting that this method is dangerous for surrounding plants and small architectural forms.
Before colonizing a stump with mushrooms, care must be taken to protect the surrounding objects.
Method 4
Thoroughly sprinkle the object you want to get rid of with regular coarse table salt. After a year, the stump will turn into dust. This method is advisable to use only for clearing the area for construction.
Requirements for a quality weeding tool
To combat grass, you need to choose the right equipment. It is permissible to use hoes or flat cutters for work. Special weeding pads are also often used. When choosing a tool, you should consider the length of the handle. It should be sufficient so that the gardener does not have to bend over.
The most convenient option would be devices that can be easily grasped by hand. It is worth considering the thickness of the wood from which the handle is made. It should be comfortable in your hand.
A wooden handle should be sanded so that there are no knots or burrs on the surface. Otherwise, there is a risk of injury and calluses. The wood for the handles should be soft and light weight. Tools made of beech or oak are considered very strong, but have an impressive mass.
The design of the device should imply a change in the angle of placement of the working part. When purchasing a tool, you should pick it up and evaluate the length of the handle. It should be comfortable
Equally important is the assessment of the angle of inclination of the working surface. It is desirable that the angle of the tool can be changed
If you build the tool yourself, you can set the required angle right away. In this case, the device should be tried on for yourself.
How to choose the right ready-made cultivator in the store
The process of choosing such a technically complex product as an agricultural cultivator does not cause difficulties, but requires mandatory consideration of the following nuances:
- power parameters for gasoline models are expressed in horsepower, and for electric models in kW;
- the standard power range, regardless of engine type, is 4-8 hp, but the optimal and most economical power is 6.0-6.5 hp.
- the value of the working width is determined by the distance between the leftmost and rightmost cutter, but in amateur models it is limited to 85 cm.
- the presence of four or more cutters in the working body of the equipment makes it possible to change the working width towards decreasing and increasing;
- in a medium-static mechanism, the tillage depth is most often 330 mm, but if necessary, you can choose more or less productive models;
- a significant part of low-power and light models are equipped with one standard gear, which allows forward movement, and a small force helps to turn the unit in the direction required for work;
- on heavier models, the presence of reverse gear is a necessity, allowing you to give heavy equipment the desired direction;
- The engine can be two-stroke or four-stroke, which has a direct impact on the power of agricultural equipment.
It should be noted that two-stroke engines are easier to maintain, but quite noisy. When choosing factory models, you must also remember that a flat cutter exclusively trims all newly emerging shoots, and the use of flat cutters allows you to make a kind of batch from the soil.
Cultivator models
There are three types of cultivator based on the operating characteristics:
- gasoline;
- electrical;
- driven by physical force (it is this type of cultivator that is easiest to make with your own hands).
Cultivator Tornado
Ripper
A classic example of a cultivator-ripper is the Tornado. The device is surprisingly simple: a working part in the form of spiral-shaped pointed teeth is attached to a handle with a long perpendicular hand. The structure is put into operation by turning the handle, thanks to which the teeth stick into the ground and are removed, loosening it. Even soil that is compacted or overgrown with weeds can be used by the cultivator. Unlike the star cultivator, it is used primarily for processing small problem areas. Compared to other designs of this type, making a manual soil cultivator with your own hands is the easiest.
Root remover
Both a Tornado-type cultivator and a hedgehog cultivator can be used as a root remover. The working part of the hedgehog is represented by steel rods rotating when moving on an axis. This part is attached to the handle (with or without a perpendicular hand attached). Like the Tornado, the hedgehog is used not only for extracting weed roots, but also for inter-row loosening, which is accompanied by the compact dimensions of the working part.
Potato digger
The domestic market for agricultural implements offers a lot of potato diggers that are structurally different (mainly vibrating, working like a walk-behind tractor attachment). A special niche is occupied by manual potato diggers, used for moderately spacious areas. The work is carried out thanks to two axes with teeth (one of which is motionless and serves to establish support, and the other, when pressed, turns out intact tubers). You can make such a simple design yourself using a pitchfork.
Tooth cultivator
For indoor plants
The cultivator for indoor plants is a small trident with pointed curved teeth. You can easily make this device yourself using strong wire. The handle can be made from decorative materials or decorated to suit every taste.
Cultivator: purpose and characteristics of types
Cultivators are very convenient and popular agricultural tools used to perform surface loosening of the soil, as well as destroying weeds, applying fertilizers and cutting furrows for irrigation activities. When choosing a model of such equipment, you must be guided by the following basic parameters:
- relief features of the site;
- useful area of the site;
- qualitative composition and characteristics of the soil;
- scope and criteria of assigned tasks.
Depending on the purpose, there are several main types of agricultural cultivators:
- continuous tillage during pre-sowing tillage with simultaneous harrowing;
- inter-row tillage of the soil and simultaneous fertilizing of cultivated crops with basic mineral fertilizers;
- pre-sowing tillage, represented by loosening and layer-by-layer grinding of the soil, as well as the destruction of weeds, leveling and compacting the soil.
Equipment can also be classified depending on the operating mechanisms:
- electrical equipment
used on small plots of land. Operation is ensured by electricity. The equipment is lightweight, compact in size and does not emit harmful substances into the environment. Disadvantages include low power and low mobility; - battery equipment
designed for soil treatment in small areas. The difference from electric models is sufficient mobility while maintaining small dimensions; - Gasoline equipment
is the most popular due to its high performance. Such units are quite powerful, mobile and convenient. The main disadvantages of the application are the emissions of harmful substances into the atmosphere, as well as the need to regularly perform competent maintenance.
Another fairly popular type of garden equipment among owners of country property is a hand-held cultivator, represented by a simple design in the form of bent hook fingers or metal stars, which are attached to a metal holder. Such homemade products allow gardeners to quickly and easily cultivate the soil
, and for manufacturing you will need the correct drawings, a little time and available tools.
Homemade hand cultivator
It is quite possible to make a manual cultivator with your own hands, without the need for any special tools or materials. The work may take no more than a day, it all depends on the chosen design and configuration of the future tool.
The parts are simple and reliable, but if the tool does break, replacing the broken part will be easy. It can be made from existing materials.
Another advantage of making a device yourself is that it is quite simple to make it even without special education.
https://youtube.com/watch?v=L_Pbf6XC7Ks
Assembly instructions
You can assemble such a device from various available materials, and there are both simple and more advanced options.
An old bicycle that can no longer be repaired can serve as the basis for production; you will also need an old two-handed saw or a head from a used cultivator. The tools you will need are:
From the bicycle you only need to take one wheel and frame. You will need to attach the cultivator head to the frame, and if it is not there, then half the tip of a two-handed saw, or steel rods, or sharp metal rods with sharpened ends. Attach handles based on aluminum or steel pipes to the bicycle handlebars. A transverse jumper is placed between them.
https://youtube.com/watch?v=qvPAIzQU5Uo
DIY electric cultivator
In a workshop, you can make an electrical device based on an industrial meat grinder. Moreover, the model does not play a role here. And if you approach the work competently, then in the end you will assemble a fairly powerful device
It is important to note that you will need a welding machine for this work.
Manufacturing instructions:
- Two corners are attached to the gearbox, pipes with bends are then welded to the corners, which will serve as handles;
- to increase strength, a steel bridge is welded between the handles;
- the axles of the cultivator wheels need to be welded to the corners;
- provide lugs on the wheels, which can be made on the basis of car springs; they are welded onto the wheels;
- connect the engine. For capacitor starting, the switch is placed on the handle of the device.
Using such a unit under conditions of rapid movement will allow you to roughly plow the ground, and if it works slowly, you will get a fine fraction.
https://youtube.com/watch?v=HHtAjybYc3U
Do-it-yourself Tornado cultivator
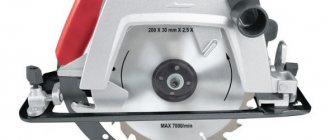
The homemade Tornado device will allow you to perfectly loosen the ground due to its twisted teeth. The pipe serves as a lever and is attached to the handle. The pipe must be at least half a meter long. The lever fixed in the pipe should protrude 25 centimeters into both sides of the handle. To strengthen the fastening, you can use electrical tape. Spiral teeth are made on the basis of spring steel, but their diameter should be a maximum of 20 cm. This size is optimal for the convenience of weeding the space between the rows.
It is recommended to warm up the metal before starting welding, but it should not soften too much. When exposed to high heat, steel will lose its properties and will simply break under hammer blows.
In this case, the lever can be a metal or plastic pipe attached with self-tapping screws. Its length should be about 50 cm, and it will act as a handle. As a result, it will be possible to work on different, even heavy soils, and remove weeds even with persistent and branched roots.
Toothed manual plower
The next model of a homemade cultivator consists of five steel discs-pancakes, which rotate on an axis 320 mm long and 16 mm in diameter. Three discs contain sharp curved teeth, which will be used as a working tool for loosening the soil. At the ends of the axle there are trunnions with bearings, on which steel brackets are fixed, converging on a wooden handle.
Diagram of a gear cultivator: 1 - disks, 2 - teeth made of rods, 3 - axle, 4 - axle, 5 - bracket, 6 - wooden handle
Steel disks and axles are turned independently or ordered from local craftsmen who know how to work on a lathe. Five holes are drilled on the side surfaces of the three disks, into which teeth made from a steel rod with a diameter of 10 mm are inserted. The resulting disks with teeth are hung on the axle, then axles with bearings and washers are installed.
When such a cultivator operates, the teeth on the discs plunge into the ground and turn over the surface layer. Sharp “claws” cut off the roots of weeds, loosen the soil and help saturate it with air.
The benefits and harms of dandelions on the site
Dandelions delight the eye with beautiful, bright yellow flowers in early spring. This plant has a powerful root that goes deep into the ground with an abundance of lateral roots. The ground part is a rosette of beautiful, bright green leaves. The peduncles are tall, the flower is bright yellow, voluminous, very beautiful, giving way to a spherical white cap of seeds closer to summer, which can fly away from the slightest breath of wind.
It is believed that this is a very useful culture that has many positive qualities.
- Dandelions attract earthworms to the area.
- This is a honey plant that is very loved by bees and other insects, which also pollinate vegetable and garden crops.
- Dandelions are a recognized green manure. They promote soil aeration and saturate the soil with humates.
- This plant releases substances into the ground that are harmful to harmful microflora.
There is also harm from culture.
- The plant consumes a lot of water and nutrients from the site.
- Interferes with the development of other cultivated plants.
- Reduces the decorative qualities of the lawn and flower beds.
- May cause an allergic reaction in people prone to allergies.
Getting rid of dandelions in your area is not easy, because the plant reproduces quickly and is resistant to adverse conditions. And yet it is possible.
Reviews and recommendations
Consumers note the effectiveness of the drug "Tornado" against weeds. Reviews indicate some features of its use:
- Plants need to be treated until they grow above 20 cm.
- Tall grass must first be mowed and removed and only then sprayed, otherwise a large amount of the drug will be used to dry the cut grass.
- After applying the herbicide, wash the sprayer thoroughly. If this is not done well enough, then during further treatment of crops, for example from late blight, the sprayed plants may die.
- Rain, which occurs shortly after treatment with the Tornado herbicide, reduces the concentration of the poison, and only the above-ground part of the plants dies. The roots remain. It is advisable to carry out treatment 6 hours before rain.
- When processing in windy weather, drops may accidentally fall on useful plants growing nearby, which will lead to their death.
Useful tips
Tips that are often found on forums dedicated to summer cottages and vegetable gardens:
- You should not bring soil into the garden if it may contain weed seeds. Try not to bring soil from the wild into your dacha.
- Do not leave empty areas in your garden or flower bed, as unwanted plants can quickly appear on them.
- Mow annual weeds before they go to seed.
- If there are large areas covered with weeds, they should be covered with film for several days. Under the influence of the sun, the soil will warm up greatly, and the high temperature will kill the bad grass.
- The weeds need to be watered with boiling water, and you can also use a steam treatment device. This will help destroy them without using chemicals.
- It is recommended to plant the area with plants that will crowd out weeds with their dense root system and lush foliage.
- It is necessary to control the composition of the soil. Some weeds do not tolerate elements suitable for cultivated plants.
- Water the plant itself, not the soil around it.
There are different types of weeds that are difficult to control, including: dandelion, field grass, fork, quinoa, gooseberry, purslane. To get a good harvest, you will have to deal with “uninvited guests” using the method that is most effective for you. You can choose it by trying each of the known methods in turn.
Caring for ampelous begonia at home
How to get rid of weeds and grass using folk remedies
Spectrum of action
All types of vegetation are affected by the drug, including harmful weeds: wheatgrass, sow thistle, thistle, bindweed, dandelion, clover, nettle, hops, etc.
The chemical successfully destroys coastal aquatic plants: reeds, cattails, sedges, etc.
It also successfully fights against deciduous trees and shrubs: alder, birch, rose hips, raspberries and others.
Stages
Call to the office - consultation, initial price indication already on the first call, if there are initial data Visit to the site to measure the scope of work and consultations on the site Estimate (required after inspection) and plan (in 90% of cases) if necessary Team visit to the site, (a contract is signed and work begins on the site on the same day) Upon completion of the work, a certificate of completion is signed. If you do not take care to uproot the stumps, then over time they can become a real breeding ground for dangerous microorganisms that will quickly spread throughout the entire site. Fungi, rot, bark beetles and many other troubles can migrate through the soil and reach healthy plants. In addition, after cutting down a tree, the stump continues its vital activity for a long time, so a lot of green growth will soon appear around it. Such unfavorable aspects make stump removal a necessity.
Methods for removing stumps from a site
There are many known methods of dealing with stumps - the use of chemicals, special equipment, and hands.
The most popular removal methods:
- Using a chainsaw - the stump is cut as low as possible - to ground level. But this method cannot completely rid the area of it, so it should not be used if the soil is planned to be used for a vegetable garden.
- Use of heavy equipment - the process is carried out using a bulldozer, tractor or excavator. Special equipment touches the top layer of soil, so this method is not suitable for protecting nearby beds.
- Grinding stumps with a special device will preserve the lawn, and the cutter works effectively even in a limited space. Milling deepens 30 cm below ground level.
- Manual uprooting - this process will require a hacksaw, cable, winch, ax, shovel. Uprooting a tree using this method takes quite a long time. But its advantage is that an object can be uprooted even in a hard-to-reach place where equipment cannot reach. In addition, in this case it is possible to remove the maximum of the root system. The land is ready for planting next year.
Soil erosion - if the soil in the area is sandy or clayey, it is washed away with a jet from a hose under high pressure. After the soil is washed away, the roots are freed from it and easily come out.
Chemical removal methods:
- Using saltpeter, holes are drilled in the stump to a maximum depth with a diameter of at least 1 cm, into which saltpeter is poured. The stump is covered with polyethylene and left to winter. In the spring, the stump will be soaked in saltpeter as much as possible and dried. They set him on fire. This method requires time and is not suitable for emergency situations.
- Urea - used similarly to saltpeter. But at the same time, urea nourishes the soil and does not require subsequent disposal of the stump. The soil in this place will be fertile and of high quality, which is optimal for planting plants.
Chemical removal is a rather long method and this is its main disadvantage. And the soil after treatment with nitrate becomes unsuitable for planting for several years. Therefore, this method is ineffective.
| Stump removal method | Price |
| Manual uprooting | 200 rub. per 1 cm diameter |
| Removal by crusher (shredder cutter) | 50 rub. per 1 cm diameter |
| Mechanized uprooting of a site (backhoe loader) | 50 rub. per 1 cm diameter |
To make a preliminary independent calculation of the price for tree stump removal, you must:
- measure the diameter of each stump at ground level (including root shoots if they need to be removed);
- if the diameter is difficult to determine, then you can measure the circumference of the stump and divide by 3.14 - you get the diameter;
- add up all the diameters of the stumps;
- select the removal method;
- multiply the total diameter by the price per 1 cm from the table below.
For example, for three apple trees with a diameter of 10 cm, each cost of removing stumps by manually uprooting will be calculated using the formula 3*10*200 = 6,000 rubles.
Calculate the cost of uprooting
Varieties of uprooters
There are several types of manual weed extractors. We invite you to familiarize yourself with their types, which will allow you to choose the most suitable option for yourself.
garden fork
Using a garden fork, you can remove a weed with a fairly developed root system. But this is provided that the fork teeth are bent at an angle of 45º or more. If they are bent less than 45º, then it is suitable for loosening the soil and removing weeds with a weak root system.
When choosing a garden tool, it is important to pay attention to ease of use. The handle of the equipment should be comfortable, so you can avoid pain in the hand
Root remover for gardening
Using a root remover, you can remove weeds with deep roots from the ground. Such devices come in a wide variety. Some have a sharp V-shaped blade, others look like a fork with 2 flat and wide teeth, and there are also models that resemble a huge corkscrew in appearance.
Crevice weed clearer
The slot weed extractor has an L-shaped blade. With its help, it is convenient to clear the weeds from the space between the tiles that are usually used to lay paths. For the same purposes, an ordinary kitchen knife is often used.
Using a hoe
There are 3 types of hoes that are used for weeding the garden: Dutch, manual and straight.
A distinctive feature of the Dutch hoe is the slight angle of the blade. This tool cannot remove deep-rooted weeds.
A hand hoe is a small handle to which a blade is attached at a right angle. It is designed to remove young plants.
Straight hoes are devices similar to hand hoes. They differ only in that their size is much larger. With their help, weeds are removed by chopping movements.
What is the tool
The most common are hand cultivators, whose weight is no more than 20 kilograms, they are compact and have high productivity .
With this device you can not only loosen the soil, but also remove weeds and apply fertilizers. The tool will also come in handy during the care process after planting the plants; with their help you can perform the following actions:
- hill up the beds;
- thin out;
- loosen the soil between the beds.
Of course, such a hand tool is certainly not comparable in capabilities to a walk-behind tractor, but it is quite suitable for performing the assigned tasks. It can also be used even in hard-to-reach areas.
Cultivators are equipped with cutters, thanks to which they move around the site, and they are the ones who carry out loosening. In addition, it can have the following working attachments:
- paws for thinning and loosening the soil;
- sock for cutting and loosening;
- hiller for cutting furrows for subsequent sowing. Then it will help in the process of hilling the plants;
- a needle-shaped disk, it is needed if the soil is covered with a large crust;
- Feeding knives are equipped with dispensers so that fertilizers can be injected into the soil.
Fork
Your weed control, anywhere, will not be complete without this tool. The tool has the appearance of a curved metal attachment, which significantly increases the strength of the handle. And this, in turn, allows you to easily cope with weeds that have deep and well-developed roots. Forks with teeth bent at an angle of 45 degrees can do shallow loosening, simultaneously removing weeds that are loosely sitting in the ground.
It should be added that the tool is easy to use, highly reliable, and does not take up much space. In addition, it is easy to use on small pieces of land and where weeds are difficult to reach.
Advantages and disadvantages of cultivators
Each type of cultivator has its own pros and cons. Electric cultivators are lightweight and small in size. They don't need to be refueled because they run on electricity. They are also quite simple and easy to use, but are not suitable for a dacha that does not have electricity.
The disadvantages include the fact that they only work in the area where the power cord reaches. Also, electric cultivators do not have high power. With such a cultivator you can cultivate flower beds and greenhouse soil, but in large areas they are completely useless. After all, the length of the cord determines the place where this cultivator can cultivate the soil.
A cultivator that runs on gasoline (gasoline cultivator) has slightly more advantages. It is convenient to cultivate large areas, because such a cultivator has high power and functionality. Disadvantages include difficulty in maintenance, heavy weight and refueling. And the more powerful such a cultivator, the more fuel is needed to refuel it. Gasoline cultivators are often called star cultivators.