Tips for builders | 02/10/2018
Beading edges in sheet parts of a car during its repair is not an energy-intensive operation, so even with significant volumes of work, it is advisable to acquire a manual edge bender rather than a powered one. The technological advantage of this process is that the workpiece can be left under pressure as long as required to overcome the elastic inertia of the material. Manual edge benders usually form the edges of sheet metal with a thickness of up to 0.8...1.0 mm, with a side height of up to 20 mm.
We make a manual edge bender with our own hands. Drawings and videos
Beading edges in sheet parts of a car during its repair is not an energy-intensive operation, so even with significant volumes of work, it is advisable to acquire a manual edge bender rather than a powered one.
The technological advantage of this process is that the workpiece can be left under pressure as long as required to overcome the elastic inertia of the material.
Manual edge benders usually form the edges of sheet metal with a thickness of up to 0.8...1.0 mm, with a side height of up to 20 mm.
Device of manual edge benders
Edge benders, although somewhat similar in appearance to sheet benders, have a fundamental difference - the height of the shelf usually does not exceed 5...20% of their length. A lower value corresponds to flanging the inner edge. When bending there is no such limitation, which predetermines noticeable design changes in the compared devices.
The first of them concerns the length of the flanging working area - for manual edge benders it can be small, since the height of the bead and the radius of curvature do not change. Accordingly, portable manual edge benders are produced, moving which along a pre-marked flanging line, we obtain the required profile.
If the edge formation zone is large, the process should be performed simultaneously. In such cases, an edge bender is more similar to a sheet bender, differing, in fact, only in the way the workpiece is pressed.
Let's consider the first version of the device. Portable manual edge bender for gradual bead shaping includes:
- Two handles, and one of them or both can be movable.
- Lever reinforcement system to create the required flanging force.
- Working jaws with a profile that matches the dimensions of the edge. Typically, the manufacturer equips a manual edge bender with a set of several jaws and the most commonly found in practice edge height and radius of curvature during the transition from the edge to the main plane.
- Adjustable travel stop: most often this is a removable slotted screw equipped with a thrust thread.
For ease of use, the handles are rubberized, which prevents the operator’s hand from slipping while applying force.
The second version of a portable manual edge bender is a roller bender, where the sliding friction of the jaws on the workpiece is replaced by rolling friction when the working rollers rotate.
In this case, the shaping force is significantly reduced, but the tool turns out to be less universal, since there is only one pair of rollers, and it is not possible to change the edge formation parameters except by replacing a pair of rollers, which is quite labor-intensive.
In addition, roller edge benders in most cases fail to perform internal flanging along small radii.
The main disadvantage of manual portable edge benders is their low accuracy: when moving the tool along the uneven line of the future edge, an error gradually accumulates, which at the end of the operation can reach a millimeter or more. This is unacceptable during auto body repair, so the quality of bead formation is determined only by the experience of the performer.
Do-it-yourself manual edge bender
Let us dwell on the option of designing and manufacturing a manual edge bender with simultaneous production of an internal or external contour along the entire length of a pre-marked workpiece.
The general view of the device is shown in the figure.
Such a manual edge bender can be used not only in car repair shops, but also in roofing work, the manufacture of tin ventilation ducts and other spatial products made of sheet metal.
The dimensions of a homemade manual edge bender are determined depending on the largest dimensions of the workpiece for which flanging is performed. For example, for large products, it is more expedient to build a table from wood or multi-layer plywood, on which to mount the edge bender; in other cases, the structure is welded from channels and sheet metal.
The design of the manual edge bender is designed for sequential execution of two transitions:
- clamping the workpiece using a clamp and lower clamp;
- flanging along a given contour by turning the handle with the punch located on it.
It is usually recommended to make a welded version of such an assembly, but this is impractical: the parameters of the flanging curve may change, and it is no longer possible to change the punch. Therefore, taking into account the small forces arising during deformation, it is better to produce a collapsible punch, which is a collection of individual modules, characterized by their radius of curvature and edge height.
The fastening of such punches to the beam is carried out using bolts (of course, all seats must be designed and made with the highest possible accuracy).
The edge formation itself is performed after the workpiece is securely fixed between the upper and lower clamps (the latter ensures smooth clamping due to the spring mounted on the rod in the upper plane). The combination of the two halves of the flanging die is carried out by moving the support bracket along the mating surface of the stops, which act as guide elements of the manual edge bender.
By changing the configuration of the punch modules, you can perform flanging not only at a straight line, but also at any other angle - up to 110...120º (to do this, you just need to provide a small bevel on the limiter, which is visible in the figure).
Manual edge bender for do-it-yourself auto repair drawings
Butt welding is notoriously difficult to do on thin iron material. Thanks to the tool that is presented in this video of the “car resuscitator” channel, the work of car repair is greatly facilitated.
Now you can mask a seam that is overlapped, resulting in a complete illusion of butt welding. Externally it looks very impressive and beautiful. First, look at how the master works with this tool of his, the design of the edge bender.
In the second video you can see product drawings.
The master shows how, using a hand-made homemade edge bender, it is possible to make an even connection between two parts during auto repair. One of the parts has a uniform, flat surface. 2 parts have an edge with a recess. Millimeter deep groove.
Two elements are applied to each other. A weld is made along the groove at the junction. Next it is sanded and leveled. We get an even, neat and flat connection of two elements; after coating with paint, it looks like one whole.
The effect of butt welding, but in reality there is an overlap.
Let's look at the design of a manual edge bender in more detail. Small vice for stability. Support point. The length of the levers is 0.5 meters. 25 tube. Two pieces of tire are welded to it. Two holes.
The result is a U-shaped part. Bolts 12. Let's try to disassemble the tool. When will it be possible to show all the components in more detail. The protrusion on this part is not formative. 2 parts have a counterpart.
A lever is made to make work easier.
Two levers are connected to each other through a fulcrum. The pipe is 25, the tire is the same size. Shoulder length 100 millimeters. The distance between the bolts is 25 millimeters. The inner tube is 20 x 20. A millimeter plate is welded to it.
The plate compensates for the difference in external and internal diameters. To simplify the design, a thread is cut into the cheek. The master did not use any drawings in the process of making this hand-held device; everything was done on a whim.
The entire structure was drawn on paper.
If you want to replicate this design for your auto repair shop, then the following video will be valuable to you. Here you can see all the necessary drawings of this tool, which is called an edge bender. A very convenient device for working in the auto repair process.
A manual edge bender for auto repair, made by yourself, is easy to use and is popular among tinsmiths. There are a number of modern offerings of this device available at retail, although it is not difficult to manufacture.
Where is edge bender used?
The device has found application in many areas of industry. In particular, it can be used to form seams in roofing iron, air ducts, and prepare product edges for welded joints. Today, car repair is given one of the first places in the use of the device, since cars are becoming the most popular among the population every year.
Equipment design and manufacturing
To make an edge bending machine yourself, and thereby facilitate the work of a tinsmith, you do not need to have practical experience. The main elements that ensure metal bending are:
- supporting surface;
- working base;
- clamping force;
- punch compression;
- levers, in the form of handles.
When developing drawings, if necessary, an additional hole punch can be made in the same device. Modern models of machine equipment use a knife to trim edges. It's also easy to make.
- The supporting surface or base of the device - this can be a table made of a pipe or metal profile, a wooden table on powerful supports, if there is a need to bend roofing iron 0.8 mm thick. A manual edge bender is designed for this value. There is no need to make special efforts, because the base is affected by insignificant forces. But the base must be strong enough, this is necessary for the accuracy of bending the metal sheet.
- Working base or table - the average dimensions of the working surface are 1m x 1.5m, more is possible. When working with sheets of overall dimensions, such characteristics will not be superfluous, since unforeseen situations may occur. For fastening to the base, it is preferable to use No. 8 or 6.5 channel. Fasteners should be made clearly horizontally. It is possible to use welding of metal structures. When using wood for the base, bolted fasteners will be the most reliable.
- Clamping - a clamping rod is used to ensure metal clamping when bending edges. You can make it using one of the options. For example, a corner with a shelf of 0.05 m, or the same rental is installed below on a larger edge. This ensures pressure to the punch at a given angle of 1350. Such sheet benders can easily bend the metal at a right angle. Holes for bolts are drilled on both sides of the clamping mechanism. Clamping can also be carried out using wings with welded pins to the base of the structure. Springs can be used to install more complex clamps. To imagine how a spring works, just watch a video on the Internet.
- Making a punch - the drawings of this element provide for the use of a square profile pipe or an angle with thick-walled shelves of the same size with a clamping device. The design involves rotation around an axis horizontally, while the upper front edge must necessarily coincide with the punch. Loops are welded at the ends for these purposes. In this case, it is important to position the clamp exactly vertically. This is the only way to prevent distortions from occurring when bending metal. It is necessary to ensure that the punch is adjacent to the edge of the working base without gaps, so the bend line will be more accurate. If the condition is not working, then the face of the punch, located on top, is in the same plane with the surface of the table. There should not even be a deviation of 1 mm. If, nevertheless, deviations occur, then the work of the machine tool will still be carried out, but the bending radius will be larger, and the result will be a rounding in place of a straight line. A hole punch can be made as an additional option for the device.
- Drive - a half-meter lever is welded to the front of the punch or to the side. For ease of work, it can be made in the form of a bracket. But for practical work, it is best to use a telescopic type lever. Its length can be easily adjusted if necessary. It is easy to make such a device from two pieces of pipe. The length of the lever itself must be firmly fixed for the given positions. For this, pins are used that connect the holes through each other in increments of 0.1 m. This step will be the most optimal, since the applied force is felt when it is adjusted by 10 cm. The design of such a handle regulates the effect of forces on metals of different thicknesses. To bend edges up to 0.8 mm, material made of galvanized or ferrous metals with a thickness of 3 mm or more is used, for example, for body work, a telescopic design will make it possible to increase the force by 2 times or more. Damage to the ribs is excluded, since the load is evenly distributed during operation. The type and thickness of the metal being processed depends on the mechanical force on the drive. When using clamping bars with different profile edges, it is possible to bend complex edges. You can also provide a pressing force and make a stiffening rib on one of the cuts or along the perimeter of the sheet.
Areas of application
Metal bending devices are used in various industries. They are used to create folds from roofing iron, make rectangular air ducts from tin or metal sheets, prepare the edges of products for welding, and parts of geometric shapes. Manual edge benders are actively used for construction and repair work. They are in demand during car repairs.
Among the advantages of this technology, in addition to the small thickness of the resulting edges and the low cost of rolled metal, one should add high resistance to wear.
Manual edge bender for do-it-yourself auto repair - Metalworker's Guide
Sheet metal and tin are in great demand, because many products are made from them: metal tiles, various shaped parts, drainage systems, corrugated sheets, parts for auto repair, etc.
Such products are bought ready-made, but if you make a manual sheet bender with your own hands, you can save a lot.
What types of benders are there?
Of course, you can buy a ready-made bender, for example, the famous Edelweiss, but such machines also cost a lot, but if you make them yourself, you won’t need any special financial costs. There are several types of metal bending machines :
- Manual bending machines. Metal bending occurs through the application of physical force. Despite the apparent simplicity of the design, they can be used to perform almost all necessary operations with sheet metal, including folding work.
- Hydraulic sheet benders. Very similar to manual machines, but the application of force occurs due to a hydraulic drive.
- Roller edge bending machines. They differ from the previous ones not only in design, but also in the principle of operation. In them, the sheet does not bend along a certain line, but is smoothly rounded. Such machines are necessary for the manufacture of pipes and other similar products.
Manual and hydraulic machines are easier to manufacture than roller machines. Do-it-yourself edge bender drawings are easy to find, but the process of their production itself is not described everywhere.
Making a manual sheet bender
On the Internet you can find many drawings for making a sheet bending machine with your own hands. One of the simplest and most effective designs is an I-beam machine diagram.
To make a manual sheet bender with your own hands, you will need: three pieces of I-beam with shelves of at least 45 mm and a thickness of 3 mm, two screws with a diameter of about 20 mm, a spring, thick metal for making jibs (to strengthen problem areas), door hinges.
The tools you will need are a drill, a grinder and a welding machine . The manufacturing algorithm is simple:
- Two brands are folded, recesses are marked and cut out for welding the loops. To weld the hinges efficiently, the samples are beveled at 45 degrees.
- Parts of the loops are welded to the prepared I-beam pieces. It is necessary to boil both the face and the back.
- To place the bolt securing the clamping bars, four triangular jibs are cut out and welded in pairs on each side of the I-beam. A nut is also welded to the jibs.
- A thick steel plate is welded to the third section of the I-beam, which will press the sheet of metal. You need to drill a hole in it for the bolt. When welding, it is necessary to accurately center the hole and nut on the mating section of the tee.
- Cut the spring to such a length that it can lift the clamping I-beam to a height of 8-10 mm. The spring is optional, but its use will greatly simplify the work of bending metal.
- Also, for convenience, it is advisable to weld handles to the head of the clamping screw. They can be made from unnecessary scrap rebar.
- A lever-handle is welded to the movable section of the I-beam. The working part of the sheet bender is ready for work, but in this form it is extremely inconvenient to use, so you need to make a bed.
This work is very simple and does not require additional description. The bed can be used with unnecessary or broken tools, if available.
The result was a powerful homemade sheet bending machine; the drawings used were simple, one of the most common. With its help, you can easily bend even long and thick sheets of metal.
By the way, instead of an I-beam, you can use a metal corner with similar characteristics.
A do-it-yourself manual edge bender is made from a corner according to the same drawings, only the corners of the base must be welded together in pairs.
To make a manual edge bender with your own hands, drawings can easily be found on the Internet . For the clamping part, you can use an unpaired corner, but it is advisable to strengthen it with jibs to give the necessary rigidity.
Features of Roller Machine
Roller benders are less common, but if you need to give a sheet a radial bend or make a pipe, there is no alternative.
On the Internet you can find drawings of a sheet bending machine with your own hands; let’s look at the simplest and most effective design.
The easiest way to buy rollers for a sheet bender is to buy them ready-made or order them from a turner; you will need 3 of them.
For this type of sheet bender, a powerful bed is especially important . Again, you can make it yourself or take a ready-made one.
The two lower rollers are fixed stationary, and the upper one can move; it should be located above them. By pressing on the upper roller, the radius of curvature of the part being manufactured is adjusted.
To make pipes, it is necessary to provide for the possibility of removing the top roll.
The most difficult thing is making a drive so that all three rolls rotate synchronously. You can use sprockets and a bicycle chain.
Precautions during operation
When using sheet metal bending machines, safety regulations must be strictly followed.:
- Inspect the condition of the robe and shoes. There should be no hanging parts, unfastened zippers or buttons.
- Check the working parts of the sheet bender for any malfunctions. If detected, do not start work until they are eliminated.
- The workplace should be sufficiently illuminated by natural or artificial light.
- There should be no unnecessary tools or materials at a distance of a meter from the machine.
- You cannot bend sheets thicker than those provided for by the design and characteristics of the machine.
Do-it-yourself manual edge bender: drawings, types of machine
Such a simple tool as an edge bender can be useful in many situations involving the need to process sheet metal products. There are many models of such a device on the modern market, but if you wish, you can make it yourself.
Edge benders can be used to form quite complex profile elements
Areas of application
An edge bending machine or a simple hand tool designed for bending edges is widely used in many areas.
The edge bender makes it possible, in particular, to produce air duct elements from thin sheet metal and to prepare the edges of workpieces for joining them by welding.
Auto repair (body work) is another area of application for such tools and equipment.
Edge bending is also actively used in construction and when performing home repair work. Using such a tool, seam joints of thin-sheet metal elements are formed and even products of various configurations are manufactured.
Bending the end of a drainpipe on an electromechanical edge bending machine
If we talk about the principle by which the edge bender operates, it is quite simple. To bend the edge of a thin-sheet product, the edge bender scale is set to the required processing width, then the edge of the workpiece is placed between the working rollers of the device and, moving the device, the bend is performed.
Main varieties
The simplest design of the edge bending devices on the market are manual roller type devices.
All manipulations with such edge benders are carried out using the handle with which they are equipped, and the main work of deforming the edge of the metal workpiece is performed by the rollers.
The width of the bend performed using such a device is regulated by means of a special limiter installed on the guides of the device.
Compact manual edge benders can be used directly on site
High mobility of the edge bender, which can be used even on high-rise objects, is ensured not only by its compact dimensions, but also by its low weight, about 2 kg. Using a hand-held edge bending tool, you can bend the edge of a metal workpiece at an angle of up to 90°, while the thickness of the metal from which it is made cannot exceed 0.8 mm.
Using an edge bender, you can make bends of any length, and their width can be in the range of 0.5–20 cm. As can be seen from the technical characteristics of such a device, its capabilities are quite limited, so it is advisable to use it only for solving simple technological problems.
An edge bending machine equipped with a hydraulic drive is more productive and functional. The operator working on such equipment does not need to exert significant physical effort in order to bend the edge of a metal workpiece.
Due to the high power that this device is distinguished by, it can be used for processing sheet metal workpieces even of considerable thickness.
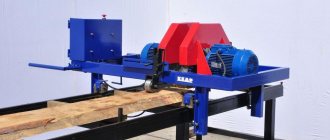
Edge bending machine ZSH-4.0 with hydraulic roller clamping
Depending on the dimensions, a hydraulic edge bending machine can be stationary or mobile. It is the hydraulic drive that is most often equipped with such equipment, which also has another name - “edge bending press”.
The edge bending machine can also be equipped with an electromechanical drive. Using this equipment, you can make folds of various types and even perform upsetting of the folded seam, if the equipment of the machine allows this to be done.
Making an edge or trimming it on a roller machine uses replaceable rollers, on which the shape of the bend depends
Edge benders equipped with a pneumatic drive are very popular. The working parts of such a machine, operating on the “rotary beam” principle, through the use of a pneumatic drive, make it possible to exert significant pressure on the workpiece being processed, the value of which can reach up to 6.2 bar.
Meanwhile, such an edge bending machine can be used for processing workpieces made of sheet metal, the thickness of which does not exceed 1.2 mm, while the width of the processed edge cannot be more than 12 mm.
When deciding to use serial equipment in this category or make a pneumatic machine with your own hands, you must keep in mind that for such a device to fully operate, it is necessary to provide an air flow of 113 l/min.
Self-production of an edge bending machine
How to make a device for performing edge bending operations? This problem can be solved quite simply.
Option one. Long straight edge bending machine
In order to make such a device, you will need its drawings, which are easy to find on the Internet, as well as the following equipment and consumables:
- metal channels from which the base and clamps of the edge bender are made;
- thick-walled corner for making a crimping punch;
- metal sheet from which the edge bender brushes will be made;
- a metal bracket used as a handle for a device.
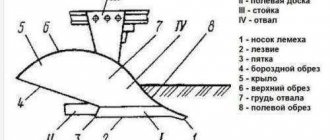
Scheme of operation of a homemade edge bender
The assembly diagram for making a machine for performing edge bending operations is as follows:
- The edges of the punch and base are chamfered, the size of which should be 7x45°, and the length should be 30 cm.
- Metal rods with a diameter of 10 mm are welded to the punch, which will act as axes. When welding such rods, it is necessary to ensure that their axis coincides with the edge of the angle.
- Samples are made at the ends of the working part of the clamp.
- A homemade edge bender is pre-assembled in a vice, with the help of which the punch is compressed with the base. In this case, it is important to ensure that the wall of the punch and the working shelf of the base, between which the cardboard spacer is placed, are located in the same plane.
- Steel brushes are placed on the punch axis and pressed to the base using clamps.
- After checking the correct position of the brushes, they are welded to the base of the device.
- Holes are drilled at the base of the edge bender into which clamping bolts are screwed.
- Studs are welded to the base of the machine - a metal channel - onto which nuts are screwed.
- Having unscrewed the bolts, they are inserted into the drilled holes of the clamping mechanism and the restriction nuts are screwed onto them.
- A handle is welded to the metal corner of a homemade edge bender.
Drawing of a bending beam (click to enlarge)
Drawing of the lower beam (click to enlarge)
Drawing of the pressure beam (click to enlarge)
Once your edge bending device is assembled, all that remains is to secure it in a bench vise.
Edge bender mounted on a workbench
An overview of the manufacture of the first version of the edge bending machine can be seen in detail in the video below.
Option two. Manual edge bender for flanging
With this homemade device you can bend edges of any length, and the design is taken from manual factory-made edge benders.
Appearance Assembly drawing Drawing of a handle with a lower jaw Drawing of an internal part Drawing of a handle with an upper jaw Drawing of a lever The entire process of working on a bender of this type is shown in detail in the video below.
Using these examples, we examined the procedure for manufacturing standard edge benders, which can be used to perform a whole list of technological operations.
If you need an edge-bending device, which is used to carry out auto repairs, then it has an even simpler design and, accordingly, low cost, so it is not practical to make it yourself: it is better to purchase such a device.
And finally, another option for making a homemade edge bender in video format.
About other equipment for bending metal edges
A homemade edge bender for body repair can also be pneumatically driven. Pneumatic edge benders are in demand among tinsmiths. The principle of operation is to create a pressure of up to 6.2 bar, due to pneumatic cylinders and beam rotation. It can be used with metal thicknesses up to 1.2 mm, and the resulting edge width can be up to 12 mm. Air consumption 113 l/min.
Automatic edge benders can be purchased at retail. The price is reasonable and the device is simple. It is not necessary to have experience when using equipment in repairs. The hole punch-edge bender is popular because it can be used to simultaneously bend the edge of a metal and make a hole with precision.
Republished by Blog Post Promoter