In this article we present you with a complete set of drawings with all the overall dimensions of our belt grinder for DIY assembly. This belt sanding machine is designed to work with a sanding belt 915mm long and 50mm wide. This grinder model is intended for a small workshop or for semi-professional use. The belt grinder is mounted on AIR 71B2 motors with a power of 0.75 kW/1.1 kW, as well as on AIR 63B2 motors with a power of 0.35 kW/0.55 kW in a flange version.
Composition of the owner's belt grinder kit for DIY assembly
| List of the main set of working drawings of the MG-915 OWNER belt grinder for self-assembly. | ||
| Sheet | Name | Note |
| 1. | Common data. | |
| 2. | Belt grinder frame. | |
| 3. | Support mechanism. Retractable crossbar. The table plate is retractable for the belt grinder. | |
| 4. | Support table. Thrust plate, belt grinder ears | |
| 5. | Belt grinder drive pulley. | |
| 6. | Straight belt grinder roller 2 pcs. | |
| 7. | Roller barrel of a belt grinder. | |
| 8. | Rolling bushing for belt grinder. | |
| 9. | Threaded axle of belt grinder 4 pcs. | |
| 10. | Assembly view 1. | |
| 11. | Assembly view 2. | |
| 12. | Assembly view 3. | |
The main elements of the belt grinder (retractable crossbar, main frame and rotary mechanism) are cut from metal 10 mm thick. We recommend assembling the material of the frame and main elements of the grinder from metal with a thickness of 10-12mm; to make the structure lighter, aluminum of a similar thickness is also suitable. For the manufacture of grinder frame parts, we recommend using laser or waterjet cutting; a plasma cutter or milling machine is also suitable.
Grinders from Chapai
Currently, a large number of designs of belt grinding tools are offered in the literature and on the Internet. Some of them are considered more successful, others are difficult to implement.
The designs of grinders from Chapai are recognized as one of the successful developments. Developer Andrey Chapai offers professional tools and versions for the home workshop. One of the significant advantages of these models is the wide range of machining angles. To solve this problem, the author proposed an original design of a rotary table. This design formed the basis of all grinders in the professional line. These include: GC 10, GC 12 and GC 16. They received a fairly high rating among specialists. To expand the functionality, the author equipped his products with a device for mounting a disk. A rotating frame assembled from two metal sheets 12 millimeters thick ensures high reliability of the entire tool.
In addition to professional versions, Chapai has developed mobile versions (GCh610-63 and GCh610-71). They are easy to use and demonstrate good consumer characteristics.
Drawing of a belt grinder frame
In the absence of access to this equipment and a certain amount of experience and perseverance, using the basic dimensions in the grinder drawings, you can assemble the machine yourself using an angle grinder for cutting metal and a drill for drilling holes. The easiest way to transfer grinder drawings to blanks is to print them in 1:1 format and glue them.
Drawing of the crossbar and frame of the belt grinder
The material of the belt tensioner mechanism for the grinder is made of 8 mm thick steel. To assemble the grinder tensioner yourself, you will need M6x1 taps, holes with a diameter of 5.2 mm, in the drawing for a 6x1 thread. We recommend lubricating the rubbing elements of the belt grinding machine with any available technical lubricant. For further stable operation of the grinder belt tensioner, it is recommended to lubricate it regularly.
Review of models and prices
If you want to purchase a ready-made machine, we suggest you study the prices of the most popular ones.
Grinder "Lefty"
Characteristics: motor – 1.5 kW, belt length – 1250 mm (up to 1600 mm); The model is interesting for its additional equipment (wheel, contour), which is included in the kit.
Appearance of the “Lefty” grinder
Grinder-sharpener “Kraton” BG 14-05
Characteristics: the device is used for sharpening metal tools and wooden parts; power consumption – 2 kW, movement of the sanding cloth – 14 m/s; disc diameter – 150 mm; tape width – 50 mm. Features: rigid cast base, adjustable stops and protective screen.
Model cost from 6000 rubles
Grinding machine BISON ZShS-330
Characteristics: machine type - disc-and-belt; circle – 125 mm; speed – 2950 rpm; tape size 762 mm × 25 mm; power - 330 W; belt speed – 810 m/min. Cost – 5490 rubles.
Grinding machine BISON ZShS-330
Sharpener METABO DS 125
Characteristics: sharpener type - with sanding belt; circle - 125 mm × 20 mm × 20 mm; circle diameter - 125 mm; circle thickness - 20 mm; landing diameter – 20 mm; speed – 2980 rpm; power - 200 W. The cost of the model is 7679 rubles.
Sharpener METABO DS 125
If you have experience creating hand grinders, tell the readers of our online magazine about it. What do you think, is it worth carrying out the work of assembling such units, or is it better to buy a ready-made structure?
Drawing of a belt grinder tensioner for DIY assembly
Drawing of a belt grinder tensioner mechanism for DIY assembly
The support table and thrust platform of the Host belt grinder are made of 6 mm thick steel using welding and subsequent grinding of the seams. You will also need an M8x1.2 tap; the holes for this thread are marked with a diameter of 6.8 mm. As a thrust element of the grinder, we recommend using porcelain tiles; they have proven themselves better than high-alloy steel or cast iron, because... its density and durability are higher.
Drawing of a table for a belt grinder
Drawing of the support table and thrust plate of the grinder for DIY assembly
It is best to entrust turning work to an experienced turner, because... The rollers and pulley of the belt grinder are high-precision parts, difficult to manufacture and require the use of turning equipment and various types of cutters, as well as a band saw for cutting workpieces. This is the main element of stable operation, smooth running of the grinder belt and safe operation of your machine. All dimensions and tolerances of grinder rollers are indicated in the following drawings.
A turning kit for assembling a grinder with your own hands can be ordered from us: Turning kit for assembling a grinder
Grinder for 610 mm belt. — DIY community on DRIVE2
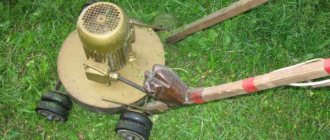
Hi all! I present to you another of my crafts. This is Grinder! I am passionate about making knives, but I can’t do without it. This is the last project this year, I want to finish it. It's 4.08 am, and I'm sitting and typing. Well, okay, let's go.
For the base, take a sheet of metal 7 mm thick. I got 200 by 300 mm. The engine from the washing machine is automatic, it is quite powerful and very resourceful. The turner machined a drive roller with a diameter of 55 mm, it was installed on the motor shaft and secured with an M6 bolt.
I cut out a stand from the same metal and welded it to the base, reinforcing it with a gusset.
The tension unit consists of a 6mm thick plate. It has a hole drilled on one side and a nut welded. An adjusting bolt is screwed into it. When twisted, it rests against a plate with a roller screwed to it.
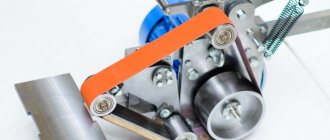
The plate is made of 2.5 mm metal and is screwed with M6 bolts through growers. The roller has a slight barrel shape that allows it to hold the tape. Everything is visible in the photo. This entire assembly is screwed to the rack through a support bearing.
A tension spring is installed at the rear.
Full size
Tension unit
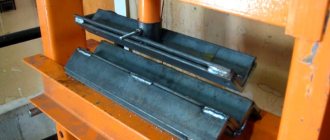
The engine is mounted on 5mm thick plates welded to the base with M8 bolts. For the pressure pad I used a piece of channel No. 10 cut lengthwise. We cut it not in the middle, but so that one half is larger and the other smaller. We'll need it later. We cut grooves in the larger piece, and drill holes with a diameter of 10 mm in the rack.
Full size
Pressure adjustment
In a smaller piece of channel we drill two holes side by side and remove the jumper with a file so that the hole becomes oval. Now we connect the two halves with a bolt. Next, we will weld the plate itself, mark the place where the parts join, draw the center and weld them in this position. This design will allow you to adjust the platform relative to the tape and set it in the desired position.
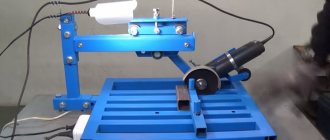
Now the table. . I had in stock a plate of a suitable size with a thickness of 10 mm. Let's clean it a little of the rust. In order for the table to be able to move and tilt at an angle, it was decided to weld a plate with a hole at the bottom, and a plate with an oval hole at the base. The table is fixed with an M10 bolt and nut.
Full size
Table mount
After all the manipulations, I took it apart and spray painted it.
Tests have shown that the engine has enough power. Not enough revs. But this is easily solved. I tested on a controller that sits on a lathe and a band saw. There, the speed is limited to 4000 rpm. I was too lazy to take it home and connect it to the computer.
Next year, in January, spare parts will arrive from China, and I will make a detailed tutorial on assembling this controller. I’ll assemble it for the grinder, and set it to the required speed, somewhere around 6000-7000 rpm. It will be just right.
Traditionally, a video with a more detailed assembly process.
Happy New Year, everyone! I wish you health, good luck and success. Bye!
Source: https://www.drive2.ru/c/520281206755950705/
Drawing of a belt grinder tensioner bushing for DIY assembly
Drawing of a belt grinder tensioner bushing for DIY assembly
To assemble the grinder rollers, you will need 6000RS bearings, 6 pcs. In case of imprecise turning, I recommend gluing them onto thread sealant, this will allow them to last longer and avoid unpleasant situations with collapsed rollers. We use CNC turning on our machines, which allows us to produce parts with an accuracy of .01 millimeters.
For a better understanding of assembling a belt grinder with your own hands, below we attach assembly drawings and views of the assembled grinder.
Working belt
You can always see a spring on a belt grinder, which is necessary to ensure automatic tension of the sanding belt. If you use such a spring, then changing the tape will be very convenient, and its tension will be adjusted automatically. It should be said right away that it will be necessary to change the tape several times even when processing one product. When processing any metal part, you must start with a belt with a larger abrasive, gradually changing it to a finer one.
Very important attention should be paid to gluing the tape. There are options for proper gluing on the Internet, and you can also watch this process on video. To make it, you need to use sandpaper on a fabric basis. The seam on the tape is made only end-to-end and it must be reinforced, for which a strip of dense fabric is used, placed on the back side of the area to be glued. To glue tape sandpaper, you must use only elastic glue, and it must be of very high quality.
To ensure high-quality and reliable gluing of the sanding tape, you will need to properly prepare it. You can glue the tape using a glue stick for a hot-melt gun: this method can be clearly studied in the video above. For heating, you can use a regular technical hair dryer.
If you wish, you can make your homemade grinding machine even more versatile; to do this, it should be equipped with an additional table placed on the side of the largest pulley. This will allow you to process parts on a belt grinder, pressing them against the sanding belt from the side of the largest pulley. If you decide to make such a table, you will need to provide for the possibility of changing the direction of movement of the sanding belt, which should always move towards the work table, and not away from it.
A simpler design of the grinder can be seen in the video below:
Assembly drawings of a belt grinder
Assembly drawing of a belt grinder for DIY assembly (View 1)
Assembly drawing of a belt grinder for DIY assembly (type 3)
Assembly drawing of a belt grinder for DIY assembly (type 2)
All the fasteners used for assembling the belt grinder with your own hands are laid out in the specification file.