What types of angles are there?
There are the following types of angles used in different fields of activity:
- Carpentry - used by carpenters. Available in different lengths from 10 cm to 10 meters
- Marking - tools of this type have graduated sides with holes for marking with a pencil. Such tools are used in the field of furniture manufacturing. The device is used to check perpendicularity, apply markings, and also calibrate other devices.
- Universal or combined - has a swivel joint, which allows you to adjust the required angle. The handle of the device is equipped with a bubble level and a holder. Universal squares combine a number of the following tools: surface thicknesser, mortar, ruler and planer
This is interesting! Erunko is a corner in which two guides are attached at an angle of 45 or 135 degrees.
2a. ACCEPTANCE RULES
2a.1. To verify compliance of angles with the requirements of this standard, the manufacturer must carry out acceptance inspection, periodic testing and reliability testing.
(Changed edition, Amendment No. 3).
2a.2. During acceptance inspection, each square is checked for compliance with the requirements of paragraphs. 2.1- 2.7, 2.9- 2.11.
2a.3. Periodic tests are carried out at least once every three years. At least three angles from those that have passed acceptance control are subjected to periodic testing for compliance with all the requirements of this standard.
At the same time, the indicators of clause 2.17 are confirmed by the results of the analysis of the controlled operation of at least five angles. The results of the analysis of controlled operation are considered positive if: the average value of the total service life of the controlled angles is at least 5 years (clause 2.17), all controlled angles do not reach the limit state within 2.5 years (clause 2.17).
If during testing it is found that the angles comply with all the requirements of this standard, the results of periodic testing are considered satisfactory.
(Changed edition, Amendment No. 3, 4).
What materials are used to produce angles?
For the production of modern angles, materials such as wood, steel and plastic are used. Some of the most durable tools are made of steel. Plastic squares are the cheapest, and wooden ones are used when working with fragile materials, for example, ceramic tiles, glass, etc.
On one or two guides of the instruments in question there are scales that allow the device to be used not only for leveling angles, but also for carrying out measuring manipulations. The length of the rulers can reach 1600 mm, and the shortest models are from 60 mm.
Another name for the tool is a corner, and an analogue of this device is a folding square called a small square. The malka differs from a regular square in that the guides do not have a rigid connection, but a movable (hinge). The following types of steel are used for the manufacture of metal squares:
- X
- U8A
- 9X
- ШХ15
Steel angles are the most in demand. However, they are different, and are subjected to high temperatures in order to harden them to a certain degree of hardness. The maximum hardness of the angles is 50-58 HRC. A high degree of hardness is needed in order to ensure high accuracy of measuring work. In terms of accuracy, squares come in grades 0, 1 and 2. The most accurate instrument is considered to be one that has an accuracy class of zero. Such instruments are used advantageously in special metrological services and calibration stations.
Squares with the first class of accuracy are used by specialists - masons, welders, builders, etc. The lowest precision devices are those of the second accuracy class, which have found their use among home craftsmen. Homemade tools do not have any accuracy class, so they cannot be used for high-precision work.
Design and principle of operation
Perhaps someone will say: “We found something to talk about! The simplest and most common gardening tool..." But the variety of designs deserves to be described in more detail.
The hoe is designed so that you can cultivate the ground at a certain distance. Therefore, you can cultivate the beds while standing on the path and not trample the soil next to the plantings.
The structure of the tool is not at all complicated: it is a handle with a blade attached to it at a certain angle.
The length of the handle and the shape of the blade depend on what kind of work this tool is intended for.
When working, the blade of the hoe goes deep into the ground, then, when moving towards itself, it cuts off weeds and loosens the soil. The depth of loosening and the level of cutting weeds depends on the depth of immersion of the blade into the soil: “under the root” or along the root.
Chopper blade: shapes and angle of inclination
Hoe blades, depending on their purpose, have different shapes and sizes.
For example, for hilling potatoes, weeding and loosening wide row spacings, hoes with a wide, massive blade are used. Its form can be:
rectangular, with one side sharpened;
triangular, the blade of which is an equilateral triangle with two sharply sharpened sides; as a rule, the opposite side is equipped with two or three teeth for loosening;
arched, having a blade resembling part of a circle. Such hoes are called “sapki” in the south of Russia and Ukraine. This tool is convenient for creating wide holes or furrows for sowing seeds;
The widely advertised Fokin flat cutter can also be called a unique form of hoe;
As a rule, the blade of the hoe is rigidly fixed, the angle of inclination of the cutting part of the hoe to the holder is from 70 to 90 degrees.
What materials are they made from?
Hoe blades are made of carbon, tool or stainless steel. The working body, made of carbon steel, sharpens very well. But it is subject to corrosion. Although, recently, hoes have appeared whose blades are covered with a layer of duroplast, which reliably protects against corrosion.
The hoe with a stainless steel blade is not only durable, but also easy to maintain. Although such a tool is by no means cheap, its high cost is justified by its long service life.
The material for the handles (holders) of hoes is traditionally wooden. Experts believe that the best cuttings come from birch. Moreover, the birch tree for making cuttings was chosen growing on the edge of the forest, not far from the road, or standing alone. Because such a birch tree fights the winds, so the wood fibers intertwine and acquire special strength. In the south, acacia is preferred for making cuttings. Because this wood springs when struck and does not dry out the hand.
But, you see, it would be strange if progress did not affect gardening tools. To reduce the weight of equipment, cuttings are made of aluminum and plastic. But the aluminum handle, although lightweight, does not spring well upon impact. In addition, in the spring, during cold times, you can feel an unpleasant chill even through gloves.
Advanced manufacturers produce choppers with fiberglass-reinforced polyamide handles. Such a tool is durable, not subject to aggressive environmental influences, and is not afraid of shock loads.
Often, small hoes are equipped with rubberized handles to ensure operational comfort.
Electric hoe
We cannot ignore the electric hoes offered by the trade. Outwardly, they resemble a trimmer used to cut grass.
Available in both mains and battery powered versions.
Available with both a cutter and pins, it loosens the soil and removes weeds. Unlike a cultivator or walk-behind tractor, it only loosens the soil superficially.
Chopper: dimensions
The width of the blade can vary from 5-10 centimeters for small models, more often used in flower beds and beds with vegetables, to 15-30 centimeters for garden hoes. The height of the blade, as a rule, cannot be less than 25 mm.
The length of the handle depends on what work it is used for. Hoes with a narrow, small blade, which are used in flower beds and mixed borders, in beds with newly sprouted carrots and beets, can have a handle of 15-30 cm. Long, more than 1 meter, handles help reduce the load on the back when working.
What are angles made of?
Modern squares are made from materials such as wood, plastic and metal. The most reliable are metal tools that are not subject to deformation, which is very important when performing construction and repair work. One or two guides have scales through which you can control the distance.
The length of the guides ranges from 60 to 1600 mm, which depends on the scope of the tool. The device has an L-shape, so among specialists who use these tools, you can find the name corner. A universal square is a small square. Unlike a square, the angle grinder has a hinged joint, which allows you to determine not only right angles.
Metal squares are made of carbon steel of the following grades:
- X
- U8A
- 9X
- ШХ15
During the manufacturing process, the tool is subjected to heat treatment, which allows the part to be hardened to a high hardness of 50-58 HRC.
Manufacturers produce squares of three accuracy classes - 0, 1 and 2. The most accurate are devices with a zero accuracy class, which are used in metrology laboratories and verification services. Devices with accuracy class 1 are used by specialists - masons, carpenters, mechanics, welders. Less precise instruments belonging to the second class are used in everyday life by home craftsmen. This is interesting! A square is also an isosceles right triangle in which two sides are at right angles. A tool of this shape is more accurate due to the fact that it has the same rigidity on any part of the plane.
Tool selection
Verification triangles can be purchased at construction stores; the range offers various options.
- Construction square, made of steel, used by home craftsmen, mechanics, carpenters, assemblers, etc.;
- Granite angles are harder, more wear-resistant and not subject to destruction, like metals;
- A square with a flexible metal ruler is most often found; this is the least durable option, but in some cases it is what is needed.
Application of a metalworker's square
It is used in all construction and installation work, in the production of structures, devices, instruments, machines, in plumbing and assembly work related to the degree marking of parts. In laboratories where precise measurements are needed. A mason or carpenter cannot do without a square. The tool is used both for interior work and for large-scale work. Not a single construction site, production machinery, or metalworking industry, from a workshop to large factories and workshops, can do without a measuring device.
Application in construction
- during welding executions, design solutions, during the soldering process;
- when cutting aerated concrete blocks;
- when installing finished blocks, checking products;
- during the construction of houses, structures, laying tiles on the floor, sidewalks and various working moments.
Metal squares with a wide heel (WSH) are used in mechanical engineering, turning, and milling work. This device is used to check the accuracy of operation of mechanized machines, the connection of parts, fastening joints, when guaranteed accuracy of pairing is needed, and the calibration of mutually located parts and moving mechanisms.
Calibration gauges are used mainly as test gauges in technical control departments and in quality assessment laboratories where certification is carried out. Pattern calibration angles are used in mass production to check right angles. Such tools are used in metalworking, installation, construction, and milling fields of activity.
Information about measurement methods
The following methods are used to measure angles:
- By comparison with reference samples.
- The goniometric method, which is based on the use of measuring devices with a goniometric scale.
- The trigonometric method consists in determining parameters that are rigidly related to the angle using a trigonometric method.
Methods of measuring with a goniometer tool
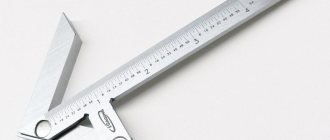
The size of an angle, in absolute units, is measured using a measuring tool called a goniometer. This term has many analogues - protractor, goniometer, sextant, astrolabe, etc. These instruments are distinguished by the accuracy of the measurements they perform; they may have different devices, but the principles of measurement are the same. Vernier protractors are most often used in practice.
Protractor design
This device is classified as a mechanical type measuring instrument. Their main task is to measure geometric angles in parts and structures.
Design of a universal goniometer
A goniometer with a vernier refers to a mechanical type of measuring instrument that is used to measure geometric angles in various parts and structures. The measurement results are presented in degrees; the presence of an additional scale makes it possible to obtain more accurate results. This additional scale is called vernier. It is fixed on an elongated ruler. Thanks to the use of this scale, measurement accuracy can be obtained within tenths of a degree.
One of the most common inclinometers is the 4UM model. With it you can take measurements in the range from 0 to 180 degrees. This measuring device meets the requirements of GOST 5378-88. The main area of its application is the industry associated with the production of parts and metal structures. In addition, it is used in repair production.
The main advantage of this device is its accuracy. Its use allows one to operate with fairly accurate figures, and this is what has ensured its demand among specialists in various industries. Like most mechanical measuring instruments, the goniometer instrument has a long service life; it does not have a specific shelf life, of course, subject to full compliance with the rules of operation and storage.
The disadvantages of this class of devices include difficulty in repair. There are no parts in this product that can be simply replaced; they are difficult to manufacture and most often have to be ordered from the manufacturer.
By the way, instruments for carrying out mechanical measurements are often compared with electronic ones, and although they look quite outdated, they are still in service.
How to use a square correctly
The tool in question is an indispensable assistant for every builder and repairman. If masters know how to use the tool correctly, then beginners are not aware of the features of proper use of a square.
Let's look at how to use a square correctly, and what you need to know.
- How to draw a perpendicular. Using a corner, you can draw lines at right angles with a marker or pencil. Lines are drawn from the side where the square part of the device is located
- Checking the connection of workpieces at right angles is achieved by applying the device to the elements to check the correctness of the angles. Especially often, tools in the field of furniture assembly and production are used to check the correctness of right angles.
- Drawing lines at 45 degree angles. Few people know that with the help of coal you can draw not only a right angle, but also one divided in half by 45 degrees. This is done very simply - to do this, initially draw a right angle in the form of two lines, and then put a point on the inside of the device (where the bases connect to each other). After this, all that remains is to draw a line, breaking the right angle in half
- Drawing parallel lines - to do this, place the device on the edge of the workpiece and measure the required distance. After this, the square is moved to the appropriate mark, while drawing a parallel line corresponding to the edge of the workpiece
- Reading and drawing various angles - the reference point is a right angle, and a corresponding mark is made with a pencil at the required marking value. After this, a corresponding straight line is drawn
- Direction for cutting with a circular saw - for this, the device is placed on the workpiece and fixed with a clamp. After this, cutting is carried out with the tool in a parallel direction to the leg of the device.
- Use as a regular ruler - allows you to determine the required dimensions
This specific tool has found wide use in various fields. You can get a right angle without a square, but using a special tool makes it not only easier, but also with maximum accuracy.
In conclusion, it should be noted that a square is a specialized tool, the main purpose of which is to obtain a right angle for the purpose of subsequent connection of parts, as well as to check their correctness during connection.
Egyptian triangle in construction
The properties of this unique geometric structure are that its construction without the use of any tools allows you to build a house with angles that are correct in all relationships.
Important! Of course, ideally the best option would be to use a protractor or square. So, the qualities of the Egyptian triangle allow you to make angles that are correct in all relationships
The sides of the structure have the following ratio to each other:
So, the qualities of the Egyptian triangle allow you to make angles that are correct in all relationships. The sides of the structure have the following ratio to each other:
- 5,
- 4,
- 3.
To check whether you have drawn the right figure, use the Pythagorean Theorem, well known from school.
Attention! The properties of the Egyptian triangle are such that the square of the hypotenuse is equal to the squares of the two legs. For a better understanding, let’s take the above relationship and create a small example
Let's multiply five by five. As a result, we get a hypotenuse equal to 25. Let's calculate the squares of two legs. They will be 16 and 9. Accordingly, their sum will be twenty-five
For a better understanding, let's take the above relationship and create a small example. Let's multiply five by five. As a result, we get a hypotenuse equal to 25. Let's calculate the squares of two legs. They will be 16 and 9. Accordingly, their sum will be twenty-five.
This is why the properties of the Egyptian triangle are so often used in construction. All you have to do is take the workpiece and draw a straight line. Its length should always be a multiple of 5. Then you need to mark one edge and measure a line divisible by 4 from it, and 3 from the second.
Attention! The length of each segment will be 4 and 3 cm (at minimum values). The intersection of these lines forms a right angle equal to 90 degrees
Alternative ways to construct a 90 degree right angle
As mentioned above, the best option is to simply take a square or protractor. These tools allow you to achieve the desired proportions with the least amount of time and effort. The main property of the Egyptian triangle is its versatility. A figure can be built with virtually nothing in your arsenal.
Simple printed materials help greatly in constructing a right angle. Take any magazine or book. The fact is that their aspect ratio is always exactly 90 degrees. Printing presses work very accurately. Otherwise, the roll that is fed into the machine will be cut at disproportionate crooked angles.
How to make an Egyptian triangle using a rope
The properties of this geometric figure are difficult to overestimate. It is not surprising that ancient engineers came up with many ways to form it using minimal resources.
One of the simplest is the method of forming the Egyptian triangle with all its attendant properties using a simple rope. Take the twine and cut it into 12 absolutely even pieces. From them, make a figure with proportions 3, 4 and 5.
How to construct an angle of 45, 30 and 60 degrees
Of course, the Egyptian triangle and its properties are very useful when building a house. But you still won’t be able to do without other angles. To get an angle of 45 degrees, take a frame or baguette material. Then cut it at an angle of forty-five degrees and join the halves to each other.
Important! To obtain the desired slope, tear a piece of paper from the magazine and bend it. In this case, the bend lines will pass through the corner
The edges should match.
As you can see, the properties of the figure make it much easier and faster to build a geometric construct. To achieve an aspect ratio of 60 degrees, you need to take one triangle at 30º and the second the same. Typically, such proportions are necessary when creating certain decorative elements.
Attention! A 30º aspect ratio is needed to make hexagons. Their properties are in demand in carpentry blanks
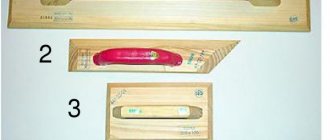
Malka
A small goniometer is called a sliding protractor; it is necessary for measuring an angle and then transferring it to a workpiece or some device. The device is equipped with a movable element for measuring the required angle, which can be rotated and acute.
A wooden fry can be easily done with your own hands at home - just attach a plywood feather using a fastener onto a wooden block base. As a result, you will get a folding, simple homemade tool that will easily allow you, for example, to accurately measure window slopes after plastering!
To work with a verification triangle, you do not need to have any special skills or experience, just care, precision and attention. However, novice workers should still look at how experienced craftsmen handle the tool.
Links
- Angle // TSB
- Square // Vlasov V. G.
New encyclopedic dictionary of fine arts: In 10 volumes - St. Petersburg: ABC-classics, 2004-2009.
Wikimedia Foundation. 2010.
See what “Angle” is in other dictionaries:
Square - I square m. One who makes or trades in charcoal; coal miner 2.. II coal m. Forest going to charcoal. III square m. Room or vessel for coals. IV corner ol ... Modern explanatory dictionary of the Russian language Efremova
Square - I square m. One who makes or trades in charcoal; coal miner 2.. II coal m. Forest going to charcoal. III square m. Room or vessel for coals. IV corner ol ... Modern explanatory dictionary of the Russian language Efremova
Square - I square m. One who makes or trades in charcoal; coal miner 2.. II coal m. Forest going to charcoal. III square m. Room or vessel for coals. IV corner ol ... Modern explanatory dictionary of the Russian language Efremova
square - fitting, link, malka, winkel Dictionary of Russian synonyms. square noun, number of synonyms: 6 • winkel (2) • link ... Dictionary of synonyms
SQUARE - 1) a tool for marking and checking the mutual perpendicularity of the surfaces of machine parts. Has an angle of 90 .2)] A drawing tool in the shape of a triangle. Most squares are rectangular with acute angles of 30 and 60 or 45.3) Short with ... Big Encyclopedic Dictionary
ENGLE - 1. ENGLE, square, male. (specialist.). Same as square. 2. ENGLE, square, male. (region). 1. Same as coal miner in 2 figures. 2. A room or vessel for coals. Ushakov's explanatory dictionary. D.N. Ushakov ... Ushakov's Explanatory Dictionary
ENGLE - 1. ENGLE, square, male. (specialist.). Same as square. 2. ENGLE, square, male. (region). 1. Same as coal miner in 2 figures. 2. A room or vessel for coals. Ushakov's explanatory dictionary. D.N. Ushakov ... Ushakov's Explanatory Dictionary
square - 1. SQUARE, square, male. (specialist.). Same as square. 2. ENGLE, square, male. (region). 1. Same as coal miner in 2 figures. 2. A room or vessel for coals. Ushakov's explanatory dictionary. D.N. Ushakov ... Ushakov's Explanatory Dictionary
ENGLE - 1. ENGLE, square, male. (specialist.). Same as square. 2. ENGLE, square, male. (region). 1. Same as coal miner in 2 figures. 2. A room or vessel for coals. Ushakov's explanatory dictionary. D.N. Ushakov ... Ushakov's Explanatory Dictionary
ENGLE - 1. ENGLE, square, male. (specialist.). Same as square. 2. ENGLE, square, male. (region). 1. Same as coal miner in 2 figures. 2. A room or vessel for coals. Ushakov's explanatory dictionary. D.N. Ushakov ... Ushakov's Explanatory Dictionary
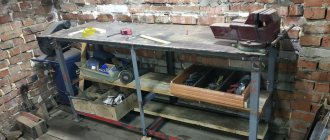
Self-production
When developing a drawing of a carpentry table, attention is paid to the overall dimensions, functionality, and materials of manufacture. For a home workshop it is better to choose a universal model
Static and dynamic loads are also taken into account.
The future owner must decide which product is suitable for carpentry work. It is easier to make a stationary standard workbench. You can also create a modular or composite, mobile version with your own hands. For each model, the project is drawn up individually.
After drawing up the drawing, materials and tools are prepared and time costs are estimated. It takes one to three days to make a simple model. The more complex the design, the more difficult it is to implement the project at home.
Drawing up a drawing
The easiest way is to download a ready-made version online. But this method involves a high risk of errors. Drawings posted online may not be accurate. If the choice has fallen on a specific project, it is useful to familiarize yourself with the finished works of those who have already used such a scheme.
When compiling, take into account the overall dimensions. It is not recommended to resort to average values; it is better to create an individual table. Specify the following parameters:
- Height. All operations should be convenient to perform while standing. For a person of average height, the height from the floor to the table top should be at least 90 cm.
- Length. The longer the workbench, the more convenient it is to use. The optimal length is considered to be at least two meters.
- Width. The optimal width of the working surface is a meter, the minimum is 80 cm.
- Configuration. The role of a right-handed or left-handed master plays a role in what operations will be performed on the work surface.
Types of folding tables for the balcony, stages of self-production
The installation method and design play a major role. So, if the tabletop will unscrew and the legs will fold, this must be indicated in the drawing. All dimensions are checked several times to eliminate the possibility of error.
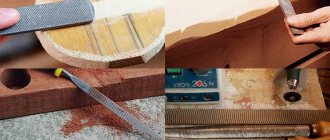
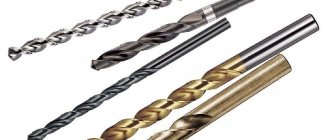
Preparation of materials and tools
Almost every craftsman has a universal set of materials and tools. The amount of fasteners, the sizes of boards and bars depend on the type of future structure. To work you will need:
- electric drill;
- wood glue;
- bolts with nuts;
- Circular Saw;
- building level;
- square;
- long rule;
- notched spatula;
- clamps;
- cutting boards;
- beam;
- slats with a cross section of 60 x 60 mm.
Clamps are chosen so that they can support the plywood sheets during gluing. The weaker the clamps, the more you will have to use them. All details must correspond to the drawing. The working surface can be assembled from a solid layer of wood or pieces of boards. Both wood and metal are suitable for the frame. Materials are selected so that subsequently any part of the carpentry table can be replaced.
Height-adjustable tables for adults and children, their shapes and sizes
Treatment
Processing of all materials comes down to cutting out parts, adjusting to dimensions, sanding and coating with protective agents. For the tabletop, a workpiece is cut out as a single piece or from several parts.
The supporting elements, the back and front of the carpentry table are cut out of the material. The production of boxes begins after the assembly of the structure is completed. Legs, handles, and additional fasteners for tools are also cut out, sanded, and polished. All parts are prepared for assembly.
Before assembly, the presence of parts is checked against the drawing. All parts of the structure must be smooth, without nicks or chips. They are cleaned of dust and laid out for convenience. Prepare tools and fasteners in advance. If additional equipment is expected to be installed, this process is postponed.
Assembly
It is more convenient to secure any additional configurations after completing the frame assembly. It is not difficult to assemble a workbench with your own hands according to the drawing. Follow the instructions:
- Connect all the parts of the tabletop together. Further assembly is possible after the glue has dried.
- Support boards are installed under the table cover and the tabletop is tightened with clamps.
- Strengthen the sides of the working surface. Plywood strips are installed along the entire perimeter of the lid.
- Smoothly process the side surfaces with a parquet circular saw. The corners are checked with a carpenter's square.
- The supports are connected to the drawers and legs. Install the legs.
- Assembling the carpentry workbench frames. Connected to the underbench.
You can assemble a carpentry workbench at home. The workshop table can be built on a wooden or metal frame. The main thing is to draw up the drawing correctly, prepare high-quality materials and tools.