Purpose and principle of operation of the miter box
Even when carrying out simple construction projects, a specialist is always faced with the need to create a perfect corner cut. The miter box allows you to accurately cut molded material at angles. In construction and repair work, the most popular are 90°, 60° and 45° vertically and 45° horizontally. It is the 45 degree angle that most firmly fixes the parts.
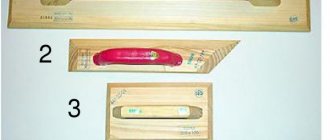
To quickly understand what a miter box is, it is better to look at the photo. There are many models on sale that allow you to achieve any given angle. The miter box is also used to create an internal corner of the parts to be joined. With its help it is easy to form a neat outer corner. The device is universal and is often used for:
- sawing boards, slats and other workpieces from various materials, including metal and plastic;
- formation of docking joints of the plinth;
- cutting glazing beads, platbands and baguette;
- connecting elements closely;
- production of frames and decorative elements.
DIY installation
After the corner is correctly cut, it must be attached to the wall. You can do this in the following ways:
- Thin carnations. This method is suitable for wooden plinthattached to wooden walls. You can no longer drive a nail into a concrete or brick partition.
- On self-tapping screws . This is also more suitable for wooden walls , but if you use drilled holes with wooden plugs driven into them, you can also attach the plinth to walls made of strong materials.
- On glue. There are now a lot of types of glue for construction work - and therefore you can use it to glue any elements. This method is suitable for skirting boards made of any material.
Device and characteristics
The word itself has German roots and is literally translated as “joint”. Many craftsmen are interested in the question of what a miter box is and what it looks like. In appearance, the device is a template and has a simple design. Sides with cuts are attached to the tray, onto which the saw is placed at a specific angle. The angle can be specified constructively or changed at the request of the user. Models equipped with a hacksaw are considered the most convenient for work. Professional tools are capable of making cuts with an accuracy of 1 mm. Often craftsmen call this instrument by other terms: tin or miter box - which is correct? It is clear that it is a miter box, and certainly not a “wort”.
Material
The products are made from durable and tough material. They serve reliably for many years. The most common devices are:
- Tree. They are reliable and guarantee high precision of the workpiece. For one-time use, you can make a device from plywood. In stores, most models are presented from beech. The cost of wooden models starts from 500 rubles.
- Plastics. Characterized by less reliability. However, they have become widespread due to their low price. The tool will cost about 100-200 rubles. The plastic case is hollow, and the wall thickness does not exceed 1 mm. During operation, under the influence of saw teeth, the device quickly wears out. A distinctive feature of plastic products is the presence of clamps that hold the workpieces.
- Metal. Aluminum is considered one of the most reliable and wear-resistant materials.
Dimensions and weight of the miter box
The weight of the device directly depends on its dimensions and material of manufacture. The weight of a typical device varies from 100 to 600 g. More complex models can weigh from 2 to 4 kg. Based on size, the following varieties are distinguished:
- Small ones. Dimensions: 212x44x42 mm. The output cut is 35x35 mm.
- Average. Dimensions: 290x85x50 mm. Allows you to make workpieces measuring 65x40 mm.
- Big ones. Dimensions: 320x125x70 mm. Allows you to work with material 90x55 mm.
These parameters may vary depending on the model and manufacturer. In most cases, construction stores offer products measuring 290x310 mm. There are also taller miter boxes, when the height exceeds the width by a couple of centimeters. These models are made with a wide aluminum tray.
Preparatory work
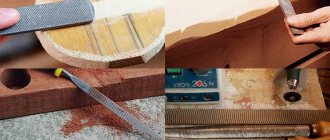
If the thickness of the base of your miter box exceeds 4 centimeters, then the holes for the screws can be made in a checkerboard pattern
It is worth noting right away that the dimensions of the parts of the miter box are not important. However, it is clear that the greater the distance between the walls, the higher the cutting accuracy will be. Thus, the previously indicated 10 cm is considered the optimal width of the device for performing most tasks
In this case, there is one important rule - the distance between the sides should be less than half the length of the blade of the cutting tool that will be used. Otherwise, its stroke in the holes will become short, which will complicate the cutting process.
The development of a carpentry fixture begins with marking its future base. First, we divide the prepared board with lines into four equal quadrants. Through the resulting central point we draw two bisectors in both directions, that is, a symmetrical letter “F” should appear on the board.
Now let's take the side walls. We divide each of them with lines across into two equal parts. On both sides of the central mark we draw two more lines, at a distance equal to half the width of the base. So, when you attach the sides to the base, these lines will become a continuation of the ends of the letter “F” drawn earlier.
At the next stage, we measure the thickness of the base. Let's say it is 1.5 centimeters. We take the side walls and draw parallel lines at a similar distance from the bottom edges. Divide the resulting narrow rectangles in half lengthwise. The last lines drawn will be the axes for the screws with which the side walls will be screwed to the base. It is also worth marking the attachment points here. On the center line, at equal intervals, place points into which the hardware will be screwed.
This concludes the preparatory work. Now let's move on directly to the manufacture of carpentry fixtures.
Types of miter boxes and their prices
Depending on the functional purpose, there are several types of miter boxes. As you can see in the photo, miter boxes differ in both the type of device, the material used, and the design. Professional and high-precision products include rotary and electric products.
Normal
This is the simplest and most common modification. If you wish, you can make a miter box with your own hands. It is recommended to buy for household needs, repairs, and a summer cottage. Most manufacturers produce such tools from plastic or wood. The design is a box and has a pair of side holes for a hacksaw. It is necessary to have slots at 45 and 90 degrees. With the help of a miter box it is convenient to work with baseboards, slats, platbands and beams. Pieces of drywall and plastic panels can be easily sawed. In some types it is possible to work with molding widths up to 120 mm.
The estimated cost of the model is 150 – 500 rubles. The advantages include low cost, the ability to fix on any surface, small dimensions and ease of transportation. Among the disadvantages are that:
- the dimensions of the workpiece are limited by the width of the wort;
- the smoothness of the cut is imperfect;
- inability to set the cutting angle;
- the number of slots laid usually does not exceed 7 pieces;
- You have to cut with short movements and the blade often jumps out of the grooves.
Rotary
The wort is equipped with a hacksaw made of metal or plastic measuring 29-60 cm. Thanks to this structure, it is possible to rotate the cutting surface by 15-135 degrees. The product allows you to change the angle in two planes simultaneously. This makes it possible to make a bevel on a workpiece of almost any size. Some craftsmen call the model precision. In addition to the saw, the kit includes an adjustable stand. The cost of the model starts from 2 thousand rubles. It is chosen for work of high complexity.
Electrical
In addition to the turntable, as in the previous model, the miter box is equipped with an electric saw. The most common type is a miter saw on an adjustable stand. This installation is often chosen for industrial enterprises and large production volumes. Non-standard devices include products that can be used to make dovetail fasteners. The models are compact. They are used as a template, located in the place of the workpiece where the groove is cut.
Universal
This miter box looks like a frame. It contains disks connected to each other. They act as guides. A saw is inserted between them and the angle is adjusted in two planes. Professionals rarely use this device. It requires additional configuration, and therefore time.
Magnetic miter box
The operating principle of the device is based on holding the hacksaw at an angle using magnets. On average, such an option will cost 400 rubles. More complex options are equipped with additional elements:
- A latch built into the body.
- Eccentrics. They look like holes into which fingers with tips resembling a rounded wedge are inserted. They press the workpiece tightly against the side.
- Inclined surface of the saw.
Best kits
Most often, professional miter boxes made of steel are purchased; there are simple sets with horizontally rotating platforms, and there are devices in which you can also change the angle of inclination of the hacksaw blade relative to the vertical plane. This allows you to create complex dovetail joints.
STAYER "PROFI"
Angular metal rotary device with a saw, blade length – 550 mm.
Peculiarities:
- Strong and stable base.
- There are clamps for fixing the workpiece.
- Convenient rotating platform for a hacksaw.
- The set includes a powerful saw with a plastic handle.
GROSS 22759
Set for professional use when sawing wooden parts and plastics, base made of durable plastic.
Characteristics:
- Machine dimensions: 360×80×40 mm.
- The length of the cutting blade is 600 mm.
- MFD platform with dimensions: 490×200×15 mm.
- Cutting angles on a scale: 15, 22.5, 30, 36, 45 and 90 degrees.
STANLEY 1-20-800
A device with a metal base for sawing workpieces from all types of materials.
Machine parameters:
- Cutting width – 143 mm.
- Cutting height – up to 95 mm.
Center tool 0347
The set is suitable for domestic and professional use when working with all types of workpieces. Features: convenient mechanism for moving the frame horizontally, strong fixation at a given cutting angle. The base has rigid fixation on both sides when tilted along a vertical plane. The miter box is equipped with an impact-resistant platform and an alloy steel blade, which is easily and quickly replaced.
Characteristics:
- The length of the hacksaw blade is 600 mm.
- The maximum cutting width is up to 115 mm.
- The cutting angle in the vertical plane is 45 degrees.
- The cutting angle in the horizontal plane is 45 degrees.
- The installation angles of the blade are up to 45 degrees.
- Cutting height – up to 98 mm.
Matrix 22750
The platform is assembled from durable aluminum elements, there are holes for screwing to the workbench. Suitable for sawing wood, plastic and steel workpieces. It is possible to adjust the position of the blade in two planes.
Characteristics:
- The maximum permissible cutting width is 160 mm.
- The maximum cutting height is 110 mm.
- Saw blade length – 600 mm.
- The angle of installation of the canvases is 45-135 degrees.
To ensure precise cutting when carrying out finishing, plumbing or carpentry work, miter boxes are used. The device allows you to cut workpieces at certain angles
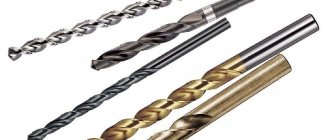
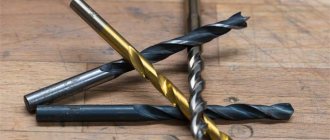
It is important to securely fasten the part and use appropriate blades for hacksaws.
- Hand hacksaws for wood: how to choose a suitable model based on purpose and characteristics, popularity rating, pros and cons
- How to choose a manual jigsaw for wood: what types are there, how to choose a blade, a review of the 4 best models, their pros and cons, as well as assembly instructions
- Wood sanding machine: how to make a disk, belt or drum grinder with your own hands, recommendations for selecting materials, review of factory models, tips for care and maintenance
- Wood sanders: belt, vibrating, eccentric, flap, rating of the best models, their pros and cons, how to choose the right one
Which miter box is better and how to choose it
First of all, it is worth clarifying for what purpose the miter box will be used. For example, for a house it is enough to choose a U-shaped mechanism with common cutting angles. It is necessary for the construction worker to be able to adjust the angle. Electrical devices are suitable for these purposes. In specialized departments of stores, you can get advice when purchasing. It is worth paying attention to the following parameters:
- Maximum possible cut dimensions.
- The material from which the device is made and the thickness of the walls.
- Saw stroke. Movement must be free and unhindered.
- Availability of a saw in the set. This is a prerequisite for quality work.
- Number of corners for a U-shaped device. The more there are, the better.
- Availability of clamps. Allows you to secure the element tightly without holding it with your hands.
Approximately
If you have enough experience, you don’t need a miter box or markings. In this case, the master simply places the skirting boards on the wall, estimates the size of the angle, and makes the cut by eye. But this method is only permissible with a lot of experience, when the finisher has a good eye and a very precise hand. If this is not the case, this method is highly not recommended: you can ruin two parts of the plinth at once without achieving the correct fit.
This video will show you how to cut corners on ceiling plinths.
Hand Right IMPORTANT: Eye fitting is more suitable for plastic and foam elements than for wooden ones. They are easy to cut with a knife right in place - and with a strong hand and a faithful eye, everything will fit perfectly. The tree must be cut - and the cost of a mistake is extremely high.
What you need to know about the miter box
Often they model something like a miter box with one seat for a specific installation. This could be a soap cutting device. Having markings allows you to work more productively. For some types of miter boxes, special markings are provided. You can use other available tools for work. In this case, the cut will be far from perfect. The set includes a saw with a backing. It simultaneously acts as a limiter and prevents the part from bending. To work effectively, you need to know what a miter box is and how to use it.
How to use a miter box correctly
Using a miter box greatly simplifies the work of the master. Next, let's look at what a miter box is used for using specific examples. Before work, carefully read the instructions from the manufacturer.
How to cut material
To properly cut an element, you need to carefully prepare the material by taking a miter box with a saw. The presence of grooves allows you to make accurate and even workpieces since the saw will take the set position. The first step is to secure the tool with screws or a clamp on a flat surface. Next, use a pencil or laser to make a mini-drawing. The workpiece is placed in the tray. In this case, the marking should be opposite the corresponding slot. Then a hacksaw is inserted and the cut is made.
Rules for using the device
To cut a workpiece at a certain angle you need:
- Secure the part by pressing it to the working platform with clamps or clamps that are present on the base.
- Set the angle at which you want to cut. To do this, use a side graduated scale. The bracket with a hacksaw is moved and secured at the desired angle.
- Sawing the part.
When working, you need to be careful: often inexperienced craftsmen make mistakes when calculating angles, as a result of which the workpieces have to be thrown away.
Expert opinion
Levin Dmitry Konstantinovich
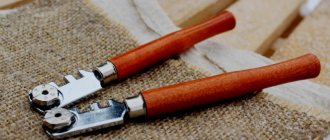
To cut ceramic elements, you will need to buy a special string. They are made from hard alloys with a special coating.
How to make a miter box from wood at home
Making a miter box with your own hands is not particularly difficult. How to make a miter box with your own hands, see the video below.
How to make a box
First you need to select the material for making the box. Coniferous planks up to 2 cm thick are ideal for these purposes. Plywood should have a smooth surface and even corners. For greater productivity, it is recommended to make the box no more than 15 cm wide. The sides are fixed to the bottom using self-tapping screws. Edges are placed on the lower part.
Marking cutting locations
It is impossible to make a high-quality miter box with your own hands for the baseboard without clear slits. Accurate marking is required along lines parallel to each other, located at the same distance. The slits are made using a hacksaw and sandpaper.
Is there a difference in technology for floor and ceiling plinths?
At first glance, there is no difference in cutting corners for ceiling and floor plinths. Indeed, there are none if we are only talking about how to make a corner with a miter box - the sawing technology is the same.
Otherwise, there are and they concern methods for determining the length of scraps for joining in corners. So, at the top, when cutting the end, the upper part of the bar is shortened, at the bottom, on the contrary, the lower part. When joining the plinth at the outer corner, the ceiling plinth increases in size at the top, and the floor plinth at the base.
Cutting methods
Cutting materials can be done either with or without a miter box. In the second case, it is quite problematic to achieve the ideal option.
Using a miter box
To cut, you need to firmly press the material with its entire surface to one of the side parts of the miter box. After work, minor errors such as nicks can be carefully removed using sandpaper.
Cutting without a miter box
There are times when miter boxes are not available. A ruler, pencil, sheet of paper, knife or jigsaw come to the rescue. If the surface of the material is large, then it is better to draw a cut line directly on it. Then draw a perpendicular to it using a square or sheet of paper. Equal segments are measured on each side of the angle. The distance between the corners is divided in half and the resulting point is connected to the vertex of the corner. Next, you can use a cutting tool.
Markings on the wall
You can trim the material using markings on the wall. Start the process from the inner corners. The frieze is applied to the corner of the wall and a straight line is drawn on the ceiling along the baguette. Next, draw a line over the adjacent adjacent plinth, cut at 90 degrees. A dot is placed at the intersection of the lines. It is alternately transferred to two friezes, from which they will make a corner. A straight line is drawn from this point to the nearest corner of the opposite side of the fillet. The excess part of the frieze is cut off with a knife. I do the same with the second baguette. The fillets are connected after trimming and adjustments are made as necessary.
If the angle is not right
Unfortunately, in some cases the angle between the walls in a room is not straight, but acute, or, conversely, obtuse. This is due to design defects that arose due to the fault of unprofessional builders, the architect’s idea, or the result of soil subsidence some time after the construction of the building. This is especially common in village houses and cottages.
House plan with sharp and outer corners
No miter box or drawing replacing it will help in this case, and you will have to make markings in place.
- Place the workpiece against one of the walls so that its end rests against the other wall.
- Draw a line on the ceiling along the workpiece.
- Carry out the same operation against the other wall.
- At the intersection of the two lines, place a mark on the workpiece itself.
- Draw a line from the mark to the corner of the workpiece and cut along it.
- Do the same with the workpiece that you will attach to the other wall.
- Glue both blanks; they will fit tightly.
Read also: Profiled sheet 114 weight 1m2
Safety precautions
When starting to work with the device, you need to know what a miter box is and why it is needed. You should prepare protective gloves and glasses in advance. It is necessary to protect the eyes from getting small chips. The tool must be firmly fixed to the work surface. If there are no clamps, then the workpiece is held by hand. In this case, the thumb should be at a considerable distance from the groove with the saw. He presses the material against the side, and at this moment the other fingers hold this side. At the beginning of work, the saw must be inserted into the grooves to the height of the teeth. An inexperienced master must work slowly and thoughtfully.
Miter box manufacturers
When choosing a manufacturer, you should take a closer look at proven brands. The most popular products are Gross, Stanley, Kuper, Profi and Stayer. They produce and constantly improve equipment for both home and industrial use. The products have a quality certificate and are designed for a long service life. You can find a suitable tool in different price categories.
High-quality and modern tools allow you to complete the intended work much faster and more efficiently. Many experienced craftsmen, as well as amateurs, appreciated the miter box. The device helps to make cuts on different materials under specified parameters in the shortest possible time.
6 021