Basic parameters and classification
The parameters according to which drill cutters intended for wood processing are divided into different categories are:
- main purpose;
- dimensions;
- the shape of the cutting part;
- design features;
- manufacturing material.
Basic geometric parameters of wood cutters
Types by purpose
Today, many tools are used to perform milling work on wood using an electric drill, since technological operations with this material can be different. Depending on the main purpose, the following types of wood cutters are distinguished.
Using such a tool, the corners of wood products are rounded.
These cutters are used to cut V-shaped grooves on flat wood surfaces. Using such a tool, you can make various patterns and inscriptions on the product, as well as process edges.
These are wood cutters, with the help of which grooves and grooves of various widths and depths are cut out on the surface of the workpiece.
Such cutters are similar in purpose to disk cutters, but they allow you to create wider grooves on the surface of the product. Cutters of this particular type are used in window production, where they are used to cut grooves in wooden frames to accommodate glass.
Using cutters of this type, semicircular grooves can be created at the end of the workpiece. Wood fillet cutters equipped with a support bearing are used for the manufacture of decorative furniture slats.
These are tools with a cutting part made in the shape of a reverse cone. With their help, you can create dovetail grooves in wood products. It is these grooves that are used to create open and hidden tenon joints between two or more parts made of wood.
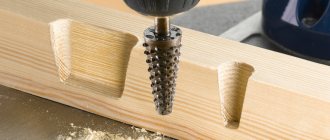
These wood cutters are designed for processing the edges of wooden products. The design of the edge cutter may contain a bearing, which, resting against the edge of the workpiece, ensures its correct position and limits the depth of its cut.
Wood cutters of this type can be made with straight or helical cutting edges. Using such tools, flat surfaces are processed.
These cutters are also designed for flat surface processing. Unlike cylindrical ones, they have cutting teeth on the end part.
Using these cutters, chamfers are removed from the edges of the workpiece. Such a wood cutter, used for installation on a drill, can also have a thrust bearing in its design, which limits the depth of the tool’s cut into the wood.
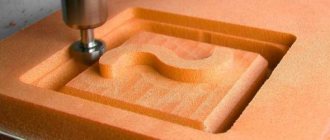
These wood cutters are used to create complex grooves and recesses on the surface of the workpiece.
These are cutters used to form elements with a complex configuration on the surface of a wood product.
Types by design
Milling tools used in conjunction with drills can have different designs. Thus, there are solid and prefabricated wood cutters, which should also be selected depending on the characteristics of the material to be processed.
Types of groove boards
Symmetrical groove
Many users have no idea how to choose a groove in a board, believing that the store will offer them only one connection and material option.
This is far from true; there you will be greeted by a large assortment:
1. Symmetrical groove. This is the simplest type. In it, the lengths of the upper and lower shelves are the same, and they protrude at the same distance.
Asymmetric connection
2. Asymmetrical groove. Here the upper shelves are longer than the lower ones.
3. Block house, used mainly for finishing walls and ceilings. The planks often imitate the relief of timber and have a semicircular or shaped profile on the front side.
4. Euro lining, just like block house, is often equipped with a relief pattern.
5. The decking board, made of wood and polymer, also has tongues and grooves for easy installation.
Note! If you plan to mount walls that are not level, have protrusions and dents without a groove board, do not expect good quality from the result. The cladding will not lie flat, height differences and cracks are inevitable.
DIY milling machine from a drill
Considering the fact that a serial milling machine is an expensive piece of equipment, the question of how to make a small milling machine from a drill is very relevant. Such a machine, used in conjunction with wood cutters mounted on a drill, is indispensable in the construction and repair of a country house, as well as in performing many other works.
Homemade machine from a drill
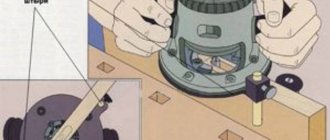
When starting to make a homemade router, you must first make a table for it, which should be stable and reliable. For this, plywood is often used, the thickness of which should not be less than 12 mm. The supporting elements can be made from four wooden blocks. An important part of such a homemade device is the limiter pad, the task of which is to ensure the correct position of the cutter in relation to the surface being processed. You can make such a platform from a sheet of chipboard or thick plywood by cutting out a piece of the required size and rounding its corners. A hole is drilled in the center of the limiting pad, which is necessary for the wood cutter to exit.
Arrangement of mechanisms for vertical movement and fastening of the drill
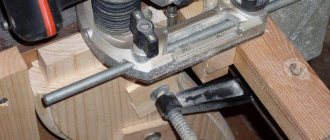
The drill itself is fixed with clamps on a stand made of chipboard. The length of such a stand should approximately correspond to the length of the drill itself, and its width should be sufficient to place power tools and fasteners on it. The stand and the limiting platform are connected to each other at a strictly 90° angle. When fixing the drill on the stand using clamps, you should place it so that the cutter inserted into its chuck extends beyond the surface of the base pad by the required amount. To increase the strength of the resulting structure, you can further strengthen it with a piece of chipboard connected with self-tapping screws to a stand and a limiting platform.
Homemade coordinate table for a machine
Using a conventional drill, you can make an even more functional and easy-to-use milling machine if you install the power tool on a homemade stand equipped with a stand with a simple microlift. Such a machine can also be made from wood, except for the lead screw, along which the microlift with the tool attached to it will move.
And in conclusion, a short video about the work of a homemade router made from a drill using a home trowel.
Planing by hand
Planing is a lot of fun when the blade is sharp and you have enough time. The jointer is ideal for planing along the grain. Don't forget to secure the workpiece on the workbench. Make a test pass, make sure the blade is set to the correct depth, and then get to work.
A face plane is good for finishing sharp edges and for cleaning up ends. Position the blade so that it cuts the finest chips. When processing the end sections, try not to stray to the side and avoid chipping.
Planing with an end plane
GROOTS CAN BE MADE EVERYWHERE
With a groove connection, the end of one part fits into a shallow groove cut across the grain of the other. This connection is an improvement on the simple butt connection. The groove shoulders provide decent strength. In fact, such a connection cannot be broken, for example, by pressing on a shelf. If it fits tightly, it can withstand oblique loads well, when the force is directed diagonally across the body. Installing back walls in cabinets or chests of drawers and bottoms in drawers further strengthens the entire structure. Finally, the groove makes assembly easier by defining the position of the parts and keeping them from slipping.
Using just two types of groove connections, you can make almost any body part. The main joint, where the groove engages the full thickness of the adjacent piece, allows for the assembly of bookcases, toy chests, wall shelves, or any other cabinets in which the side walls extend beyond the adjacent pieces (Figure 1).
Rice. 1
.
Main groove connection. Rice.
2 . Modified groove/tenon connection.
If these "through" angles are unsuitable or unsightly, use a modified joint (Figure 2) called mortise/tenon.
How to make a groove in a board - All about timber and woodworking
Knowing how to make a tenon and groove with a hand router, you can even at home make not only beautiful but also reliable furniture, but also various wood structures characterized by excellent load-bearing capacity. The tongue-and-groove system connects not only elements of various furniture (tables, chairs and shelves), but also frames of low-rise buildings that experience significant loads during operation.
A tongue-and-groove joint made by hand
In order to make a tenon on a wooden beam using a hand router, several conditions must be met:
- securely fix the workpiece and correctly orient it in relation to the guide sole of the router;
- set the height of the working part of the cutter so that the tool removes a layer of material of the required thickness from the surface of the workpiece.
BASIC CONNECTION IN GROOVE
Cutting grooves on a tabletop circular saw with a set of groove discs is much faster than manually. But long or wide pieces are difficult to maneuver around the table. A pendulum saw solves this problem, but it has a drawback - usually its console is not enough to cut across wide parts.
A router helps solve this problem. But this also has its drawbacks.
First, if you are selecting more than one pair of grooves, setting the ruler for each side can be time consuming. Therefore, use an insert with a width equal to the distance from the rib of the router base to the cutter. To install the ruler, slide the insert along the marked shoulder line on the work piece (Figure 4).
Rice. 4
. Insert for router.
Second, the thickness of the workpiece is almost never matched to the cutter to ensure a tight-fitting joint. Solid wood parts can be planed or sanded, but plywood parts are difficult to trim. Cutting a groove to fit is more clear. But this requires two passes with a router - one for each shoulder.
Faced closely with the selection of grooves, you can make a simple device (photo A).
What is the best way to make a cut?
Circular saw
This is the most convenient tool for sawing boards. Compared to some other power tools, it has better performance. But it is worth remembering that circular saws differ in characteristics and scope of application.
Before buying a saw, decide for what purpose you will use it. The main use of circular saws is cutting or cutting boards.
When choosing a saw, you need to consider the depth of the saw. There are circular saws on sale with cutting depths from 30 to 130 mm. You need to find out what thickness of boards you will be sawing and, based on this, give preference to one saw or another.
GROVING DEVICE
The device consists of two rulers (one for each groove shoulder) and two strips that rest on the edges of the workpiece. One ruler and one strip are T-shaped fastened at right angles. Gaps along the other strip and ruler allow you to install boards up to 300mm wide and select grooves up to 38mm wide. Two clamps in an adjustable bar rest against the workpiece and lock the fixture in place.
To operate, you need a set of guide bushings for the router. With bushings, the rulers should be slightly offset to the side relative to the width of the groove itself.
The device is made of poplar, but Karelian birch plywood or MDF is also suitable. The T-nuts and MB screws are recessed, so the router can slide along the rules without hindrance.
Having finished manufacturing, you need to make inserts for installing the rulers. Plane a piece of cutting board approximately 450 mm long, 150 mm wide and 20 mm thick to the same thickness along the entire length. It all depends on the size of the sleeve and the cutter. Leave the jig in place while you make and fit four inserts, each approximately 50mm long, about 25mm wide and equal to the thickness of the gaps. Ideally, the thickness of the inserts should be equal to half the difference in the diameters of the cutter and sleeve.
Precise adjustment of the inserts is accomplished by using them with rulers installed when routing on a short piece that has been sawed off previously. Loosen the adjustable ruler, place the scrap between the rulers and two inserts on each side.
Tighten the screws. Remove the inserts and trim and mill the groove. If the trim does not fit into the groove, adjust the thickness of the inserts.
Creativity without limits
Milling equipment is indispensable when processing wood. With its help, you can turn a wooden blank into an elegant decorative product. This equipment is most often used by professionals, but experienced amateurs can also master it. Using mechanisms is not an easy task , so before you start working with them, you need to ensure your comfort and safety. Organization of the workplace is very important. The home craftsman must remember that during work there is a possibility of damage not only to the cutter or mechanical device, but also to health.
OPERATING THE DEVICE
Marking the grooves is very simple. Determine the shoulder line for each groove by making a pencil mark on the face of the piece to be worked. You can put the two side walls together and mark all the grooves at once, or mark the second side wall after routing the first.
Once the jig is aligned and the cuts are marked, align the straight edge with the mark (photo C), lightly tighten the clamps and make a pass with the router, then move the jig to the next mark. A well-chosen groove should fit the tenon without gaps or backlash (photo D).
Tool that can be used
Let's consider what devices can help you when carrying out work:
| Fraser | There can be two options here - either a full-fledged machine that can perform any work, or a manual milling machine, with which you can quickly perform some operations right at the construction site. |
The first solution is used by professionals, since the price of the machine is high; the second type of tool is also suitable for home use
Specialists use special machines for longitudinal profiling of timber
MILLING THE GROOVE/TENK JOINT
For large and wide parts of housings or long and narrow parts, milling grooves is relatively simple and safe. Select a cutter of the correct diameter, attach a ruler to the base of the router and make passes with it, moving the ruler along the end of the part (Fig. 8). Many routers are sold with a ruler, but to improve the quality of work, it must be pressed to the base with a clamp or screws.
The most accurate way to mill a tenon is to clearly set its thickness between the ruler and the cutter (Fig. 9). To support the base of the router, use a clamp to press a piece of thick board flush with the end of the workpiece.
We connect the beams using the “oblo” method at the corners
When making a corner connection of a log house using the bowl method, there are three possible methods:
- sampling with an oval comb;
- groove in the tail;
- half a log sample.
Of the above methods, the last one is the most used and simple. Technologically, making a groove is similar to a “groove”, but in addition, a laying groove is selected along the length of the beam. During the installation of logs, the laying cutout is filled with insulating material, and this procedure is repeated during the installation of each subsequent log house.
Important! For reliable and high-quality fastening, in addition to the groove, the logs are attached to dowels. They are round dowels that are driven into drilled holes in the logs being joined.
When laying using the oval ridge method, in addition to the main and laying grooves, an oval protrusion is left in the bowl, and a cut of the same shape is left in the lying log. Thanks to this protrusion and cutout, reliable fixation of the log house is ensured.
The fat tail laying is the most complex of the three listed, because the groove made in the log has an unusual shape (most often it is rectangular) and is located across the log, and in the next log the cutout has a longitudinal cut of the same shape. Although making a selection in this way is very problematic, such a connection is very strong. When building and installing it yourself, you will have to acquire not only a chainsaw, but a router and an electric jigsaw.
Considering other installation methods, it should be noted that they are all very similar to each other. For example, “Oblo” and “Okhlop” have a difference in the location of the cut; in the latter, the groove is cut from the bottom of the log.
If we consider the “ohryap” method, then the groove in the beam is cut longitudinally and transversely, that is, there is a double cut in the bowl, and at the same time it is made in both logs.
HOMEMADE DEVICE FOR SELECTING GROOTS
Although the device looks complicated, it is quite easy to make (Fig. 10). Cut the workpieces to size, and then carefully plane the planes and edges. Then select a groove in the fixed bar for the fixed ruler using a few cuts on a circular saw. Then, to ensure a tight fit and square edges, use a sharp chisel to trim its shoulders. The half-wood connection on the adjustable ruler is made so that its upper surface is in the same plane as the fixed ruler.
Mill out all the cracks in the planks and rulers using a ruler pressed to the base of the router (Fig. 8). First, releasing the cutter approximately 3 mm in each pass, mill narrow through slots in several passes. Next, mill out pockets for the screw heads and T-nuts.
Small clamps are used as clamps. The pressure pad is a T-shaped nut at the end of the screw. The locknut prevents the pad from coming loose when it presses against the workpiece. Select the grooves in the adjustable bar so that the clamps can hide behind its edge. Rice. 10
. Device for making grooves.
Hello! In principle, you can put a cutter in a drill if we are talking about a hand router cutter. But the effect will not be very good. I tried to install and process it manually, but the quality of course left much to be desired. And the chuck constantly relaxed and the cutter flew out. I made a special table and installed a new cartridge. The quality has certainly improved, but the processing speed is low and the processing depth is difficult to regulate. In general, you can install it, but there will be some inconvenience and the drill has a small rotation, not for milling, and the motor may burn out!
If the only question is what is possible or not! , then you can certainly adapt the cutter to a drill and you can mill with it, but what the result will be is a completely different question.
At first, the rotation of the drill is not enough; for a clean cut of the cutter, the cut will be torn and unsightly - you will have to additionally process everything with sandpaper, and perhaps there will not be a smooth surface at all, since due to the lack of rotation, wood fibers will be torn out!
Secondly, in order to work with a drill with a mounted cutter, you will need to construct a holder device, because a working cutter will constantly be pulled out of the processing area and it will be very problematic to hold it with your hands!
Thirdly, if it is a large shaped cutter with a significant diameter, then working with such a cutter is not possible at all, and even more dangerous!
In general, the conclusion is this: if there is some rough work, such as cutting or grooves, for example, for a lock or internal parts, then it is quite possible to cope with this work with a drill and a cutter!
Special types of wood finishes
Once you've decided what you'll be doing, separate your carefully selected and planed lumber into groups. Mark each piece according to its future location in the product, marking the top, bottom, front surfaces and best edges. Using a pencil and tape measure, mark the sections of the required length, and use a square to mark the cut lines. Use a compass to draw arcs and circles. Using a dividing compass, transfer the dimensions from the drawing to the wood. If you need to make the board narrower or mark a joint, set the thicknesser to the desired division and scratch the mark by moving the thicknesser along the edge of the workpiece. Use a small pencil to mark lines running at oblique angles. If you need paired parts, mark them at the same time and remember that one part should be a mirror image of the second. Use a knife to mark connections.
If you want to make round parts (chair legs, bowls, plates), you cannot do without a lathe. Buy the most powerful and heaviest machine your budget can afford, with an adjustable chuck and faceplate set. Spindle-shaped and cylindrical parts are turned by securing the workpiece between the front and rear centers of the machine, bowls or plates - on the outside of the spindle.
The best lathes are equipped with a device that allows you to turn large workpieces on the outside of the spindle. You will need a variety of turning tools - a chisel, a parting cutter, an oblique chisel and a radius scraper.
To obtain smooth surfaces, numerous types of sandpaper (sandpaper) are used. The skin can be used either on its own or wrapped around a block of wood. It is best to sand the wood several times - after sawing, after the glue has dried and after final finishing.
Sanding wood with sandpaper
For the first sanding, use regular sandpaper, for finishing - fine sandpaper based on aluminum oxide (it is more expensive, but lasts much longer). For sanding large flat surfaces, use a cylindrical grinder. Work in a well-ventilated area and be sure to wear a dust mask.
Sanding wood with a cylindrical grinder
Originally the term "natural finish" meant that the wood was sanded and left in its natural state, but now also includes oiling or waxing. Danish or teak oil is applied in a thin layer with a lint-free cotton cloth or brush.
Wood finishing with teak oil
Allow to dry and sand with the finest sandpaper to remove the “ridges” (the rough texture of raised wood fibers that occurs when the first coat of finish is absorbed), then apply a second thin coat. If you want to make the surface less hard, rub it with wax mastic.
When finishing items that will come into contact with food, use a vegetable oil, such as olive oil, instead of teak or Danish oil. Rub it in with a cloth.
You have a choice between mineral spirits oil paint and waterborne acrylic paint. Both types of paint are applied with a brush. The visual difference between surfaces painted with one paint or another is very small, however, after working with oil paint, brushes should be washed with white spirit, and after using acrylic paint, with running water.
Oil paint fumes can cause dizziness and nausea, while acrylic paint fumes can cause a dry throat. Regardless of the type of paint you use, wear a respirator and work outdoors if possible.
When working with American oak, you can get an interesting texture by wire brushing the wood. The texture is pleasant to the touch, and the resulting rough surface means you don't have to worry about damage from pets' claws.
Wire brushing wood
The brush is moved along the fibers until there are no untreated areas left on the surface, after which it is rubbed with oil.
Finishing wood with a candle flame
A candle flame finish helps hide the imperfections of low-quality wood. Oil varnish is applied to the painted surface with a brush. After a while it dries out and becomes sticky, and then a burning candle is passed under the surface. Be sure to wait until the surface becomes sticky (it should show fingerprints) and keep the can of polish and brush away from the candle. It is better to do this work together somewhere away from the workshop. Practice on scraps before you get started with any serious work.
We suggest you read: Which tree burns hotter?
Hazardous factors
Milling machines require complete safety and high qualifications of the worker.
When using electric machines, accidents may occur due to material ejected during milling. Therefore, the performer of the work must have special work clothes. If heavy dust is generated during the milling process, you must wear safety glasses. Maximum safety in this situation is provided by special clamps and vices that effectively hold the workpiece, preventing it from being thrown out. Do not hold the workpiece in the rotation zone of the cutter with your hands or directly touch the rotating tool. It is necessary to use special clamping devices to advance the part during milling.