To restore order and free up space occupied by accumulated things, a metal rack is assembled. You can buy a ready-made design or make it yourself. If the weight of the objects is small, an aluminum corner is used as the material. To store preparations for the winter in city apartments, racks made of steel corners are installed on the balcony. To accommodate a large number of heavy objects, make a rack from pipes in a garage, shed, or cellar.
Advantages and disadvantages of metal shelving
The advantages of metal structures include:
- Reliability and durability. The shelves can support significant weight without damage.
- Easy to care for.
- Wear resistance. Even with intensive use, metal pipe racks retain their characteristics and appearance unchanged.
- Full compliance with fire safety requirements.
- Storage of items made of any material.
- The metal frame is resistant to moisture and temperature changes.
Disadvantages include:
- It is more difficult to make a rack from a metal profile than from wood;
- the price of metal structures is higher.
Manufacturing materials
As a rule, racks and shelves are made of wood, metal or plastic. For a wooden structure, not only wood is used, but also PVC and chipboard, which are reinforced with sheet metal for strength.
Do not forget that wood is a flammable material and it is very light, so it will not withstand heavy loads. Wood is also very sensitive to humidity, despite the fact that temperature does not affect its structure. With high humidity, it is subject to rotting, deformation, and mold. So if you decide to equip your garage with wooden shelving, immediately think about what you will put on them and take into account the humidity of the room. Do not place racks and shelves where it is damp. In addition, if you make a wooden rack with your own hands, do not forget to impregnate it with antiseptics, which will give the material strength and durability, protect against insects, and prevent the appearance of mold, fungi and other microorganisms.
Metal products are made from perforated corners, profile pipes, combining them with wooden materials to make the structure lighter. Most often there are racks made of profiles, which are distinguished by their lightness and strength.
Metal products are more resistant to the influence of chemicals, withstand heavy loads, and humidity and temperature do not affect its performance, do not rot, and do not ignite. If the structure was purchased in specialized stores, then assembling it will not be difficult.
Plastic is not resistant to severe frost and heat, but tolerates moisture well. Such structures are flexible and lightweight, but cannot withstand heavy loads. They are inexpensive and intended only for light items.
Types of shelving
When choosing a metal storage system option, the complexity of manufacturing and operating conditions are taken into account:
- Modular structures are assembled from perforated profiles of different sizes. They are reliable, and the height of the shelves can be easily changed if necessary. However, the price is steep.
- Aluminum frames are attractive in appearance; their low weight allows you to quickly move the collapsible rack to another place. The disadvantages are the high price and deformation from impacts.
- Shelves of any size and configuration can be made from profile pipes. The shelves can withstand a lot of weight. For manufacturing you will need a welding machine and skills in working with metal.
- In terms of price and labor costs, frames made from metal corners are similar to the previous option, but are inferior in strength and aesthetics.
- The CD profile for fastening drywall is good because welding and expensive tools are not required to assemble the frame. Sold in building materials stores at affordable prices.
Review of ready-made
The modern market offers countless convenient and multifunctional shelving, both wooden and made of metal. Universal designs will fulfill their purpose completely and fit into any garage space. In Ikea stores you can find excellent options made of steel and high-quality wood, complemented by cabinets, drawers, fasteners and hooks for more convenient use.
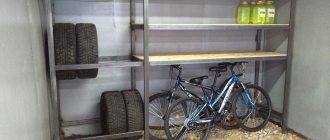
The tire rack is convenient and practical to use in the garage space. Excellent examples can be found in stores, but some craftsmen assemble a similar design themselves, purchasing metal consumables separately: a corner or a profile. Shelves and panels for tools that you can buy or make yourself will be useful.
Connection by welding or bolting
Metal structures assembled with bolts are easier to make than welded racks, but their rigidity is low, since there are backlashes at the joints. To increase stability, the frame is attached to the wall with plates with holes screwed to the posts. They are nailed down with crutches or dowels. They are attached to a wall made of foam or cinder blocks with anchor bolts. The prefabricated option is chosen if rearrangement is expected in the near future or there is no possibility of welding. Perforated angle frames are assembled without bolts. The horizontal crossbars have hooks that are inserted into the grooves of the posts. However, such a connection also suffers from backlash. Therefore, when installing high racks, the structure is welded.
What does the list of preparatory work consist of?
Stopping short, calculate the amount of consumables, including mounting parts and fasteners, consider the location and shape of the future rack, decide on the level of operational loads so that the future rack has at least one and a half safety factor.
A mobile rack is more complex and material-intensive. Stationary structures are attached to the walls, which has a positive effect on increasing their load capacity and reducing material consumption.
When choosing the latter option, you should take into account the complexity of possible dismantling and installation in another location.
Requirements for racks
To ensure that the metal rack is safe to use, the installation is guided by the requirements of GOST 16140-77:
- distance between racks 0.9 - 2.9 m;
- rack width 0.45 - 1.35 m;
- the curvature of the posts and crossbars should not be more than 3 mm per 1 m or 0.1% of the length;
- permissible deviation of the racks from the vertical is 1 mm per 1 m without load, and under the influence of weight 4 mm, but not more than 6 mm in length;
- sharp corners and edges must be smoothed;
- if the load does not exceed 60 kg, the shelf does not need an additional bar (stiffening rib), for 90 kg one crossbar is installed in the middle, for 120 kg - two;
- Cracks, lack of penetration, sagging, slag inclusions larger than 1 mm in size, and undercuts deeper than 0.5 mm are not allowed on welded seams.
About the strength of plasterboard shelves and their structures
When making a shelf, rack or stand for household appliances from plasterboard yourself, it is worth determining the load to which the entire structure will be subjected. Both the service life and the safety of operation of the product depend on this.
GKL slabs are thin (0.6-2.4 cm) and fragile. A metal profile frame helps them withstand the load. Designing structures should begin by taking into account the expected weight of the items that are planned to be placed on the rack:
- if a plasterboard shelf will have a decorative function, then the frame is made lightweight in order to save materials and your own time;
- for stands for equipment, you need to assemble reinforced structures, and for long shelves, make additional vertical posts and double the number of horizontal guides;
- a rack for books or household supplies in the pantry is made using wooden blocks for the frame, because thin metal profiles sag when luggage weighs heavily, and the thickest gypsum board is chosen for shelves.
To make a plasterboard shelf in a room with high humidity, use moisture-resistant plasterboard. It is also undesirable to load the racks too much, since the gypsum filler becomes more plastic when exposed to moisture.
How to assemble a rack from an aluminum profile with your own hands
Assembling a rack with your own hands from a profile can be done even by a person taking up this task for the first time. It is easier to work with than wood.
The main advantage of the modular design is the ease of assembly from a ready-made kit
Materials and tools
To calculate how much material is needed, first sketch out a sketch indicating the dimensions and number of shelves. Profile dimensions are selected depending on the expected load. To connect the parts, you will need self-tapping screws with press washers, since their fastening is more reliable. It is better to take pointed ones, since drill ones make large holes, so the strength is reduced. Shelves are made from boards 2 - 3 cm thick, 10 mm or more plywood, OSB sheets no thinner than 12 mm.
To work you need to stock up on tools:
- Tape measure, pencil or felt-tip pen, square for checking angles.
- Metal scissors for cutting profiles.
- Screwdriver. If you screw in each screw manually with a screwdriver, it will take several days to assemble the frame.
- A wood hacksaw for cutting shelves. The process will speed up if you have a circular saw or jigsaw.
Build process
When the materials and tools are prepared, begin assembly:
- On the profile, mark the length of the racks, crossbars, and crossbars along the width of the shelves. To prevent the rack from turning out crooked due to errors with the dimensions of the workpieces, you need to re-check the correctness of the markings.
- On the side walls of the profile, cuts are made to the base and bent at this point. The workpiece is cut along the fold line.
- Longitudinal cuts are made on the crossbars to a depth equal to the width of the profile of the vertical supports. Internal bends, if any, are cut off.
- The crossbars are inserted into one another to form a rectangular cross-section. The cut ends are bent 90⁰. You need two of these parts for each shelf. They are installed on both sides of the frame.
- The assembly of the sidewalls, so that there are no distortions, is carried out on a flat surface, possibly on the floor. Cross members are inserted between a pair of vertical supports. After checking the corners, each bend is screwed with 1 - 2 self-tapping screws.
- After both sidewalls are ready, the rack is assembled from the profile. First install the lower crossbars, then the upper ones. If no distortions are found during inspection, the rest are fixed. It is more convenient to screw in the screws by placing the frame on its side. Having secured the parts on one side, it is turned over to the other.
- On profile racks with wide shelves, additional supports are installed from below in the middle of the lower crossbar. After determining the height, bends are made on them and screwed with self-tapping screws.
- After measuring, the shelves are cut. To increase the rigidity of the frame, cutouts are made in the corners so that they extend onto the side crossbars. To fasten wood, it is better to use self-tapping screws with fine threads.
Areas of use
Any furnace design is a whole organism in which all parameters must be coordinated - from the size of the firebox and ash window to the height of the pipe. Cracks that appear in different sections disrupt the sealing of the walls of the chimney, combustion chamber and other areas involved in the removal of combustion products. As a result of such disturbances, cravings become worse, and smoke, which contains many substances hazardous to humans, can penetrate into the home.
Such processes often lead to tragic consequences, because carbon monoxide can cause fatal harm to the body. In addition, damaged stoves are a fire hazard. The most harmless thing that can happen if the seal is broken is that the efficiency of the unit will significantly decrease.
In this video you will learn the pros and cons of sealant:
The traditional method of repairing damage is to putty with clay mortar, but this procedure has a temporary effect and does not provide a lasting seal. In addition, the repaired part must be constantly monitored, because at any moment new cracks may appear at the patch sites. Therefore, a more reliable method of getting rid of cracks is to use special sealants for high temperatures.
Read also: how to work with refractory fireclay clay.
No less important is the sealing of chimney pipe connections made of ceramic or metal, as well as those made of multilayer sandwich panels. Not only the effective operation of structures, but also the safety of the entire room depends on the quality of the docking. In addition, sealants are needed to organize the passage of the chimney pipe through the roof and rafters. Here the compounds are used as an additional element, which fills the gaps between the apron of the frame.
Without such mixtures, it is impossible to completely close all the cracks in the passage of the chimney pipe, so previously bitumen mastic was used for these purposes, or they came up with their own methods of sealing joints.
Furnace restoration:
https://youtube.com/watch?v=RnEDvZYoifg
If depressurization occurs in a metal chimney from a gas-powered boiler, the flame in the gas burner will regularly go out. This problem is quite common when operating gas units. The main reason for such situations is a violation of the sealing at the joints of the chimney sections. In this case, the optimal repair agent is fire-resistant silicone.
How to make a metal rack from a profile pipe with your own hands
Depending on the capabilities, the profile pipe frame is assembled with bolts or welded. An alternative option made from metal corners will be cheaper, since their price is lower. To simplify installation, make a combined rack with your own hands. Instead of a pipe for the side posts, use a metal corner.
You can make racks of any size and configuration from profile pipes
Preparatory work
To determine the dimensions of a rack made from a profile pipe, you need to measure the location of its installation. When installed along the entire length of the wall, its sides should not reach the corners by 10 - 15 cm. A metal structure for a garage where there is little space is made up to the ceiling. Due to this, you can reduce the length and width without sacrificing capacity. The height and depth of the shelves depend on the size of the items being placed. Having decided on the parameters, drawings are drawn up indicating the general dimensions, dimensions and cross-section of the parts. Even a simple sketch will help you avoid mistakes when cutting workpieces and installation, as well as accurately calculate the amount of materials.
Choice
First of all, you need to decide on the material for the structure, the final size, which depends more on the room, and the loads that will be placed on the rack. The set that you will receive in the store depends on all this.
The most interesting thing is that some stores may even offer you to assemble this entire structure after delivery, which again is a nice bonus. Personally, I am sure that, if time allows, it is better to assemble the rack that you chose in the store yourself - time passes, and men simply change toys.
Helpful tips and layout ideas
The functionality of a metal rack will improve if you implement the recommendations of knowledgeable people:
- to increase the number of shelves for storing jars with blanks, they are made 30 cm high;
- in order not to be distracted from work by searching for what you need in garages and workshops, workbenches are built into the storage system;
- metal rack on wheels with a stand for tools, convenient to roll out for repairs on the street;
- to increase the usable area of the greenhouse, racks are installed, on the shelves of which boxes with soil are placed;
- space for wheels and bulky items can be left under the bottom shelf, raising it 60 - 70 cm from the floor;
- If you make a drawer with compartments for hardware on one of the shelves, they will always be at hand.
Example of rack layout 1
Example of rack layout 2
A self-made metal rack is not only cheaper than a factory one, but also more convenient to use. It is collected taking into account the characteristics of the room, the number and size of objects. The assembly of a metal structure with the required parameters can be performed even without a welding machine.
Peculiarities
Garage shelving is an open or closed storage system consisting of vertical posts, crossbars and shelves of varying heights. High-quality steel and wood are used for their manufacture. Wooden products are more fragile and bear less load than metal ones, which can withstand fairly large objects. Structures can be dismountable, if they are assembled with bolts, and non-dismountable, if they are welded and installed permanently on the wall using nails or self-tapping screws.
Garage shelving remains, in practice, the best option for storing tools, spare parts and other equipment. Among the main advantages are spaciousness, compactness and accessibility. Depending on the type and material of manufacture, large objects, small parts, unnecessary utensils, cans, and tires can be placed on them. They will fit neatly along the wall, and the shelves are under the ceiling and will conveniently accommodate everything that makes the garage space cluttered. Spare parts, tools, consumables and other small items put away on their shelves look more aesthetically pleasing and neat and will always be at hand.
You can make a rack yourself without incurring large expenses, or purchase it in specialized stores. The modern market allows you to choose exactly the product that is right for you. Self-made racks will be in no way inferior to purchased ones, if you follow the diagrams and instructions, use quality materials and put in a little effort, and will last the same number of years, keeping your garage tidy and clean.
Types of shelves
According to the method of arrangement, shelves can be built-in or wall-mounted. Niches give the room an organic feel, merging with it. They can be located against the wall or perpendicular to it, dividing the room into zones. mobile, can be located anywhere and can be attached in different ways:
- made of plasterboard are attached to 2 adjacent sides and perfectly replace ready-made shelving.
- With one-sided fastening, they can be located anywhere and are attached as needed in the household.
Plasterboard shelves built into counters and tables are also gaining popularity: we see photos of these in fashion magazines and in modern fashionable interiors. Few people know that making the same ones at home will not be difficult.
Shelves made of plasterboard can be suspended from the ceiling when the structure is attached to hanging profiles and there is no installation to the wall.
Finished structures look very interesting when illuminated: a “floating” effect appears and the space visually expands.
Covering the frame with plasterboard
After completely assembling the cabinet frame, you can begin covering it with plasterboard. Sheathing of the frame should be done from the outside and inside. However, if the cabinet is small, then it is quite possible to get by with cladding from the outside. It should be remembered that the larger the cabinet, the greater the load will be placed on its internal shelves and walls. Therefore, it can be covered with 2 layers of gypsum board.
Fastening plasterboard sheets to profiles is carried out similarly to the installation of gypsum boards when cladding walls and ceilings:
Scheme of fastening gypsum boards with screws.
- The gypsum boards should be secured to the profiles with 25 mm metal screws.
- The fastening step should be no more than 20 cm.
- First, the plasterboard element is fixed around the perimeter of the frame, and then to its remaining parts.
- The screws must be tightened correctly: the depth of their indentation should be no more than 1 mm, otherwise the cardboard may be damaged. To do this, you can install a special limiter on the screwdriver. If the screw is still screwed in deeply, then it must be unscrewed and screwed in again at a distance of 5 mm from this point. The old hole will be filled with putty later. In Fig. Figure 1 shows a diagram of fastening gypsum boards with screws.
- The sheets should be joined together with a certain distance - 2-3 mm. This will make it easier to process the seam when leveling it.