TOP 6 drawings will help you make a cutting machine from an angle grinder with your own hands without errors and extra costs. Answers to frequently asked questions, recommendations.
TEST:
Is it possible to make a homemade cross-cutting machine from an angle grinder: a verification test with answers based on the materials presented
- What switches are installed for emergency stop of the machine?
a) manual;
b) hand and foot.
- Which angle grinders are suitable for creating a cutting machine?
a) pneumatic and electric;
b) battery-powered.
- Minimum power of the electric motor of an angle grinder for a cutting machine from an angle grinder:
a) 400 W;
b) 900 W.
- What machines can be made based on angle grinders?
a) trimming, cutting;
b) grinding, milling, sharpening.
- Where can you place the grinder in the cutting machine?
a) above the tabletop;
b) under the tabletop.
Answers:
- The correct option is b). Foot switches are more convenient because they operate quickly.
- Theoretically, there is enough power in all three options. In practice, a) - electric and pneumatic models are used. A battery is not needed for a stationary machine. For a pneumatic drive, you will have to purchase a compressor of appropriate capacity.
- 900 W or more. Correction is made if workpieces made of relatively soft materials are expected to be processed, or at high speed.
- Both options are correct. A powerful grinder is suitable for creating various machines at the household and semi-professional level.
- Two mounting options are allowed. Experts prefer the top one.
An electric grinder performs many different work operations. To reduce labor costs while increasing accuracy, it is used as the basis for the machine.
“Bulgarian” is a common name for an angle grinder (angle grinder). By changing the disk, this universal device can be converted for cutting and performing other work operations.
Bulgarian women
How to make a cutting machine step by step with drawings: 4 reasons in favor of implementing the project
In order not to doubt the correctness of the decision made, study the following facts:
- without reliable fastening, the workpieces vibrate, increasing the risk of damage to the disk;
- it is difficult to manipulate a heavy tool with high precision while maintaining the perpendicularity of the cut;
- difficulties increase when processing thick products, when creating a large batch of similar parts;
- Using both hands significantly increases the likelihood of injury.
A high-quality machine is necessary to solve the noted problems and improve productivity. It is created according to the following algorithm:
- clarify the purpose and scope of work;
- study drawings of factory analogues and homemade products, choose the appropriate option;
- compose a set of design documentation with a list of necessary purchases;
- carry out assembly according to the approved plan with performance testing.
Main components of the device
To make a stand for an angle grinder we will need the following parts:
support frame: it can be welded from profile pipes; such a design will have increased rigidity and not be afraid of vibration; when using wooden blocks, it is advisable to take hardwood;
Support frame
- working platform (table cover) with mounting holes: it is made of sheet steel; You can also attach a sheet of cast iron from an old stove to the support frame - it drills easily and is not difficult to work with;
- a vertical stand for attaching tools: for it we use two small pieces of steel corners with holes drilled in them; they are bolted to the grinder gearbox using the holes for the handle; for reliable fixation, we first lightly fasten the corners together by welding directly on the grinder, and then, after removing the tool, we finally weld them together;
Tool holder
- a rotary lever with fastenings: we will describe the principle of its operation below;
- quick-release vice for securing parts; since the thread on the stud quickly fails, we will make a clamp from an elongated nut cut in the shape of a semicircle, which is welded onto the stud; to make it heavier, we attach a small piece of metal to its opposite end, which will serve as a kind of paw for lifting the clamp;
Quick clamping vice
a rotary table for processing products of complex shapes: you can use a hub from a passenger car of a suitable size as it;
Rotary table
a ruler attached to the turntable: for simple work you can use a carpenter's goniometer; for precise measurements, a structure is assembled from a protractor and 2 machinist's rulers.
TOP 6 drawings with explanations for making a homemade metal edger
It is not difficult to create a standard circular saw if you attach a grinder under a work table with a slot. It is necessary to consider a guide system for high precision movement of workpieces.
Picture No. 1. Schematic diagram
Look at picture No. 1 to see what a typical edger looks like. Here the angle grinder is mounted on a movable hinge, which somewhat complicates the design. This scheme has several advantages:
- simple and reliable fastening of the workpiece;
- the significant weight of the upper part will help to use less effort when cutting workpieces;
- if necessary, hand-held electric tools are dismantled to perform work operations as usual.
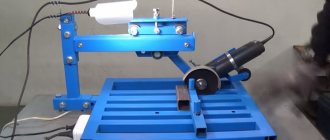
Picture No. 2. Stand for an angle grinder
This power frame is assembled from standard steel angles and pipes with a square cross-section. Welded joints are more durable. But it is also possible to create a prefabricated structure using screws and nuts.
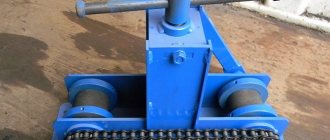
Picture No. 3. Assembly drawing of a pendulum saw
This project can be used as an example for making a high-quality metal edger. Equipping with wheels makes it easier to move a heavy product.
For your information! In other racks it is necessary to install screw supports. With their help, unevenness in the floor covering is compensated.
Picture No. 4. Pendulum circular saw
Look at the picture for an example of a machine for processing wood. This technique is suitable for cutting large workpieces. It is necessary to choose a grinder with sufficient power so that it is enough to work with large-diameter discs. A load is secured on the reverse arm of the lever (instead of an electric motor, as in the drawing). The weight and mounting location are selected in accordance with personal requirements and the characteristics of a particular design.
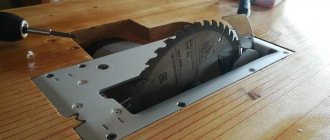
Picture No. 5. Drawing of a circular saw
This machine can be converted to be mounted at the bottom of an angle grinder. If longitudinal sawing of wood is planned, such an engineering solution will be optimal.
Picture No. 6. Design of a factory miter saw for wood
Look at Picture No. 6. You can use it to make a set of drawings with your own hands. It is recommended to pay attention to the spring, which lifts the working unit to its original state. A rotary table with measuring devices will help create a machine with increased tolerance requirements.
Picture No. 7. Drawing of the frame
In the manufacture of this part of the machine, thick metal is used. This solution increases cost and weight, but extends service life, increases reliability, improves fastening of hinged elements and processing accuracy.
Features of a homemade design
The versatility of a homemade cutting machine is determined by two main criteria.
Firstly, you can cut metal workpieces at different angles - 45 and 90 degrees. For this purpose, two separate platforms with guide slots are provided.
Secondly, the lever to which the angle grinder is attached can move in two planes: up and down vertically, and back and forth horizontally. A very convenient feature.
Thus, you can cut not only a profile pipe, a metal angle or a steel round, but also sheet metal.
Converting an angle grinder into a machine step by step: 10 assembly stages, electrical diagram for drawings
To create a machine yourself, you need to choose a design that matches your existing skills and capabilities. The easiest way is to assemble a machine from blanks created according to drawings in a specialized metalworking workshop. Otherwise, you will have to master welding technologies and purchase the necessary equipment.
Below is a step-by-step self-assembly algorithm with useful comments:
- After approval of the project parameters, the necessary materials, workpieces, tools and replacement attachments are purchased. The shopping list is determined based on the prepared set of design documentation. Compliance with current standards is not required in this case. However, all important details must be included, as in the examples above.
- Blanks for the power frame are cut. The table is made from sheet steel with a thickness of at least 5 mm.
- A transverse shaft is welded to the pendulum arm. When creating this unit, the perpendicularity of the parts is carefully controlled.
- A grip in the shape of the letter “P” is suitable for attaching an angle grinder. A hole for bolts is made in its side parts. With these fasteners, the hand tool is rigidly attached to the machine bed. Choose a fairly strong part of the grinder body.
- Additional fixation is provided using a metal clamp. All of the above mounts are made rigid to improve accuracy.
- The swivel bearings are pressed in. Instead of standard factory-made units, steel pipes with thick walls of suitable internal diameter are used.
- The assembled units are fixed on the axis of two sides.
- The pendulum is attached to the platform by welding. To avoid damaging the bearings, it is recommended to limit the temperature rise. To cool, use a cloth soaked in water.
- Weld a block with a mount for an angle grinder. Reinstall the angle grinder, protective devices, and return spring.
- They check the quality of the assembly, the reliability of the fastenings, and the functionality of the pendulum. Connect the machine, check the functionality first at idle and then in operating mode. The groove in the table is cut with a disk of appropriate width.
Picture No. 8. Connecting a magnetic starter with shutdown buttons and a protective thermal relay.
Look at Picture No. 8. Here is an electrical diagram for the drawings that improves the protection of equipment from overheating. It is also useful for quick emergency shutdown. One or more buttons for breaking the corresponding circuit are installed in a convenient place in the machine body. Foot operated switches are also used.
Making a wall chaser
It is necessary for the groove. Furrows are cut in plaster, brick, and concrete. You can't do without it. This tool has a long spindle and guard. Device creation scheme:
- If you need to install two disks, grind off the washer.
- Place one disk and screw it in
- Then place the second disk and screw it in.
For family needs, such a wall chaser should be quite enough.
So what do you need to do for this?
For a small farm it is suitable for making and grinding feed (for chickens and hens)
- We make a small hole in the existing sheet to fill in what is needed.
- Secure the grinder with bolts
- It is necessary to make a sieve with a capacity of 20 cm
- Make a 3 mm hole in the container; the grind size should correspond to the size of the hole.
- Attach the sieve to the base
- Cut out the bottom of the bottle and insert the neck into the base of the crusher
What can you make from an old grinder? Home craftsmen ask themselves this question quite often. But if your angle grinder works properly, you can use it to make a wall chaser. By using equipment without modification, you are putting yourself at risk. In order to avoid risk, you can make a nozzle with a solid base, which will allow you to make cuts in the walls over the entire diameter of the disk.
This addition is a footplate in the form of a stop that allows you to move the tool along the wall. The efforts will be uniform. When you make such a device, take the time to install a closed cover, which will be supplemented with a pipe for connecting a vacuum cleaner.
Machine reinforcement and other operator protection
A reliable power frame is the basis of safety. Additionally, they cover moving parts and prevent unauthorized persons from accessing the work area. When processing parts, goggles, masks, mittens, and other personal protective equipment are used.
In addition to the reliable strengthening of the machine, a certain location of the grinder serves to protect the operator. For safety and to prevent damage to clothing, it is installed so that the sheaf of sparks during operation is directed in the opposite direction from the person.
All 5 options for homemade grinder machines for various purposes
The drive of tools in this category is highly powerful. A high-quality grinder is small in size, durable, and resistant to high workloads. Some models provide speed control. Modern angle grinders are equipped with overheating protection as standard. Such products are a good basis for the manufacture of homemade machines for various functional purposes.
Picture No. 9. This homemade cross-cutting machine is suitable for processing granite and marble slabs
Grinder lathe
Picture No. 10. Diagram of a wood lathe made from a grinder.
The standard design is used here. The only excellent component is the device for transmitting force to the spindle. A gearbox is needed to regulate the speed and torque within the appropriate range.
Homemade wood milling machine with your own hands, other types of equipment
Picture No. 11. To secure different tools, a do-it-yourself wood milling machine must be equipped with a universal head
For your information! This device can be attached to the electric motor shaft after dismantling the standard gearbox.
Picture No. 12. Quick solution to problems
Look at Picture No. 12 shows how you can assemble a full-fledged sawing/circular machine from available materials in 15-20 minutes. With its help, it is easier to ensure precise processing of wooden workpieces compared to using hand-held power tools.
Picture No. 13. From the picture it is not difficult to understand the principle of operation and design of the grinding/surface grinding machine
3 other machines: sharpening machine, for sharpening chains and cutting bricks
Picture No. 14. Sharpening machine
Here, potentially dangerous places are protected from damage by sparks using strips of foil. A temporary, but inexpensive and quick solution to a practical problem.
Picture No. 15. When equipped with a suitable disk, such equipment is used for cutting brick, ceramic tiles, natural/artificial stone
Picture No. 16. Rigid attachment to a durable tabletop turns an ordinary grinder into a convenient machine for sharpening chains
VERY DANGEROUS! In any case, we must not forget about the intended purpose of the equipment. If you are making a homemade metal cutting machine, you should consider strengthening the structure. Processing of plastic and wooden workpieces is carried out with less stress.
Sheet steel cutting machine
Grinder machines, which can be used to cut steel sheet material, are much more complex than conventional pendulum ones. The main difficulty here is that the sheet of metal has certain linear dimensions and it is necessary to maintain evenness of cutting along the entire line. Another difficulty here can be considered the effect of heating the cutting area, during which the metal expands and clamps the angle grinder disk in the channel, which is fraught with jamming and rupture of the tool with all the ensuing consequences. The main parts of such a machine:
- Base. Ideally, it should be no smaller than the sheet that is supposed to be cut with a grinder, or allow the entire cutting area to be laid on it. It is necessary to use steel as a manufacturing material so that it absorbs heat, preventing the steel cutting line from overheating.
- U-shaped stand. This structural element serves as a guide for pulling the angle grinder through. The length of the section between the legs of the stand should be sufficient to place a sheet between them, plus allow the body of the angle grinder to fit freely.
- The carriage is a movable element that moves along a U-shaped stand on bearings. A pendulum console and a depth limiter for lowering the cutting disc are attached to it.
- The pendulum console serves as a mechanism for lowering the angle grinder to the level of the working position. Also attached to it is a tool control handle.
We make a machine for cutting metal using high-quality equipment: TOP 3 manufacturers of angle grinders
This list contains brands whose equipment has received high ratings from ordinary users and professionals:
- Bosch. It is famous for its reliability and well-thought-out small design elements. A significant limitation is the high cost even in the basic configuration.
- Hitachi were initially expensive. But these days, part of the production has been moved to China, which has reduced costs. Some models do not have automatic speed stabilization under load.
- Makita - Reasonable combination of price and quality. All new high power models are equipped with effective overload protection, which extends the actual service life.
The simplest device for an angle grinder stand
Actually, this device cannot be called a stand, but the work with it can be done almost the same as that provided by the most technologically advanced stand. The principle of its operation is clear from the short video:
But if instead of a strip you use a corresponding corner with a sawn-off part of one of the shelves, as one of the authors of a similar design did, then there will be no need to drill a blind hole in the head of the angle grinder.
In this case, the tool will be fastened with two screws into the threaded holes for the handle existing on the head of the angle grinder. But the principle of operation of the sole will not change - only its rigidity will increase.
The method of using an angle grinder as a kind of circular saw using the same sole, shown in another video by the same author, will also not change:
Dear readers, if you have any questions, please ask them using the form below. We will be glad to communicate with you
How to avoid 4 mistakes during operation of grinding/surface grinding and other machines
In order for the machine to perform its functions for a long time, the following simple rules must be followed:
- Do not increase the load more than planned.
- Use suitable replacement tips as specified in the manufacturers' official instructions.
- Remove dirt promptly to avoid deteriorating the air cooling mechanism.
- Maintain the ideal state of electrical insulation and the functionality of protective devices.