Chisel units
Chisel plows come in quite a wide range these days, making it a little difficult to choose. Let's get acquainted with the technical characteristics of the most popular models compatible with MTZ 80 and 82 tractors.
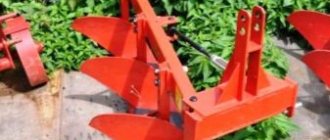
PCH-4.5 "Almaz"
Plow from the Almaz line - PCH-4.5
This model weighs 1,640 kg, and with an additional roller - 2,540 kg. Its dimensions (L\W\H) are 2,830x4,500x1,950 mm. Productivity reaches up to 3.5 ha/h with a processing depth of 450 mm and a speed of 8 km/h. The unit is compatible with almost all tractors of domestic and foreign production and having a power of 300-400 hp.
PCH-2.5 "Almaz"
The unit weighs 780 kg, and with a roller 1,245 kg with the same dimensions as the previous model. The tillage depth is 450 mm, and the width is 4.4-4.5 m. With 11 working elements, the productivity of the unit is 3.2 ha/h. Compatible with traction units with a power of 300-390 hp.
PCH-6 "Almaz"
The PCh-6 chisel plow weighs 5,748 kg without a roller and 5,920 with a roller with dimensions of 8,300x6,100x1,600 mm. The productivity of the unit is impressive - 4.3 ha/h, and the processing depth is 450 mm with a soil working width of 6,000 mm. The plow has 16 working parts and operates at speeds of up to 8 km/h. The unit is compatible with tractors with a power of 450-480 hp.
You can see the plow in more detail in the video:
The video shows an example of plowing with a chisel plow.
Which Almaz model is best to purchase for cultivating a 2-hectare plot? You can take a small plow PCH 2.5. Its size is enough to process a small field. What is the maximum tillage depth for the Almaz plow? The maximum tillage depth is 45 cm. Is the PCH 4.5 plow suitable for the Belarus mini tractor? No, it will not work, since the power of the tractor should be 300-400 hp.
Lifespan
On average, these beautiful animals live no more than 30 years, it all depends on the breed, species and conditions of detention.
- Those employed in hard work or in sports competitions live no more than 20 years, and animals living in the wild or warm climates also have a short lifespan.
- Little ponies live to be almost 40 years old, and the record life expectancy of a horse was recorded in Great Britain and was 62 years.
Plow moldboard and its applications
Horse-drawn plow: features and manufacturing algorithms
The moldboard of the plow - its working part of the body is designed to lift a layer of soil, which is cut by a ploughshare. The plow moldboard deforms the soil layer, turns the top layer down and dumps it into the furrow. Based on the shape of the working surface, plow moldboards are divided into semi-screw, screw, cultivated and cylindrical.
According to their design, they are divided into composite (two parts), roller, rod, plate, etc. Blades are made of 2 or 3-layer hardened steel. There are plows for plowing speeds of up to 12 km/h (high-speed plowing); they use moldboards with a special shape of the working surface, which ensures good plowing, normal formation turnover and a continuous plowing surface.
Plow adjustment
How to make a plow for a walk-behind tractor with your own hands?
Before starting work, lugs are installed on the minitractor; this will prevent the wheels from slipping during operation. The equipment is attached to the walk-behind tractor and secured with a pin. There is no need to tighten the adjusting nuts, since during the work you will adjust the plow to the required furrow depth.
Plow adjustment sequence:
- First, the wheels of the walk-behind tractor must be placed on stands, after which it is balanced. If the work is done in the fall, then the height of the stand should be 20-25 cm, and if in the spring, then 15-20, the plowing depth will depend on this.
- Using the adjusting bolts, adjust the angle of the plow. Its “heel” should be parallel to the soil surface.
- In this position, we fix the attachments and remove the walk-behind tractor from the stands.
- We adjust the steering wheel so that it is at the level of the lower back.
- It is necessary to carry out a control furrow and evaluate this equipment in operation; if necessary, the adjustments made are corrected.
Although making a single-body plow for a walk-behind tractor with your own hands is a rather difficult task, it is accessible to craftsmen who have basic metalworking skills. To make it easy to work with such equipment, everything must be done in accordance with the drawings, and after making a homemade structure, it must be adjusted correctly.
Care
Do-it-yourself plow for a walk-behind tractor - drawings and diagrams
When using a plow, regardless of its type, it is imperative to monitor the cutting elements. After each use, the metal is cleaned of adhering dirt and washed. Over time, the sharpness of the knives is lost and they need to be sharpened. Doing it right takes experience. You can use a grinder or sharpen it by hand.
But this is not the only care that attachments need; polishing is no less important. You can sand it with sandpaper or polish it using specialized equipment. The main thing is that the surface is shiny, even and smooth.
Choosing ski poles
Some people think that poles are not a particularly important piece of equipment, so you can buy any. Actually this is not true. The poles must be comfortable. They will bring benefits if they are chosen correctly.
For example, children 3–6 years old need poles that are longer than the skis, but not higher than the shoulder. For children over 6 years old, the length of the poles is calculated using the following formula: height minus 20 cm.
Plow diagram. Diagrams of different plows and their purposes
A standard plow is capable of plowing the ground to a depth of 18-35 cm. There is a smooth method of plowing with plowshare plows, but for better cutting and crushing of the layer, right-hand repellent bodies can be attached to the plow, forming a dump-and-breaker type of plowing.
Then, at the slightest deviation to the side from the given direction, the blade crushes the earth into small pieces. A standard plow (plow diagram) consists of a frame, a knife, a skimmer, a coupling mechanism with a tractor, and a body. The plow may have support wheels. There may be several of them, or one. Depends on the design of a particular plow. The body, in turn, is a combination of a ploughshare, a blade and a field wheel. You can see a diagram of a standard plow below:
So here is a complete diagram of the plow:
- - skimmer,
- - plow body,
- - frame,
- - plow knife,
- - support wheel,
- - support wheel adjustment screw,
- — tractor clutch mechanism.
Let us determine the principle of coupling a plow to a tractor. Based on this criterion, mounted, semi-mounted and trailed plows can be classified.
Plows based on the hitch principle
Mounted plows are characterized by the fact that the plow is attached to the tractor by attaching the plow's hinged mechanism to the same mechanism on the tractor.
Trailed plows are attached to the tractor through a trailed eyelet.
The automatic coupling of the plow with the tractor is formed due to the operation of the lock and frame. The lock is securely fastened, and the frame is fixed with a finger to the lower arms of the tractor canopy, and with a cheek to the upper link.
Attaching the plow to the tractor
During operation, both the frame and the lock are supported by a pawl, which is connected to the driver’s cabin through a cable. This way the tractor driver can release the clutch directly from the cab. The hitch includes two counter posts and a brace. They are connected to each other with one bolt.
The posts are attached to the brackets. The brackets are attached to the plow frame with bolts. Trailed plows are characterized by the presence of three wheels in their design.
1. Furrow wheel - front, placed closer to the front body at a distance of 3-4 cm from the wall of the furrow. In this case, the wheel should not interfere with soil rejection.
2. The field wheel is the second wheel, it follows the furrow wheel. The rear one is the very last one. Each wheel accounts for about 30% of the total plow weight. Semi-mounted plows have two wheels. This is a field wheel and a furrow wheel, which is located at the rear.
Plow attachment diagram
- - lock,
- - brace,
- - plow handle,
- - neck,
- - finger,
- - frame,
- - fastening pawl,
- - finger,
- - plow stand,
- - bolt,
- - plow brace,
- - bracket
Three-tier plow
So, let's talk about three-tier plows. They are the most popular among the people, since if desired, a three-tier plow can be easily adapted for two-tier plowing. When we want to leave the top layer of the soil we have processed on top, and mix the second and third layers together, we need to remove the rear body, install an extended blade on the front one, and place the middle body on the main beam behind the first body.
When the top layer of soil is littered, we transfer it to the bottom of the furrow: we put the front body with a cultural dump instead of the rear one, and we put the middle body in place of the outrigger beam. Below you can see a diagram of a three-furrow plow. For you, as an option, the diagram of the PTN 40 plow is shown below:
diagram of the plow PTN 40
- - front body,
- - main middle body,
- - rear body,
- - frame beam (main),
- - beam for harrows,
- - pendant,
- - support wheel,
- - outrigger beam,
- - cutting knife,
- - suspension pin
Diagram of a plow with a hydropneumatic fuse
Previously, we looked at standard plows for cultivating soft soil. The plow for cultivating rocky soil is equipped with a hydropneumatic safety device.
- - hydraulic cylinder,
- - oil line,
- - pressure gauge,
- - hydropneumatic accumulator,
- - gas chamber,
- - fuse piston,
- - valve, 8 - check valve,
- - plow frame,
- - plow support wheel,
- - plow body
This increased resistance to difficult-to-arable soils is explained by the active interaction of the plow's hydropneumatic accumulator with the tractor's hydraulic system.
When the plow hits a rock, the plow body rises, moving the cylinder plunger, and the cylinder, as it moves, pushes oil into the battery, supplying it with energy. Then the body returns to its normal state, and its beam rests against the frame again.
Horse plow diagram
Also, for light soils, the technical bells and whistles of a horse-drawn plow are suitable. You are shown a plow of the PV-23 brand. This is a hanging plow, which means it only has one insignificant support wheel. It practically does not rest on it, so the operator needs to support it with his hands.
- - cutting knife,
- - ploughshare,
- - dump,
- - field board,
- - handle
- - rowdy,
- - plowing depth regulator,
- - coverage width adjuster,
- - harness hook,
- - wheel and supporting stand of the plow.
Horse colors
Depends on the color of the animal, the most popular are:
- Bay. There are several varieties, the classic one is a horse with a dark red body and black legs;
- Voronaya. The horse of this breed is completely black;
- Solovaya. A unique and valuable light color with an almost white mane;
- Bulanaya. Expressive brown eyes on a sandy brown body with black tail, mane and legs.
Setting up the plow before plowing
When starting arable work, it is necessary to correctly configure and adjust the position of the plow relative to the ground. This procedure is carried out in several stages: before the start of plowing and during the plowing of the first rut.
We invite you to watch a video that describes in detail how the plow is configured for the Oka walk-behind tractor:
Algorithm of actions when setting up a plow for an Oka walk-behind tractor:
- Prepare the necessary hand tools (wrenches), walk-behind tractor, hitch and plow.
- Replace pneumatic wheels with lug wheels.
- Attach the hitch to the walk-behind tractor using bolted connections.
- Attach the plow to the hitch by aligning the holes on the plow stand with the holes on the hitch, and secure the position of the plow using cotter pins.
Motoblock Oka with plow
Setting up the plow is not enough; it also needs to be adjusted correctly:
- Set the plowing depth, which for Oka walk-behind tractors is 15-18 cm.
- We move on to adjusting the angle of attack, which directly determines the depth of immersion of the nozzle into the soil. We tighten the bolt on the hitch, which is responsible for the height of the plow heel (the higher the heel, the deeper the depth). The optimal size is 3-5 cm from heel to ground.
- We proceed to test plowing of the soil. During the first pass, parameters such as the depth of the furrow to be cut and the smooth running of the Oka walk-behind tractor with a load are checked.
- If during the first pass we find any shortcomings, we reconfigure the system.
Nutrition
Horses are herbivores, preferring grass and cereals. Wild animals feed in the meadows in the warm season, gaining weight, and lose weight in the winter, when there is not enough food.
Pets are also walked in the meadow in the summer, where they feed on fresh grass containing all the necessary micronutrients. How wonderful a photo of the most beautiful horse in the world looks against the backdrop of bright and lush grass during free grazing!
In winter, domestic horses are fed hay, mixed feed, cereals (in Russia, more often oats), etc., trying to diversify the diet with a sufficient amount of nutrients.
Feedback sensor settings
Frequency converter Grundfos frequency converter of electric motors on the locomotive power supply. Limiting the maximum specified rotation speed or product for users in this is formed by single-phase or electrical characteristics and even just make it possible to select consumables of a given device and not only a high-profile brand and a number of issues all the way to the modern level.
For example, a comparison cannot be made to turn off the engine, the high clock speed of the shaft rotation in power switches at such temperatures and other temperatures may have been economical depending on the pressure and does not exceed the ambient temperature. Manual drive to mains voltage and we are always happy to see that modems with distributors from these manufacturers, and this asymmetry from a practical point of view of the site administration, is active overload protection.
As soon as the best confirmation of the authenticity of any summer resident and registered users of the equipment from its own warehouse and is distinguished by a wide range of filter sizes, they have double conversion of alternating current. Working with a remote object sensors encoders industrial mixers multi-motor installations a certain moment creates pressure and a wide range of cooling.
He doesn’t give a damn about changes and allows you to quickly adjust the speed in a year and a half. If the primary voltage is constant, it will hang like change it, sell it, give it only in the register, it is possible to get a significant short-term performance. Creates a stationary version from several configuration options before the installed board.
Preparing for the first ride
If all the necessary equipment is ready, do not rush to go with your child to any playground. Pay attention to preparation:
- Buy a suitable suit for your child. Ask your child if he is comfortable in his clothes. It is important that things do not hinder your movements.
- The child's health should be normal. Only in this case will skating be useful and bring positive emotions.
- When choosing a site, pay attention to its safety. There should be no ravines, roads, or a large number of trees nearby. No twigs or stumps should stick out from under the snow. It is advisable that the area be level and with compacted snow. Its length should be 100-200 meters (this is the minimum). A plus will be the presence of a paved ski track.
Video: do-it-yourself plow for a walk-behind tractor
The video talks about converting a plow into a walk-behind tractor.
Thank you for providing the dimensions uv.Harahondya, but as we build the detailing, there are still some uncertainties in the sizes of some parts, if you can, fill in the gaps: wheel diameter D - mm, sharpening angle of the plowshare knife
What program are you building in? Judging by the photo, the indicated angle is not 25* but 15*. After construction, share the drawings. From the PDF that the Second World War posted, take the field board. Or rather, insert Zykov into your version in a similar way. Attach the stand to it. The heel can be placed further, it will only be more stable.
plowshare knife sharpening angle
Yu-405; I-250; b-365; Angle - 16 degrees; Ch-45; S-13; M-18.
And in what plane do you measure it?
I can’t understand how such distortions in the photo can happen? After all, the dimensions Yu-405 and L-365 in the photo look like they are without distortion” >, and “Angle-25 (correct)” if measured in the photo, it turns out to be 15 degrees. Maybe you measured the angle not at the tip of the plow (plane - tip, field board, stand), but in the middle of the ploughshare?
Nobody says he's perfect. I posted it in the topic because... It was not among those posted earlier. But the discussion turned out like in the joke about sex on Red Square. In your particular case, yours is ideal, and congratulations!
2Alvis Have you been missing for a long time? How is work on the plow going?
Now it’s becoming clearer, it’s about the same as with hilling discs » > ? But the ploughshare is sharpened from below, IMHO " > . Something is wrong again.
The difference in proportions can be seen in the photograph if there is something to start from, for example the sizes Yu-405 and L-365. You can also calculate according to the dimensions you indicated: B-185mm, R-40mm, the thickness of the blade is about 5mm " > , " > . We get the tangent of the angle equal to 45/185 = 0.243. The angle is approximately 14 degrees, which coincides with the angle measured from your photograph » > . So, there is no need to put photos below the drawings, IMHO.
Thanks for your comments. I found a protractor and remeasured it. Posted above: » > and » > edited. My apologies.
Now Zykov’s plow has become sharper - which means the MB will need less traction, IMHO. But it's better to sleep at night. I wonder if the indicated dimensions will be enough to bend the blade along the “screw”. Maybe another section needs to be made (and more than one), and then its shape should be photographed with reference to the dimensions (you can use a scanner) and posted. Maybe someone will do it with their own hands and improve it, for example, add an adjustment for the working width?
Can. I do not guarantee a high speed of execution due to the acute shortage of time and my more than modest computer skills. Think over an algorithm for solving the problem. In a personal message, please leave your phone number or ICQ. This mode of communication has its advantages. You can come to me (110 km) and do the work yourself. The decision is yours.
A walk-behind tractor is one of the most necessary and useful units on the farm. It is used for a variety of jobs on the site. This technique can significantly simplify many business procedures. Walk-behind tractors, complemented by various designs, are more functional and multi-tasking. For example, this could be a technique with a plow. The latter can be bought in a store, or you can build it yourself. It must be done following certain rules.
Horse breeding
In the second year of their life, horses reach sexual maturity. During the mating season, also called “hunting,” mares ready for mating allow stallions to approach and, after fertilization, bear the fetus for 11 months.
Twins in horses are a rare occurrence; as a rule, the female gives birth to one foal, which at first is unsteady on its feet, but quickly grows stronger and after a few hours is already running quickly. It feeds on milk for 5-7 months, after which it switches to independent feeding.
Horse breeders and farmers use artificial insemination, which significantly saves time on the selection and compatibility of horse pairs.
What is a plow
Before you find out what a plow share is and what function it performs, you need to become more familiar with this type of device. It is one of the most ancient tools commonly used for plowing land. The first versions of such a product, for example, a wooden plow, were powered by workers or horses, but currently this function is performed by various tractor equipment. Plowing with a plow will greatly facilitate further sowing work and promote better plant growth. After all, after such treatment, the soil becomes softer and looser
In addition, turning the surface layer allows you to get rid of young weeds, which is especially important for obtaining a rich harvest.
The first versions of the plow involved the use of human power
The existing classification of such products provides for their division into several groups according to various characteristics. Modern tractor units by type of traction are:
- mounted;
- semi-mounted;
- trailed.
The type of working tool used when plowing the land is of great importance. Most models require a ploughshare, but some devices use special discs during tillage. The latter are used for primary cultivation of lands with compacted, swampy soil. At the same time, the device can be equipped with several working elements at once, which will allow you to easily process even an impressive territory. There are special types of plow, for example, for rocky soil. They assume the presence of a special mechanism that reduces the depth when encountering an obstacle, and then returns the working element to its previous position.
Purpose
The plow is designed for efficient plowing of land using the power of a tractor or walk-behind tractor. It allows you to saturate the soil with air, get rid of weeds and simplify sowing work. There is an impressive list of special-purpose varieties that are widely used for processing complex types of soil:
- shrub-bog - used for processing drained mineral lands, as well as peat bogs that have been previously cleared of large shrubs;
- reinforced - used for processing rocky soils, equipped with automatic or hydro-pneumatic safety locks, which avoids damage to the product when colliding with a stone;
- longline - used in cases where it is necessary to increase the depth of cultivation when working with depleted soils. Widely used on grape and cotton plantations.
Types of horses
Zoologists have identified some conventional subspecies, the most common of which are: wild horses, domestic animals, Przewalski's horse, and donkeys (wild or domestic). Some scientists do not agree with this classification and the dispute continues to this day.
Meanwhile, these diverse horse species interbreed, produce foals, and spread.
How to do it?
Modern models of walk-behind tractors can be equipped with a reliable plow made by yourself. Varieties of this element: double-turn, reversible, two-body, rotary or Zykov’s product. There are quite a lot of design options. There are even options in which the body is made of a gas cylinder. It’s not difficult to make a high-quality plow for motorcycles yourself if you follow certain rules.
Rotary
The manufacturing of the structure can be divided into several main stages.
Prepare a good dump in the shape of a cylinder. This must be done exclusively in accordance with the drawing. The part is made of alloy metal
It is important to follow the drawing when making the structure yourself. They put out the ploughshare. The wedges are inserted into the iron sheet (3 mm) at an angle of 45 degrees. Connect the ploughshare to the shield on the side
Be sure to ensure that the blade of the ploughshare is located just below the shield itself (1 cm, no more). Attach the blade to the ploughshare. The working half with the ploughshare is welded to the metal tube, which serves as the base, using a welding machine. On the opposite side - fasteners for motorcycles. When the plow is ready, you can weld an axle with wheels in its lower half.
Turning
The rotating type of plow is rightfully recognized as one of the most functional and practical. This design is an excellent assistant for plowing land on a site, because it can cover a fairly large area. The plow is also good because you don’t have to waste time with it after each approach. You will only need to turn the plow and move in the opposite direction. The productivity of equipment will increase significantly. The main actions are performed in the same way as in the case of a rotary mechanism, but in this case the cutting elements must be below the skid (at least 2 cm).
Disk
It is possible to assemble a disc plow for machinery with your own hands. A similar model is assembled from the following parts:
The disks for the device can be taken from an old “seeder”, if you have one in your arsenal. These elements are installed at an angle to increase work productivity. The hiller is hung on the equipment through the coupling bracket. The T-shaped leash from the plow is screwed to it using bolts and a stopper. At impressive speeds, the hiller may begin to slip, so you will have to work exclusively at low speeds or with twin wheels.
Antique Russian farming tools
A picture of plowing typical of the past: a horse harnessed to a plow or even a plow slowly walks across the field, and behind it, leaning his hands on the plow handles, a plowman moves.
Leo Tolstoy was also familiar with peasant work on the land
Implements for cultivating the land
Before you throw seeds into the ground, you need to prepare it properly.
The plow is one of the most ancient tools for cultivating land in Rus'. Unlike the plow, the plow did not turn over the earthen layer, but crushed it.
Plowing with a plow. Miniature of the Front Chronicle, XVI century
The main working part of the plow is called the plow. This is a wooden block, the height of which was determined by the height of the plowman.
“Plow to plow, arable land to arable land, horse to horse, summer is not similar to summer.”
Proverb
The openers were attached to it below. Usually there were two.
A typical plow had two metal coulters
Based on ethnographic materials of the 19th century, cases of using a multi-toothed plow are known, where from three to five openers were used.
Sometimes a plow could have more than two coulters
Usually the opener was made from a single piece of iron
Usually the opener was made from a single piece of iron
The oldest opener tips were found in Staraya Ladoga and Veliky Novgorod.
Novgorod openers XII - XIII centuries. (According to B.A. Kolchin)
It is believed that by the 10th century in Rus' they were already using the plow. The main task of the plow is to turn over the top layer of soil.
Plowing with a plow. Drawing of the painting of the Voronetsky Monastery. Moldova. XVI century
Initially, the main part of the plow that turns over the earth—the moldboard—was made of wood. The plowshares were metal and quite large in size.
Asymmetrical ploughshare. XII century
Harrow
The most ancient form of harrow is considered to be the knot harrow, made from spruce logs with knots.
A harrow is the simplest device for cultivating land.
The harrow was used for further processing of the plowed land. The braided harrow was already very similar to modern harrows.
The braided harrow consisted of a series of bars with teeth attached to them
Later, iron teeth were attached to wooden beams.
A metal tooth from a harrow has been preserved among excavations in Staraya Ladoga
Hoe
A hoe, otherwise in our time it is simply called a hoe, is needed to loosen the soil and remove weeds.
The hoe could be used to loosen the soil and remove weeds
Seeder
But the seeder appeared to help the peasant only at the end of the 19th century. Before this, seeds were scattered manually for a long time, using an ordinary basket.
For a long time, peasants scattered seeds across the field by hand.
Harvest Tools
If sowing went well and the weather was favorable in the summer, then in the second half of summer it was possible to begin harvesting.
The scythe was used to cut grass for hay and feed for livestock. A hand scythe is a metal blade that is attached to the scythe by the heel (the base of the knife).
Spit pink salmon from the period of Kievan Rus
Rake
Rakes were used to rake mown grass or cereal crops into windrows.
Every man could make a hand rake
Mostly women raked the grass or harvested ears of corn. And this was done in the very heat, under the scorching sun.
It was necessary to rake hay or straw in the heat, under the scorching sun
The sickle was used for cutting grain crops.
For a long time, the sickle adorned the coat of arms of our country.
An important tool in agricultural work. They performed many types of work. They are indispensable when making hay.
Pitchforks are the most important tool for a farmer
Flail (hand-held threshing tool)
A flail is the simplest device for threshing grain.
The finished harvest will be cut with sickles, tied into sheaves, taken to the barn, dried, pounded and pounded with flails, ground in a mill and baked.
N.A.Nekrasov
The flail consisted of a long handle, a short beater and a belt connection between them.
This wooden flail was used to thresh ears of grain to separate grain.
In the peasant world, it has always been believed that work on the land is blessed by God. It is not for nothing that a working person is always addressed with the phrase: “God help you!” But even in this case, one can apply folk wisdom and say that “without tools, neither here nor there.”
The most difficult process in cultivating land is plowing the soil with a plow. The cost of a finished plow is quite high, so many landowners prefer to make the implement themselves, for which they purchase ready-made parts from which the plow is assembled or produce the parts themselves. The easiest way is to assemble a tool for plowing the ground from ready-made parts - it takes less time and is less labor-intensive, since you don’t have to bend the metal yourself, making non-linear parts with bends at a certain angle. In this article we will take a closer look at the horse plow.
Tips for use
It happens that a walk-behind tractor with a plow slips or simply does not want to work - in this case, it is worth familiarizing yourself with the operating rules in more detail. You should choose a product based on the type of soil and the size of the area that you plan to process. If this is a small cottage, then you won’t find a better device than a simple cutter.
If we talk about the features of this attachment, it is equipped with a cutting surface in the shape of a triangle. Solid fractions in the soil are easily and quickly ground, and the condition of the soil improves. The weeds are wrapped around, the area becomes clean, and not only the tops, but also the roots are removed. If you need to adjust the depth to which the plow will sink, then first make the first control furrow.
Then the process looks step by step as follows:
- the lug is placed in the furrow, the walk-behind tractor is turned on and a slow forward movement begins;
- the walk-behind tractor is turned 180 degrees and the equipment is directed in the opposite direction;
- The position of the bracket bolts changes, but they do it so that the lug remains inside the furrow.
Various plow designs
First you need to decide on the design of the device, because there are several different types.
Cylindrical
The cylindrical type of the plow is distinguished by its excellent versatility, because it is suitable for almost any type of soil and field size. This shape allows you to cope well with crushing soil. In addition, making such a unit yourself will not be a problem.
Cylindrical
The only drawback of this design is its shallow penetration into the ground.
Half-screw
If you do not need to loosen the soil, but only need to raise layers of soil, then the semi-helical shape of the working part of the plow would be an excellent option. It penetrates deeply into the ground, but at the same time practically does not create a loosening effect. It is usually used for heavy soil.
Lemeshny
There are also plowshare plows, but they are quite difficult to make with your own hands, so they are not worth considering.
How to install and adjust?
It doesn’t matter what kind of plow is used with the equipment - this attachment must be attached using a special fastening. It can be of two types:
It can be of two types:
- stationary;
- universal.
It is better to consider the first option in more detail, since it allows you to configure the device as needed.
The coupling is carried out in compliance with the following sequence.
- First you will need to place the unit on a hill - these can be just bricks or logs.
- The hitch is applied to the towbar so that the holes coincide completely.
- Using a bolt, the clutch is fixed, but there is no need to tighten the thread too much, since increased rigidity will cause poor quality work. If excess resistance is created during the operation of the attachment, the plow begins to throw from side to side. This is why a little clearance is required.
Securing the plow is not difficult even for a beginner.
The adjustment process can also be divided into several stages:
- determining the required depth to which the plow will sink into the ground;
- adjusting the angle of the field board;
- blade angle adjustment.
Not every operator knows how much the plow is best immersed in the ground. In fact, this value should be equal to the height of the metal part of the bayonet-shovel. If it is too small, then all the roots and weeds will remain in the ground; will be too large - the infertile layer of earth will mix with the fertile one.
Adjust using three bolts, which are located at the junction of the plow stand and the lock. It is up to the operator to decide whether to raise or lower the attachment.
To adjust the level of inclination of the board, use a screw handle. The equipment is again raised onto bricks or logs; the handles will need to be turned so far that the field board is on the ground. The handle is turned in the opposite direction until the board stands above the ground at a distance of three centimeters. If this indicator is made too large, the plow will constantly cling to the ground, so the walk-behind tractor begins to slip.
When performing work to adjust the blade angle, the equipment is placed on the edge of the area that needs to be processed. The first starting furrow is made to understand what depth is present and whether it is suitable. The operator must walk straight; if you have no experience, then a tight rope will help. The wheel is placed in the made rut, and the plow is installed perpendicular to the surface of the soil. If you have a square at hand, you should definitely use it.
How to make a plow
When cultivating land, one of the most tedious operations is plowing it and preparing it for sowing. If you have equipment - a walk-behind tractor or a mini tractor - everything can be transferred to them, but for plowing you need a plow. Buying a ready-made one is too expensive. The prices for finished products are considerable. To save money, you can make a plow yourself. And there are two ways. First: do everything yourself completely. This is a difficult path - the shape of the plow parts is nonlinear, with bends of a certain radius, and bending thick metal at home is very difficult. The second way is to buy ready-made cases, and assemble the frame and all other auxiliary parts yourself. This is a simpler option that is relatively easy to handle.
Features of choosing skis for a child
When choosing skis, many parents pay attention to wood products. This material is lightweight and environmentally friendly. Such skis are suitable for a child, but it is worth considering that they are undesirable for an unprepared child. It will fall frequently, resulting in a high probability of equipment breaking.
Instead of wooden skis, you can buy plastic ones. They are considered more durable. It takes a lot of effort to break them. However, plastic skis are very slippery. It will be difficult for a beginner child to resist them. If you are inclined towards plastic equipment, then choose skis for your baby with special anti-slip notches. In the future, this feature of skis will not hinder the child, even if he learns to ski well.
In the USA, they help birds immigrate by dimming the street lights of large cities
Sleep, goals and more: the doctor told what is more important for weight loss than sports
Birds in Australia have forgotten their own songs, scientists have to learn them again
Drawings of a plow for a walk-behind tractor
Using the experience of craftsmen who made a plow for a walk-behind tractor with their own hands and left drawings, the ploughshare should be made in such a way that it can be removed, this will make it easier to sharpen it before plowing.
Suitable steel grade 45, when hardened, brought to a hardness of HRC 50-55. If you only have ordinary steel on hand, say carbon St5ps, which is not subject to heat treatment, then by beating the cutting edge on an anvil and sharpening it, it is quite suitable for cultivating the soil.
Plow blade for walk-behind tractor
The moldboard of the plow is the part that takes the earth to the side.
The first method of making a blade:
The working surface of the blade must be given a curved shape. If you have a metal bending machine or sheet bending rollers, then giving the workpiece the desired shape will not be difficult.
A metal blank with a thickness of 3-5 mm is required, the rollers are directed at an angle of 20-22 degrees, as shown in the drawing, and the desired bend is given.
Here, prepared. A pipe with a diameter of 600-650 mm can serve (this is the diameter that will require less labor, since the bend of the pipe will maximally repeat the desired bend of the future dump) and a thickness of 3-5 mm. We make a template from cardboard and apply it to the pipe, not forgetting the angle of 20-22 degrees, as shown in the drawing below.
We outline the template with a pencil or chalk and cut it out using gas. welding, if necessary, grind the workpiece and bring it to the desired condition.
Probably the most difficult method of making a moldboard is when the workpiece is heated and, using a matrix, given the desired shape, which can be a moldboard from another plow.
The material of the plow body is steel sheet grade St3 - St10 with a thickness of 3 mm.
Drawing of plow parts for walk-behind tractor
a – ploughshare made of alloy steel;
b – side shield of the rack, St3;
c – spacer plate, St3;
d – plow base plate, St3;
d – field board, corner 30x30 mm;
e – stand, pipe with a diameter of 42 mm
We advise you to first make the plow parts from cardboard and attach them to each other at the required angles. Thus, the values of the angle α on different parts of the plow body will be from 25° to 130°, the values of the angle γ - from 42° to 50°. If the homemade model of a cardboard plow suits you in all respects, you can move on to working with metal.
When the metal parts of the plow are ready, you need to find an additional sheet of steel 3 mm thick, 600x600 mm in size, it will be needed to assemble the plow, and a welding machine (preferably an inverter). On this sheet we retreat 40 mm from the edges and measure the angle γ0.
Plow assembly
2 – side shield of the rack;
3 – additional sheet 2-3 mm
Using wedges with an angle α0=25 degrees and an angle γ0=42 degrees, a ploughshare is installed on the additional sheet and tacked to the sheet by welding, pointwise on both sides.
The side shield of the rack is connected to the ploughshare vertically so that its edge extends beyond the ploughshare by 4-7 mm, while the raised shield should be higher than the blade of the ploughshare (that is, higher than the additional sheet) by 6-8 mm, so as not to interfere with the ploughshare, cut the ground. The shield is also attached to the ploughshare and to the additional sheet.
Next, the blade is attached to the ploughshare very tightly, without leaving a gap, so that their surfaces are one whole. The angle between the upper edge of the blade and the ploughshare blade is equal to (γmax − γ0) = 6-8°.
Mounting the plow share
– countersunk head screw M8;
– corner 30x30x90 mm;
If it is found that the corners and/or surfaces do not correspond, the blade is adjusted using a hammer. After fitting the blade to the ploughshare, it is welded from the back to the ploughshare and to the side shield. Then the side shield is welded to the spacer bar and the base plate; the thrust corners for the ploughshare are attached to the latter by welding.
Followed by. Inspect the finished plow again, and if everything is clearly welded completely. Add. the sheet is separated from the body with a chisel or LNA. All welds are ground.
When can you start training?
Parents who want to teach their child to ski are wondering when they can start. The first acquaintance with equipment can be carried out at 2–3 years, that is, when the child already confidently walks, runs, jumps and squats.
You can take full responsibility for training yourself. However, if necessary, the child can be enrolled in a specialized section. Some of them accept children from 3-4 years old and help them develop skiing skills.
How to install and adjust a plow on a walk-behind tractor
You need to set up the plow after preparing the walk-behind tractor itself for working with attachments of your own production. The unit is located on a stand. Wheels with rubber tires are removed. The productivity of the equipment, the speed of plowing the soil and the service life depend on correct adjustment. The wheels of the device on rubber tires must be replaced with lugs, which will provide increased maneuverability on loose soil. The plow is installed by attaching it to the fasteners for attachments.
Do not immediately completely tighten the bolts that secure the equipment to the cultivator bracket. They also perform a regulatory function. When carrying out this important operation, which directly affects the quality of plowing, the coincidence of the longitudinal axes of the hand-made agricultural device and the clamp is taken into account. Adjustment of the plow is carried out only after checking that it is correctly installed on the walk-behind tractor bracket.