When cultivating land, one of the most tedious operations is plowing it and preparing it for sowing. If you have equipment - a walk-behind tractor or a mini tractor - everything can be transferred to them, but for plowing you need a plow. Buying a ready-made one is too expensive. The prices for finished products are considerable. To save money, you can make a plow yourself. And there are two ways. First: do everything yourself completely. This is a difficult path - the shape of the plow parts is nonlinear, with bends of a certain radius, and bending thick metal at home is very difficult. The second way is to buy ready-made cases, and assemble the frame and all other auxiliary parts yourself. This is a simpler option that is relatively easy to handle.
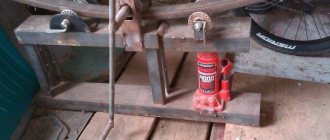
Homemade frame for a plow on a mini tractor
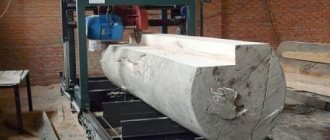
Double-furrow homemade plow for a mini tractor
Installing the support wheel
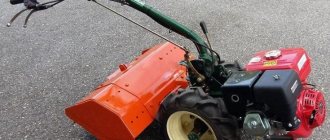
Making a plow for a walk-behind tractor with your own hands
With the help of a walk-behind tractor, a wide variety of agricultural work can be performed, such as: plowing, mowing, sowing, planting and digging up potatoes, carrots, onions, hilling, etc. But for each of these works you will need a specially designed agricultural tool. This is where the question arises about what is more profitable: buying a ready-made plow, or making a plow for a walk-behind tractor with your own hands.
Plows include several types, each of which has a special design. So, today, for plowing with a walk-behind tractor, single-body plows, either reversible or rotary, are used.
Single body plow
The single-body plow has the simplest design and the presence of a huge number of drawings of its modifications. Therefore, it represents the best option for making it yourself, especially for those owners of walk-behind tractors who do not have the necessary skills.
Making a homemade single-body walk-behind plow will not present any difficulties. You won’t even need to have any specialized equipment or tools for it. Those stored in the barn or garage of every self-respecting owner are quite suitable.
Care
When using a plow, regardless of its type, it is imperative to monitor the cutting elements. After each use, the metal is cleaned of adhering dirt and washed. Over time, the sharpness of the knives is lost and they need to be sharpened. Doing it right takes experience. You can use a grinder or sharpen it by hand.
But this is not the only care that attachments need; polishing is no less important. You can sand it with sandpaper or polish it using specialized equipment. The main thing is that the surface is shiny, even and smooth.
Do-it-yourself plow for a walk-behind tractor (drawings)
Based on the experience of people who made a plow for a walk-behind tractor with their own hands and drawings, you need to make the plow share removable in order to sharpen it before plowing.
The best material for making the cutting part of a plow for a walk-behind tractor is alloy steel 9ХС, which is used for circular saw blades.
45 steel, which is hardened to HRC 50-55 by hardening, will also work. If you only have ordinary steel, for example carbon steel St.5, which is not subject to heat treatment, then it can also be adapted for cutting a layer of earth by beating the cutting edge of a cold plowshare on an anvil and then sharpening it.
Plow blade for walk-behind tractor
Blade manufacturing method No. 1. The working surface of the blade must be given a cylindrical shape. If you have sheet bending rollers, then it is not difficult to give the workpiece the required shape.
To achieve this, a blade blank, cut by gas or electric welding (or scissors) from a steel sheet 3-4 mm thick, is fed to the rollers at an angle of 20°-23°, bent, and then given the required shape using a template using a hammer.
Drawing of a plow blade made of 3 mm steel sheet
Method number 2. The blank for the dump can be a steel pipe with a diameter of 550-600 mm and a wall thickness of 4-5 mm. First, a blade template is made from thick cardboard, then the template is applied to the pipe so that the lower generatrix of the blade template makes an angle of 20-23° with the generatrix of the cylindrical pipe.
The outline of the blade is drawn with chalk, then it is cut out by gas welding and sanded. If necessary, the shape of the blade is adjusted with a hammer according to the existing template.
The shape of a plow blade made of a pipe with a diameter of 550-600 mm and a wall thickness of 4-5 mm
Method No. 3. The most labor-intensive way to obtain a dump is to place the workpiece in a forge for heating (or heating it in another way). Then the workpiece is bent according to a matrix, which can be used as a moldboard from another plow.
The material of the plow body is steel sheet grade St.3-St.10 with a thickness of 3 mm.
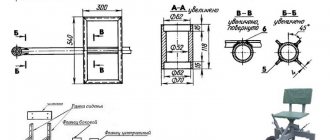
Plow parts drawing:
- a – ploughshare made of alloy steel;
- b — side shield of the rack, St3;
- c — spacer plate, St3;
- g — plow base plate, St3;
- d - field board, corner 30x30 mm;
- e - stand, pipe with a diameter of 42 mm
We recommend that you first make the parts of the plow from thick cardboard and connect them together by gluing, maintaining the appropriate angles. Thus, the values of the alpha angle on different parts of the plow body will be from 25° to 130°, the values of the gamma angle will be from 42° to 50°. If your homemade cardboard plow model suits you in all respects, feel free to start working with metal.
When the steel parts of the plow are made, to assemble its body you will need an auxiliary sheet of steel 2-3 mm thick with dimensions 500x500 mm, and you will also need a welding machine. The angle γ0 is laid out on the auxiliary sheet with a distance of 40 mm from the edges.
Plow assembly
- 1 - ploughshare;
- 2 — side shield of the rack;
- 3 – auxiliary sheet 2-3 mm
Using wedges with an angle α0=25°, a plowshare is installed on the auxiliary sheet and welded to the sheet pointwise on both sides.
The side shield of the rack is connected to the ploughshare in a vertical position so that its edge extends beyond the edge of the ploughshare by 5-8 mm, while the side shield is raised higher than the blade of the ploughshare (that is, higher than the auxiliary sheet) by 6-10 mm, so that do not interfere with the plowshare cutting the ground. The shield is also lightly welded to the share and to the auxiliary sheet.
Then the blade is applied to the ploughshare as closely as possible and without gaps so that their surfaces are one whole. The angle between the upper edge of the blade and the ploughshare blade is equal to (γmax − γ0) = 6-8°.
Mounting the plow share
- - ploughshare;
- — countersunk head screw M8;
- - dump;
- — base plate;
- — corner 30x30x90 mm;
- - M8 nut
If it is found that the corners and/or surfaces do not match, the blade is reworked with a hammer. After adjusting the blade to the ploughshare, it is welded from behind to both the ploughshare and the side shield. Then the side shield is welded to the spacer bar and the base plate; the thrust corners for the ploughshare are attached to the latter by welding.
The plow is once again inspected and thoroughly welded, while the auxiliary sheet used to assemble the plow is separated from its body with a chisel or “grinder” with a cutting disc. The thrust corners of the ploughshare are thoroughly welded to the base plate. Then all welds are cleaned, and the surfaces of the blade and plowshare are sanded.
Rotary plow for walk-behind tractor, homemade
The rotary plow is universal, used on walk-behind tractors, and contains a manual rotary mechanism on a standard single hitch. As you know, when plowing the soil with a conventional plow, in one pass the layer of soil is turned over by the ploughshare in one direction. In order for the soil of the next row to turn over in the same direction, you have to return to the beginning of the previous row and start from the same side of the plot.
A rotating plow will allow you to plow much faster - at the end of the row, after turning the walk-behind tractor, you simply turn the ploughshare in the other direction and continue cultivating the soil.
Plowing depth and how to adjust it
The plowing depth should be at least 20 cm. It is easy to set up. To do this, the unit is rolled out to the site of the upcoming work, where a control pass is made. A cord is stretched along the approximate first furrow. It is advisable to immediately turn the handle of the device to the left in order to move on a surface that has not yet been plowed. The passage to the opposite end of the section is carried out at minimum speed. This will allow you to check the correct installation of the plow bar and make the necessary adjustments.
The right lug should be placed in a fresh furrow and moved forward slowly. After the first pass, the device turns 180° and moves in the opposite direction. At the same time, the depth of the furrow made is assessed. If it is unsatisfactory, the equipment is adjusted using the bolts of the fixing bracket. It is necessary to ensure that the right lug does not leave the furrow, and the equipment stand is placed perpendicular to the soil surface.
Plow dimensions for walk-behind tractor
The rotary plow is characterized by the presence of three structural planes: the lower horizontal plane of the skid, the side vertical plane of the skid and the front moldboard plane. If, after removing the ploughshare and moldboard, the plow is placed on a horizontal table, pushed close to the wall, and its side surface is pressed against the vertical wall, then the surface of the table will coincide with the lower horizontal plane of the skid, and the vertical wall with the side vertical plane of the skid.
- The first condition for a good plow is the location of the lower cutting edge of the installed share 10...20 mm below the lower horizontal plane of the skid.
- The second condition for a good plow is that the side cutting edge of the installed plowshare forms a straight line with the side cutting edge of the moldboard, and both of them should protrude 10mm beyond the side vertical plane of the skid.
- The third condition for a good plow is that the front working surface of the ploughshare meets the moldboard in the same plane and without a gap. They should not have protruding fasteners, but should be polished and shiny like a mirror.
Upon completion of work with the plow, it is recommended to clean the polished surfaces from soil, pour in machine oil or lubricate with Litol-24 and rub with a rag. This will protect polished surfaces from corrosion.
The fourth condition for a good plow is a flat back side of the ploughshare, making an angle of 15...20 degrees with the flat surface of the plow installation, equal to the rear angle of the installed ploughshare.
The side cutting edges of the plowshare and blade must also have rear angles of 10...20 degrees with the side plane of the furrow, and the side cutting edge of the blade can be rounded.
Assembly diagram
If the plow is made independently, then after all the elements are available, they must be correctly assembled into a single structure. The opener will need to be placed on an additional sheet, using wedges with an angle of 25 and 42 degrees. The element needs to be welded, but this is done pointwise and certainly on both sides.
The side shield is attached to the opener so that it is placed in a vertical plane, but protrudes by 7 mm. In turn, the shield must be 8 mm higher than the coulter blade - if this requirement is not met, then the plow will not be able to complete the task assigned to it. The shield is also welded. The blade is attached to the coulter, and this must be done in such a way that there is not even a small gap.
If it is found that there is no compliance with the required characteristics, then the blade should be brought to the desired position with a hammer.
Only then do they work again by welding and attach the shield from the side to the spacer bar and the plate at the base. Using a chisel, the additional sheet is separated, and the seams are perfectly sanded.
How to install a plow on a walk-behind tractor
Before you start setting up the plow, you need to prepare the walk-behind tractor itself and install the plow on the walk-behind tractor. To do this, the walk-behind tractor is placed at the work site, the wheels with rubber tires are removed and steel lug wheels are installed. This is done in order to reduce the slipping of the walk-behind tractor when plowing due to soil resistance.
After this, they begin to attach the existing walk-behind plow to the attachment. The fastening nuts should not be fully tightened in order to be able to adjust the unit. Then the unit is fixed to the mounting bracket of the walk-behind tractor with two steel pins. Once these operations are completed, the plow adjustment operation can begin.
Plow hitch
Motoblock hitch disassembled
The hitch is an important design element that ensures reliable fastening of attachments to the Neva walk-behind tractor. The most popular option is a U-shaped mount made from a channel, which is installed under the steering wheel of a walk-behind tractor.
When creating the hitch, you will need to drill holes for attaching the bracket and mounting pin. The bracket for attaching to the walk-behind tractor is either at the top or bottom, so as not to interfere with hanging.
Adjusting the plow on a walk-behind tractor
Adjustment of the plow on a walk-behind tractor should be carried out with maximum adherence to the rules, because the quality of plowing directly depends on it. It is carried out in the following steps.
First, the wheels of the walk-behind tractor are placed on stands specially prepared for this purpose and it is balanced. The height of these stands directly determines the depth of plowing (the height of stands for plowing frozen soil should be no more than 20-25 cm, for spring soil - 15-20 cm).
After this, the adjusting bolts are used to set the angle of inclination of the plow so that its “heel” is parallel to the surface of the ground.
After securing the plow, the walk-behind tractor is removed from the stands and placed on the ground. The steering wheel is set so that the control handles are at the height of the plowman’s belt.
The last step in adjusting the plow is to evaluate whether it is set correctly. To do this, control plowing is carried out in the form of two to three furrows, measuring the depth of cut and the quality of the soil dump, as well as the distance between the furrows. If the distance between the furrows exceeds 10 cm, or they overlap each other, the adjustment must be repeated.
Hillers
Hillers allow you to cut furrows for planting crops, but their main use is hilling up potatoes to get a larger yield.
There are several types of hillers:
- Negotiable. This is the simplest type of hiller, which works using two plows.
- Disk. This option is more effective. It works using two rotating disks. Which rotate and loosen the soil.
- Active. This is a special type of hiller that works using propellers. If disk and revolving hillers simply turn over the top layer of soil onto the potatoes, then this one first chops it up and only then discards it.
From the manufacturer
The official manufacturer offers one version of the hiller - the universal reversible hiller OU-00.000-01.
It looks like two connected plows. It is possible to adjust the width of the rows by rearranging the plows at different distances from 45 to 70 cm. The plow is immersed in the ground to a depth of 10 cm. The average speed of movement of Belarus with a reversible hiller is 4 km/h. The structure weighs 20 kg.
Analogs
The best analogue for any factory-made attachments for MTZ is Lida products. Including hillers.
The OK-2 hiller is presented by a Lida company and has similar parameters to the universal hiller, except for the immersion depth. The maximum immersion of this unit is 12 cm. Accordingly, the speed in this case drops to 3 km/h.
Unfortunately, there are no special disc hillers for the MTZ walk-behind tractor.
You can always choose a universal option for a walk-behind tractor that will work successfully on it. The main thing is to choose a hitch.
Ukrainian offers a large amount of universal equipment, including disc hillers. Disc sizes can vary from 18 to 36 cm. Their maximum immersion level can be half the diameter. The disadvantage is that they are designed to process only 1 row, while reversible hillers work with two rows at once.
Homemade option
Making a disk hiller is problematic; a reversible hiller is much simpler in its design. To make it, it is enough to have two plows on hand, which are connected with bolts not to the Belarus, but to the frame. And the frame itself is already connected to MTZ.
The frame should be made from a square tube in the shape of the letter “T”. This design is simple but effective and has been known since Soviet times.
Video reviews
Review of the universal hiller OU-00.000-01 for the MTZ walk-behind tractor
Setting up hiller discs on a MTZ walk-behind tractor
An example of hilling with a Belarus MTZ-09 walk-behind tractor
Here are some reviews from people who have already used this unit:
Gennady:
“When choosing between a disk and a reversible hiller, it is better to take a disk one. It is a little more expensive, but it works more stably and does not cut potato tubers. Based on practice, the rows are not always planted equally, and sooner or later you will hit some bush. But if you plant through a potato planter, I think there shouldn’t be any problems.”
Dmitriy:
“If you look at which hiller is better, then there is no definite answer, each is good in its own way. It is better to use the disk one until the potatoes have sprouted, or in the early stages of growth. It makes small lumps of soil, thereby saturating it with oxygen. After this, active growth of tubers occurs, and usually the next day sprouts are already visible from the ground. And with the current climate: plus 30 °C and no rain, this is what is needed. And the return one can already be used when the potatoes have grown and gained strength, without fear of damaging them.”
How to make a rotary plow for a walk-behind tractor with your own hands
This model is completely different from all other plow models. This rotary plow for a walk-behind tractor includes several curved shares mounted on one axis. During operation, the plow axis rotates from the power take-off shaft of the walk-behind tractor and turns over the soil.
A rotary plow connected to a walk-behind tractor cultivates the soil to a depth of 25-30 cm with little physical effort from the worker.
Working with a walk-behind tractor equipped with a rotary plow is easier than with a conventional plow, as it allows movement not only along straight lines, but also along curves, which makes it easier to process areas with complex geometry.
Nowadays, many farmers are debating how effective the rotary plow is, but it is increasingly gaining popularity among summer residents when cultivating rooted and overgrown soil.
Features of work
Attachments make it possible to expand the scope of application of the Salyut walk-behind tractor. You can effectively carry out absolutely all the work typical of rural areas. Undoubtedly, before starting work you will have to thoroughly understand the instructions, because the effectiveness of the equipment is, first of all, the correct settings and adjustments.
Rotary plow
Using a rotary plow, which has left and right multi-directional plows in its design, you can plow in forward and reverse directions. For the most effective work, it is better to choose a model with a plow adjustment, that is, the ability to adjust the cutting depth and tilt angle.
Plow installation:
- depress the pedal;
- fix the stand;
- after that the entire structure is rotated 90°.
Zykov's plow
Zykov's plow is significantly different in appearance from other models. The video review clearly shows that its main differences are carefully selected angles and a completely different profile of the plow-mold surface, which makes it possible to better paint the soil and turn over the layer. Such plowing almost completely eliminates weeds.
Here is a review of plowing with a Zykov reverse plow on a Salyut walk-behind tractor
Double sided plow
A double-sided plow (hiller) is used for hilling agricultural crops and destroying weeds. This device is used to cultivate the soil and cut a furrow for planting plants. Subsequent backfilling is done by turning on the walk-behind tractor in reverse. The units are distinguished with variable and constant working width.
A device with a non-adjustable width works in conjunction with a lightweight walk-behind tractor; 12 mm racks reliably protect it from overload. The most widespread are hillers with variable widths that can be adjusted. Such plows work perfectly in combination with Salyut 5DK walk-behind tractors. However, they have one drawback - the soil crumbles after passing.
Dutch hiller
Less known is the Dutch hiller, which forms narrow wedge-shaped furrows due to the movement of its wings not only to the sides, but also upwards. The formed bed ensures better contact of the planting material with the soil. Structurally simple, easy to manufacture, cheaper in cost.
Disc dipper
The disc hiller is much more productive, but its price is 3-4 times higher than usual. However, according to reviews, owners do not return to their previous devices after working with a disk hiller.
The Salyut walk-behind tractor with a Japanese engine is the most successful choice of agricultural equipment in terms of a combination of proven quality and reasonable price.