A level is a fairly common tool. It is also called “level”. It performs a number of important tasks. It is used in many areas.
The level is used by topographers, designers, builders and surveyors. It is also actively used by professional and home craftsmen when carrying out repair work. In terms of construction, the “level” is very simple. It is a device for measuring height differences.
Not everyone knows how to work with a level correctly. Some home craftsmen decide to determine the height difference by eye. But this is inaccurate and can lead to serious problems during the construction or renovation process. Professional craftsmen often use laser types. They are more modern and have high accuracy. But they are more expensive than optical analogues. It is important to be able to use different tools, understand their operating principles and features.
So let's assume we have:
- You, with a phone, a calculator, or at worst with a notepad and pencil.
- Optical level (preferably with a compensator, which will greatly facilitate the work process).
- Tripod.
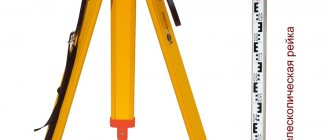
- One or two leveling rods (the pattern on them can be either checkered (black and red stripes) or in the form of a ruler; if the distance to the standing points is short, this is not critical for us).
- An assistant who understands your commands (you can use walkie-talkies to save your vocal cords).
What we need:
In a general sense, any action with a level is a transfer of elevation marks. Using a point with a known height, we determine the instrument horizon (HI) - the height of the instrument’s sighting beam (the horizontal line along which our gaze goes when we look into the instrument) above the conditional “zero”.
GI = the ground mark known to you in advance at a certain point (benchmark, finished floor mark, etc.) + counting on the leveling rod (if anything, both black strokes and red strokes, and the spaces between them on the leveling rod have the same height 1 cm)
If we want to determine a mark at any other point with an unknown height, we place a staff on it (of course, maintaining its vertical position), and subtract the reading on the staff from the horizon value of the instrument. Voila! The altitude is now known to us.
Level device, preparation for work
Classic models of optical instruments consist of two main parts indicated in Figure 1 by numbers:
- The lower or stand (1) has three lifting screws (9), which are used to bring the vertical axis of the level to a vertical position. To do this, adjust the round bubble level (7) using the lifting screws. There are two circles on it - large and small. The bubble should take a position strictly in the center of the small circle.
- The upper part with the telescope (2) rotates freely 360 degrees and is equipped with the following adjustment screws:
- guiding (5) – to search for a staff or an object that replaces it;
- fastening (4) – to fix the rotation of the tool;
- sharpness adjustment screw - otherwise ratchet (6);
- elevation (3) – to adjust the contact cylindrical level, which sets the visual axis of the pipe to a horizontal position.
The rear sight (10) and the front sight (11) are used to guide the pipe.
Figure 1 — Level device
Through the eyepiece of the tube, a contact image of the halves of the cylindrical level bubble is visible. When the halves come together, the horizontal level will be adjusted. Through the tube we also see a horizontal sighting line, along which readings are taken along the geodetic staff. Some instrument models may have a reticle. The device is ready for use if all its levels are adjusted.
Older models (NV-1) have two levels:
- cylindrical on a stand;
- a contact cylindrical level with a telescope, which is visible in the eyepiece of the telescope.
Later models were produced with a self-aligning line of sight. In them it is enough to adjust only the lower cylindrical level.
Let's look at an example of setting out the height at one of the points.
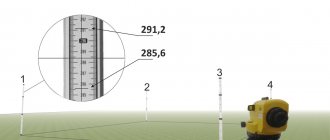
You, standing behind the device, aim at a staff standing on a benchmark with a known altitude mark. Let's say +148.900. The count on the staff at this point was 1.100, respectively, adding up, we get +150.000 - our Tool Horizon (do not forget that the device must be properly initially leveled and motionless during the work process). Let's say we want to set the elevation H=149.600. By simple calculations, we find the reading that should be on the staff: 150.000–149.600 = 0.400. We inform the assistant about this information and he moves the staff vertically until the reading of 0.400 is in the crosshairs of the level’s grid of threads. We stop the assistant with a confident shout and watch as he fixes the height of the point. When working on the ground, in a field, or at a summer cottage, it is most convenient to use cut reinforcement of a small cross-section as a beacon/benchmark. On it, for example, our elevation mark will be marked with multi-colored tape. It would also be useful to designate our fixed point by wrapping a signal tape around it, or by building something like a pyramid from scrap materials.
With these simple operations we mastered the level! :)
How to use a laser level
Taking measurements with a laser level is easy. But before using it, you need to study the instructions. It is supplied with each device by the manufacturer.
How to measure distance
Distance
Most models of levels of this type are equipped with rangefinders. This allows you to build a plane and calculate the distance automatically. If you don't have a rangefinder, you'll have to use a tape measure.
Use for flooring
A laser level is used when installing floor joists. It is enough to start the device. A zero level will appear around the perimeter.
Application when working with walls
A laser level can be used to control the process of laying a brick wall, installing a shelf, or a lighting fixture. It is also used to level railings on stairs. The list of works for which the level will be useful is wide. The device allows you to accurately determine the position of an object relative to a plane.
Error of laser levels
High precision laser tool. But it is better to check its accuracy before use. There are different methods for this. The easiest way to do this is in a small room that you can measure yourself by hand. This will allow us to correlate both results and clarify the calculations.
Error check
The laser level is placed in the center of two walls and turned on. The location of the laser cross is marked on the wall. Next, the device is rotated 180 degrees. Make a note on the wall. Then you need to move the level to any of the walls and install it at a distance of 70 cm. Make the same marks. Measure the distance between the marked points. Subtract one distance from another. Compare the obtained result with the specified accuracy. If the data does not exceed the accuracy specified in the manual, then the laser device is working correctly.
Video instructions for working with a laser level
Determination of benchmark and key points
During a geodetic study of a construction site, the benchmark is placed at the lowest point of the plane, which is determined visually or by a cursory “shoot”. At this point, a massive pole with a straight cut is driven into the ground, on which it is convenient to install a rail.
The number and location of key points depends on the leveling tasks. If we are talking about preparing a foundation pit, the points are placed on the internal and external corners along the contour of the future structure. When placing control points, high precision is not required; it is only important that there are no local bumps or holes in the place where the stakes are installed.
Within the boundaries of a populated area there are special, measured and officially approved reference points for reference to them when measuring new construction sites.
All points should be as equidistant as possible from the level installation site and be at least 5 meters away from it. If you are leveling a small area, you can use a level to shoot all the points from the side, or use a hydrostatic level.
Device selection
Before purchasing a level, consider how often you will use it. For home use, for example, in order to hang a picture, you do not need self-leveling professional models with many functions. When purchasing a device, we advise you to focus on several points:
- Measurement errors.
- The distance the beam can reach.
- Working hours.
- Is it possible to self-level?
- At what temperatures does the device function normally?
- Equipment.
- The quality of the material from which the level is made.
Types of levels
Currently, you can find various types of levels on sale, which differ in their characteristics. Depending on the accuracy of such devices, they are usually divided into three categories:
- Technical, the error of which can reach 10 millimeters.
- Accurate - with an error of no more than 2 millimeters.
- Highly accurate - with a permissible error of 0.5 millimeters.
Until the recent past, optical levels were in demand, but today the most popular are measuring instruments that are built on electronic and laser technology.
Laser levels are compact in size, and using such a device does not require any professional skills. Today, such devices are most popular in construction , where they can be used to calculate the horizontality of even small-sized surfaces. Laser models are capable of drawing a luminous, clear line, the presence of which makes it possible to visually establish existing deviations from the horizontal, which greatly simplifies the necessary calculations.
Optical instruments use a special design of numerous lenses, which allows you to build the most accurate image, obtaining data on the horizontal surface. This measuring device is simple in design and easy to use. It consists of the following elements:
- Telescope.
- Stands.
- Round level.
- Tripod or tripod.
The essence and specifics of leveling
There are many ways to determine the curvature of the earth's surface: by the slightest difference in atmospheric pressure, using a theodolite or water level and other devices. However, geometric leveling is considered the most universal, fast and accurate method: even with technical levels used in construction, the measurement error is only 10 mm per km.
The essence of leveling is to determine the difference in height (excess) of each of a set of points on the ground relative to a certain reference point, called a benchmark in construction. After the virtual plane has been determined, a zero mark is measured relative to it, which in most cases lies at the floor level of the first floor of the building.
In principle, there is nothing complicated in leveling except for two specific points. On the one hand, the surveyor and his partner must be able to use a level and a staff, know the finer points of adjustment and correctly install control posts. Another nuance is that there may be objects on the ground that prevent visual contact between the level and the staff. Therefore, the installation site of the level has to be periodically moved, determining temporary reference points and establishing the height difference for them. But in the end, all calculations come down to banal arithmetic.
optical level bosch gol20, gol26, gol32
The working range of the Bosch GOL optical level is within 100 m. The device is widely used by real professionals when checking heights, creating slopes, and constructing engineering structures. The telescope included in the model guarantees 20x image magnification. The device body is made of a special duralumin alloy, which protects against impact damage and prevents corrosion. The Bosch GOL optical level belongs to the class of high-precision instruments, since the absolute error in measurements is minimal and amounts to ±1.6 mm per 1 km. Such outstanding results were achieved thanks to the introduction of modern knowledge from the field of geodetic instrumentation. The shortest focal length does not exceed 0.3 m. The model is equipped with a horizontal circle with clear graduations and a pentaprism to control the circular level. The lens with a diameter of 36 mm is protected by a rubber cover from the negative effects of sunlight and rain. It is also worth noting that there are endless aiming screws on both sides of the device.
Move a mark
Let's figure out how to move the elevation mark using a level. For example, we need to make a benchmark, based on which the excavator operator will dig a pit, two meters deep below the floor level of the building. The value of the floor height is what we need to indicate to the excavator operator.
We install the rail at the reference design point, the height of which corresponds to the design height of the building’s floor, that is, zero, and take a reference. When developing a project independently or when linking an existing project to the area, the height of this point is set using a peg or a mark is placed on some fixed surface (brick fence, tree, pole, etc.).
Or such benchmarks (marks) are set by a surveyor accompanying the construction site. Let, for example, it turn out to be 162.
Directly at the site of the future pit, we drive in a peg and, placing the rail close to it, again take the value, let it be equal to 179. The difference will be 17 centimeters. We set aside 17 cm from the bottom of the batten up the peg, mark the value with a marker or pencil. By driving another peg nearby so that its top coincides with the notch, we get a clearly visible landmark, after which the peg with the notch can be removed.
Advice
. If any height value needs to be preserved for a long time, it should be securely fixed by driving a nail or marking it with waterproof paint. To do this, draw two horizontal lines, with a small (a couple of millimeters) gap between them. It is this interval that must correspond to the height mark.
Settings
To level the level, you need to rotate it so that one lifting screw is on the front of the device, and the other two are on the left and right. The air bubble should be on the central axis of the level mark. To do this, the side screws are rotated in opposite directions. To move the air bubble in the vertical level of the device, the screw on the front must also be rotated. When setting the next bubble level, you should control the previous one.
Photo: using an optical level
When the air bubble is set to the “zero point”, the level should be rotated 180° and make sure that the bubble remains in the same place. If it has moved, it should be adjusted again with two screws and a hex wrench according to the instructions.
Types of levels and where they are used
Options for using the level:
Some readers ignorant of construction may ask the question of how a level differs from a laser level. Levels are more versatile tools that can not only project a point, but also perform circular leveling at an angle to a given plane. However, in some laser models, when tilted, it begins to squeak unpleasantly, swearing that the plane is broken, however, this does not prevent the level from doing its job adequately. These self-leveling laser levels will be the best choice for a person who is involved in laying slabs and inclined structures. Today, two types of these devices can be distinguished: optical and laser. Let's look at how to use each type of level.
Learning to use a level to level surfaces
Let's start preparing
Let's get started: how to use a laser level for various purposes
Choosing a good device
We maintain safety and provide care
Construction or repair can be greatly simplified if you know how to use a laser level - the video lesson in our article and a detailed description of the process will help. Let's say right away that this device will help you achieve maximum accuracy when measuring both horizontal and vertical surfaces.
The operating principle of the level. Installation of the device
The principle of operation of the level is extremely simple: the optical axis of the device is located strictly horizontally and does not deviate when the device is rotated, being constantly in the same horizontal plane.
Let's take a closer look at how this quality can be used in practice.
We begin work by installing the device. We extend it and install the tripod. When working on soft soil, we press the points that end the “legs” of the tripod into it.
By adjusting the length of the “legs”, we set the tripod to a convenient height for work, trying to ensure that its upper platform, where the level is placed, is horizontal.
We remove the level from the protective case and install it on a tripod, securing it with the tripod screw.
Now you need to align the level so that its optical axis is strictly horizontal. For this purpose, the tool is equipped with a round bubble level located on the frame. By rotating the verniers on the legs of the device, we position the air bubble strictly in the center of the level (see Fig. 1).
Now, no matter how we rotate the device tube, the optical axis will be located horizontally.
Working with a level at a construction site
Level Bosch GLL 3-80 Professional and other popular models
Today there are many devices that are designed to take measurements on the ground or indoors. Some of them are more effective, which is achieved due to the quality of the ingredients. Let's consider which devices of this type are worth purchasing.
The most functional device is considered to be the laser level GLL 3-80 Professional, produced by the famous German company Bosch. A similar device is used indoors. The error of the device is extremely small. Deviations are practically not observed even at a distance of up to 10 m. It is worth saying that there are special receivers with which you can increase the range of the instrument to 60 m.
Laser level GLL 3-80 Professional is the most functional device
The device is powered by batteries. If you use the device without interruptions, the charge will last only 4 hours. Therefore, it is worthwhile to provide additional sets of batteries in advance. This tool is equipped with a holder, thanks to which its location can be adjusted.
The GLL 3-80 Professional level can be used for economic and professional purposes. There are special magnetic type holders on the tool body. Among other things, the device has an automatic adjustment function, which allows for its alignment.
Among the optical levels, it is worth highlighting the H-05 level, which belongs to the high-precision category. This device is professional; it is intended for calculating the difference between points when performing various engineering and geodetic works. When using such a device, you should understand that it requires certain knowledge and skills from the operator. To operate the device, you need a special staff equipped with a half-centimeter scale.
It is worth highlighting several companies that produce reliable and durable equipment. For example, on the modern market you can often find various models of levels manufactured by DeWALT. Stabila also sells high-quality devices.
Devices manufactured by DeWALT are of excellent quality.
Types of levels, their purpose
Levels are divided into subgroups according to two indicators: measurement accuracy and operating principle. According to the first parameter, the following varieties are distinguished:
- highly accurate. The error in measurements is 0.2-0.5 mm per 1 km. dv. progress;
- accurate. The error in measurements is 0.5-2.0 mm per 1 km. dv. progress;
- technical. The error in measurements is 2-10 mm per 1 km. dv. progress;
To mark the terrain, determine differences in relief and make reference to specific points, the simplest products with low accuracy are suitable. PHOTO: stroibloger.com
During the work at each stage, it is important to accurately record the device data in order to eliminate possible errors. Based on the operating principle, products are divided into:
- geometric _ The sighting beam is emitted, the level is brought to a horizontal position, which makes it possible to measure the difference in the location of the points. Points must be marked on the territory using special slats. Such leveling can be simple or complex (carried out from 1 or more points that change sequentially);
- trigonometric . Devices called theodolites are indispensable when measuring permissible inclination levels. The distance and inclination are measured between the device and the control point, and then the required value is calculated using the formula;
- hydrostatic . Devices that consist of two communicating vessels. In them, the difference in heights at various elevations is determined by the liquid level. Such vessels, which are connected to each other using a hose or sleeve, are installed at control marks. The technique is quite accurate, but is limited in distance by the length of the sleeve or hose;
- optical-mechanical . Devices that make it possible to determine the parameters of points using a light beam and special slats. The devices are equipped with an optical tube to make visual observations. To make measurements with such a device, special skills and abilities are required;
- laser _ Precision devices that project a narrow beam using a laser onto various surfaces. Such products are easy to use and make it possible to work with both points and planes;
- digital . Laser or optical products that display the received data in digital form will store it and, in some cases, partially analyze it. The devices are highly accurate and make it possible not to require the help of an assistant. However, they are expensive and susceptible to mechanical damage.
PHOTO:
Levels can be used for various tasks where it is necessary to ideally exactly correlate the position of two points relative to each other horizontally or vertically. For example, the level of inclination of the building relative to its foundation.
How to use an optical level when building a foundation
To know how to operate the level, you must follow a certain sequence of actions. Work algorithm:
- The product is installed in such a way that all corners of the base can be clearly seen in a fairly narrow field of view (90° or less). This will make it possible to prevent errors in measurements.
- With an assistant holding the rod, the outer corners are “shot” and their height is recorded.
- The height of the others is subtracted from the height of the highest corner and the difference is recorded - this will become the thickness of the bulk layer.
- With the help of building materials, all points of the foundation are brought to the same level.
- The cord is stretched horizontally, steel spacers are placed between the bed and the base.
- To roughly fit the strap to the lace, linings are placed in the required place.
These are the main recommendations when operating with the device at various stages of building construction.