Polystyrene foam is a good heat insulator, characterized by durability and low weight. It is used to create a variety of shapes, blanks and models, as an excellent insulation material. It's quite easy to work with. But often such material is produced in the form of blocks with large geometric parameters. Cutting them with a saw or knife is very inconvenient. Products crumble, which disrupts their structure.
The problem of cutting thermal insulation material is solved by a foam cutter, often called a cutter. You can purchase it at a hardware store or make it yourself. In the second case, the home master gets at his disposal a tool that suits him in all respects.
The simplest tool for cutting sheets of foam plastic (foamed polystyrene) can be made without the slightest difficulty using 4-5 flashlight batteries and an ordinary guitar string. The process for creating a carver will be as follows:
- the batteries are connected in series to form one unit;
- A guitar string is attached to the ends of the resulting module.
As a result of these actions, a tool with an electric closed arc is obtained. The current passing through it will heat up the string. In the area of its contact with the material being cut, the process of melting and cutting of the polystyrene foam sheet into two parts will be observed.
For the described homemade thermal knife to work, the string must be heated to 130–150 °C. With this simple tool you can cut 1-3 blocks of foam. It is not advisable to use it for cutting a large number of sheets because the batteries will run out very quickly.
If a master uses foam plastic regularly and performs large volumes of work, it is advisable for him to make a tool with his own hands that operates from a household electrical network. Such homemade thermal knives, which do not require separate chargers, are used for:
- linear cutting;
- figured cutting.
They use a nichrome thread or a metal plate as a working thermoelement. A mandatory unit of such devices is a transformer that reduces the voltage (Figure 1). Its windings must meet the following requirements:
- cable cross-section – from 1.5 mm;
- voltage - from 100 V (primary winding), 15 V (secondary).
Experts recommend connecting the step-down device to an autotransformer (LATR), which allows you to smoothly adjust the output voltage. If you don’t want to purchase such an expensive device, you can do otherwise:
- place a switch on the secondary winding taps;
- equip the step-down transformer with a rheostat.
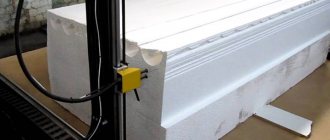
A homemade thermal knife for cutting flat sheets of expanded polystyrene foam is a simple design. The principle of its creation will be understood by any craftsman.
The basis of the structure is a frame made of steel profiles or wooden blocks. A working surface made of particle boards and thick plywood is mounted in its lower part. Some craftsmen use PCB sheets for its construction.
The function of a working surface can also be performed by a regular table or workbench. Then there is no need for a frame. And the process of constructing the structure itself is as follows:
- Two vertical supports are mounted on a table (another flat surface), which are secured with insulators.
- A transformer is connected to the latter through electrical contacts to reduce the voltage.
- Nichrome wire is stretched between the insulators. A special weight is suspended from it. It is needed to tension the thread.
This foam cutter operates simply. An electric current passes through the thread, heating it, which leads to stretching of the wire. The load does not allow the latter to sag.
The heated nichrome thread easily cuts the foam block horizontally, which is moved by hand. As a result, flat sheets of insulating material are obtained. Their thickness is determined by the distance separating the stretched wire from the working surface of the table.
When performing the described operation, it is important to ensure the supply of polystyrene foam at the most uniform speed possible.
In cases where the material needs to be cut vertically, the design of the cutter is slightly modified. The frame must be additionally equipped with a holder. Hang a nichrome thread and a weight from it, passing the latter through a hole pre-drilled in the table. It is advisable to install a hollow metal pipe in it, which will protect the master from burns when the wire is heated.
If you will be cutting at home sheets of foam plastic that are large in thickness or geometric dimensions and which do not fit on the work surface due to their parameters, it is recommended to make a thermal knife from a hacksaw or a hand jigsaw. The work is performed as follows:
- The cutting blade of the jigsaw (hacksaw) is removed.
- An electrical cable is connected to the handle of the tool.
- Nichrome wire is bent at a given angle.
- The figuratively bent thread is installed in the place where the canvas was previously located and secured with nuts and screws.
How to do it yourself
The need for a cutter can arise at any time if you do some household chores quite often. Perhaps someone has encountered the need to make a part using a special mold for casting with epoxy resin.
And to do this, you will need a piece of foam. For example, you can use foam from TV packaging. It is necessary to draw on it using a ruler, compass and ballpoint pen the places where holes will need to be made in the future.
This is where the need for an electric cutter comes into play. After all, it will be difficult to perform this action without spoiling the foam sheet without such a tool. Let's consider one of the options for how to make a device of this type at home.
A homemade cutting device can be of various designs. It is on it and the type of cutting that will depend on how exactly the cutter copes with its goals.
Before you start making a cutter, you should decide for what purpose you need it, because depending on the purposes, they are divided into several groups:
- with metal work plate;
- for linear cutting;
- for shape cutting.
conclusions
Making a foam cutter with your own hands is quite simple. The methods listed above will help you understand the structure and operating principle of the foam cutter. Such devices are practical and easy to assemble. Each method has its own advantages, so home craftsmen can choose the most suitable one, depending on the available materials.
It is important to exercise extreme caution when working with such power tools. This poses a risk of electric shock. Some homemade cutters are also used for cutting polystyrene foam.
Some homemade cutters are also used for cutting polystyrene foam.
(No ratings yet)
Stages of creation
Since linear cutting is the most common, let's look at this option in more detail:
- Cutting part. To do this you will need nichrome wire, approximately a spiral with a diameter of 0.6 mm. It can be taken from old electric stoves or other heating electrical appliances. The length of such a wire should be 14 cm (its resistance will be 2 ohms).
- Transformer application. For everything to be correct, the first step is to calculate the voltage and current for heating the cutting part. This can be done using the formula - Ohm's law I=U/R. Thus, you can determine the power of the power transformer.
- Making a cutter. The base can be made of any metal, but its length must be at least 11 cm. Next, an insulator - a PCB plate - must be attached to the end. Now fasten the contact groups along the edges of the plate; they can be removed from the electrical outlet. It is into these contacts that it will be possible to attach spirals of different shapes.
- How does the cutter work? After the cutter is plugged in, the wire will heat up and become slightly reddish in color. This is exactly what matters, since a heated cutter will make it possible to easily and quickly cut the foam, which will not peel off.
Features of work
While learning how to make a manual foam cutter yourself, it is also necessary to consider the operating features of such equipment. As mentioned above, such an instrument has a string. It heats up and melts the surface of the foam.
This material reacts quite poorly to heat.
Therefore, it is important to maintain the technology of the entire process. Cutting with a hot thread is quick
This allows you to achieve high quality cuts.
It's easy to check the string's heating level. To do this, a test is carried out on a test piece of polystyrene foam. If, when immersing the thread, long pieces of material remain on it, it has not yet warmed up enough. If there is no foam on the string at all, then the temperature is too high. In this case, you will have to cool the instrument a little. With proper heating, you can perform fast, accurate cutting.
Step-by-step production of a thermal cutter
You can make a thermal cutter using a burner or soldering iron and an old jigsaw. Let's consider the manufacture of such a device step by step:
- Sleeve. Initially, you need to make the main and most difficult thing - the bushing. So, to do this, the plate must be bent and turned. Next, you need to make a hole in the sleeve; the thread will be inserted there in the future.
- Burner. You need to cut off the wire that leads to the hole, take suitable connectors, and then solder them to the break point.
- After everything is done, you can connect the thermal cutter. Cut an old jigsaw in half. A pre-prepared claw plate must be attached to the upper part with screws. But we attach the bottom to the base using self-tapping screws.
- Insert the sleeve into the foot. Now, with special attention, you need to use a plumb line or a square to mark the point under the hole of the sleeve from the hole. Next, drill a hole in the base. The diameter of the hole in the base should be about 5 mm.
- Thermal cutting machine So, when everything is ready, you need to straighten the nichrome wire. To do this, you should turn on the burner at full power and touch the nichrome with the wires from it. Everything must be done in such a way that there is a distance between the wires equal to the height of the device. If the thread does not heat up, but the burner begins to hum, find a thinner wire. This is necessary because the one you selected does not have enough resistance.
- Operation of the device. With a pre-installed guide, you need to cut foam dies to a given thickness, or you can make the shape curly.
Cold floor sources
The culprits of such discomfort:
- First of all, the foundation may be improperly insulated or not at all insulated. The foundation is the basis of the structure and its correct laying affects not only the floor covering, but also the entire structure;
- the boards used for the flooring are not tightly fitted to each other, which causes drafts;
- installing the floor itself too close or below the foundation level;
- a thin layer of insulating material.
All this leads to the active development of these factors. You should not lose sight of any bark beetles that are not averse to feasting on wood, thereby causing irreparable damage to the wooden structure.
Application
If you are making repairs or doing wood cutting, or you need to cut a piece of plywood, then an electric cutter will be very useful for you, which can also be used even for cutting thick fabric.
If you think that for all of the above actions you will only need to use a thermal knife, or a hacksaw will suffice, then you are mistaken.
After all, a hacksaw will not make the edges smooth and not torn, as is the case with a cutter.
Polystyrene foam is a universal and common material that has a large number of useful properties. For example, its excellent thermal insulation properties are known to many (especially for construction workers), which, coupled with accessibility and environmental friendliness, makes this material virtually no alternative and irreplaceable.
Polystyrene foam is supplied in the form of standard blanks - large slabs. For this reason, a thermal knife for foam plastic is a necessary tool, since manual processing of foam plastic in the vast majority of cases threatens to damage the structure of the material, which is fundamentally undesirable.
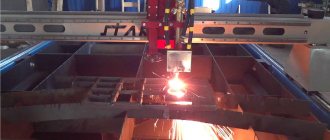
What is the difference between finished products
This is explained by the same principle of operation of any metal laser cutter, which is as follows:
Working principle of laser cutting
- During the cutting procedure, the laser acts on the metal surface in such a way that an oxidizing agent is formed on it, which increases the energy absorption coefficient.
- The powerful radiation causes the material to heat up.
- At the point of contact of the laser beam with the metal, a very high temperature is created, leading to the melting of the metal surface.
The difference in the operation of a factory cutter and a homemade laser cutter lies in their power, and, accordingly, in the depth of the laser cut into the metal surface. Thus, factory models are equipped with high-quality materials, which ensures sufficient depth. Homemade cutters can cut only 1-3 cm.
What is a foam cutter?
A foam cutter is a special device that allows you to give a certain shape and dimensions to future products made from this material. The tool is useful because cutting foam plastic is carried out without unnecessary effort on the part of a person, which eliminates any unevenness or roughness on its surface. In this case, you will not need to search for and purchase special polystyrene foam, since foam plastic from any household appliance (refrigerator, TV, washing machine), which is supplied with it in the vast majority of cases, will be suitable.
Advantages and disadvantages
Thanks to the thermal knife, the creation of multilayer products is greatly simplified.
Its advantages for needlework are obvious:
- No need to use candles or scissors.
- The cuts are obtained without soot.
- High cutting speed increases.
- The ability to neatly join the edges of the material.
- Comfortable to work both sitting and standing.
- Backlight,
- Ruler for cutting cut calculations,
- Uneven temperature conditions in different areas.
Disadvantages include:
- Electricity costs.
- Unpleasant odor from materials such as brocade, organza, plastic, which provokes coughing.
- Lack of quality certificates for many models for home use.
Homemade foam cutter: types
Before you start making your own cutter for cutting foam plastic, you must first decide on its type. Currently, there are three main types:
- intended for figure cutting;
- equipped with a metal working plate;
- designed for linear cutting.
Each of these types is tailored for specific methods of cutting sheets. However, line cutting is the most popular method as it is versatile and quite practical.
Construction stages
If we consider the option of a cutter for linear cutting, then there are three main stages of creation:
- To make the main cutting part, you will need a special nichrome wire, the diameter of which should be 0.6 mm. Its length must be at least 14 cm, so its resistance will be equal to two ohms. Finding it will not be difficult, since old heating devices and electric stoves contain it in large quantities.
Regulated power supply circuit
- In order for a homemade device to work without any problems or complaints, you should calculate the current and voltage required to heat the cutting part. The transformer power can be determined based on the standard formula (I=U/R).
- The length of the metal for the cutter must be at least eleven centimeters, and the choice of metal is not fundamental (absolutely any type can be used). At the end you need to connect a textolite plate, which will serve as an insulator. After this, you need to secure the contact groups taken from a standard electrical outlet along the edges of the plate. It will be possible to install spirals of different shapes into these contacts.
A self-made cutter must be connected to an electrical outlet. After this, the device’s coil will gradually heat up, as evidenced by its red color. It is at this moment that the foam processing process should be carried out, since the heated cutter will eliminate the deformation of the foam and will not allow it to peel off.
Homemade linear cutting cutter
Important! To minimize and completely eliminate the risk of injury, it is necessary to adhere to safety precautions when working with this equipment, since the power of this tool is quite sufficient to damage any part of the body.
Foam cutting machine based on a computer power supply
Not all home craftsmen have a transformer lying around in their bins, but many have a power supply from an old computer lying around gathering dust. It's good that you didn't throw it away. It will come in handy to make a thermal cutter for foam plastic.
OnlyOnUser
I assembled a foam cutter for 3 kopecks. I used the power supply from the computer and everything that was lying around at the construction site - boards, slats, screws. I made the string by stretching a spiral from an electric stove. The length of the spiral is 10 cm. It produces a straight wire 60 cm long and 0.5 mm in diameter. The issue price is 45 rubles. The string tensioner is a hammer. I assembled the device using self-tapping screws. I energized the string by connecting to it the yellow wire of the 12-volt power supply and the common black wire.
wind1windSuper Moderator
To start an ATX computer power supply, connect the green PS-ON pin with a jumper to GND (common wire). The photo below shows the pinout of the 20-pin connector on the motherboard. On the power supply block these outputs are mirrored.
Step-by-step production of a thermal cutter from improvised materials
When making electric tools for cutting foam, you can use a variety of elements and devices. For example, a thermal knife can be made from a soldering iron, a burner and/or an old (unnecessary) jigsaw. Let's look at the five main steps required to do this:
- First you need to make a bushing - a basic and complex element in its structure. The taken plate needs to be bent and turned, then carefully drill a hole into which the thread will be inserted.
- After this, you need to remove the wire leading to the hole, and then find suitable connectors and carefully solder them into the gap area. It is important that all further work using the finished cutter is carried out with insulated wires.
- After that, we connect the thermal cutter. The old jigsaw needs to be cut into two parts. In its upper part we install a claw plate on the screws, which had to be prepared in advance. And using self-tapping screws we connect the lower part to the base.
- Insert the sleeve into the foot. We mark the point under the hole of the sleeve from the hole using a square (or a plumb line). We make a hole in the base with a diameter of 5 mm.
- Straighten the nichrome wire. First, turn on the burner at full power and touch the nichrome wire with its wires. It is important that the distance between the wires is equal to the height of the device. At the same time, if the device hums or makes strange sounds, and the thread does not heat up (this is a consequence of insufficient resistance), then you should find a wire of thinner thickness.
Cutting material using a hot tool
To cut a sheet of foam plastic, you can use the most ordinary knife, if you first prepare it for this procedure:
- You need to make sure that the length of the knife is greater than the thickness of the sheet that will need to be cut.
- Next, you need to mark the lines on the sheet along which it will need to be cut.
- The next step is to heat the knife using a gas stove or a special gas burner. Carefully draw a hot knife along the intended line; the foam will begin to melt and cut clearly along the line.
It is important to consider that it is not possible to achieve a perfectly even cut using this method, and it is also only suitable for cutting small pieces of material. The fact is that even slightly shaking hands will not allow you to achieve a straight line, and a constantly cooling knife will not allow you to make a neat and long cut.
But if your goal is to cut off a small piece, then a hot knife will allow you to do this very quickly and without wasting extra money and time. Please note that after cutting, the knife should never be used in the kitchen or at home, as the foam contains toxic substances.
Knife
A simple soldering iron cutter
If you need to make quite a lot of foam blanks, but don’t want to make an overly complex cutter, then you can use its simple analogue, which works on the basis of a regular soldering iron.
It is important to choose a soldering iron that is not too powerful, since its temperature is excessive for normal sheet cutting. If the power is too high, the foam will smoke a lot, smoke, and be difficult to cut.
The next step will be to select and install a nozzle on the tip of the soldering iron, since the standard tip is in no way intended for these purposes. We need to find or make our own long and flat tip, which will look like a small knife blade, but less sharp. Copper wire folded several times is good for making such an item. Another option is to simply take out the tip of the soldering iron and shape it into the desired shape.
Next, the tip is tightly fixed to the tip of the soldering iron and you can start cutting.
The soldering iron is inserted into a socket, heats up and cuts the foam using a similar principle to a hot knife. The main advantage of this method is that there is no need to constantly heat the knife; cutting can continue continuously.
Soldering iron cutter
Unconventional cutting method - nichrome thread
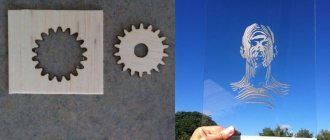
All the methods presented above allow us to process polystyrene foam exclusively in a straight, even line. In situations where you need to make an unusual shape, a semicircle or a zigzag, you can use unconventional methods. For example, nichrome thread. With its help, you will learn how to cut foam plastic so that it does not crumble, with minimal time and physical costs.
First, you will need to do some preparatory work to assemble the necessary equipment. So, you should make sure you have a small spring, a 24-volt transformer and nichrome wire. The working surface of the table is set at an angle from 20 to 60 degrees. We stretch the wire across the table. We fix the ends of the wire on each side of the table with a spring.
No garbage, everything happens very quickly and without unnecessary movements. The only difficulty is assembling the necessary equipment, since not everyone has transformers.
Thus, there is nothing overly complicated about how and how to cut polystyrene foam at home. Even with an ordinary knife you can perform all the necessary operations. If you purchase better equipment, the processing process will take a minimum of time, without additional effort, noise and debris.