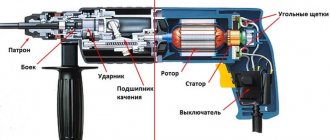
Modern drills use two main types of chucks, which differ in the way the drill is secured. The first type includes key cartridges. This design allows you to fix the drill using a special key, which rotates the adjusting ring clockwise until the element is completely fixed. The second type includes quick-release chucks. The design allows you to replace and fix drills manually. This is very convenient if you need to change the nozzle frequently. However, there are situations when difficulties arise when changing the drill in the chuck. In this case, a few useful recommendations on how to remove the drill from a drill without a key will not hurt. We will talk about this further.
Types and causes of drill jamming in an electric drill
There are several reasons why an electric drill may jam.
- Marriage
The most obvious reason for the breakdown is a manufacturing defect; this problem most often occurs in very cheap and low-quality drills. That is, tools from Bosch, Makita, Metabo, Interskol companies will be less likely to be defective. That is why such equipment is popular.
- Violations of the rules for using the tool
Even the most reliable tool can fail if used incorrectly. And here it doesn’t matter who the manufacturer is - the same Bosch or Makita are even more susceptible to breakdowns if operating rules are violated.
This reason is not tied to a specific brand or tool parameter, but some brands provide for this point and provide protection from an inexperienced user.
- Chuck malfunction
If the tool is used or stored incorrectly, the main part of the drill can easily break. This is a very common problem, but it cannot be called a marriage.
Attention! Most often, the device breaks down due to user negligence.
In the first two cases, it is most likely impossible to repair the instrument at home. In the case of the third problem, you can do everything yourself. But first you need to determine the type of cartridge.
For newbies
So, let's start with the simplest case - with inexperienced users. Screwdrivers have something called a torque regulator. It looks like a scale around the front of the screwdriver, which is right behind the chuck. There are numbers on it from 1 to 10, 15, 20 or even more - different for different models - and the last position on it is indicated in the form of a drill. If you rotate this regulator and set it opposite the special mark so that one of the numbers is next to it, then when a certain torque is reached, the cartridge will no longer rotate, but will begin to click. If you put it on a “drill”, then the screwdriver will try to twist with all its might, as much as the engine power allows it.
However, it is worth noting that with two-speed screwdrivers, at the second speed, even in the “drill” position, if the torque reaches a certain value, then a protective system is triggered, which simply turns off the current supply. At the very first speed, the screwdriver will also try to turn “to the last.”
And a beginner can start drilling or screwing screws, for example, when the torque regulator is set to one of the numbers, or the screwdriver is set to the second speed (and it is recommended to drill at it).
The drill can be clamped quite tightly, and as a result, when you start to release the drill or bit in the standard way (by turning on the reverse, holding the chuck and pressing the start button), either the torque limiter or the protective system may work.
Therefore, in such a situation, you just need to set the screwdriver to first speed and set the torque regulator to the “drill” position. On single-speed models, you only need to set the torque regulator to the “drill” position. Well, then again we unscrew it in the standard way.
Types of drill heads
Before you figure out how to remove a drill from a drill, you should understand what fastening mechanisms manufacturers use.
There are only two main types:
- Key or toothed
The key type is very reliable, but as the name suggests, a special key is needed to tighten it. It activates special cams that firmly fix the drill. This type is the most reliable, but the drill fastening time leaves much to be desired.
Gear chuck
- Quick-clamping
Quick-release sockets are keyless and are tightened by the user's manual efforts.
Keyless chucks are divided into two more types:
- Double coupling
It consists of two couplings, which means you need two free hands to fix it. One of the advantages is that such couplings are more reliable and require less effort for fastening.
Double coupling quick-release
- Single coupling
Single-coupling ones are much more convenient, since only one hand is used for fastening. This type of chuck ensures no backlash, but more force must be applied to tighten it.
Single coupling quick-release
How to release the keyless chuck
To release the double-clutch chuck, you need to turn the clutch so as not to break the ratchet. To do this, you need to use various plumbing products. keys, otherwise you will have to completely disassemble the drill and unscrew the head. This means that you need to unscrew the screws on the body and, remembering the location of the parts, go through the drill.
With a single-coupling structural element, the procedure does not change, that is, try to first unscrew it with the help of a plumber. key, and then simply disassemble the drill and remove the chuck, disassembling it.
If the drill is expensive, you need to make several cuts. Dirt that gets inside and causes the mechanisms to get stuck can also be a problem. It could be sand, soil with water or rust. In this case, you need to remove the insides of the drill and thoroughly clean it, and then start removing various pebbles and pieces of grass.
Note! It is better to film or record a video of all stages of disassembling the tool on your phone, as there is a chance of forgetting something or starting to pull out the wrong parts.
Rotating the double-sleeve chuck
Homemade tap for aluminum alloys
To create internal threads in brass or light alloy parts, you can use homemade tools and drills from a regular set. Calibrated steel wire will do. Using a die, an external thread is cut on it, after which the workpiece is hardened. After hardening, it is necessary to release the part to the color of ripe straw. The cutting edges are sharpened using a whetstone or sharpener, after first clamping the part into a collet chuck.
Video on how internal threads are cut:
How to use the filter on the website to select a drill bit for threading?
In the Metal Drills section, a filter with the “For thread” parameter has been implemented, thanks to which you can find the desired drill in literally 2 mouse clicks:
- Choosing a thread.
- Click “Apply”.
- We get suitable drills.
How to release the key chuck
The key cartridge is much easier to release. First, you should try to free the drill in the usual way, simply by increasing the handle of the key and asking for help.
If the part is jammed tightly, you need to sort out the drill, then remove the head and replace it with a new one. If the drill is expensive and you need to get it anyway, you should disassemble or saw the chuck itself.
You can also find dirt that has gotten into the drill and is preventing it from spinning. Then you need to remove all components and remove dirt from the cartridge.
How to spin a drill without a key
How to unscrew a drill without a key? Many people ask this question, especially when the key is lost, which happens quite often.
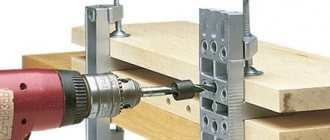
You need to get two screwdrivers: a Phillips and a flathead. The first step is to insert a Phillips screwdriver into the key hole and a flat-head screwdriver into the groove for the teeth. Then they pull the screwdriver in the direction of unwinding, and the Phillips acts as a lever. In this case, with a minimum of effort, you can unscrew the head and solve the problem of how to unscrew the drill without a key.
Unscrewing the key chuck
Diameter of threaded drill (table)
| Metric thread, M | |||
| Tap | Drill | Tap | Drill |
| 1.1 | 12.8 | ||
| M14x1 | 13 | ||
| M2x0.4 | 1.6 | M16x2 | 14 |
| M16x1.5 | 14.5 | ||
| M3x0.5 | 2.5 | 14.8 | |
| 2.9 | M16x1 | 15 | |
| M4x0.7 | 3.3 | M18x2.5 | 15.5 |
| M4x0.5 | 3.5 | M18x2 | 16 |
| M5x0.8 | 4.2 | M18x1.5 | 16.5 |
| M5x0.5 | 4.5 | M18x1 | 17 |
| M6x1 | 5 | M20x2.5 | 17.5 |
| M6x0.5 | 5.5 | M20x2 | 18 |
| M7x1 | 6 | M20x1.5 | 18.5 |
| M7x0.5 | 6.5 | M22x2.5 | 19.5 |
| 6.8 | M22x2 | 20 | |
| M8x1 | 7 | M22x1.5 | 20.5 |
| 7.2 | M24x3 | 21 | |
| M8x0.5 | 7.5 | M24x2 | 22 |
| 7.8 | M24x1.5 | 22.5 | |
| M9x1 | 8 | M27x3 | 24 |
| M10x1.5 | 8.5 | M27x2 | 25 |
| 8.8 | M27x1.5 | 25.5 | |
| M10x1 | 9 | M30x3.5 | 26.5 |
| M11x1.5 | 9.5 | M30x3 | 27 |
| 9.8 | M30x2 | 28 | |
| M11x1 | 10 | M30x1.5 | 28.5 |
| 10.2 | M33x3.5 | 29.5 | |
| M12x1.5 | 10.5 | M33x3 | 30 |
| 10.8 | M33x2 | 31 | |
| M12x1 | 11 | M33x1.5 | 31.5 |
| M14x2 | 12 | M36x4 | 32 |
| M14x1.5 | 12.5 | M42x4.5 | 37.5 |
| Pipe thread, G | |||
| Tap | Drill | Tap | Drill |
| G 1/8 | 8.8 | G 1 1/4 | 39.5 |
| G 1/4 | 11.8 | G 1 3/8 | 42 |
| G 3/8 | G 1 1/2 | 45.5 | |
| G 1/2 | 19 | G 2 | 57.5 |
| G 5/8 | 21 | G 2 1/4 | 63.5 |
| G 3/4 | 24.5 | G 2 1/2 | 72.5 |
| G 7/8 | G 2 3/4 | 78.5 | |
| G 1 | G 3 | 85.5 | |
| G 1 1/8 | 35.5 |
| Inch UNC thread | |||
| 1/4x20 | 5.1 | 7/8x9 | 19.5 |
| 5/16x18 | 6.5 | 1x8 | |
| 3/8x16 | 8 | 1 1/8x7 | 25 |
| 7/16x14 | 9.4 | 1 1/4x7 | |
| 1/2x13 | 10.8 | 1 3/8x6 | |
| 9/16x12 | 12.2 | 1 1/2x6 | 34 |
| 5/8x11 | 13.6 | 1 3/4x5 | 39.5 |
| 3/4x10 | 16.5 | 2x4 | 45 |
| Inch fine thread UNF | |||
| 1/4x28 | 5.5 | 3/4x16 | 17.5 |
| 5/16x24 | 6.9 | 7/8x14 | 20.5 |
| 3/8x24 | 8.5 | 1x12 | |
| 7/16x20 | 9.9 | 1 1/8x12 | 26.5 |
| 1/2x20 | 11.5 | 1 1/4x12 | |
| 9/16x18 | 12.9 | 1 3/8x12 | 33 |
| 5/8x18 | 14.5 | 1 1/2x12 | 36 |
| Trapezoidal thread Tr | ||
| Tr 8x1.5 | 6.6 | Tr 14x3 |
| Tr 10x1.5 | 8.6 | Tr 14x4 |
| Tr 10x2 | 8.2 | Tr 16x4 |
| Tr 10x3 | 7.5 | Tr 18x4 |
| Tr 12x2 | 10.2 | Tr 20x4 |
| Tr 12x3 | Tr 22x3 | |
| Tr 14x2 | 12.2 | Tr 22x5 |
To cut internal threads with a tap, you first need to drill a hole of a certain diameter. The table shows the most popular threads and drill diameters required for drilling holes for threads.
Using a vice
Coupling or quick-release elements can be unscrewed using a vice. To do this, firmly secure the vice, then tighten the coupling(s) into it.
If the drill is switchable and it is possible to turn it in the other direction, then start turning it slowly, increasing the power, and with a small probability the chuck may become wedged.
When the drill turns only in one direction, you need to wedge it manually, with your hands or a plumber. keys.
Note! You cannot immediately accelerate the drill to maximum speed, because there is a chance of breaking the vice or breaking the chuck.
Preparing for work
Proper preparation should be made before starting work. To determine whether a tool is ready to perform tasks, there are several conditions:
- When the drill is started using the power cord, it must be connected to the mains;
- If it operates using a battery, it must be connected and charged;
- A drill is inserted and fixed inside the drill.
To check the functionality of the drill, you need to click on the power button. If the chuck rotates fast enough, there is enough charge and you can start working. If it rotates very slowly, then the battery is discharged and needs to be recharged.
Using Spring Wire
The opposite problem can also happen when the drill bit gets stuck in the workpiece. In this case, unscrewing the drill is not too difficult, but problems may arise with the available tools. There are several steps you need to take:
- Use a welding machine to heat the stuck part.
- Make grooves at opposite ends.
- Place the spring wire into the spiral groove.
- Start twisting the stuck drill until it starts to unscrew itself.
- Start removing the drill.
It is worth noting that you need to take out the drill slowly and slowly, since the work requires precision.
In order to avoid getting into such situations and not wondering how to remove a drill from a stuck drill chuck, you need to use the tool according to the instructions and follow all the rules. Well, if such a situation happens, you can re-read the article again and no longer wonder: the drill is stuck in the drill, how to get it out.
Concrete accessories
The drill bit sizes for concrete hammer drills may vary. This indicator depends on the diameter of the hole you need to get. But all drills for stone, brick and similar coatings have a hard tip. It is made from a special alloy, which gives it higher characteristics. Drilling of such coatings occurs through impact-rotational motion.
If conventional bits have a cylinder-shaped shank, then the drill bit for a hammer drill comes in other shapes. To drill a small hole in a concrete surface, use an auger drill with a carbide tip. Large holes are cut using a crown with carbide teeth along the edges. Diamond-coated tools are also popular due to their durability.
For granite surfaces, it is customary to use nozzles based on Pobedit. This tool has different softness and is therefore suitable for different surfaces. For ceramic tiles, an excellent solution would be a spear-shaped drill with a tungsten or pobedit tip. For glass, it is recommended to use a crown with a special coating around the edges.