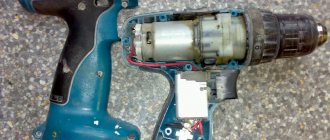
Cordless screwdrivers are powered by a battery, the service life of which is shorter than the life of the tool itself and the charger. If the battery is not charged to the rated voltage, the current output drops sharply, it does not hold the load, the engine stops working, and the tool does not turn on. The battery is the most expensive and important part. When an electric storage device fails, you should not rush to buy a new device; you can try to restore or replace it. Many users want to know how to replace batteries in a screwdriver with their own hands.
Types of batteries for screwdrivers
Almost all modern models of screwdrivers have the same battery pack design - elements connected in series into a single circuit. Their shape, dimensions and denomination are always the same. Together they create the final voltage of the device. The only difference between them is the capacity. This makes it easy to trim and replace such batteries.
As a rule, 3 main types of batteries are used:
- Nickel-cadmium.
The rating of each block is 1.2 volts. Their main advantages are as follows:
- Availability due to prevalence and low price.
- Resistance to negative ambient temperatures.
- Preservation of characteristics when stored in a discharged state.
Disadvantages are manifested in small capacity, as well as a number of factors such as:
- Presence of memory effect.
- Self-discharge.
- Small range of charge-discharge cycles.
In addition, due to the toxicity of the production cycle, this type of battery is produced by manufacturers in 3rd world countries, which in itself can manifest itself in manufacturing defects and low quality.
The simplest nickel-cadmium batteries installed in a battery for a screwdriver Source alicdn.com
- Nickel metal hydride.
Batteries of this modification produce a voltage of 1.2 V. Many people prefer them as an alternative to failed units when they need to repair a battery for a screwdriver. This is explained primarily by high quality, since the production line does not pollute the environment, and therefore the technology is widely used in developed countries by well-known manufacturers.
In addition, they have the following number of advantages:
- Minimal memory effect.
- Low self-discharge rate.
- Higher capacity - in comparison with the above variety.
- Maximum operating range of charge-discharge cycles.
Disadvantages are manifested in high cost, inability to operate at low temperatures and deterioration of performance during prolonged storage in a discharged state.
Nickel-metal hydride batteries for installation in a screwdriver battery Source alicdn.com
- Lithium-ion
Batteries of this type provide a nominal value of 3.6 V. The main advantages are as follows:
- Large capacity.
- Several times greater range of operating cycles compared to other modifications.
- No memory effect.
- Minor self-discharge.
- Possibility of reducing the weight of the battery pack - due to the need to use fewer batteries in the circuit due to their greater potential and capacity.
The disadvantages are expressed by the maximum price and limited shelf life. After just 3 years, batteries lose most of their capacity due to chemical breakdown of the filler.
Note! The main cause of screwdriver failure is the failure of the battery, or more precisely, the loss of the nominal value or capacity of its individual elements. Thermistor failure, disconnection of contacts and other reasons are extremely rare.
Lithium-ion batteries for installation in screwdriver batteries Source virtustec.ru
See also: Catalog of companies that specialize in electrical work of any complexity
Mounting types
The battery case is attached to the device in 3 ways:
- Using glue.
- Fastening with snaps.
- Use of screws.
Some models use several combinations of fasteners with different types of fasteners: for example, screws and glue.
Fastening with glue
You need to act carefully with the adhesive seam to prevent cracks and chips from appearing on the plastic. The adhesive layer is struck with a rubber mallet for 10-15 minutes. You need to act slowly, carefully pull the halves of the body and separate them from each other. Gradually, the adhesive seam will collapse, begin to crack, and you can use a knife to open the seam.
You can separate the glued module in another way: use a thin knife blade to carefully loosen the seam, and then use the flat end of a screwdriver to slowly separate it into two parts.
To facilitate the process and save time, it is better to use a hair dryer. Using a hot jet from a hair dryer, the adhesive layer is heated around the entire perimeter. Under the influence of thermal air, the glue will become soft and further opening of the case will be easy.
Important! Heat work must be carried out at a safe distance using gloves.
Snap fastening
Snap fastening is the easiest way to detach. There is either one or two latch on the sides. Just apply a little force and they will open.
Using Screws
To unscrew the module, select a screwdriver of suitable shape and length. Disassembling the unit is very simple; to do this, unscrew the screws and disconnect the housing. It is necessary to remember from which holes the screws were unscrewed so that during assembly they can be screwed into place.
Important! During assembly, each unscrewed screw must be strictly in its place to avoid electrolyte leakage.
Troubleshooting
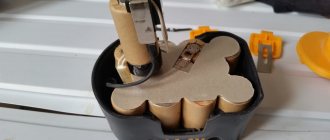
Due to the fact that the power supply is a chain of series-connected elements, it is necessary to determine which specific member has failed in order to replace it to restore the functionality of the screwdriver battery. Since one non-working link de-energizes the entire chain.
For this purpose, the following algorithm of actions is used:
- The battery is installed in the charger until the charging signal is received.
- The battery pack is being disassembled.
- The voltage of each bank is measured with a voltmeter.
- Marks are placed on all elements whose value is lower than those that normally work. For example, nickel-cadmium devices produce 1.1 or 1.0 volts instead of the required 1.2 V.
- Next, the device is assembled and turned on until the motor power noticeably decreases.
- After this, the disassembly and voltage measurements of all elements are repeated.
Banks whose nominal loss is 0.4 volts or more compared to normal ones are not suitable for further use and require replacement.
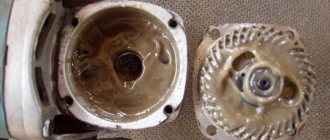
A battery for a screwdriver consists of a chain of batteries connected in series Source acums.ru
Advice! An alternative way to create a load for the battery before testing is to connect a light bulb of the appropriate rating. When the lamp begins to dim, the battery cells can be checked for differences in rating.
List of required tools
Repairing or diagnosing a screwdriver battery is impossible without certain tools and measuring instruments. To restore a battery, you don’t have to buy expensive tools; budget manufacturers are quite suitable.
List of tools required to repair the screwdriver battery:
- Multimeter. A measuring device that allows you to determine direct and alternating voltage, resistance, current, or test a circuit for an open circuit. More expensive models are capable of measuring the capacity of elements, but they are not useful to the home craftsman.
- Flat and figured screwdrivers. An indispensable tool that will come in handy more than once in the future.
- Fitter knife with replaceable blades.
- Soldering iron. A power of 40 W will be quite enough. More powerful models are more expensive, and if handled incorrectly, the element can be damaged.
- Tin and solder. Inexpensive consumables.
Consumables will also come in handy, for example, electrical tape or heat-shrink tubing, household glue, and small pieces of wire.
Possibility of recovery
When it comes to a failed lithium-ion battery, the only way to get your screwdriver battery working again is to replace it with a new one. This is the best possible option in this case, since batteries of this type do not have any memory effect, and the reason for their breakdown is associated only with the chemical decomposition of the filler. However, the cause of the malfunction may also be hidden in a violation of the device’s control circuit.
Therefore, to accurately determine the cause of a breakdown, two methods are used:
- Install another, working control circuit, and try to start the device. If the verification method helped, then the reason lies precisely in the breakdown of the circuit.
- Using an adjustable charger, connect the jar to a current of 4 V and 200 mA. An increase in the nominal value on it to the specified 3.6 volts indicates complete serviceability. The cause of the breakdown must be sought either in neighboring batteries or in the control circuit.
To identify a faulty element, you need to check each bank of the screwdriver battery pack Source ytimg.com
Checking by resistance value
Multimeter device diagram.
The performance of each battery can can be assessed with a higher probability by comparing the banks by their internal electrical resistance. } myth parameter correctly indicates battery reliability. The resistance value is determined by calculation by dividing the operating voltage by the operating current minus the load resistance.
The operating voltage must be measured under load; in this case, a resistor with a precisely defined value of its own electrical resistance should be used as a load. It is natural to recommend a resistor with a resistance of 10 Ohms and a power of 25 W to create a load. The check is carried out for each bank separately. Operating voltage and current are measured.
As an example, consider the average test. For a new battery bank, the internal resistance is 0.1 ohm. As a result, the lower the internal resistance of the can, the better it is. In real terms, the operating voltage under load was 1.19 V and the current was 112 mA for one bank and 1.18 V and 70 mA for the second bank. The resistance will be 0.63 Ohm and 5.71 Ohm, respectively.
Repair and replacement of battery components
When carrying out the procedure, another, more effective way to restore the performance of the battery is to replace the failed elements with serviceable ones. However, for this purpose you will need to purchase new banks or take them from another working battery. In this case, it is extremely important that the dimensions, as well as the electrical characteristics and type of elements being installed, coincide with those originally installed.
The procedure is carried out by cutting out old and soldering new elements into the chain. To do this you will need the following basic set of necessary consumables and tools:
- Wire cutters.
- Soldering iron.
- Solder or tin.
- A flux that does not give rise to a subsequent oxidation reaction.
Options for selecting new cells
Choosing new elements is simple - in terms of design, dimensions and capacity, you need to choose exactly the same cans as the old ones. Then there should be no problems with installation, charging and operation. Due to the improvement of technology, elements with similar mounting dimensions but larger capacity may appear on sale. It is undesirable to use them, since they will require more energy replenishment time at the same current and will operate under different conditions. In this option, you can replace all the banks with new ones at once.
Video description
Video about repairing a failed screwdriver battery:
- The series connection of the batteries must be such that “+” is in contact with “-”. Otherwise it simply won't work.
If you change only some of the batteries in the screwdriver battery, a potential difference will arise between those already used and those not yet used. It can be eliminated through the alignment procedure. To do this, the following series of actions are taken:
- The assembled battery is placed on a full charge - 8-10 hours.
- The battery is left alone for a period of 24 hours.
- Next, the voltage on the banks is measured. It should be approximately the same everywhere.
- After this, the battery is charged and the device turns on at full power. In this case, the load factor on the screwdriver itself is taken into account so that it does not deteriorate.
- Then the “charging-discharging” cycle is repeated 2 more times.
Recommendation! To extend the battery life, it is necessary to erase the memory effect once every 3 months, using several consecutive charge-discharge cycles.
Elimination of memory effect
Restoring a screwdriver battery does not always require some radical action. Often, alternating full charging (until the charging light goes out) and completely discharging the battery helps restore battery capacity. This method is also called “boosting the battery.”
How to erase battery memory effect
It is associated with the so-called “memory effect” and is characteristic of nickel-based screwdriver batteries. And it is especially pronounced in nickel-cadmium. It occurs when a battery that has been discharged to zero is not fully charged and begins to be used, or vice versa. This leads to enlargement of the crystals of the active substance, which reduces the area of its active surface.
Follow the manufacturer's recommendations for charging and discharging modes.
The so-called “training” of the battery helps to remove this effect or significantly reduce it. It consists of repeating cycles of full charge and discharge.
To do this, the recoverable battery is completely discharged using, for example, a light bulb. Then it is fully charged and discharged again. Repeat the process 5 times and if the individual battery elements are working properly, the characteristics will return to normal or close to it.
Briefly about the main thing
Most modern models of screwdrivers are equipped with 3 types of batteries:
- Nickel-cadmium.
- Lithium-ion.
- Metal hydride.
Each of them has individual pros, cons and application features. All of them are a chain of cans connected in series. The failure of one of them leads to the inoperability of the entire battery. To identify the weak link, you need to perform a charge-discharge cycle and measure the voltage of each element.
The most common nickel-cadmium batteries are reconditioned by flashing and compression-compaction of the electrolyte. Lithium-ion ones can only be changed. In this case, replacing the batteries in the screwdriver battery is carried out by cutting out the old ones and soldering new ones into a common chain, followed by equalizing the potential through a series of “charging-discharging” cycles.
Ratings 0
Replacing nickel-cadmium batteries in a screwdriver with lithium ones
Recently, on forums dedicated to electrical tools, the process of replacing nickel-cadmium screwdriver batteries with Li Ion batteries is often described. And this is no coincidence. More modern lithium-based cells have much higher capacity . And the number of work cycles they have is at least one and a half to two times greater.
Very often, cadmium batteries are replaced with the popular lithium 18650, so named based on their size. You can change batteries to lithium if the tool is used daily or very often. The high number of cycles of lithium-ion batteries is ideal for professional craftsmen who use the tool every day.
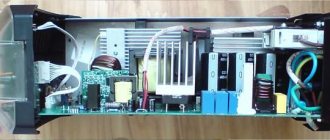
In order to convert a screwdriver from “cadmium to lithium”, you will need 18650 batteries and a special charging module. This module allows you to charge the battery and transfer the load on the same terminals (the same protective board that was mentioned at the beginning). Such modules have protection against short circuits between elements.
Drive testing principles
Diagram of a device for testing batteries.
Checking battery means finding its real main properties. A battery test is usually carried out to determine its characteristics or the reason for its failure. First, it aims to clarify the characteristics of the new battery, and in the second, it includes measurements of features on the battery that do not power the screwdriver to the appropriate extent. The test is carried out only when the battery is charging.
When testing screwdriver , keep in mind the impact of the “memory effect”. This phenomenon is based on the fact that frequent charging of a battery that is not completely discharged can change the capacity of the cell due to the introduction of residual charges from the previous charge. Nickel-cadmium specimens are especially susceptible to the “memory effect”. This property causes a full “training cycle” to be carried out before testing. It consists of {working discharging the battery and then charging it.
A more important parameter of a screwdriver is its capacity. To determine it, there is a special device - a pendant-type battery tester, but it is mainly used by specialists and is not available to most users. Therefore, this parameter is usually analyzed in a way that evaluates other traits. The current and voltage at the battery output are directly measured.