A gasoline trimmer, also called a brush cutter or gas trimmer, is a complex technical device.
Therefore, sometimes it breaks down and stops working normally, or does not start at all.
Despite the variety of brands and models, all breakdowns of such equipment can be divided into several groups, which we will discuss further.
In this article, we will describe the most common malfunctions that gas trimmer owners may encounter and tell you how to fix them.
Trimmer breakdowns and methods for eliminating them
Do-it-yourself trimmer repair involves eliminating all problems that interfere with the normal functioning of the unit. Among the most common are the following:
- breakdown of the CPG (cylinder-piston group) of the engine;
- the trimmer fails when trying to increase the operating speed;
- ignition coil failure;
- there is no connection between the motor and the gearbox;
- there are extraneous sounds during operation;
- the engine cannot reach the required speed.
Failure of the engine's CPG can occur due to low quality fuel or wear and tear of engine parts. As you know, the piston group is lubricated thanks to the oil that is added to gasoline. In old oil, the lubricant precipitates out, which makes the oil unusable. If you continue to try to start the trimmer, you can ruin the motor in a matter of seconds, and this will entail additional costs for repairing the trimmer. This breakdown is considered the most expensive. To eliminate it, it is necessary to replace the piston group assembly; to be more precise, it may be necessary to replace the cylinder, rings, piston and seals. In such cases, it is unlikely that you will be able to do without additional help, unless you are a master yourself and know how to handle such equipment.
You can repair a lawn mower yourself if it starts and idles, but then chokes when you try to increase the operating speed. To eliminate this breakdown, carburetor repair or cleaning of the muffler or gas filter is required. At first glance, everything can be solved quite simply, but if after you clean the clogged parts of the trimmer, it does not work, then additional diagnostics may be required.
Carburetor repair
When inspecting the carburetor, you should pay attention to the possible leakage of the fuel used; to identify carburetor problems, the following measures must be taken:
- purging the fuel hose to eliminate possible clogging of the element;
- checking and replacing the gasket located between the engine and carburetor;
- determination of tightness and maintaining constant pressure in the unit.
If necessary, you can disassemble and thoroughly clean the unit yourself, using gasoline; cleaning the nozzle and channels is carried out using compressed air.
The trimmer gets very hot
Overheating of the trimmer can occur for many reasons:
- gasoline does not have the same octane number as indicated in the instructions for the unit;
- the proportions of gasoline and oil were not observed during preparation of the fuel mixture;
- the mixture of fuel and oil was prepared a long time ago (the mixture cannot be stored for more than 2 weeks);
- the trimmer operates beyond the time specified according to the instructions;
- a low-power trimmer is used on thick and hard grass, the device works with overload and heats up quickly;
- has moved towards the rod or the cassette cover has become stuck.
The latter happens if you install a mowing head that is not suitable for this unit.
, or when the axis moves inside the rod. These changes make it harder to rotate, the load on the engine increases, and it overheats.
Gasoline trimmer device
The main component of any gasoline tool is the internal combustion engine (ICE), which transmits torque to the executive body through various methods. In a modern lawn mower, an alloy rod (pipe) is used as a transmission element between the motor and the trimmer head, inside which the drive shaft is located.
Thanks to the high-speed engine, the rotation speed of the fishing line can reach 13 thousand revolutions per minute, depending on the manufacturer of the braid. In order to avoid mechanical and thermal damage to the gearbox, a special hole is provided in its housing for introducing lubricant in the form of ointments. To make the headset easier for the owner during long-term work, all models of brush cutters are equipped with a durable shoulder strap.
When you press the gas
If the gas pump stops when you press the gas, the reasons may be as follows.
- The most common option is carburetor adjustment, which occurs when there are significant loads on the drive, after prolonged inactivity of the mechanism, or when it is used in harsh conditions.
- The fuel valve is clogged, which prevents its relaxation, as a result of which gasoline in the system begins to flow normally.
- Loosening and lowering of the cable in the carburetor. Expansion of the fuel hose can also occur before it breaks due to significant stress.
- A clogged chimney (check valve), resulting in a lack of fuel in the tank.
If the problem is related to the carburetor block, then this may be recognized as the appearance
. When a hose breaks or a cable stretches, these components are replaced.
Surprise from Khopr
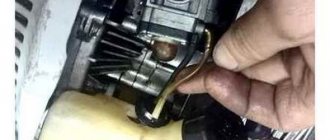
Since the Hopper starts up easily with the air damper open, I did not immediately notice that the air damper lever had rubbed the fuel hose almost completely through at the point of contact:
If you see that your trimmer's choke lever is resting on the fuel hose, insulate the hose at the point of contact and file or sand the sharp edge of the lever.
Other articles: Adjusting the carburetor of a lawn mower, trimmer Lubricating the shaft and gearbox of a lawn mower, trimmer Adjusting the valves of a lawn mower, trimmer Adjusting the valves of a diesel walk-behind tractor Heavy diesel walk-behind tractor (starting, storage) Maxcut MC 55 motor drill - drilling holes for poles Leveling a concreted metal pole
AgroSemFond online store - seeds, planting material and other gardening products by mail from Nizhny Novgorod.
Peculiarities
It should be noted that the gasoline scythe is very easy to operate. It is enough to see how other users use this unit to start using it fully. Performing basic technical functions is intuitive and does not require any difficulties in practice. Properly running in a gasoline trimmer is also not difficult. Moreover, there is almost no difference between devices of the household and professional categories.
The key difference is the type of motor. On professional equipment it is more powerful and produces more revolutions. The two-stroke engine is more often used in household models. Four-stroke units are more reliable and produce more force, so they are suitable for special conditions, complex and overgrown areas.
What to do if the main lock gear is broken?
If the sash gearbox is broken, you need to contact a plastic window repair company and call a specialist. He will select the necessary fittings and repair the window. If the windows were recently installed, then it may be possible to get by by replacing only the main lock. But experience shows that the gearbox breaks when the window is more than 10-15 years old. Therefore, it will be difficult to choose exactly the same fittings, since many manufacturers periodically update their products and stop producing old models. We also wanted to draw your attention to the fact that after 10-15 years, if one of the fittings elements breaks, then most likely other elements will soon begin to break as well. Therefore, for the sake of economy and practicality, it is advisable to immediately change the entire window trim.
(121) » ROSTECH » The lawn mower works but the fishing line (reel) does not cut! What is the problem??? 05/10/2020
Dry and wet spark plug, what does this mean and how does it affect engine starting?
Most tool owners immediately resort to checking the condition of the spark plug contacts. This is done in order to understand from the condition of the spark plug what could be the reason for the impossibility of starting the lawn mower engine. Based on the condition of the spark plug contacts, appropriate conclusions can be drawn about what may be causing the malfunction. Diagnosis of the spark plug on the trimmer is performed in the following order:
- The spark plug is unscrewed, after which it is subject to inspection. The ideal condition of the electrodes is if they have a brown soot (brick color). If the spark plug is wet and has black or white carbon deposits, this indicates a corresponding malfunction
- If the spark plug is wet, then there is a portion of unburnt fuel in the combustion chamber that does not need to be drained. Clean and dry the spark plug contacts, then make sure it is in good condition. To do this, connect it to the candle holder and place it on the surface of the cylinder. Turn on the ignition and pull the starter handle lightly. In this case, the spark plug should produce a high-quality and constant spark. If the spark is weak or absent at all, then the spark plug should be replaced.
- The trimmer may not start due to a large gap between the spark plug contacts. The gap between the spark plug electrodes should be in the range from 0.7 to 1 mm. To set the gap, special feeler gauges are used
This is interesting!
Drying spark plug contacts by calcining them is strictly contraindicated, as this method will lead to damage to the part.
If there is a spark at the spark plug, but the trimmer does not start, then the reason lies in the supply of the fuel mixture to the combustion chamber. To make sure of this, you should do the following:
- Take 20 grams of fuel into the cap of a PET bottle or into a syringe
- Pour it into the combustion chamber through the spark plug hole
- Screw in the spark plug
- Put on the candle holder and start the engine
If the engine of the lawn mower starts after the above steps, then the cause of the malfunction should be sought directly in the fuel line and carburetor. If the engine does not start even after these steps, then you need to check the serviceability of the high-voltage wire. The high-voltage wire, like the spark plug, is a consumable item. If there is a suspicion that the trimmer armored wire is faulty, it should be replaced
If, after the above steps, you cannot start the engine of the lawn mower, then you need to take into account the following recommendations:
- If there is any doubt about the serviceability of the spark plug and high-voltage wire, it is recommended to replace them immediately
- Check that sparking is working properly, and if there is no spark on the new spark plug, then the breakdown is related to the ignition unit - coil failure
- The ignition coil is not repaired, but replaced. If the diagnostics really indicate a malfunction of the lawn mower’s ignition coil, then it is not difficult to replace it with your own hands
https://youtube.com/watch?v=YixHJCGg9gg%3F
If there is a spark plug, and it is dry, and the trimmer does not want to start, then we move on to checking the next unit - the air and fuel filters.
This is interesting!
If the spark plug electrodes are red or pink, this indicates that the fuel used contains a large amount of additives. You should refuse such fuel by changing the gas station or brand of gasoline.
Types of starting lawn mowers
What should you do first? Press the throttle lever lock and corresponding trigger to set the throttle to the starting position. Then press the start button. Release the throttle lock, throttle trigger and start button. Thus, we have activated the throttling function. To return the engine to idle, you must press the throttle lock and throttle trigger again.
Starting a cold trimmer engine
Please note that the throttle trigger must not be pulled before the engine has started and is running.
- We place the tool on a flat surface and slowly press the fuel pump button up to 10 times, the number may vary depending on the model.
- Then set the starting system switch lever to the “START” position.
- The starter cord must be pulled sharply until the engine starts.
- Let the powertrain run for 5 to 10 seconds and then depress the throttle trigger to disengage the starting system.
Starting a warm lawnmower engine
- Keep the throttle trigger pressed and do not release until the engine starts running evenly.
- We sharply pull the starter cord and wait until the power unit starts. In this case the trigger must be pressed.
- A warm engine is started within 10 minutes after stopping it. If more time has passed, then use the instructions for turning on a cold unit.
Starting the engine with a flooded spark plug
In this case, the power unit can be started if you set the starting system lever to the RUN position, the throttle trigger must be pressed. Then we pull the starter handle as many times as necessary to start the engine. If the power unit does not start for a long time, you should contact a service center for help.
The first step is to check the availability and quality of fuel
If you don’t understand why the lawn mower won’t start, then first make sure that there is fuel in the tank. Beginners often forget that they need to pause periodically to fill the tool with a gasoline-oil mixture. If the gas mower's tank is empty, then naturally it will not start, no matter how much you try to do it.
If there is fuel in the tank, but it is impossible to start the engine of the tool, then do not rush to disassemble the carburetor. Make sure that the trimmer motor is started correctly as indicated in
If the launch is carried out according to the instructions, then it is important to consider the following points:
Use not just high-quality gasoline with the maximum octane number, but exactly the brand recommended by the manufacturer. And this brand is not always AI-95 gasoline. If you don’t know, then choose AI-92. The oil must be special - for two-stroke engines. If the lawn mower has a four-stroke engine, then you need to fill it with pure gasoline without mixing it with oil. You should not skimp on the quality of trimmer engine oil, just like you should not skimp on gasoline. After all, the service life of the engine depends on the quality of the fuel used. Observations show that most mowers control the process of preparing oil and gasoline for the trimmer only at first.
The more experienced the mower, the less attention is paid to the process of mixing gasoline with oil for a two-stroke engine. The ratio of gasoline to oil should be as recommended by the manufacturer
Usually this ratio is 25 to 1, that is, for 1 liter of gasoline you need 40 ml of two-stroke oil (motor oil for a car, much less used oil, cannot be used) Proper storage of the fuel mixture. It often happens that after preparing the fuel mixture, it sits for a long time, more than 2 weeks. It is impossible to store a ready-made mixture of gasoline and oil for a long time, as this leads to the fact that the oil precipitates, and thereby the properties of both petroleum products are lost. Even thorough stirring after long-term storage of the finished mixture is not a reason for its further use. That is why it is not recommended to prepare more than 2 liters of mixture at a time.
Make sure that all of the above points have been completed, and only then can you start checking the condition of the spark plug. The trimmer does not start for various reasons, and most of them can be identified independently. It is simply irrational to resort to disassembling the carburetor if it is impossible to start the engine. The next step towards troubleshooting is checking the condition of the spark plug.
This is interesting!
During long-term storage of diluted gasoline with oil, these elements decompose into heavy fractions. These fractions clog not only the instrument’s fuel filter, but also the carburetor channels. The maximum duration of fuel storage is no more than 14 days.
One reason for a flooded lawnmower engine.
After inspecting the main elements of the engine and interviewing the owner of the lawn mower, we finally identified the reason that led to such consequences.
Inattention of the operator, who may have accidentally touched the choke control lever and switched it to the “OFF” operating state, in which the air supply was limited, implying the opening of the damper.
It is possible that the operator did not sufficiently understand the meaning of the ON and OFF damper position indicators and became confused.
In a word, the human factor is present in all unpleasant situations that occur during the operation of equipment.
Trimmer won't start
No matter what type of equipment, trimmers are subject to various breakdowns. Often, at the beginning of the summer season, owners of such a tool complain that the trimmer does not start, and it takes a long time to find the cause of the malfunction.
There is no pumping
In a situation where the engine hums but there is no pumping, the problem may be in the network. If the voltage drops below 220 V, the engine may not have enough power to operate the compressor correctly. In this case, you can install a stabilizer in the network or, if the phase is overloaded, temporarily disconnect the electrical devices connected to it from the power supply.
Pressure switch
Another reason could be a clogged bypass valve, which is supposed to relieve high pressure. In this case, you need to remove and clean it. If the valve is damaged, it must be replaced.
In some cases, the reason may be incorrect operation or a malfunction of the voltage relay. It is difficult to repair it yourself, and if it is not possible to contact a service center for repairs, you can replace it.
Problems with a used trimmer
List of malfunctions of a used lawn mower (gasoline trimmer) with any engine:
| Malfunction | Possible reason |
| The muffler is clogged with products of incomplete combustion of fuel (carbon deposits). Clean the muffler. |
| Increased vibration of the rod | The mower shaft needs lubrication. |
Removing and disassembling the starter, replacing broken parts
To repair the trimmer starter, you will need to first disassemble it and then reassemble it. This process is not particularly difficult. To work, you will need a screwdriver with a tip of the desired shape.
Disassembly of the starter unit
The starting mechanism is disassembled in order to install new parts instead of broken ones in the following sequence:
- use a screwdriver to unscrew the screw that secures the pulley with the starter cover;
- remove the spring and antennae;
- carefully remove the pulley (you need to turn your head away or work while wearing glasses and gloves);
- determine why the trigger mechanism broke down;
- if the spring has collapsed almost completely, then it is replaced;
- when the spring leaves the hook, it is installed in its original place, bending the antennae first (the photographs show the installation process);
After the spring plate is installed inside the groove, carefully twist it. To change the spring, you should work carefully and carefully: it may accidentally burst under the influence of the force caused by installing it in place
Even if you carefully remove the roller, the spring strip very quickly flies off the reel and can injure your hand with its sharp edges
To change the spring, you should work carefully and carefully: it may accidentally burst under the influence of the force caused by installing it in place
Even if you carefully remove the roller, the spring strip very quickly flies off the reel and can injure your hand with its sharp edges
Starter assembly
Assembly of the starter unit is carried out in a number of stages:
the coil is turned over, installing it so that the spring bend fits exactly into the groove of the body, as in the photo below;
- place two washers, between which a spring is placed;
- put the cup with antennae in place;
- tighten the screw (photos below).
When performing the above manipulations, it is necessary to place two washers. If this is not done, the spring will eventually damage the plastic cup, and when it is tightened, wedging will begin. Because of this, it feels as if a spring has come off. To eliminate this drawback, you need to install this part of a longer length or an additional washer.
When such spare parts are not available, you can simply unscrew the screw slightly and the starter unit will start working without jamming. But this option is temporary - it is better to repair it efficiently as quickly as possible.
Spring tension
After installing the spring, it should be tensioned. To do this, perform the following steps:
- remove the handle from the starter cord;
- then the rope is inserted into the spool groove;
- tension the spring by rotating the coil in the direction opposite to the clockwise direction (winding);
- make the required number of revolutions specified in the operating instructions for the trimmer model used and corresponding to the length of the cord used;
- at the very end, the rope is threaded into the hole intended for this purpose, located in the starter cover;
- put the handle in place, fixing it with a knot.
If after repair the spring continues to fly off, you can get rid of it in the following ways:
- squeeze a piece of the plate of suitable size into the groove at the location of the spring hook;
- Drill holes on both sides of the groove in the coil into which to insert the spring hook and secure it with a wire.
Replacing a broken cord
A torn rope is replaced in the following sequence:
- the old cord is removed;
- choose a rope of appropriate size (thickness and length);
- having threaded it through a special hole located in the reel, tie a knot;
- cock the spring, producing the required number of revolutions;
- secure the handle.
Assembling the starter on the trimmer and winding the spring is not difficult, you just have to do it carefully and with caution. For different models of lawn mowers, the breakdowns of the starting mechanisms are the same, so they are repaired in the same way
However, there are some nuances associated with their design features.
How to repair the main lock reducer yourself?
Let us say right away that it is impossible to repair the gearbox on the main window lock. It is necessary to completely replace the constipation. Choosing the right window fittings on your own is also very difficult; we have already written about this several times on the pages of our website. It is more economical and profitable if the repair of the plastic sash is carried out by a specialist. Since in addition to the brand of fittings, you need to know its series and overall dimensions. The hardware manufacturer also plays an important role. Properly installed German fittings will serve you for decades.
Next, you need to remove the broken fittings from the sash and install new ones. Even for an experienced craftsman, replacing window fittings takes an hour. We have had cases where clients tried to fix the window themselves. It all ended at the stage of removing the sash from its hinges and disassembling it. Almost no one was able to install the fittings independently and correctly. Or it took more than a single day. Therefore, we strongly recommend that you save your nerves and seek help from specialists.
You can call a technician if the main locking gear of a plastic window breaks down by phone every day from 9:00 to 21:00. A specialist repair visit is free!
Brushcutter: why does the engine work, but the reel or blade does not spin?
Sources:
https://tehnika.expert/dlya-sada/trimmer/neispravnosti-ustranenie.html https://tehnika.expert/dlya-sada/trimmer/remont-i-smazka-reduktora.html https://www.remokno2010. ru/reduktor-osnovnogo-zapora.html
How to fix breakdowns and malfunctions of a chainsaw
Hundreds of sawmills encounter chainsaw malfunctions every day. Now let's look at ways to eliminate them. Experienced sawers know the problems with their tools and don't need to read instructions on how to identify and fix problems. However, such instructions will be useful for those who have not yet mastered their newly purchased gasoline unit.
- If the candle has carbon deposits, it should be cleaned. Before starting the engine again, it is recommended to change the fuel mixture
- If the spark plug is wet, you will need to adjust the carburetor
- Lack of spark requires replacement of the spark plug or high-voltage wire. On the new spark plug you need to set the gap to 0.2 mm
- The fuel filter cannot be cleaned, so it should be replaced if the chainsaw is suspected of being faulty. Before replacing the filter, the fuel tank must be emptied.
- The air filter needs to be cleaned. This is easy to do - remove the part from the tool, and then blow it with a compressor
- If checking the fuel supply shows that the gas-oil mixture does not flow out of the hose, then it needs to be cleaned
- The chainsaw carburetor is adjusted periodically when it is discovered that the unit begins to operate intermittently. Detailed adjustment instructions
- If the chainsaw stalls under load, then only cleaning and adjusting the carburetor will help correct the situation.
- When a chainsaw heats up and stalls, the cause is the ignition coil. As the tool heats up, the resistance increases, so the spark can either be lost or weakened, which affects the power of the unit. You also need to check the unit for air leaks from hoses, seals and gaskets
- If the chainsaw revs on its own and does not slow down, it means that the fuel filter needs to be replaced and the air filter cleaned. If this does not help solve the problem, then you need to make sure the carburetor is set correctly. The reason for an unauthorized increase in speed is a lean mixture, when a large amount of air enters the cylinder and a low fuel content
- If research has shown that the chainsaw muffler is faulty, then it should be dismantled and then cleaned. This must be done using special detergents, which can be purchased at a specialized center. When dry cleaning the muffler, you need to use a respirator, since soot contains many carcinogenic substances
- After checking, a faulty CPG is detected. Everything is sad here, and if there is no sufficient compression or there are scoring marks on the walls of the cylinder or piston, then a major overhaul is needed. Upon completion of such repairs, do not forget to carry out
- If the chain lubrication system malfunctions, it is necessary to determine the cause of the failure, and only then eliminate it. If the channels become clogged, they will need to be cleaned. If an oil leak is detected, it can be eliminated by sealing the tubes and channels or by replacing them
If a malfunction is detected, it should be eliminated as quickly as possible. If this is not done, then one part will lead to failure of the entire assembly or even the mechanism. Any instrument (Chinese, European or Russian) needs proper care, operation and regular preventive measures.
Publications on the topic
Learning how to properly wind fishing line onto the reel of a trimmer and lawnmower installation instructions
How to repair a starter on a chainsaw
When you press the gas, the chainsaw starts to stall - causes and solutions to the problem
Attachments for chainsaws or how to expand the capabilities of the unit
DIY trimmer repair
Repairing a lawn mower: how to restore the drive shaft engagement
Trimmer malfunction: The edges on the trimmer drive shaft licked (I had to buy a new shaft).
The reason for the trimmer malfunction: “Licked” because the shaft splines at the top are not engaged over their entire length (it happens that the shaft only engages a few millimeters at the end). At the bottom, the shaft enters the gearbox its entire length under its own weight.
Do-it-yourself trimmer repair At the first time. The trimmer must be checked and made so that the shaft fits into the clutch at the top for the entire length of the splines (or edges, if they are square). To do this, try to put the gearbox higher on the pipe, having first loosened its fastening, or try to push the pipe deeper into the shock absorber, having first loosened its fastening. If the shaft splines still do not fit the entire length into the clutch, then you need to shorten the pipe (cut off a part) to the length necessary for the splines to fully fit into the clutch.
Warning: Just don’t overdo it with cutting the pipe (it’s better to cut off a smaller piece), because if the shaft turns out to be longer and needs to be cut, then when the shaft splines heat up, the metal will release, i.e. the hardened metal will become soft and will not last long (the shaft itself is made of alloy steel).
PS If the shaft has already been “licked”, then simply turn it over - install the shaft with the top splines down into the gearbox and do what is described in Do-it-yourself trimmer repair.
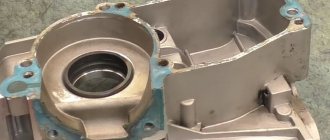
Trimmer repair: how to stop lubricant leaking from the gearbox
Trimmer malfunction: Where does the lubricant go from the trimmer gearbox (Chinese trimmer, instead of a plug, a grease fitting and a syringe were screwed into the gearbox).
Cause of trimmer malfunction: Solid oil under pressure pressed through the closed bearings of the gearbox. During operation, liquid hot lubricant, driven by rapidly rotating bevel gears (in a small volume of the gearbox housing), “flies out” either into the drive cartridge if the sealed bearing rings on the driven shaft are pressed, or upward into the pipe body if the sealed bearing rings on the drive shaft are pressed gearbox
Do-it-yourself trimmer repair: Replace the bearings (or the entire gearbox) at a service center and then use a special lubricant for the trimmer gearbox (for example, Husqvarna).
Tip: Chinese lawn mowers have a small hole for adding lubricant to the gearbox, so it would be more convenient to take the lubricant from the branded tube into a medical syringe (without a needle), and then add lubricant from it to the gearbox.
Repair of trimmer Husqvarna 333R
Malfunctions of the Husqvarna 333R trimmer over 3.5 seasons of active commercial use (required replacement):
- Husqvarna trimmer gearbox assembly: a piece of the aluminum housing broke off after a strong impact on a piece of steel pipe protruding from the ground (me and the lawn mower were turned 180*, and the metal knife WINDSOR 300-3 * 2 mm (1″) was bent like a bowl). What I did: I made a steel temporary clamp.
- Aluminum engine sump - both front mounting ears broke off. This is a trimmer malfunction.
- One muffler mounting bolt (the edges of the Husqvarna bolt head have been smoothed).
It is advisable to change the muffler (it is dented and a little “overgrown” with soot inside). Or at least clean the spark-extinguishing mesh if they were not removed when the trimmer was first used.- The attachment of the steering column to the Husqvarna trimmer pipe broke off (one ear out of two).
- Weak thread for the spark plug in the cylinder head (try not to unscrew the spark plug unnecessarily).
- Axial play of the crankshaft has appeared.
- Gasket for the Zama C1Q carburetor of the Husqvarna lawn mower (made from thin paronite).
- Also, regarding the repair of the trimmer: in the second season (after about 170 liters of gasoline burned), it was necessary to add paper under the two long screws securing the Zama C1Q carburetor (the threads in the plastic intake manifold were smoothed out) in order to prevent air leaks due to loose screws.
- Also in the second season, the “net-lost” thread was disconnected from the tank plug (the ball assembly was rather weak).
- The rear screw securing the Husqvarna trimmer's aluminum tray was replaced with a larger one (the thread in the plastic case was smoothed out).
- The plastic loop that hangs the Husqvarna trimmer on the hook of the strap has broken. I made a metal loop.
- I replaced both side screws on the shock absorber cover of a Husqvarna 333R trimmer - the body in the aluminum shock absorber body was “sawed” (I drilled it both in the shock absorber and in the pipe).
- I replaced the self-tapping screw securing the wire on the ignition coil (the threads in the aluminum casing were smoothed out).
Note: I read somewhere that the life between failures of two-stroke engines is no more than 500 hours, and in 3.5 seasons I burned ~370 liters of gasoline, i.e. if 0.35 l. per hour, then the operating time is already more than 1000 hours! The Husqvarna 333R trimmer is a very reliable trimmer (petrol mower).
Note: Please write in the comments what you think about this trimmer repair.
Petrol trimmer repair: how to replace gearbox bearings
Trimmer malfunction: tell me how to disassemble the gearbox on the trimmer to replace the bearing (Husqvarna). And does he even understand?
Answer: the Husqvarna trimmer gearbox can be disassembled to change spare parts such as bearings, bevel gears, housing (since the assembled gearbox for a Husqvarna trimmer costs about $150.) You need to remove it, loosen the tightening bolts at the bottom, and be sure to wash it (for example , gasoline), then use round pliers to bring the ends of the locking spacer ring together (there are two of them on the gearbox) and pull out the bearings with a small puller. They should go easily, since the upper bearing is no longer pulled together by the housing, and the drive shaft of the Husqvarna trimmer comes out of the lower one.
Trimmer repair: how to restore the thread in the spark plug hole of the cylinder
Trimmer malfunction: The spark plug is difficult to tighten.
Cause of malfunction: The thread in the spark plug hole of the cylinder is damaged due to the fact that the spark plug did not follow the thread when screwing it into the cylinder, or sand got on the threaded part of the spark plug, or the thread was torn off by a large force on the key.
Do-it-yourself trimmer repair If the spark plug is not screwed in deeply, you can drive the threads in the cylinder with a tap of the appropriate size, then screw in a new spark plug and tighten it with a force of 32-33 N*m. If the spark plug does not turn, then everything is fine, but the next time you turn the spark plug out, you need to be especially careful. If the spark plug turns, you will have to install a bushing (repair sleeve). To do this, it is better to contact a repair shop for chainsaws and gasoline trimmers. There are the necessary tools and qualified personnel to select and purchase (or make) a spark plug repair bushing suitable for your spark plug, then properly disassemble the engine, drill the spark plug hole of the exact required diameter, and cut the appropriate threads in the cylinder. Then rinse everything and blow off any shavings, screw the spark plug into the bushing, apply thread sealant or cold welding to the threads of the bushing, screw the spark plug together with the bushing into the prepared hole, dry it, assemble everything, start it and adjust it. Another option is to replace the engine cylinder. Repairing a lawn mower yourself is similar to repairing a trimmer.
Tip: The main thing when installing a spark plug is that you first need to tighten the spark plug a few turns BY HAND, and then take the key. If the spark plug comes out easily by hand, it means it is installed correctly and can be tightened with a tool (a spark plug wrench with a knob). If the spark plug does not want to be twisted by hand, you should not tighten it with force with a wrench, since the spark plug has gone the wrong way and the threads in the spark plug hole of the cylinder will inevitably be damaged and an expensive repair of the trimmer engine will be needed.
Repairing a lawn mower: how to cut and change the gasket under the carburetor
Trimmer malfunction: A cold trimmer engine with the carburetor air damper closed starts almost normally, runs at high idle speeds, when the engine heats up, unstable operation is observed, after which the trimmer engine suddenly stalls. The malfunction of a lawn mower is the same as that of a trimmer.
Cause of malfunction: Air leakage under the trimmer carburetor gasket due to loosening of the carburetor or frequent removal/installation of the carburetor.
DIY trimmer repair: Make a new trimmer carburetor gasket from thin paronite (up to 0.8 mm thick) or thick cardboard. How to make a carburetor gasket: cut out a piece of thin paronite or thick cardboard that is slightly larger than the future finished gasket, coat the seat on the cylinder or carburetor with oil or grease, carefully apply the prepared piece for the gasket so that a clear imprint of the grease remains on it (the outline of the future gasket ). Then cut out the middle with a small sharp narrow chisel on a heavy metal lining (for example, an anvil), cut out the holes with a special head from a set of suitable diameter, and cut the outer part with scissors. As an option, apply paronite or cardboard to the cylinder seat, just do not move it, tap the edges with a mallet, and knock out the holes with a ball from the bearing, but there is a risk of damaging the edges. The first option is how to make the carburetor gasket better. That's it, the trimmer carburetor gasket is ready. Repairing a lawn mower with your own hands in this case is similar to repairing a trimmer.
Trimmer repair: how to replace gears and bearings in the trimmer gearbox
Trimmer malfunction: Trimmer gearbox - hum, grinding, squeaking and other noises in the lower part of the trimmer, jamming when turning and the driven shaft is loose. The malfunction of a lawn mower is the same as that of a trimmer.
Cause of malfunction: The trimmer gearbox bearings have failed due to overheating of the gearbox, lack of lubrication in the gearbox housing, impact of the trimmer knife on a stationary object, long-term (many years) active operation.
Do-it-yourself trimmer repair: Replacing the bearings in the trimmer gearbox yourself (you need keys to remove the gearbox; pliers to remove the retaining rings and disassemble the gearbox; gasoline to wash all the insides to troubleshoot the parts; new trimmer gearbox bearings for replacement) or replace the gearbox bearings In workshop. If only one trimmer gearbox bearing is destroyed, both bearings still need to be replaced. Or, as an option, replacing the trimmer gearbox assembly - select the gearbox to match the diameter of the pipe onto which it will be clamped and along the splines of the drive shaft (square, star, hex). Repairing a lawn mower yourself is similar to repairing a trimmer. PS: After replacing the bearings in the trimmer gearbox or replacing the gearbox assembly, do not forget to fill the gearbox housing with grease (you need a good lubricant, for example Husqvarna) through a special hole in the gearbox housing from a tube of lubricant or from a syringe (without a needle), if the hole to fill is very small.
Repairing a lawn mower: how to restore functionality to a broken starter spring
Trimmer malfunction: The trimmer starter cord stopped returning to the starter housing when trying to start the engine. The malfunction of a lawn mower is the same as that of a trimmer.
Cause of the malfunction: The end of the spring in the trimmer starter jumped out and the pulley jammed.
Do-it-yourself trimmer repair: Disassemble the starter, drill a hole where the recess is to fix the end of the spring, thread a wire, insert the spring, lay one turn, tie the wire thus fixing the spring end that has jumped out, lay all the turns of the spring, bend the end of the spring inward to engage with groove on the other part. Then place the washer, spring, part with two antennae, tighten the central screw, insert the cord through the hole, tie a washer at the end to secure the end of the cord, lay the cord, check the operation of the starter and the return of the cord to the trimmer starter housing. Repairing a lawn mower yourself is similar to repairing a trimmer.
In what cases is it necessary to adjust the carburetor?
The stable operation of a lawn mower's carburetor largely depends on its correct settings.
Node adjustment is required in the following cases:
- after running in a new trimmer, when 4–5 full tanks of fuel were consumed during operation;
- when the operator frequently changes the brand of gasoline used for refueling;
- as a result of sudden changes in weather;
- due to prolonged storage of the trimmer;
- as a result of arbitrary unscrewing of the adjusting bolts of the brush cutter caused by strong vibration of its motor;
- due to a sharp increase in the amount of fuel consumed by the trimmer.
It will also be necessary to adjust the mower's carburetor in cases where carbon deposits quickly appear on the tool's spark plug, as well as when there is a sharp increase in the volume of exhaust gases emitted by the trimmer.
Cutting part of brush cutter
Regardless of the manufacturer, almost every model comes with fishing line and steel knives.
Trimmer cutting part
The cross-section of PVC trimmer line can vary from 1.5 to 3.0 mm.
Made of durable polymer, during mowing it is subject to intense wear and, as a result, breakage. Therefore, from time to time it is necessary to check the presence of fishing line in the head and, if necessary, replace it. It is recommended to purchase an additional bobbin to quickly replace it with a reel that has run out of line.
Typical malfunctions of chainsaws
Having determined the causes of the chainsaw breakdown, you can begin to eliminate them. To eliminate this or that breakdown, you need to know what methods exist for this. First, let's figure out what malfunctions of chainsaws can arise during their operation:
- Engine problems. The engine may not start or may stall immediately after starting. In addition, there may also be problems such as the inability to develop full engine power, which can often depend on the quality of the air-fuel mixture. If the engine runs unstably, then it is time to diagnose it.
- Malfunctions in the ignition system. If the engine does not start, you should first inspect the spark plug. The presence of carbon deposits on the spark plug indicates that the ratio of gasoline and oil is incorrect or that one of these substances is of poor quality. If the spark plug is wet, this indicates an excess of fuel. The carburetor must be adjusted correctly. Be sure to check the presence of a spark on the spark plug, which will ensure that it is working properly.
- Failures in the fuel supply system. The reasons for the inoperability of this system are: contamination of the fuel filter, clogging of the hole in the tank cap, as well as insufficient amount of fuel mixture entering the cylinder.
- Carburetor failure. It is necessary to check this mechanism and clean it. Determining the cause of a malfunction in the carburetor is quite problematic if there is no experience, so it is recommended to contact specialists.
- Malfunction of the exhaust gas removal system. Over time, the walls of the exhaust pipe become clogged with carbon deposits, which helps reduce the diameter of the exhaust pipe.
- Piston or cylinder failure. They are one of the most serious breakdowns, as a result of which a major overhaul of the engine will be required. Scratches and scuffs appear on the piston or cylinder, and the piston rings or crankshaft bearings wear out.
- Chain lubrication system malfunction. If there is no oil supply to the chain, this can lead to a number of negative consequences. Therefore, it is recommended to check its consumption after each oil refill. The reasons that oil does not flow to the chain may be clogged channels or a malfunction of the oil pump.
- Broken chain hand brake. Occurs due to contamination of the brake band with grease or sawdust. It is strictly prohibited to operate a tool with such damage.
Most of the above breakdowns can be fixed on your own if you have experience, but if you don’t have it, you can try to fix the faults under the guidance of a specialist. In any case, you should first find out the cause of the breakdown yourself, and then decide how and who can fix it.
The main lock gear is broken: what to do?
Just like that, suddenly the plastic window stopped opening! The handle turns, but the window is closed. The main locking gear of the plastic window has broken! What to do ? We recommend watching the video on this page below, where the breakdown of a PVC window reducer is shown in detail.
The video shows how, when manipulating the window handle, the gearbox came apart and its halves moved in different directions. Accordingly, with the normal position of the handle, we cannot open or close the window. In such a situation, nothing can be done; it is impossible to repair the main locking gearbox. Therefore, you must try not to touch the window. Leave it in the closed position. In the open position, try to close the sash and seal it with tape until a specialist arrives.
Return under warranty and post-warranty service
Those owners of chainsaws who just received a new tool in the morning, unpacked it and assembled it in accordance with the instructions, but were unable to start it or the engine starts and immediately stalls, are especially distressed. Let us warn you right away - under no circumstances try to disassemble the new engine and do not tear off the warranty stickers. Under such circumstances, it is best to exchange the faulty chainsaw for another, or request warranty repairs.
Standard chainsaw equipment
In accordance with the legislation of most CIS countries (including Russia and Ukraine), electric and chainsaws are subject to return if faults are discovered that were not specified by the seller.
The buyer may also demand a reduction in the price of the defective product, reimbursement of the costs of its repair, or a refund for the defective instrument. The owner of the chainsaw can make these demands only during the warranty period, subject to compliance with all the conditions specified in the warranty card. As a rule, the buyer is given 14 days to identify all faults and shortcomings and contact the seller.
Signs of a chainsaw engine malfunction
If you experience at least one of the symptoms listed below:
- chainsaw won't start
- chainsaw starts and stalls
- the engine does not gain power
- The engine stalls when running or runs rough
then we can say that there is a malfunction in the chainsaw engine. Below we will take a closer look at possible breakdowns and their causes.
If everything is in order with the electrical equipment, then we check the carburetor.
Vacuum carburetors are installed on trimmers. When disassembling, cleaning or washing it, you need to be extremely careful - under no circumstances disassemble the lower part of the carburetor, where the primer is located. The air filter (it is visible if you remove the protective casing from the carburetor) must be washed with detergents. Best for washing dishes. After drying, put it back. We wash the carburetor with clean gasoline and blow through all the holes with a pump. We also wash the fuel line filter, then dry and assemble everything. Usually, after all the manipulations, the trimmer starts working.
A thin cable instead of a fishing line, is it worth installing it on a brush cutter?
This thought comes to the mind of almost everyone who has had to mow 10 acres overgrown with tall grass. At first glance, the idea seems good. The cable is stronger than the fishing line and does not wear out as much. However, not all so simple.
Quick start of the unit
- We place the tool on its side so that the air filter is on top. In this arrangement, it is possible to ensure that the fuel mixture reaches the very bottom of the carburetor. The engine can start on the first try if you remove the air filter before starting and pour a small amount of the mixture into the carburetor (a few drops are enough, and don’t get too carried away), and then install the recently removed parts back. This method has been tested in practice and works in most cases. Surely many owners of an old domestic car used a similar method on their car. The principle with the scythe remains absolutely the same.
- If the first advice does not bear fruit, then you need to unscrew the spark plugs and look at them carefully. We unscrew the spark plug, check its functionality, and then dry the combustion chamber. A candle that shows no signs of life must be thrown out and a new one installed. If everything is in order with the old one, then we put it in place and move on to the next method.
- If the spark plug is fully operational, the filter is clean, and the fuel mixture is fresh, then you need to resort to a universal method of starting the lawn mower. It is worth closing the carburetor choke and pulling the starter handle once. Then open the damper and pull the starter about 3 more times. This procedure is repeated 3 to 5 times. The engine should start. But you shouldn’t pull the handle too hard, because in this case you will also have to repair the starter of the lawn mower. This will only be needed if the cable breaks or the handle breaks. In other cases, it is recommended to replace the starter immediately. This unit is sold completely assembled.
- There is also a very simple way to get a braid. Many people forget to press the gas choke after filling the fuel mixture. It is usually located near the gas tank. On a household mower, it looks like an ordinary ball of air, which must be pressed 5-10 times for the mixture from the tank to go as intended. In most cases, this option works flawlessly. You just need to help the fuel flow through the channel.
Correct replacement of spark plugs
Many people know that spark plugs should be changed periodically, but few do it correctly and in a certain sequence. To perform all the manipulations correctly, you should familiarize yourself with the correct procedure.
- Stop the engine and wait until it is cold, otherwise you may be seriously burned.
- Disconnect the high-voltage wire from the spark plug. We unscrew the spark plug using a special wrench. We examine the candle.
- The part must be replaced if it is in poor condition, very dirty, or if a crack is found on the body.
- Check the gap between the electrodes. Their size should be 0.6 mm.
- We install a new spark plug and tighten it with a wrench.
- We install a high-voltage wire on the central electrode of the spark plug.
There is nothing complicated in this procedure, and absolutely any owner of a gasoline scythe can cope with it.
The lawn mower stalls after starting
The engine may stall after starting the device if the carburetor is not configured correctly or is misadjusted. It's very easy to identify. Vibrations may occur and are clearly felt during operation. You can make the adjustment yourself; you should strictly follow all the instructions written in the manual.
The engine may also stall due to a clogged fuel valve. In this case, it must be cleaned, and then the problem will be eliminated.
If the scythe starts up and then suddenly stalls, this means that the supply of fuel to the carburetor is difficult. It is necessary to loosen the carburetor valves, then the free flow of fuel to it will be carried out in the required quantity.
If there is excessive air leakage, then the engine may also stall. You should increase the speed a little so that air bubbles leave the fuel system. It is also worth checking the integrity of the fuel intake hose. If any damage is found in it, the part must be replaced immediately.
Gasoline trimmer does not start - 10 possible reasons
Before you try to make the tool work on your own, carefully study the instructions for its operation. Maybe the information contained in it will lead you to this or that idea. When operating under load, the trimmer stalled and will no longer start. There is a spark. Gasoline is supplied. Otherwise, you will have to find the cause of the malfunction using a selection method. Why the trimmer won’t start: the spark plug is flooded, after winter, under load, and other reasons for the breakdown of a gasoline trimmer. It may be one of the following:
- The switch on the boom is not turned to the “On” position. This is one of the simple steps, but from time to time newbies forget to turn on the tool before starting it.
- Similar errors include the lack of fuel in the tank. If the fuel runs out and you have forgotten about it, simply fill the tank (usually located near the engine) with AI-92 gasoline.
- Absence, inappropriate mixture or incorrect proportion of engine oil. Less than 50g of oil should be added frequently as a reference. The homelite trimmer doesn’t remember the model, it races and at the start time it doesn’t start well. This will serve as additional lubrication and will keep your trimmer's engine in working condition. Also keep in mind that there are different types of oil (“synthetic”, “semi-synthetic”, “mineral water”) - they all have different effects on the operation of the mechanism.
- If the mower-trimmer does not start after winter, drain the remaining fuel in the gas tank and replace it with fresh fuel. This is especially important for small, low-power trimmers with small motors that are sensitive to poor consistency. In addition, during the winter, sediment may form on the bottom of the gas tank, which causes problems with the operation of the device.
- Excessive pumping of fuel can also be one of the reasons why the trimmer stalls and does not start. When the air damper is closed, the spark plug is filled with fuel. It should be turned out and dried, and then stuck in its place and try to start the engine while holding the gas trigger. Chainsaw Shtil 180 won't start? Reasons and solution! Today, the manufacturer Shtil occupies a leading position among other companies that produce. It is better to check it beforehand for the presence of a spark between the electrodes. If there is no spark, the spark plug should be changed.
- Problems with the filter. The trimmer is not suitable for my case. Starts and runs, does not pick up speed. That the trimmer does not start when hot or even when cold. If the brush cutter does not start. If your trimmer has trouble starting, remove the air filter and run the tool without it. If everything works out, the filter should be replaced with a new one. Another option is to painstakingly clean and blow out the old one, but a replacement will still have to be done at some point.
- your trimmer stalled
and won't start? Try to clean the so-called breather - an element designed to smooth out the pressure in the gas tank. Cleaning can be done with an ordinary long needle. A clogged breather often causes a malfunction. - The knives have been removed from the machine - some models will not work under this condition.
- Violation of density. You can check this using a pressure gauge. If the pressure begins to drop, you should find which part of the carburetor is faulty. In most cases, the carburetor gasket wears out.
- From time to time, after a long period of operation, you may notice that the trimmer has overheated and will not start. The stihl fs45 benzo trimmer starts and tried to start. Or it won't start, mtd stc 55 p. Author. Firstly, you need to know that you should definitely take breaks. The amount of continuous operation time recommended for this model must be indicated in the annotation. You bought yourself a new petrol trimmer and in this case the brush cutter won’t start or. Also, the problem of overheating may lie in a faulty ignition coil or in the air cooling system, which prevents overheating.