The easiest way to obtain such holes is to use an awl with a diameter of 1 to 3 mm. This awl can be easily made from a thick needle or even from a piece of piano wire, the length of which is approximately 5 cm. The needle or wire is first hammered half the length into a piece of hardwood, and a handle is subsequently made from this wood. The end of the wire remaining outside is sharpened into 3 or 4 edges. A well-made awl in this case acts like a drill, piercing the wood, it is rotated and it cuts and turns out the wood fibers, and does not just push them apart.
How to drill a perpendicular and vertical hole
Although it is sometimes necessary to drill at an angle, it is most common to make vertical holes (that is, perpendicular to the surface). In order for drilling to take place strictly at an angle of 90 degrees, it is necessary to use special guides. They will allow you to drill perpendicularly without deviating in any direction.
The simplest guides allow you to make only vertical holes, but there are also more complex designs that allow drilling at certain angles.
Repairing large holes in drywall
Conventional adhesive adhesive is not suitable for large holes; there is a high risk of the glued piece falling out. Therefore, before repairing a hole in drywall on a wall measuring 10 cm or larger, you will have to stock up on tools and materials:
- Screwdriver and/or drill;
- screws;
- Wood block or picket;
- A piece of drywall of the appropriate size;
- serpyanka;
- Primer, putty, putty.
First, a rectangular piece is cut out with GCR, a slightly larger hole. Applying the purchased patch to the warped surface, mark the edges of the future hole. Then the drywall is carefully cut along the marked lines. To prevent the seam from bursting in the future, the edges of the liner and the hole are cleaned with a knife at an angle of 45 to form a triangular groove.
Next comes the turn of the frame for the patch: a wood block (picket) is cut 5-6 cm longer than the hole and moved inward. Pressing it against the seam side of the drywall, we screw the wood frame with screws from the front side. The number of bars depends on the size of the hole; they should be enough to keep the insert in a fixed position.
After fixing the patch, the surface is primed. The general seam is sealed with serpyanka and filled with base putty. Once dry, apply final putty and sand.
Portal about construction
How to drill metal How to drill glass How to drill tiles How to drill concrete How to drill wood and chipboard
Small diameter holes (up to 10-12 mm) in wood and chipboard are most often drilled with ordinary metal drills. They cope with their task quite successfully. But if every millimeter is important for the position of the hole, then you need to use special drills.
When entering wood, a metal drill may deviate slightly to the side, even if a recess is made with an awl at the site of the future hole.
In general, drilling wood can be done even with an ordinary nail or a piece of wire with a flattened end. Special drills for wood have to be resorted to only when it is necessary to drill a hole of large diameter, or when increased demands are placed on surface cleanliness and accuracy. There are several types of such drills:
- spiral (a);
- twisted or single-spiral (it is sometimes also called spiral) (b);
- feather (in);
- annular (crown) (d);
- Forstner cylindrical drill (d).
Drills for drilling wood
Drills for wood are made from tool alloy and tool carbon steels; metal cannot be processed with them.
Twist drill
drill holes of small and medium diameter. It can easily be replaced with a metal drill bit, although the hole will be cleaner if you use a wood twist drill bit.
Single twist drill
It has a sharp cutting edge and a screw shape that removes chips well. It is used when you need to get an accurate deep hole with a clean surface of the walls.
Feather drill
They are usually used when drilling holes with a diameter of 10 to 25 mm, although there are drills with a diameter smaller than 10 and larger than 25 mm.
This drill is the simplest in design and the cheapest, so it is reasonable to use it in all cases where high demands are not placed on the quality of the hole. The disadvantages of a feather drill include poor direction, low diameter accuracy, rough surface of the hole walls, and the need to periodically remove chips by stopping drilling and removing the drill from the hole. The advantages are simplicity and low cost. Feather drill
bits
used when drilling large diameter holes - up to 100 mm or more. The kits contain one mandrel with a shank and a centering drill and several bits that are inserted into the mandrel.
Drilling holes with
a Forstner drill
has a centering point and a sharp scorer. Thanks to the latter, it is distinguished by precise cutting geometry. Typically used for drilling blind holes to precise dimensions in softwood, chipboard or laminate for the installation of furniture canopies.
Forstner cylindrical drill
Forstner cylindrical drill
Forstner drill can be short or long pointed.
Forstner drills
It is more difficult to make a blind hole for a hinge in a thin door with a Forstner drill with a long point, since the point can make a through hole. But a drill with a short tip is more prone to moving to the side. In addition to differences in the length of the tip, the Forstner drills shown in the photo above differ in their maximum rotation speed. So a drill with a short tip has welded knives made of high-speed steel and is suitable for working at high speeds, and a drill with a long tip has a maximum rotation speed when working with soft wood equal to 1000 rpm.
There is another device for cutting large holes - this is a ballerina
, designed for cutting large (up to 300 mm) holes in thin pieces of wood, chipboard, fiberboard and other materials.
Ballerina
The ballerina consists of a centering drill and two cutters that are used to cut out a circle. The displacement of the cutters along the guide sets the diameter of the circle being cut. To rotate the ballerina, use a brace or drill with a low speed. You can also rotate it manually.
How to drill wood and chipboard
To prevent the drill from going to the side at the very beginning of drilling, you need to make a small depression in the center of the future hole with an awl. Drilling wood is carried out at low and medium speeds of the drill. The main problem when drilling through holes is chipping at the drill exit. There are two ways to deal with them. First drill a thin hole and drill along it from both sides of the part to the middle with a drill of the final diameter. In this way, it will be possible to avoid chips that occur at the exit. The second method is to firmly press a piece of wood onto the side where the drill comes out, which is removed after drilling.
To make the drill perpendicular, jigs are used. The latter are especially convenient for making holes in cylindrical parts.
Drilling jig
Drilling chipboard requires special attention due to its fragile structure. The presence of laminated or veneer coating complicates the task. To avoid their peeling, use drills with a sharp edge (in particular, a cylindrical Forstner drill) and a backing plate at the exit. To mark holes, be sure to use an awl.
Portal about construction
How to drill metal How to drill glass How to drill tiles How to drill concrete How to drill wood and chipboard
Small diameter holes (up to 10-12 mm) in wood and chipboard are most often drilled with ordinary metal drills. They cope with their task quite successfully. But if every millimeter is important for the position of the hole, then you need to use special drills.
When entering wood, a metal drill may deviate slightly to the side, even if a recess is made with an awl at the site of the future hole.
In general, drilling wood can be done even with an ordinary nail or a piece of wire with a flattened end. Special drills for wood have to be resorted to only when it is necessary to drill a hole of large diameter, or when increased demands are placed on surface cleanliness and accuracy. There are several types of such drills:
- spiral (a);
- twisted or single-spiral (it is sometimes also called spiral) (b);
- feather (in);
- annular (crown) (d);
- Forstner cylindrical drill (d).
Drills for drilling wood
Drills for wood are made from tool alloy and tool carbon steels; metal cannot be processed with them.
Twist drill
drill holes of small and medium diameter. It can easily be replaced with a metal drill bit, although the hole will be cleaner if you use a wood twist drill bit.
Single twist drill
It has a sharp cutting edge and a screw shape that removes chips well. It is used when you need to get an accurate deep hole with a clean surface of the walls.
Feather drill
They are usually used when drilling holes with a diameter of 10 to 25 mm, although there are drills with a diameter smaller than 10 and larger than 25 mm. This drill is the simplest in design and the cheapest, so it is reasonable to use it in all cases where high demands are not placed on the quality of the hole. The disadvantages of a feather drill include poor direction, low diameter accuracy, rough surface of the hole walls, and the need to periodically remove chips by stopping drilling and removing the drill from the hole. The advantages are simplicity and low cost.
Cone step drill
The most popular are drills with a diameter of 0t 6 to 30 mm. (less often up to 40 mm.) in increments of 2 mm. That is, 6, 8, 10, 12 mm. etc. Typically used for drilling sheet metal up to 2mm thick. and plastic up to 5 mm thick. The undeniable advantage of this drill is that for 1500 ─ 3000 rubles. you buy about 10 ─ 15 diameters.
Read also: How to make a mini growbox with your own hands?
If when drilling plastic, the drill behaves very well, then drilling holes of large diameters in metal is associated with some difficulties: with large volumes of work, a 6 mm drill quickly becomes dull; Drilling large diameter holes requires significant physical effort.
How to drill without a drill
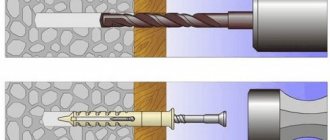
When renovating an apartment, attaching shelves, lamps, carpets, paintings and other items to the wall is not an easy task, especially if the walls are made of reinforced concrete blocks or panels. The main difficulty in this case is to punch a hole for a nail or screw.
Previously, 20 years ago, various bolts and drills were used for this. It was a difficult and long process. Today, all this work can be done using special power tools. The depth of the hole depends on its purpose. For fastening heavy objects, a hole with a depth of 5–7 cm is required. For lighter objects – 5 cm.
But what if you need to make a hole, but the electricity has not yet been supplied? The old way will do here. The hole can be punched using a special bolt. The technology is simple. Place the bolt at the point of the future hole and start hitting it with a hammer. After each blow, the bolt must be rotated around its axis. During operation, the bolt must be periodically removed from the hole and cleaned. Long, but effective.
You can punch a hole using a metal dowel. Using strong and sharp blows, we hammer the dowel into the wall 2–3 mm, then loosen it with pliers and remove it from the hole. We repeat these steps until a hole of up to 2 cm is obtained. It is difficult to make a deeper hole using this method. And one more way. This is when a hole is made with a drill inserted into a hand brace. In the absence of a brace, the drill can be used as a punch. In this case, you need to hit the drill sharply, but not too hard.
Through holes up to three cm
For repairs you will need a small set of tools and materials:
- Sharp knife;
- Sealant or PVA glue;
- Any material at hand to fill the space for the holes. This could be crumpled paper or a piece of foam left over from the packaging of received home appliances;
- putty;
- Sandpaper;
- Putty knife.
Before filling a drywall hole of this size, you need to prepare the surface:
- Clean the edges so that a smooth inner surface emerges without crumbling bits and pieces of paper;
- Carefully go over the inner edge of the cleaned hole and the area around it with primer at a distance of 5-10 cm;
- The prepared lumps of paper or polystyrene are smeared on the sides with glue and the hole is sealed with it. You need to make sure that the edges of the homemade cork do not protrude above the plane of the wall;
- After the glue has dried, seal the hole with putty.
READ How to Attach a Mixer to a Rotary Hammer
Subsequent steps depend on the type of decorative wall covering: the color requires careful alignment, since a small flaw is noticeable on the painted surface. Therefore, another layer of putty and careful smoothing with fine sandpaper may be useful.
DIY drill
Small-sized hand drills, the like of which you can make yourself, are best suited for this operation. To do this, two laces and a handle are tied on top to a rigid axis, which can be a steel or wooden rod, and a sharpened nail on the bottom. In the middle of the rod you need to attach a heavy flywheel, which will act as an inertial battery. In order to put this drill into action, the laces are manually wound onto the rod, and then, after installing the nail in the right place, they press the handle. The rod rotates and the nail is drilled, the pressure on the handle is stopped when the laces are completely untwisted. The flywheel rotates by inertia and winds them onto the rod again, and then stops and you need to press the handle again. Viscous wood species may not yield to such a drill, as the drill will get bogged down and slow down its rotation.
DIY screw drill
For the construction of a screw drill, a rotation mechanism from a children's top is well suited. Instead of a cartridge, a pencil holder from a compass works well. When you lower the engine with the same thread by hand, the screw axis of the drill begins to rotate. With this mechanism of action, the drill head must rotate freely on the axis.
If you don’t have a top at hand, you can bend the screw of this action yourself. To do this, you will need a strip of steel, one end of which must be secured in a vice mounted on a machine or on a table, and the other end must be secured in a hand vice. When the hand vise is rotated, the strip is evenly twisted into a screw, onto which a wooden slider with a pre-drilled hole is then mounted. In order to ensure that the engine does not have any difficulties when passing the screw surface of the strip, the strip is heated and, passing through it in this state with the engine, a thread is made on the strip. To make a hat, a small wooden ball with a hole slightly larger in diameter than the diameter of the screw is suitable.
While traveling in Laos I need to drill some holes in the wood of a double door to install a cabinet. The wood is quite hard and I don't have an electric drill (and can't find one).
I only have two small screwdrivers (- and +), a small hammer, but I can find screws, nails and other basic tools. The wood is hard (so much that I can't even get it to fit into a small screw), the screwdrivers aren't very good quality, and the screws are even worse.
Any recommendation on locking the door from the inside would be of interest if this is not possible.
Answers
Make a bow drill:
Take a piece of wood large enough to hold in your hand. Clean out a small hole in the forest. The non-pointed end of the drill fits into this hole. This is called "holding the hand."
You are going to use this block of wood to push the drill bit through the door.
Make a bow from strong wood and strong thread. Wrap the cord around the drill bit, perhaps a couple of times, to get a good grip on it.
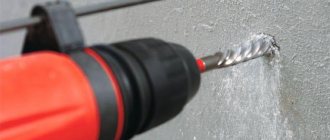
What to do if, when drilling a hole in concrete, the drill gets completely stuck in the wall
Basically, the drill jams as a result of getting between a piece of crushed stone and reinforcement, especially when drilling deep. If, when starting the tool, only a characteristic buzz is heard and nothing else, then this is a clear sign of a stuck tool. When starting work, it is important not only to know how to make a hole in the wall, but also how to remove a stuck nozzle.
If the drill is equipped with a reverse function, you can try turning it on. The reverse rotation will release the drill. This method is suitable if the jam was noticed immediately, and the situation did not have time to worsen.
Otherwise, the first thing to do in such a situation is to stop the process and turn off the tool. It is useless to immediately try to remove the attachment by hand or with a drill, as the drill may break off. In this case, it will be more difficult to remove it.
The stuck bit is removed from the drill, and another drill of a smaller diameter is inserted into the tool. Carefully, without touching the nozzle, clear the space around the jammed part from the concrete. When enough space is available, the drill can be removed from the wall with your hands or long-nose pliers.
There are more unusual ways to get a stuck drill out. When a significant part of it sticks out from the wall, you can put a gas wrench on it and try to unscrew it in the opposite direction. If you cannot turn the key by hand, you can try to do it with a hammer.
It happens that a drill stuck in a wall breaks. It is much more difficult to get a fragment than a whole nozzle. You can use a new drill to clear the space around the fragment and then try to loosen it and remove it with pliers. This is difficult to do if the piece is deeply embedded.
Another way: drill out the fragment with a larger diameter nozzle. The hole that has already been made expands to a piece of the stuck drill. Then there are two options: use a thin drill to expand the space around the fragment or try to immediately remove the fragment with long-nose pliers.
If the place for the hole in which the nozzle is stuck is rigidly fixed by the floor plan and it is impossible to move it a few centimeters, then the nozzle or fragment must be removed, and a wooden plug (dowel) must be inserted in place of the expanded hole. Otherwise, it’s easier to leave the fragment in the wall and cut down the piece sticking out (if any). The hole formed during the removal process is sealed with a solution.
What is a wood ballerina
A circular adjustable ballerina drill is a device that is designed for drilling round holes of large diameter. The tool has a simple design. It consists of a shank with a transverse rod on which movable carriages with cutters are attached. The rod has markings according to which you can set the required spread of the cutters relative to the center of the intended hole. A core drill is fixed in the middle of the shank. It serves as a centering element and support when drilling.
In addition to designs with two cutting elements located symmetrically, there are ballerinas with one cutter or even three. In the latter case, they are located on the base in the form of a disk with grooves.
Tool functionality
A high-quality ballerina is made of high-strength steel, which makes it possible to use the device in working with soft and hard wood.
This tool has an adjustable drilling diameter. This allows you to make holes of almost any diameter. The limitation of the drilling range depends on the size of the ballerina. Manufacturers produce devices with the following cutter spread limits:
- from 30 to 120 mm;
- from 40 to 200 mm;
- from 40 to 300 mm;
- from 40 to 400 mm.
The maximum drilling diameter is limited by the rod on which the cutters are mounted. The minimum is the thickness of the shank.
A ballerina drill can be used in any places where using a jigsaw or a hand router would be inconvenient. For example, this may be assembled and installed furniture, in the part of which it is necessary to drill a neat hole, given the limited space. Another example is an uneven (concave or curved) surface. It’s unlikely that you’ll be able to do everything smoothly and neatly with a jigsaw or milling cutter. It will be difficult to control the inclination of the tool relative to the surface. A ballerina can easily cope with this task.
Expert advice
In order for you to correctly drill a concrete wall, you must have the necessary equipment, perform all work carefully and adhere to the following recommendations:
Features of working with the tool
The principle of working with a circular drill is simple. A hole is drilled using a centering drill, and then the cutters are put to work. They gradually make a narrow groove, gradually cutting through the material in a circle to the full depth.
The materials used in working with the ballerina are varied: wood, fiberboard, chipboard, MDF, plasterboard, plastic. One common point is that the thickness of the part should be no more than 15-20 millimeters. This parameter is limited by the length of the incisors. Usually the manufacturer indicates the maximum drilling depth on the packaging. If you try to drill into thicker material, you may experience problems with ragged edges.
The use of a tool with one cutter is characterized by runout. This is caused by a lack of balancing relative to the longitudinal axis of the drill. The beating will be especially noticeable when cutting large diameter holes. Cut holes using a drill at low or medium speed. When working on a drilling machine, such problems do not arise.
Also, a laminated or veneered surface can cause inconvenience when working. After passing through the decorative layer, drilling proceeds without problems.
A feature of the circular drill can be considered the ability to adjust the diameter. The distance between the cutters can be set using a scale on a rod or more accurately using a caliper. This is convenient if you need to make a hole without gaps for a pipe or round part.
The spacing of the cutters relative to the center is adjusted individually. It is necessary to align the cutting parts as accurately as possible. This will eliminate unnecessary effort during operation and extend the life of the tool.
Repairing damage three 6 cm
Repairing holes in drywall ranging in size from three to 6 cm or larger is done using patches made from the same material. That's why you shouldn't throw away drywall treatments after repairs; you should throw in a few pieces just in case. Otherwise, you will have to ask familiar builders who work with GCR.
The most common method. cut a round hole in the warped area using a drill with a drywall fastening (crown). The hole is made with smooth edges. Then they start making a patch with that crown:
- Cut a square with sides four 5 cm larger than the diameter;
- A circle is drilled from the side of the seam, without reaching the front layer of paper;
- The plaster is cleaned with a knife, chisel or any other available equipment. The result should be a round insert with a square paper front;
- The plaster and drywall surface are based, not excluding the inside of the hole and the liner ribs;
- After the primer has dried, gypsum putty is applied to the edges of the hole and a plaster is applied to the hole;
- Using a spatula, spread the excess putty over the surface and press the square portion of the patch against the wall.
Subsequent actions. This is putty and processing with decorative material using conventional technology.
How to choose and what to pay attention to
Choosing a high-quality circular drill is quite easy. The main thing is to know the main points that you should pay attention to first, but also not to lose sight of the little things.
The design is a very important point: a wood ballerina comes with one chisel or two or more. For frequent use, it is better to purchase an option with two or three cutting elements. It is easier to work with such devices and the quality of the processing performed will be at an acceptable level.
It would not be superfluous to be able to replace individual parts. Inexpensive circle drills can have a solid shank with a permanent center drill and rod.
Metal, its quality determines its strength and ability to withstand workloads. High-quality tools are made from high-strength steel or alloys. The shank and cutter holders are shaped using a machine tool. The rod is usually stamped and made of the same metal.
Cheap options often use soft metal or alloys, which can be brittle. Under load, parts may become deformed or break. Such a tool will not last long and it will also be difficult to achieve accuracy from it.
The quality of workmanship, the main feature is the absence of backlashes and distortions. All parts must fit together and be securely fastened with fixing screws.
The markings of a high-quality ballerina's barbell are stamped. Sometimes the divisions are highlighted with bright paint for better visibility.
Cutters and high-quality cutting elements are made from hardened tool steel. They are secured to the holders with rivets or soldering. Solid cutters with holders (made of the same metal) quickly become dull and are not durable.
Manufacturer, when choosing any tool and consumables, preference should be given to well-known and long-proven brands and brands. The most common are Topfix, Stayer, Irwin, Strum.
Purchasing an adjustable circular drill for use at home, or if you need to drill several holes, is completely worth it. This eliminates the need to purchase an expensive tool that may only be needed a few times.
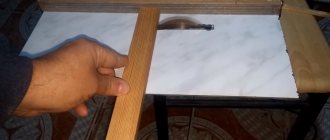
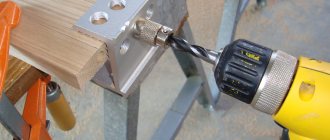
How to drill a straight perpendicular hole with a hand drill
If you don’t have a drilling machine at home or at least a stand for a drill, then drilling an even perpendicular hole is quite a difficult task. To do this, you will need special devices, for example, a jig for drilling holes, but you can’t buy such a device everywhere, or you need to make a vertical hole at 90 degrees urgently. Let's find out how at home you can easily drill a perpendicular hole using a regular hand drill.
The first device for evenly drilling holes is quite simple - it’s a pair of pieces of wood fastened together with a tenon and an iron construction fastening angle glued to the inside, that’s all, I further refined it with stain and varnished it since this is a device I use quite often.
How to drill a straight perpendicular hole with a hand drill
How to drill a straight perpendicular hole with a hand drill
It’s easy to use, we put it on its side, put the drill in the intended place, lean the inner corner of our homemade corner tightly against the drill and drill like that, if the hole should be very deep, and this corner is already in the way, then you can safely remove it and drill further without it , since then the drill itself will go straight.
How to drill a straight perpendicular hole with a hand drill
How to drill a straight perpendicular hole with a hand drill
The second device is a conductor made of a wooden block; using a corner, we mark an even line at 90 degrees on it. Then on a circular saw we set the cutting depth to about 5-7 mm and make cuts with it. Using a utility knife, we make chamfers on the edges of the cut and the jig for drilling vertical holes is ready!
How to drill a straight perpendicular hole with a hand drill
How to drill a straight perpendicular hole with a hand drill
How to drill a straight perpendicular hole with a hand drill
How to drill a straight perpendicular hole with a hand drill
Now we place our jig on the surface that we will drill, bring the guide recess to the drill and drill, pressing the drill to this cut.
How to drill a straight perpendicular hole with a hand drill
If you don’t have time at all to make such devices, you can simply take two slats, move one slat slightly relative to the other to form an angle and tighten them with clamps, then placing the clamp in this corner, you can quickly drill an even perpendicular hole with a drill without using a stand or drilling machine.
How to drill a straight perpendicular hole with a hand drill
Article rating:
How to drill wood without a drillLink to main publication
Related publications
- Hand tools of a professional electrician
Diamond drilling
This is another way to easily drill through a concrete wall.
. However, it is used only by professionals with special equipment (powerful electric motor, etc.).
How to drill a frame wall? This is not a problem because diamond drilling produces holes of large diameter and depth and without dust that irritates the eyes. At the same time, water is supplied directly to the drill, due to which it is cooled. As a result, the resulting holes have a neat appearance, and the appearance of cracks is completely eliminated.
How to drill tiles to avoid cracking? See here. What is a drill jigsaw? Find out in this article.
Drilling concrete walls using this method is usually performed by professionals from specialized companies. In the vast majority of cases, when installing hidden electrical wiring, one cannot do without such a dirty and noisy procedure as Strobl. Therefore, there is no point in stocking up on a diamond drilling rig for independent work.