Thermal cutter. Foam cutting machine. Mobile “goat” for cutting polystyrene foam. An electrical device made of nichrome thread, LATR, transformer or computer power supply has many names. It can be used everywhere. Make a wet facade based on foam plastic. Make carved decor for wall decoration or various crafts from PPS. Another plus is that the thermal cutter cuts foam plastic and EPS faster and better than a hacksaw or knife. It's not difficult to make it with your own hands. We offer you 4 options of machines for cutting expanded polystyrene, from trikopek ones - assembled from various “unnecessary items”, to the most advanced ones - based on a welding inverter.
Methods for cutting foam plastic at home
For self-processing of foam boards, various improvised tools and devices are often used. The most common methods for cutting material at home are:
- Open with a shoemaker's knife. The blade of the tool must have a special sharpening - the tip is blunt, and the wide part is perfectly sharp. When cutting with such a knife, unpleasant sounds are created.
- Processing the material with a soldering iron. It is recommended to flatten the end of the working part of the soldering iron to increase its thickness. The tool allows you to quickly and smoothly cut small foam products. You can also create rounded shapes using a soldering iron.
- Nichrome wire cutting. This option is considered the most popular when cutting polystyrene foam at home. Its main advantage is the accuracy and speed of product processing. For cutting material with a string, a stationary installation is made, which can significantly increase the productivity of the process.
Shoe knife - a device for cutting foam plastic at home
If necessary, you can make a nichrome device for cutting foam plastic with your own hands.
Tools
Hot electric knife for cutting paralon and foam plastic (150W,220V, 150mm blade)
The most commonly used tools for cutting foam are:
- knives;
- hacksaws;
- soldering irons;
- machines with nichrome wire as a working part.
In order to cut factory sheets of foam into separate pieces of the required size at home, they most often use a handy tool for cutting foam. These primarily include stationery knives, shoe knives, wood and metal hacksaws with fine teeth. It is necessary to cut foam plastic carefully, as it can crumble greatly during this operation. Moreover, the larger the grain, the stronger the crumbling will occur.
Knives for cutting foam plastic are well sharpened - the sharper the blade, the faster and more accurate the cutting . In addition to stationery and shoe knives, special foam knives with a special rubber lining are used. Also, in addition to sharpening, the blades are heated to facilitate cutting.
These tools can only make straight cuts. With their help, you can only obtain elements with straight sides: squares, rectangles, trapezoids, etc.
The main disadvantage of cutting with knives is that the thickness of the sheet should not exceed 5-7 cm. Hacksaws and saws with fine teeth are used even when the thickness of the source material is up to 30 cm, but the cuts are rough.
Mechanical cutting is always accompanied by a high level of noise, as well as the generation of a large amount of debris.
Using shaped cutting of foam plastic, you can make sculptures, figures and decorative elements
Shaped cutting of polystyrene foam is carried out exclusively by thermal methods. To do this, soldering irons with special attachments, as well as machines, are used.
Professional foam cutting machines are produced for companies that produce casting molds for metallurgy, scenery for theaters and film studios. They allow you to obtain elements of any shape, with arbitrary angles. Using such equipment it is possible to produce balls and rounded elements.
Professional machines are very expensive, and it makes no sense to use them at home.
The soldering iron attachments look like a steel plate that fits onto the thermocouple. The result is a constantly heated knife, which allows you to make holes in the sheets, as well as cut the sheets into pieces of arbitrary shape.
How to do it yourself
And to do this, you will need a piece of foam. For example, you can use foam from TV packaging. It is necessary to draw on it using a ruler, compass and ballpoint pen the places where holes will need to be made in the future.
This is where the need for an electric cutter comes into play. After all, it will be difficult to perform this action without spoiling the foam sheet without such a tool. Let's consider one of the options for how to make a device of this type at home.
A homemade cutting device can be of various designs. It is on it and the type of cutting that will depend on how exactly the cutter copes with its goals.
Aligning the machine filament
Aligning the filament over the tabletop of a homemade electric foam cutting machine at home is done by running the nuts on the insulating roller mounting posts along the threads. The same rollers lift the filament above the tabletop.
But it may happen that the filament of the foam cutting machine is aligned too high above the table surface.
Then, before cutting the foam, we place a board of the required thickness or two parallel bars of equal height on the table. We place a sheet of foam plastic prepared for cutting on the board and push an electrically heated filament through it.
Of course, heated nichrome will always be in a rigidly fixed position above the foam cutting table. We will move the foam away .
Cutting material using a hot tool
To cut a sheet of foam plastic, you can use the most ordinary knife, if you first prepare it for this procedure:
You need to make sure that the length of the knife is greater than the thickness of the sheet that will need to be cut. Next, you need to mark the lines on the sheet along which it will need to be cut. The next step is to heat the knife using a gas stove or a special gas burner
Carefully draw a hot knife along the intended line; the foam will begin to melt and cut clearly along the line.
It is important to consider that it is not possible to achieve a perfectly even cut using this method, and it is also only suitable for cutting small pieces of material. The fact is that even slightly shaking hands will not allow you to achieve a straight line, and a constantly cooling knife will not allow you to make a neat and long cut.
But if your goal is to cut off a small piece, then a hot knife will allow you to do this very quickly and without wasting extra money and time
Please note that after cutting, the knife should never be used in the kitchen or at home, as the foam contains toxic substances
Knife
A simple soldering iron cutter
If you need to make quite a lot of foam blanks, but don’t want to make an overly complex cutter, then you can use its simple analogue, which works on the basis of a regular soldering iron.
It is important to choose a soldering iron that is not too powerful, since its temperature is excessive for normal sheet cutting. If the power is too high, the foam will smoke a lot, smoke, and be difficult to cut
The next step will be to select and install a nozzle on the tip of the soldering iron, since the standard tip is in no way intended for these purposes. We need to find or make our own long and flat tip, which will look like a small knife blade, but less sharp. Copper wire folded several times is good for making such an item. Another option is to simply take out the tip of the soldering iron and shape it into the desired shape.
Next, the tip is tightly fixed to the tip of the soldering iron and you can start cutting.
The soldering iron is inserted into a socket, heats up and cuts the foam using a similar principle to a hot knife. The main advantage of this method is that there is no need to constantly heat the knife; cutting can continue continuously.
Soldering iron cutter
Features of work
While learning how to make a manual foam cutter yourself, it is also necessary to consider the operating features of such equipment. As mentioned above, such an instrument has a string. It heats up and melts the surface of the foam.
This material reacts quite poorly to heat.
Therefore, it is important to maintain the technology of the entire process. Cutting using a hot thread is done quickly. This allows you to achieve high quality cuts
This allows you to achieve high quality cuts.
It's easy to check the string's heating level. To do this, a test is carried out on a test piece of polystyrene foam. If, when immersing the thread, long pieces of material remain on it, it has not yet warmed up enough. If there is no foam on the string at all, then the temperature is too high. In this case, you will have to cool the instrument a little. With proper heating, you can perform fast, accurate cutting.
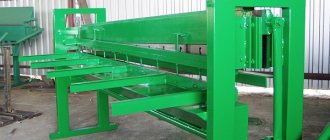
Specialized machines and their prices
Often, polystyrene foam is used not for insulation or soundproofing of buildings, but for the production of advertisements or in interior design. This is possible thanks to the use of special machines designed for figured cutting. What is typical is that with the help of such equipment it is possible to process material simultaneously in 2 or even 3 projections. If desired, you can produce the most complex elements, such as gears, chess, miniature models of cars, various figures, and any decorative ornaments.
Below are the most popular devices on the domestic market, as well as the average market price for them.
FRP-01
This unit owes its enormous popularity to the simplicity of its design and versatility. It is possible to produce molded elements, figures and letters for signs, insulating boards, and so on. The operation of the device is controlled using a computer program included in the kit.
The approximate cost of the unit is 110-115 thousand rubles.
FRP-01 machine for cutting foam plastic
SRP-K "Kontur"
Another wonderful model that allows you to produce various parts for facade finishing and formwork for pouring mortars. The control in this case is manual, but the power consumption is relatively low (about 150V), and it is very convenient to transport.
The average market price is about 42.5 thousand rubles.
Foam cutting machine
Expanded polystyrene is a good insulation material, an excellent raw material for various decorative elements, which you can make yourself. For decorative cutting of foam plastic, you will need a specialized machine. There are many options for such equipment, it all depends on the intended design of the product.
Cutting the material can be done using a tungsten filament. It should be noted that this thread is hot, but its temperature can be adjusted. In addition to polystyrene foam, you can cut other materials with this thread. This is especially true in the manufacture of various components intended for stucco.
The required stencil is applied to the expanded polystyrene plate, and an object is created using a tungsten filament. This procedure is not difficult and does not take much time.
You can also use a construction blade or cutter for the equipment. The design of the machines may differ, but the principle of operation remains the same - the use of a tungsten filament, which is connected to the electrical network. Using such a device, you can independently produce decorative elements from polystyrene foam of any configuration.
To perform cutting, it is recommended to purchase the following tool:
- Tungsten filament.
- String.
- Thermal cutter.
If you assemble the cutting machine correctly, there will be no difficulties during the work process. The main thing is to use a high-quality tool, show maximum diligence and care. And to perform such work, you do not need to contact experienced craftsmen.
Step-by-step instructions for making a cutter
First we need to decide on the tools and materials that we will need to create the cutter. The list of required materials includes:
- A sheet of chipboard or other dense base, approximately 600 by 400 millimeters in size. The size can be changed, it will depend on the size of the sheets you are going to work with.
- A flat wooden strip, about a meter long.
- Material for legs: 4 caps from plastic bottles, a piece of lath or other material.
- Nichrome wire, approximately 0.4 mm in diameter. You need about half a meter, but it is better to buy with a reserve.
- Tension spring. It is for tension, not compression. Such a spring cannot be found everywhere.
- 10-15 screws.
- Wires, crocodiles for fastening them.
- Computer power supplies and cable for it.
Now let's move on to the tools that we will need to manufacture and assemble the structure. These include:
- Drill or screwdriver;
- Jigsaw or hacksaw for wood;
- Screwdriver;
- Pliers;
- Drill for screw diameter.
DIY world
Rating: 5 / 5
Methods for cutting large sheets of foam plastic. The nichrome thread is suspended vertically (Fig. 1) or stretched horizontally to the table surface (Fig. 2).
By adjusting in the first case the distance from the thread to the movable guide angle and in the second - the height and angle of the thread relative to the table surface, you can obtain workpieces of any shape and size.
The expansion of the thread when heated is selected using a weight.
By changing the distance between the movable contact-clamps (crocodile type), the filament heat is adjusted. When working with small foam pieces, there is no need to make a special frame to secure the nichrome thread.
To do this, you can use a regular jigsaw or hacksaw, replacing the file or blade with nichrome thread (Fig. 3). In this case, it is necessary to carefully insulate the current-carrying contacts on them.
Insulate the moving part of the hacksaw that regulates the thread tension from the body with asbestos or a paper gasket, and the tension wing with a textolite washer.
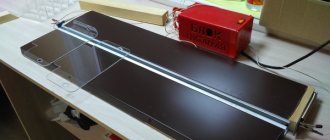
Thermal cutter for shaped cutting of foam plastic. The cutting part is a piece of nichrome wire attached to a handle made of insulating material. The design of the tool is shown in Figure 4.
| Rice. 4. Thermal cutter device: 1 - nichrome wire (spiral from an electric stove), 2 - screw with nut and washer, 3 - handle (textolite S 4 mm), 4 - electrical cord, 5 - plug, 6 - rubber or vinyl chloride tube. |
A thermal cutter allows you to make indentations, cut out cavities in the thickness of the material, and generally handle foam plastic the way a sculptor handles clay. After such treatment, a thin melted crust remains on the surface, increasing the rigidity and strength of the foam and closing its pores. You can make a step-down transformer yourself. For this you will need transformer iron Ш20Х24. The primary winding contains 1600 turns of wire brand PEV-1 0.39 (or PEV-1 0.44), and the secondary winding contains 50 turns of wire of the same brand and thickness 1.0-1.1 mm. To select the current value, make a rheostat (a pre-stretched spiral from an electric stove is suitable for it). For the winding frame, use a suitable asbestos-cement or ceramic tube 0 10-15 mm and about 80 mm long. The nichrome wire should be wound until the frame is filled. If you are seriously interested in cutting polystyrene foam, then it makes sense to prepare several of these cutters (Fig. 6) with different tips.
Rice. 7. Some techniques for working with a thermal cutter: a - formation of a cavity, b - chamfering.
What material to choose for cutting
Before we start working with the material, we need to find out what kind of foam there is, what type of foam is best used for cutting at home.
Polystyrene unpressed
This is the most common and familiar polystyrene foam, which is familiar to us from technology packaging. The material consists of many small white balls that are tightly connected to each other, but can become separated from mechanical stress. It is very widespread and is most often used in the manufacture of products at home.
Polystyrene pressed
This is a similar type of foam, which is simply additionally pressed. Because of this, it has a much denser structure, it is more difficult to crumble, but such material also costs much more than its non-pressed counterpart. Due to the high price, pressed polystyrene foam is not widely used, but for some products it can definitely be used, since its structure is quite smooth.
Polystyrene extruded foam
Polyvinyl chloride foam
The rarest and most unused type of this material, which has one interesting property - the ability to extinguish on its own when ignited. It does not emit hazardous substances, but if it does catch fire, the smoke from it is very dangerous and can pose a health hazard.
Types of electric cutters
The electric foam cutter can be used for a variety of purposes. This will determine the type of design and overall performance characteristics of the equipment. There are three main types of homemade cutters.
The first category is used for linear cutting. The second group includes cutters that perform shaped cutting of material.
Designers use them. This type is used less frequently for home repairs. There is also a tool with a metal working plate.
Such equipment must have a step-down transformer in its circuit. It must be rated for a minimum power of 100 watts.
The secondary winding of the transformer must have a cross-section of at least 1.5 mm. It must withstand a voltage of 15 V. In this case, you can achieve high performance results.
Metal plate cutter
There is another way to convert a soldering iron into a foam cutter. To modify the tool, you simply need to replace the tip with a copper plate. Steel will also work, but it takes longer to heat up and is more difficult to sharpen. However, with proper sharpening, a steel plate can cut any synthetic material, including polystyrene.
One side of the plate must be carefully sharpened. Sharpening can be done on both sides. It is necessary that the sharpening angle is not too large. The cutting of the material is carried out not only by the blade, but also by the blade of the plate. Such a cutter has one drawback - you will have to experimentally find the optimal heating temperature for the knife.
Step-by-step production of a thermal cutter
- Sleeve.
Initially, you need to make the main and most difficult thing - the bushing. So, to do this, the plate must be bent and turned. Next, you need to make a hole in the sleeve; the thread will be inserted there in the future. - Burner.
You need to cut off the wire that leads to the hole, take suitable connectors, and then solder them to the break point.
Please note: such areas must be isolated
After everything is done, you can connect the thermal cutter. Cut an old jigsaw in half. A pre-prepared claw plate must be attached to the upper part with screws
But we attach the bottom to the base using self-tapping screws.
Insert the sleeve into the foot. Now, with special attention, you need to use a plumb line or a square to mark the point under the hole of the sleeve from the hole. Next, drill a hole in the base. The diameter of the hole in the base should be about 5 mm
The diameter of the hole in the base should be about 5 mm.
Thermal cutting machine So, when everything is ready, you need to straighten the nichrome wire. To do this, you should turn on the burner at full power and touch the nichrome with the wires from it. Everything must be done in such a way that there is a distance between the wires equal to the height of the device. If the thread does not heat up, but the burner begins to hum, find a thinner wire. This is necessary because the one you selected does not have enough resistance.
Take note:
nichrome should be hot, but should not get red hot. If the string turns red, you need to reduce its heating using the regulator. In the event that the nichrome is red even at a minimum, then a compensator should be left 5-10-15 cm above the spring of nichrome wire. And only after that you can make contact.
- Operation of the device.
With a pre-installed guide, you need to cut foam dies to a given thickness, or you can make the shape curly.
Homemade thermal cutter from a soldering iron
Diagram of a thermal cutter made from a soldering iron: 1 – safety screen, 2 – 2 M6 bolts with clamps, 3 – brackets, 4 – stand, 5 – section of a straight tip, 6 – copper plate, 8 – wooden board, 9 – support legs.
To process foam plastic, not only heated wire can be used, but also a heated metal plate. The basis of this thermal cutter (see Fig. 7) is a conventional soldering iron with a power of 60 W, designed for a voltage of 220 V. Instead of the usual tip, this device uses a plate knife, which is the main element of the cutter. It can cut not only foam plastic, but also any hot-melt synthetic material.
The base of the device is a sheet of heat-resistant plastic, plywood or a wooden board (8), to the bottom of which support legs (9) are attached. They are needed because in the middle of the base there is a gap into which the heated knife is lowered. Opposite the slot at the edge of the pad there is a stand (4) with brackets (3) for installing a soldering iron.
The stand is made of a metal tube, and the brackets are made of 2 M6 bolts with clamps (2). A safety screen (1) is also attached there, which protects the worker’s hands from burns.
The thermal cutter knife is a copper plate (6) pressed into the cut of the straight tip (5) of the soldering iron. The cutting edge of the knife is sharpened at a slight angle. It can be sharpened on one or both sides. The degree of heating is selected experimentally.
Unconventional cutting method - nichrome thread
All the methods presented above allow us to process polystyrene foam exclusively in a straight, even line. In situations where you need to make an unusual shape, a semicircle or a zigzag, you can use unconventional methods. For example, nichrome thread. With its help, you will learn how to cut foam plastic so that it does not crumble, with minimal time and physical costs.
First, you will need to do some preparatory work to assemble the necessary equipment. So, you should make sure you have a small spring, a 24-volt transformer and nichrome wire. The working surface of the table is set at an angle from 20 to 60 degrees. We stretch the wire across the table. We fix the ends of the wire on each side of the table with a spring.
No garbage, everything happens very quickly and without unnecessary movements. The only difficulty is assembling the necessary equipment, since not everyone has transformers.
Thus, there is nothing overly complicated about how and how to cut polystyrene foam at home. Even with an ordinary knife you can perform all the necessary operations. If you purchase better equipment, the processing process will take a minimum of time, without additional effort, noise and debris.
Features and benefits of polystyrene foam
The material is made in white color, consisting of almost 95% air. Due to the absence of harmful substances in its composition, the insulation is environmentally friendly and cannot harm human health. Polystyrene foam is manufactured in slabs of different sizes and thicknesses, and is also used for many different tasks due to the huge number of the following positive qualities:
- Resistance to moisture, due to which the insulation is not negatively affected by various fungi and mold. In addition, due to its resistance to humidity, the insulation does not age and is not susceptible to destruction under its influence.
- Light weight, allowing you to easily transport and carry the foam, as well as use it when carrying out repair work and performing many other tasks that are conveniently carried out not only with someone, but even alone with your own hands. Due to its extraordinary ease, when installing outdoors, you need to take into account that its sheets can fly away even with a weak breeze.
- The material withstands low and high temperatures, as well as temperature changes, which is why it can be used not only for internal, but also external insulation of a house. In addition, polystyrene foam can be used for a number of other tasks, for example, it can be used to insulate a metal entrance door.
- Ease of cutting. Thanks to this, you can cut foam plastic with your own hands at home without the help of specialists, using various tools.
- High thermal insulation and sound insulation performance. In the first case, the insulation provides reliable protection of the premises, preventing the penetration of cold from the street, as well as retaining heat inside the buildings, which makes it possible to significantly reduce the cost of heating them. Good soundproofing qualities significantly reduce the amount of incoming and outgoing noise and allow, for example, when living in an apartment building, to listen to music louder and not create any inconvenience to neighbors.
Taking into account all the above indicators, polystyrene foam is an excellent thermal insulation material, which, in addition to all of the above, also has a fairly long service life without losing its positive qualities over time.
Shaped cutting
Lately, shaped cutting of foam plastic, for which a thermal cutter is used, has been quite in demand. The cutting element in this case is a nichrome wire, attached to an equipped handle made of insulating material. The thermal cutter makes it possible to make indentations of various shapes in polystyrene foam.
After such treatment, a melted crust is formed on the surface of the material, which gives greater strength to the material, but also covers the pores. Therefore, it is necessary to use a step-down transformer, which is made independently. You just need to purchase specialized transformer hardware.
To correctly select the current value, it is necessary to make a rheostat, for which you can use a pre-stretched spiral of an electric stove. To make the winding frame, you can use a ceramic or asbestos-cement pipe (pipe parameters: thickness 1.5-2 cm, length 8 cm). Nichrome wire must be wound onto the pipe until the frame is completely filled.
Stages of creation
- Cutting part. To do this you will need nichrome wire, approximately a spiral with a diameter of 0.6 mm. It can be taken from old electric stoves or other heating electrical appliances. The length of such a wire should be 14 cm (its resistance will be 2 ohms).
- Transformer application. For everything to be correct, the first step is to calculate the voltage and current for heating the cutting part. This can be done using the formula - Ohm's law I=U/R. Thus, you can determine the power of the power transformer.
- Making a cutter. The base can be made of any metal, but its length must be at least 11 cm. Next, an insulator - a PCB plate - must be attached to the end. Now fasten the contact groups along the edges of the plate; they can be removed from the electrical outlet. It is into these contacts that it will be possible to attach spirals of different shapes.
- How does the cutter work? After the cutter is plugged in, the wire will heat up and become slightly reddish in color. This is exactly what matters, since a heated cutter will make it possible to easily and quickly cut the foam, which will not peel off.
It is important to know: having received such a device, in just three minutes you can cut the required shape from a sheet of foam plastic.
Be sure to follow all safety rules so as not to injure yourself and others. After all, the power of the cutter is enough to damage any part of the body during operation. And connecting to electricity further increases the risk of injury.
Making a laser cutter
First you need to remove the laser cutter from the drive. This work is not difficult, but you will have to be patient and pay maximum attention. Since it contains a large number of wires, they have the same structure
When choosing a drive, it is important to consider the presence of a writing option, since it is in this model that you can make notes with a laser. Recording is done by evaporating a thin layer of metal from the disc itself. In the case when the laser is working for reading, it is used half-heartedly, illuminating the disk
In the case when the laser is working for reading, it is used half-heartedly, illuminating the disk.
Laser cutting diagram.
When dismantling the upper fasteners, you can find a carriage with a laser located in it, which can move in two directions
It should be carefully removed by unscrewing; there are a large number of detachable devices and screws that are important to carefully remove. For further work, a red diode is required, with the help of which burning is carried out
To remove it, you will need a soldering iron, and you also need to carefully remove the fasteners
It is important to note that the irreplaceable part for making a laser cutter should not be shaken or dropped, therefore, it is recommended to be careful when removing the laser diode
To remove it, you will need a soldering iron, and you also need to carefully remove the fasteners
It is important to note that the irreplaceable part for making a laser cutter should not be shaken or dropped, therefore, it is recommended to be careful when removing the laser diode
Once the main element of the future laser model is removed, you need to carefully weigh everything and figure out where to place it and how to connect the power supply to it, since the diode of a writing laser requires much more current than the diode from a laser pointer, and in this case you can use several ways.
Next, the diode in the pointer is replaced. To create a powerful laser, the original diode must be removed from the pointer, and a similar one from the CD/DVD-RW drive must be installed in its place. The pointer is disassembled in accordance with the sequence. It must be untwisted and divided into two parts, with the part that needs to be replaced on top. The old diode is removed and the required diode is installed in its place, which can be secured with glue. There are times when difficulties may arise when removing the old diode; in this situation, you can use a knife and shake the pointer a little.
Laser pointer diagram.
The next step is to make a new case. To make the future laser convenient to use, connect power to it and use a flashlight body to give it an impressive look. The converted upper part of the laser pointer is installed into the flashlight and power is supplied to it from rechargeable batteries, which is connected to the diode
It is important not to confuse the polarity of the power supply. Before assembling the flashlight, the glass and parts of the pointer must be removed, as it will poorly conduct the direct path of the laser beam
The last step is preparation for use. Before connecting, you need to check that the laser is securely fastened, that the polarity of the wires is connected correctly, and that the laser is installed level.
After completing these simple steps, the laser cutter is ready for use. This laser can be used to burn paper, polyethylene, and to light matches. The scope of application can be vast, everything will depend on your imagination.
Thermal methods for cutting foam plastic
Cutting material using a thermal cutter is also a fairly popular method. The instrument itself has the appearance of a nichrome thread, which is laid on a frame in the shape of a frame. When an electric current passes through the nichrome wire, the metal surface heats up and the foam begins to melt. There are several types of cutter designs. The simplest option takes the form of a nichrome string stretched over ceramic insulators, which are attached to the edges of a frame made of wood or metal.
Using this tool, you can cut not only foam boards, but also wooden slats, plastic pipes, as well as any material that melts or decomposes at temperatures up to 270°C. If you need to cut sheets with a significant length of cut, then it is much more comfortable to use the machine, which looks like a thread stretched in a vertical position on a textolite stand.
To control the heating of the nichrome string, an LATR or rheostat is used. Excessively high surface temperatures can cause melting and even lead to fire of the insulation. The advantage of this method is the complete absence of dust and debris, and the cut site itself takes on a melted appearance, outwardly reminiscent of alkyd varnish treatment.
If, in the process of working with foam plastic, there is a need to cut off only small parts of sheets, for example, when making models and sculptures, then the best option is to use an attachment for a powerful electric soldering iron.
In addition, lasers are used to cut this material. In some cases, it is even used at home. For this task, an ordinary LED laser with a power of 2-5 W is used, through which it is possible to cut foam boards along any desired trajectory. At the moment, using such a tool, you can cut paper and foam plastic within 10-15 minutes, which is why it is quite difficult to process a significant volume of material with it.
Having familiarized yourself with the different options, you can not only find out what is better for cutting polystyrene foam at home with your own hands, but also choose the most suitable method for use, through which it will be convenient to cut it.
Video:
You may be interested in:
How to glue foam plastic to the ceiling: frame and frameless fastening
How to cut penoplex at home: choosing the right tool
How to insulate a floor under linoleum: optimal materials for installation
Electrical circuits of the power supply
You can apply power voltage to the nichrome thread of a foam cutting machine using several circuits.
What is LATR and how does it work?
The industry produces laboratory autotransformers, which are commonly called LATR (adjustable laboratory autotransformer). They are connected directly to a 220 V household power supply and, depending on the type of LATR, are designed for different load currents.
LATR is a toroidal transformer with one primary winding, along the turns of which, when the handle located on top is rotated, a graphite wheel moves, allowing you to remove voltage from any section of the winding. In this way, the voltage at the LATR output can be changed from 0 to 240 V.
The wires to the LATR are connected using a terminal block, on which its electrical diagram is drawn and the inscriptions “Network” and “Load” are written. A cord with a plug is connected to the “Network” terminals to connect to a household network. The “Load” terminals are used to connect a product that needs to be powered with a voltage different from the household power supply.
Attention! One of the power wires, the bottom terminals in the photo, is connected directly to one of the load wires. Thus, if a phase gets on the lower terminal, then touching this circuit will be dangerous for a person.
Therefore, in the case of using LATR to heat the nichrome wire of a foam plastic cutting machine without an isolating transformer, it is necessary to check the absence of a phase on the common wire with a phase indicator. If there is a phase on it, remove the LATR supply plug from the socket and, turning it 180 degrees, insert it again. Recheck the bottom wire for phase presence.
Usually there is a label on the LATR body that provides data on its load capacity. On the LATR shown in the photo, the label is installed directly on the adjustment knob.
From the label it follows that this is a LATR of the LOSN type, the output voltage can be adjusted in the range from 5 to 240 volts, the maximum load current is 2 A.
If the design current does not exceed 8 A, then it is quite possible to power the nichrome wire through an LATR type RNO 250-2.
This LATR allows you to connect a load with a current consumption of up to 8 A, but given the short duration of operation of the device for cutting foam, it will completely withstand a load current of 10 A.
Before using LATR as a power source, it is necessary to check its functionality. To do this, you need to connect a power cord to the “Network” terminals of the LATR, and a multimeter or pointer tester turned on in the alternating voltage measurement mode to the “Load” terminals, to a limit of at least 250 V. Set the LATR voltage adjustment knob to the minimum voltage position. Insert the plug into the socket.
Slowly turn the LATR knob clockwise to make sure that the output voltage increases. Return the LATR handle to the zero position. Remove the plug from the network and connect the wires coming from the nichrome thread to the “Load” terminals. Insert the power cord plug into the socket and use the phase indicator to check the absence of phase on the nichrome wire. Having dealt with the phase, you can slowly turn the LATR handle to apply voltage to the nichrome wire. It should be taken into account that the wire heats up gradually, over several seconds.
Attention! It is strictly forbidden to touch the wire with your hand to check the degree of its heating when the supply voltage is applied to it! The temperature of the wire is very high and you can get burned!
When the wire heats up to a slightly noticeable glow, you can begin cutting the foam on the machine.
The principle of operation of the frame is shown in the diagram
The wire cutter must be electrically isolated from the frame. Therefore it can be made of metal. It is important to ensure constant tension on the wire. When heated, nichrome expands, adding up to 3% in length. This causes the string to sag.
Therefore, tension is provided by a weight or spring. It must be selected carefully. Excessive force may break the wire if it gets too hot.
The temperature is provided by the strength of the flowing current. Voltage is not important, so it should be kept as low as possible for operator safety. Optimal value: 12-36 volts. Setting it too low will result in more current to achieve the same power since nichrome has high resistance. There will be a voltage drop.
The power supply circuit must be made adjustable. The best option is LATR. The output voltage adjustment is smooth, the transformer can withstand a heavy load.
Before finishing work, you should practice on unnecessary pieces of material. Cutting polystyrene foam with your own hands using nichrome is akin to playing musical instruments. The power characteristics need to be adjusted, and the optimal speed needs to be felt. It is useful to mark the voltage regulator.
Another power source is a car battery. A high power variable resistor will be required to adjust the temperature. The advantages are obvious - you can work in conditions of lack of power supply.
Simple foam cutting tool
This foam cutting machine allows you to perform cross cutting, or remove a layer of any thickness along the sheet. The density of the material does not matter; everything is regulated by the temperature of the thread and the speed of movement.
Circuit using a step-down transformer and a current-limiting capacitor
You can establish a stable output current from the secondary winding of the transformer using ordinary capacitors connected to the primary winding of the transformer.
The capacitor must be designed for a voltage of at least 300 V and have a capacity, depending on the type of transformer and the current consumption of the nichrome spiral, of the order of 50 μF. Based on this principle of stabilizing the current on the secondary winding, I have developed a charger circuit for car batteries. The transformer must be of appropriate power and have a 10% voltage reserve.
Circuit using LATR and step-down transformer
If the amount of current consumed by the nichrome wire is greater than the LATR can provide, then you will have to additionally turn on a step-down transformer after it according to the electrical diagram below.
As you can see, unlike the previous diagram, the network winding of the power transformer is connected to the output of the LATR, and the nichrome spiral is connected to the secondary output winding of the transformer. In this circuit, thanks to the isolating step-down transformer, the nichrome spiral is not galvanically connected to the electrical network and is therefore safe for operation. In addition, it became possible to more smoothly adjust the output voltage and, therefore, more accurately set the temperature for cutting foam plastic on the machine.
The power of the transformer and the voltage on its secondary winding are taken based on calculations performed using the above method. For example, for the proposed design of a machine for cutting foam plastic, with a nichrome wire diameter of 0.8 mm and a length of 50 cm, the power source was an LATR with an output current of 2 A, followed by a step-down transformer with a power of 150 W and a voltage on the secondary winding of 12 V.
Cutting foam with a hacksaw and grinder
Using the first tool, cutting insulation is much easier, although the principle of the work performed is no different from what happens when using a knife. It is often preferred when there is a need to cut slabs up to 8-10 cm. To cut foam sheets, you can use a hacksaw for metal or wood, but in any case, the blade must be of optimal length and have small teeth. With such cutting elements, the cut will be noticeably smoother, and the amount of debris generated will be an order of magnitude less. You can carry out work using this tool in almost any convenient position.
When cutting, it is only important to make a smooth movement of the hacksaw, and not jerkily
Cutting foam sheets can also be done using a grinder and an electric jigsaw, but in this case it must be taken into account that a significant amount of debris is generated during the work. This is due to the fact that in the first situation the tool circle rotates at high speed, and if the disk also has large teeth, then during the cutting process there will be significant destruction of the insulation structure at the cut site. If you reduce the speed to a minimum value, the foam will begin to burn and melt, which must be avoided to avoid damage.
In general, the grinder is excellent for cutting slabs up to 50 mm thick, but the quality of the cut will be an order of magnitude better than when using a knife, hacksaw or other electric tool. To obtain an optimal result, you need to use a thin diamond-coated wheel, which, after passing through, creates a better-quality cut than when using a disk designed for working with metal.
When carrying out work, you can also use a jigsaw, but with its help it is not possible to achieve perfect evenness on the cut due to the vibration of the file, and also a lot of small debris appears during the cutting process. A significant advantage of its use is the ability to make shaped cuts, which are much more difficult to make using the other tools listed above.
How to cut foam without special equipment
The first common question is what to do if you need to cut foam, but building a special cutter is too difficult, expensive and useless. There is a way out, even several.
Methods for cutting foam plastic
Wood hacksaw
The large teeth of the hacksaw allow it to grab onto the foam granules and cut it quite effectively. To implement this method, you do not need to modify anything yourself; you just need to purchase or take a ready-made hacksaw for wood. In the same way, cutting can be done using a jigsaw; in this case, it will be important to choose the right file for it.
Wood saw
But this method is not widely used, since when using it, the foam will crumble in any case, and it will not be possible to achieve a perfectly even cut. Also, if you use the tool carelessly, the plate may crack and all the work will go down the drain. Therefore, the following methods are almost always used to cut such capricious material.
Do-it-yourself foam cutting machine
Cutting machines are more convenient because the cutting thread is fixed in them and only the foam plastic needs to be moved. This allows for increased precision of movements. During manufacture you will need the same tools and equipment as in the previous case.
An angular ruler marks the place where the filament will go. If the surface is fairly flat, this can be done using a plumb line. To do this, a self-tapping screw with a wide head is screwed into the end, and a thread with a load is wound onto it. A hole with a diameter of 6 mm is drilled in the selected location. To prevent the string from burning the wood, a plate made of textolite or metal is installed. The material should be placed flush with the surface.
A wire is threaded into the hole, the lower end of which is put on a self-tapping screw. The screw is screwed in next to the hole. The length of the spiral should be such that when heated it turns red. Since the wire elongates at high temperatures, it is necessary to use a compensating spring to avoid sagging. A spring is attached to the top self-tapping screw, and a nichrome thread is attached to it.
An energy source is connected to the ends of the thread, which can be a battery with a voltage of 11.7-12.4 V. To regulate this indicator, a thyristor regulator circuit is used. The regulator can be taken from an electric angle grinder. You can also control the tension using a spiral on a polystyrene foam cutting machine.
This spiral is mounted on a wooden block to which the upper edge of the filament is attached. Connects to the wire in series. Its function is to lengthen the nichrome thread and, accordingly, reduce tension. This can be achieved by changing the connection location to the nichrome spiral. The shorter the distance, the more the thread heats up and the more the foam melts.
If a transformer is connected to the machine, it must be galvanically isolated. In this case, a transformer with taps must be used.
With the help of such a simple machine, you can cut foam plastic with your own hands. Additionally, you can make various devices. During repairs, you can make a miter box with your own hands or a tray that will help you cut the material evenly at the desired angles.
Homemade foam cutter
A homemade cutter is designed for minor work. It is not possible to cut an entire sheet of polystyrene foam with it. To cut foam plastic at home, you must:
- Make 2 holes in a wooden block 10-11 cm long. They should match the diameter of the pencils. You need to step back 1-1.5 cm from the edge. The recess should be slightly deeper than half of the block in order to fix the pencils. Thanks to this distance, you can cut a sheet of foam plastic of almost any thickness.
- Glue both pencils into the holes using hot glue or PVA.
- Make a small hole in the top of each pencil for the copper wire.
- Bend the copper wire with round pliers so that small rings are formed at its ends. After this, install it into the holes in the pencils.
- Glue the battery connector perpendicular to the wooden block. Additionally, it will act as a handle.
- Glue a switch onto the block so that you can turn off the power to the string.
- Then connect 2 wires to the connector. After this, connect to the switch, and then output each to a separate pencil. To prevent the wire from sagging and interfering with work, it is fixed with electrical tape. To ensure reliable connection quality, you need to solder the wires to the connector. The joints must be insulated using heat shrink tubing or electrical tape.
- Remove the braid from the second end of each wire and screw it to the copper wire. Solder the connection.
- Thread the nichrome thread into rings of copper wire and secure to them. The string should be pulled tight between the pencils. When heated, it stretches and sags a little. The stronger the tension, the less sagging.
- Insert batteries into the connector and start cutting foam sheets.
This way you can make a simple device for cutting foam plastic with your own hands. And another option for manufacturing the machine, see the video: