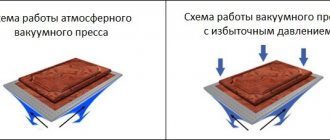
Heat bending equipment (string)
Heat bending equipment (string)
Post by neznaika » Jun 28, 2006 7:28
pm Hello. Can you tell me where I can buy a device for bending acrylic; it is popularly called a zipper or a thermal designer. Previously they sold TDC, but now they don’t. I tried to search, I couldn’t find it on sale, they answered that they make such a device themselves, but how exactly.
In general terms, of course, I prefer how it works, but maybe you can read it in more detail somewhere, or better yet, buy it ready-made
Post by Nikolay » Jun 29, 2006 4:12 pm
Good afternoon Oleg.
We bend acrylic on a hot string. The string is mounted on 2 rollers mounted on bakelite plywood (10 mm). One roller is stationary, and the other with a spring (to tension the string while it is heating). Transformer 220 V with 24 V output. Nichrome string D = 0.5 mm, length no less than 600 mm (choose it when connecting so that it is not very red when heated, or install a lat-rheostat). The string runs along the edge of the plywood without touching it. You will attach 1 mm plastic to the table and place an acrylic blank on it, the blank should be higher than the string. Of course, there are ready-made machines for 4 strings. I saw him at an exhibition in Moscow two years ago. I looked at it and did what I described above. With respect, Nicholai.
Equipment and tools for cutting and bending plexiglass.
Post by Ramires » 12 Jul 2006 15:56
We were planning to buy a milling and engraving machine. The goals are the production of small volumetric letters, the production of POS products (price tags, etc.) from plexiglass. Tell me which router is suitable for these purposes (it is unlikely to be European or American). The table size is approximately 100x100. It is desirable that the machine subsequently be suitable for other tasks (engraving, composite processing.)
And a separate question: does anyone have special equipment for bending plexiglass? How much does this pleasure cost, and where can I get it?
Post by neznaika » 12 Jul 2006 20:58
Post by Sergey Belokurov » 13 Jul 2006 05:44
Ramires There are two solutions: “cheap” and “manual”.
Let's start with manual. You need a jigsaw and a string, the cost is insignificant, but everything will have to be done by hand. It will not be possible to cut the composite in the future.
Cheap way. This is a milling machine for cutting, and again bending with a string. The method turns out to be semi-manual, but you can cut composite and wood and brass and plastic with a milling machine. The issue price is about 10 thousand conventional units.
Post by Alexander Romanov » Jul 13, 2006 08:38
Since we're talking about plexiglass, you can't find a better string. It can bend almost any plastic. It’s simple, cheap, and relatively safe.
How to bend plexiglass?
Post by Anton Kuznetsov » 17 Oct 2006 21:22
Post by Vadim Guryev » 20 Oct 2006 21:53
Post by SiL » 21 Oct 2006 07:50
Post by Vadim Guryev » 30 Oct 2006 04:24
I apologize for the silence. We did everything empirically. They took nichrome, stretched it to the required length, and began to select a trans. The diameter of the wire is not critical - from 0.3 to 1 mm, the main thing is a transformer that would produce enough power at 12-24 volts. It is also advisable to have an LATR or something similar to adjust the voltage on nichrome. The first device we assembled was simple as hell - 0.25 wire (I don’t remember exactly), 0.5 m long, an old powerful Soviet iron connected in series and that’s it! The next one was more serious - the trans was bought at the railway depot (they are in every car), the power is amazing, the winding is nichrome. A string with a diameter of 1 mm was unwound from it from a non-working winding. What you need to keep in mind is that when heated, the length of the string increases very much, so you need to come up with a tensioning system. Then two more sheets are attached to the asbestos cement sheet with a gap of approximately 5-7 mm between them. The nichrome is located in this gap. Although they were made from plywood, it smokes slightly and burns, but it works.
In general, we have Uncle Vova, who comes in the morning and asks, well, can you come up with something else for about 200 grams? He is given the coveted grams, and after a couple of days he brings a prototype of the finished device
Post 777 » Oct 31, 2006 00:35
Post by SiL » 31 Oct 2006 08:08
Polishing plexiglass
Polishing plexiglass, along with cutting, milling, gluing, bending and other types of processing, is one of the main technological operations in the manufacture of plexiglass products.
There are three ways to polish acrylic:
- polishing plexiglass with fabric or felt wheels using special polishing pastes,
- polishing plexiglass with a torch flame,
— polishing plexiglass with a diamond tool.
Polishing plexiglass with paste and flame requires preliminary preparation of the surface - sanding with sandpaper of various grain sizes to remove all irregularities remaining after mechanical processing of plexiglass (saw cutting, milling).
If the method using a flame is insufficiently skilled, it can lead to local overheating of the processed plexiglass surface - this can lead to the formation of bubbles or subsequent cracks. Overheating of the surface, and, consequently, the appearance of cracks, also occurs when polishing plexiglass using pastes.
The most advanced and progressive method of polishing the end surfaces of plexiglass is diamond polishing of the ends of plexiglass using a diamond tool on special equipment. This type eliminates the need for preliminary surface preparation, i.e. can be processed immediately after cutting.
Akrilform LLC has all the necessary arsenal of diamond polishing equipment for fast and high-quality polishing of acrylic products.
Our equipment allows us to carry out diamond polishing and satin finishing of the ends of organic (acrylic) glass with a thickness of up to 120 mm, a workpiece length of up to 3100 mm, including at an angle of up to 48 degrees.
Price list for polishing plexiglass.
| Material thickness, mm. | Price* (rub./linear meter) | |||
| 100 - 249 m.p. | 250 – 499 m.p. | 500 – 999 m.p. | 1000... m.p. | |
| 1 — 2 | 20 | 18 | 16 | 14 |
| 3 | 30 | 27 | 24 | 21 |
| 4 | 40 | 36 | 32 | 28 |
| 5 | 50 | 45 | 40 | 35 |
| 6 | 60 | 54 | 48 | 42 |
| 8 | 80 | 72 | 64 | 56 |
| 10 | 100 | 90 | 80 | 70 |
| 12 | 120 | 108 | 96 | 84 |
| 15 | 150 | 135 | 120 | 105 |
| 20 | 200 | 180 | 160 | 140 |
| 25 | 250 | 225 | 200 | 175 |
| 30 | 300 | 270 | 240 | 210 |
Minimum order price* from 1500 rub.
* Excluding VAT (USNO).
Calculation of the cost of polishing plexiglass up to 100 m.p. produced upon request.
Calculation of the cost of polishing plexiglass with a thickness of over 30 mm. produced upon request.
The cost of polishing does not include the cost of material, delivery, packaging.
Prices* are based on polishing a workpiece with a side of 100 mm or more.
The prices* indicated on the website do not constitute a public offer and are for informational purposes only. Please check with the company's employees for the exact cost of the product.
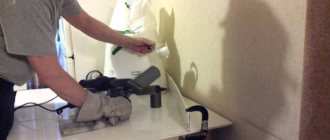
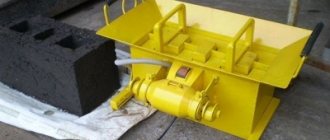
Acrylic bending machine in 20 minutes
I’ll say right away that the main assembly criteria are: from what we had, the heating length is 80 cm, lightweight (so that a girl can pick it up and hang it on the wall with one hand).
I won’t write anything about the power supply; it was left over from the previous machine, which I decided to replace. There is a lot of information on the Internet.
In the workshop I found the remains of a profile for a compartment door and a U-shaped profile made of painted tin.
Connecting them with rivets, we get:
I attach the bars so that there is a flat surface.
Now you need to tighten the nichrome thread (or whatever it’s called). Sold in household goods and twisted into a spring.
After looking at a bunch of fasteners for this thread, I didn't like anything. I didn't want to increase the size of the machine. Therefore, I secured the tension springs perpendicular to the direction of the thread.
I cut the spacers (blue ones in the photo) from aluminum composite. You can use textolite. The main thing is to maintain the temperature and not damage the thread. Their main task is to adjust the position of the heated thread (lower, raise). I cut out a corner at the top so that the thread would not fly off. I secured all this to a wooden block for the sake of electrical isolation.
The result was a light, smooth machine. The wires from the power supply are attached with “crocodiles” directly to the thread. You can easily remove it from the wall, bend a few pockets and put it away so it doesn’t get in the way.
Thank you for your attention.
Possible duplicates found
please take a photo of the power supply parameters. there should be a tag on it that says how many watts, amperes.
SUITABLE CHARGER FOR A CAR BATTERY. It is quite powerful and has adjustment.
good bending machine
Is there a machine that allows you to bend acrylic faster? Well, can you bend it in 5 minutes, or, at worst, in 10?
Well, they sell machines that also heat the top (2 strings), but this is more for thick acrylic than for speed. The time is approximately 1-3 minutes per fold.
Can you post a video of how the bending process happens? It’s clear how to do it, but what to do with it later is not so clear. If it's not difficult of course =)
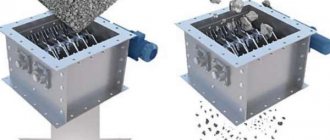
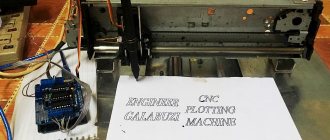
How to make a machine for bending sheet acrylic, plexiglass and plastic
Hello, dear readers and DIYers!
Surely many of you are familiar with such sheet materials as plexiglass, acrylic and plexiglass. They are widely available, have good transparency, and do not break like regular glass. Often aquariums are made from plexiglass, and all the side walls are made from a single sheet, and only one joint has to be glued. The processing of such materials is generally similar to ordinary plastic, and they can be bent by heating the desired area to a certain temperature.
In this article, the author of the YouTube channel “Idea Generator” will tell you how you can make a machine for bending acrylic and plastic sheets.
This machine is quite simple to manufacture and can be repeated at home.
Increasing the thickness was required so that the edge of the 20-mm U-shaped aluminum profile would be flush with the surface of the overlay (this will be the working part of the table).
The profile is measured according to the width of the base and cut to the required length with a hacksaw.
Next, near the profile, on the sides of the solid part of the base, pilot holes for self-tapping screws are drilled, and metal corners are screwed into these places.
A very important point - the corners should be attached only to the wooden part of the base, and not touch the profile!
The last part of this machine will be a small clamp. The author cut it out of a square aluminum profile pipe. The length of the clamp is equal to the width of the table.
At the edges of the clamp, two holes are drilled for M6 bolts.
If you use a regular 12 V power supply without adjusting the current, you will have to select the length of the spiral. In this case, there is a risk of damaging the block.
Heating of the plastic occurs quite quickly due to infrared radiation, and the required degree of heating of the workpieces is determined experimentally.
I thank the author for the advice on making a simple machine for bending plastic and acrylic.
Good mood, good health, and interesting ideas to everyone! Subscribe to the telegram channel
site so as not to miss new articles.
The author's video can be found here.
Source
Night light made of LED strip and plexiglass
I continue the theme of my crafts.
This time we will make a night light from LED strip and plexiglass.
My daughter does gymnastics, and I decided to please her. My daughter’s team is called “Kubanushka” (Kavkazskaya station, Krasnodar region). And what could be better than a night light with the name of the team?
I prepared these boards with spacers and cut out the base of the lamp from 4 mm plexiglass.
I wanted thicker plexiglass, but 4 mm is the maximum thickness that we found. So we will make from what we have. Also, we will need a set of LED strip 1.5 m 6 W 160 Lm/m 3000 K
which I bought in Leroy. The set contains a switch; in principle, you can buy it with a remote control if you want to repeat it. This will probably be even better, but it will also be more expensive.
We make a drawing in a vector editor and mirror it:
The reflection is needed so that you can glue the reflected image from the inside to the plexiglass and engrave it, then after all the work is done and when turned over, we will get a normal picture. The drawing itself will be on the back of the night light.
Well, then we engrave with Dremel. My wife carefully helped me out