In order to save space in small rooms, maximum benefit is extracted from each piece of furniture located in the room. There will be much more space in the bedroom if it is equipped with a bed with a niche under the mattress, which is used to store a variety of things. You can make a lifting mechanism for a bed yourself, saving significant money. From this article you will learn about the benefits of multifunctional furniture and detailed step-by-step instructions on how to make a universal lift-up bed with your own hands.
A bed with a lifting mechanism is quite practical, as you can store things in it
Machine structure
The operating principle of a crane is based on the physics of simple mechanisms. The simplest version of the crane is a stick placed on a fulcrum in such a way that the free ends have different lengths. Now if you hang a load on a short lever, it will take less effort to lift it. The most common design is one that uses, in addition to levers, a system of blocks.
A do-it-yourself crane is an indisputable assistant in small-scale construction. When constructing a private house, the use of bulky industrial cranes is not required. The height of the houses rarely exceeds 2 floors, and the weight of the lifted load is 200 kilograms.
Crane diagram
Although there are many variations of lifting mechanisms, a classic crane consists of the following parts:
- An arrow with a block attached to its end. Depending on its length, the height to which the load can be lifted is determined.
- Platform. The boom and counterweight are attached to it. It is the main part of the crane and is subject to significant loads. Therefore, when manufacturing a platform, it is important to pay special attention to its strength.
- Counterweight. Serves for crane stability. Defines the maximum load weight that the crane can lift. Stackable counterweight options are available to provide maximum stability.
- A guy wire connecting the boom and the counterweight. Allows you to adjust the tilt of the boom and move the load in both vertical and horizontal planes.
- Winch with cable. It is the lifting mechanism itself. The power of the winch determines how much weight the crane can lift.
- Stand with a rotating mechanism. It is necessary to turn the crane to the sides.
- The support cross, which is the base of the crane. Sets the stability of the entire structure. When manufacturing it, you should also pay attention to its strength.
Homemade mini crane
Regardless of the height of the structure, the weight of concrete blocks always remains the same. To make work easier during construction, you can make your own crane. With a small carrying capacity of about 200 kg, it is not difficult to assemble. The equipment is intended for domestic use and weighs 200-300 kg. This is a convenient model, easy to assemble and disassemble. Small dimensions allow you to transport equipment in a pickup truck. Prepared drawings will help simplify the assembly process; they include the following information:
- The basis of the structure consists of a cargo winch and supports. For the first, a gearbox with a worm base is used. With its help it is possible to create a manual drive. Then assembling the boom winch will become easier. Construction supports serve as a base for external screw parts.
- Winches need a base. It is made from an electric motor rotor. All parts must match each other in size, so they are carefully measured with a ruler. You won’t be able to make the base yourself, because this requires special equipment.
- The platform is equipped with wheels, this will simplify the movement of the crane along the surface.
- To ensure that the crane stands stable and does not lose balance, the boom is set to zero level.
- An arrow is made from a pipe with a diameter of up to 8 cm. Its acceptable height is 5 m. A profile of 2 corners is installed in the base.
- A turning mechanism is created from a car hub. He will be responsible for the rotation and lifting of the boom. The hub can be used from any cargo transport.
- Simple bricks are suitable as a counterweight.
- The crane is installed on a frame from an old machine or on a caterpillar track.
- Since the equipment operates at low speed, the turning mechanism and winch do not need a brake.
To make a garage crane, you will need: a hand winch, a cross pipe and racks on wheels. Pipe fasteners are welded at the top of the racks. The manual winch is mounted on a vertical stand. You can buy a ready-made winch or make it yourself. For self-production, a drum with cables is used, which is mounted on a structure made of pipes. A large sprocket with a chain is attached to the drum, and a small one is attached to the electric drive. If the winch is manual, the shaft with the drum is supplemented with a handle. To move the cable, rollers are required; they are mounted on the beam.
The result is a compact device that will not take up much space and will be easy to disassemble. The finished crane will be able to move loads of up to 800 kg.
terms of Use
To operate lifting mechanisms safely, certain rules must be followed.
Homemade Pioneer crane
These rules apply to any lifting device:
- The load capacity must not be exceeded. A load that is too heavy may damage the device.
- The base must be stable. Homemade lifting devices should be located on a previously prepared hard horizontal surface.
- In bad weather conditions, you should also refrain from working with the crane. Strong winds will throw the crane off balance, and poor visibility may make it difficult to see people under the boom.
- Before operating a crane or lifting device, it is necessary to conduct an external inspection to identify any malfunctions. If malfunctions are detected, operation of the crane is prohibited.
- It should be remembered that when working with the lift, you should not make sudden movements. The load must be lifted smoothly. And most importantly, do not stand under any lifted load.
Offers from manufacturers
A lift for gypsum boards (plasterboard sheets) provides significant advantages when performing operations with plasterboard sheets in comparison with carrying out all work manually:
Reduces the number of installers to one person. No matter how virtuoso you are, you won’t be able to attach a plasterboard sheet to the ceiling alone. The spacer lift makes this trick possible;
While the lift holds the gypsum board in a given position, the installer screws it on
Facilitates the transportation of plasterboard sheets around the construction site. The device in question allows not only to lift and hold sections, but also to transport them from place to place.
A lightweight sheet of drywall can be transported to the desired location by securing it in a lifting mechanism
In hardware stores you can find the following devices for installing drywall on the ceiling:
Please note that the prices in the article are valid for the summer of 2022
Levpano 1
I recommend choosing a lift model with a load capacity of at least 30 kg, since the weight of one plasterboard sheet can range from 20 kg to 34 kg.
The Levpano 1 drywall lift is the brainchild of a German company that has long and rightly earned a reputation for producing high-quality products. Specifications:
| Parameter | Meaning |
| Permissible lifting height of gypsum boards in a horizontal position | 350 cm |
| Load capacity | 75 kg |
| Lifting mechanism | Manual winch with two cables: main and safety |
| Adjusting the length of the horizontal support | 130-225 cm |
| Base dimensions | 95 cm by 95 cm |
| Number of wheels | 4 |
| Wheel diameter | 12.5 cm |
| Wheel lock | Present |
| Structure weight | 46 kg |
| Possibility of rotation of the fixed sheet | 360 degrees |
| Price | 67,000 rubles |
A conveniently located lock on the handle of the Levpano 1 model prevents the possible fall of the plasterboard sheet
Premos
The lifting height of the purchased model must be at least 350 cm, so that it is convenient to use even in rooms with high ceilings.
"Premos" is a professional drywall lift that can cope with tasks of varying complexity. It is noteworthy that, despite its high performance capabilities, it is inexpensive.
Specifications:
| Parameter | Meaning |
| Permissible lifting height of gypsum boards in a horizontal position | 450 cm |
| Load capacity | 105 kg |
| Number of wheels | 3 |
| Wheel lock | Present |
| Structure weight | 23 kg |
| Possibility of rotation of the fixed sheet | 360 degrees |
| Price | 16,000 rubles |
“Premos” comes with a special bag-case, in which it is convenient to carry it when disassembled
EDMA
I recommend ignoring models that have unreliable plastic elements in their design. As practice shows, their service life is short, and the risk of sudden breakdown during operation is very high.
"Edma" is a representative of a popular French brand, the distinctive feature of which is the ability to operate in a confined space. Specifications:
| Parameter | Meaning |
| Permissible lifting height of gypsum boards without an extension | 350 cm |
| Permissible lifting height of gypsum boards with an extension | 450 cm |
| Load capacity | 80 kg |
| Maximum base width | 125 cm |
| Minimum base width | 63 cm |
| Number of wheels | 3 |
| Wheel lock | Present |
| Structure weight | 53 kg |
| Possibility of rotation of the fixed sheet | 360 degrees |
| Price | 62540 rubles |
In Edma you can lift drywall automatically using a screwdriver
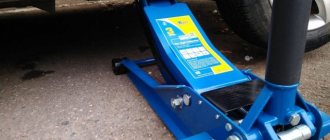
What characteristics should a garage lift have?
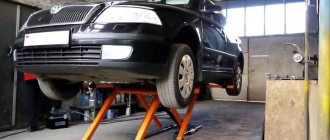
In garage conditions, two types of lifting mechanisms are used. The first type includes a lift that can lift the entire car, and the second type includes a goose-type lift that allows you to move loads around the garage.
Lifts of the first type are stationary devices and the main requirement for them is stability. The car weighs more than a ton and should not have the slightest chance of falling. In order to prevent any accidents, the garage lift must have a reliable stopper.
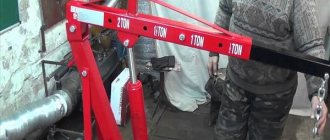
Homemade goose tap
The goose type lifts are most often used in auto repair shops. It is quite simple to make it from a profile pipe or channel. First, the base is welded on which the rotating mechanism needs to be installed. It is best to make an arrow with an adjustable reach. This will make it possible to move weights in any direction.
Inexpensive mini lift
Practice shows that when building a private house, a real crane is not always needed. Often, a developer can get by with “little expense” and make a small lift based on an electrically driven hoist.
Gexx FORUMHOUSE Member
My design is simpler than the authors above, but it suits me quite well. I bought a hoist with a load capacity of 300 kg without a block and 600 kg with a block. Tests have shown that the device can lift a load weighing 250-270 kg, then the engine protection is triggered. During the construction season, I used it to lift about 40 pallets with building blocks, a 6-meter beam for the mauerlat, rafters, mortar for masonry and concrete for the reinforced belt.
The lift, again to save money, is made from used pipes, angles and channels.
All rust was cleaned off with a grinder, and the pipes were sprayed and then painted with paint with a rust reducer.
In order to be able to assemble the lift on the ceiling of the second floor, all components (where welding is not needed) are made dismountable - with bolted connections.
A hoist is installed on the stand using clamps.
In case of rain, a plastic bottle with the bottom cut off is placed on the control panel.
The telpher covers a canopy made of used roofing iron.
When lifting a pallet, two boards are placed under it, and the pallet is lowered onto them.
The entire structure is fixed to the floor with clamps.
Drawing with dimensions of the lift.
As a result, the user has a universal, self-manufacturing and budget “helper” that greatly simplifies the work of building a house.
These are topics that describe in detail how to make a lift for aerated concrete, and provide dozens of options for mini-cranes, from simple to the most complex designs.
Production of jib cranes of general industrial, fireproof and explosion-proof design. The lifting capacity of stationary electric and manual jib cranes is up to 5 tons, boom radius is up to 7 m (possibly more on special order). The lifting capacity of wall-mounted manual console cranes is up to 3.2 tons, boom radius is up to 7 m.
Creating a dimensional drawing of an electric cantilever crane is one of the most important stages of its production. Drawings allow us to take into account most of the nuances associated with the crane design, installation and further work already at the design stage. The drawing clearly demonstrates such parameters of the crane as the method of its installation, the maximum and minimum reach of the crane boom, its lifting capacity, the maximum lifting height of loads, the height of the device itself, its weight, all static loads on the structure, the dimensions of the fastenings and the angle of its rotation.
Next on the page is a drawing of a typical cantilever slewing crane. If you need to upgrade a slewing jib crane or install additional options on it, our company’s specialists can quickly provide you with dimensional drawings, taking into account all the improvements.
How a simple block design works
The pulley system or pulley system has been known to mankind since ancient times. The classic system design consists of pulleys and cable. One pulley is called a block. Depending on the method of fastening, the pulley can be movable or fixed:
- Fixed block. It is attached to the support and plays the role of changing the direction of movement of the rope. Does not provide any gain in strength.
- Movable block. It is located on the side of the load and gives a gain in strength.
The principle of operation of a pulley block is similar to the principle of operation of a lever in the physics of simple mechanisms. The role of the lever in this case is played by the cable itself. In the case of a simple block of two pulleys, the movable pulley divides the rope into 2 parts and in order to lift the load the same distance, a rope twice as long will be required. The work of lifting the load is performed in the same volume. And the effort, due to the fact that the length of the rope has become twice as long, becomes half as much.
If there are more than 2 pulleys in the system, the gain in strength is approximately equal to the number of blocks. In the case of 3 blocks, the effort will be 3 times less, and 4 blocks will require only a quarter of the original effort.
Construction[edit | edit code]
Construction in IndustrialCraft² is easiest using construction foam (), which serves as a source of foam concrete () - a strong and blast-resistant block that can also be painted and attached to the texture of any other block. If construction foam is compressed, then foam concrete becomes a very cheap building material, since when sprayed, one compressed foam produces 12 blocks of foam concrete.
Room lighting in IndustrialCraft² can be done not only with torches, but also with the help of an electric lamp, from which a floor, wall, table or ceiling lamp is formed (), depending on the placement. A lamp made from an electric lamp consumes electricity for lighting.
Complex block system how to calculate power gain
If the system is designed in such a way that one simple pulley pulls another simple pulley, then this is already a complex system of blocks. To theoretically calculate the gain in strength, it is necessary to conditionally divide a complex chain hoist into simple ones and multiply the values of the gain from simple chain hoists.
For example, if the system consists of 4 blocks, and the first conditional simple pulley has a gain of 3. It pulls the second simple two-block pulley, also with a gain of 3. The total force that will need to be applied will be 9 times less. It is the 4-block complex chain hoist that is most often used by rescuers.
Refilling chain hoists
Reeving is a procedure for changing the location of pulleys and the distance between them. The purpose of this operation is to regulate the speed and height of lifting loads in accordance with a certain pattern of cable passage through the blocks of the lifting mechanism. There are the following types of reserve:
There is also variable reeving. It can be either double or quadruple. The movable rollers are mounted on several movable cages held by a rope. The reeving ratio is changed by lowering the hook suspension onto the support while reeling in the rope.
Source
Methods for attaching a rope to a lifting mechanism
When creating complex pulley blocks, there are often situations when a cable of the required length for attaching the moving block is not at hand.
Crane for gas blocks
Methods for attaching a cable using general-purpose rigging:
- Using a cord. Using a self-tightening knot, the cord is tied to the main cable. As the load is lifted, the grappling knot moves along the main rope, thereby allowing the height of the load to be increased.
- Using clamps. In the case of using a steel cable, it is not possible to use a cord, so it is necessary to use special clamps.
Lifts - types, classification, design solutions
Builders and finishers who constantly carry out work on the installation of plasterboard ceiling structures know how difficult it is to keep gypsum boards suspended. At the same time, the sheets need to be secured. And what’s most interesting is that in the end the sheet should lie flat and beautiful on the ceiling surface, and the fastening should be reliable.
It is almost impossible for one person to carry out such manipulations, which is why even professionals constantly take someone as a partner. If you do not have an assistant or even a worthy candidate for this position, then experts recommend purchasing a special drywall lift
Upon arrival at a specialty store, we recommend turning your attention to labels such as Levpano and Roger Mondelin. These are the highest quality and most reliable samples, tested in practice.
Levpano unit
The main task of the gypsum plasterboard lift is to lift drywall to the mounting location. Lifts are most in demand when attaching gypsum board ceilings, since only with their help can you press a sheet of drywall to the frame as evenly as possible.
Attention! Sheets of drywall can be kept on the lift indefinitely, until you finish installing the entire ceiling structure. As for height, gypsum board lifts come with both mechanical and electric drives, so you can always adjust the lifting height
If you don’t have extra money for a lift for installing drywall, then you can design it yourself
As for height, gypsum board lifts come with both mechanical and electric drives, so you can always adjust the lifting height. If you don’t have extra money for a lift for installing drywall, then you can construct it yourself.
We create a simple lifting mechanism with our own hands
Construction of a crane is not a quick task and is justified if it is required frequently or the volume of work is large enough. In cases where the load needs to be lifted urgently or this is a one-time operation, you can use improvised means.
To create a simple lifting device you will need a cord and two blocks. One block and the end of the rope are fixed motionless on the support. This will be the highest point to which the load can be lifted. We attach the second block to the load using slings or a hook. We first pull the rope along the block attached to the load, then pass it through the upper block. The gain in power will be 2 times. Using your own weight, you can easily lift a load weighing 100 kilograms to the required height.
DIY mini crane
If you add the ability to move the upper block along a guide, for example along a rail, you can get a do-it-yourself jib crane. It is useful in garage conditions for moving heavy machine parts.
It should be remembered that when working with the lift, you should not make sudden movements. The load must be lifted smoothly. And most importantly, do not stand under any lifted load. The same rule applies to a crane - standing under the arrow is prohibited.
Industrial development[edit | edit code]
Electrical engineeringedit | edit code
Once a sufficient amount of latex, red dust (), copper, iron and tin has been found, you can begin to manufacture a generator - the first source of electrical energy, as well as the first consumer of electricity - an electric furnace (), which works almost twice as fast as a conventional one. To create an electric furnace you will need copper and red dust, because you will definitely need an electrical circuit.
IndustrialCraft² recommends that mined ore be first crushed in a crusher and only then smelted. Thus, from one block of ore you get 2 ingots, instead of one. Therefore, the sooner the crusher is manufactured, the better. There is also an ore washing machine and a thermal centrifuge, which allows you to wash even more resources from crushed ore. Likewise, it is recommended not to melt latex in a furnace to make rubber, but to use an extractor, as it squeezes more rubber out of the latex. The crusher, ore washing machine and extractor are also consumers of electricity.
Miner's affairs | edit code
At the initial stage of development in this mod, when a lot of iron has been accumulated, it is worth stocking up on stone pickaxes and one iron one and going to the mine (cave or canyon). It is recommended to stay in it for an hour or two of real time, mining a pile of , various stones (stone, coal, lapis lazuli, obsidian, diamonds) and red dust, so that later, during any complex or not very difficult crafting, you do not have to run into the mine for new portions of useful resources.
Subsequently, a mining laser and a drilling rig (used for automatic extraction of resources) will be very useful in mining.
Agricultureedit | edit code
The agricultural complex can be effectively used for the player’s life thanks to perches (which simplify farming) and plant selection. For example, Ferrium yields a small pile of iron dust as a harvest, and Aurelia yields a gold nugget. A mug of coffee is extremely useful, as it gives the player more energy, making him move faster. A coffee mug () is crafted from coffee fruits.
Materials and tools
The most important thing when making a crane is to use high-quality tools and materials. This will guarantee that the structure will be strong and safe.
The cable should have minimal stretch; this will give a greater gain in strength when using a pulley system. The fittings used for tying must be taken only from metal. Plastic fittings cannot withstand heavy loads and break at the wrong time. To fasten individual parts of a homemade crane, you should choose high-strength hardware products.
If a winch is intended to be used, its lifting capacity should not be less than 500 kilograms. The best choice would be winches that can lift a load weighing 1 ton or more.
In conclusion, I would like to once again remind you of the need to observe safety precautions when working with lifting mechanisms. Also, regardless of whether the crane is purchased or made by yourself, you should inspect it before starting work.
Assembly instructions
It will take 2 days to assemble a simple or movable structure. The process of making a crane beam with your own hands:
- The main load that the crane will move falls on the stand. To securely fix the structure, you need to make a frame. To do this, legs for the tap are welded from metal corners. The corners are welded to the pipe at an angle of 45° on both sides of the pipe.
- To make spacers, 2 triangles are welded to each rack.
- For a mobile structure you will need rollers. They are welded to a horizontal base, positioned on both sides of each rack. To prevent the rollers from breaking and to withstand the weight, use products that are designed for metal containers. Furniture cannot be used.
- A pipe is installed at the top of the structure. It is designed to move the lifting mechanism.
- The roller for moving the cable is mounted on an I-beam. The I-beam is pre-welded at the central point of the pipe.
- To give the frame additional stability, a pipe with a square cross-section is welded to the beam element. It is placed on top of the beam so that it protrudes forward by 20 cm on both sides.
- The transverse pipe is inserted into a pipe with a square cross-section and through holes for fastenings are drilled on both sides. Bolts are used as fasteners. The homemade frame for a U-shaped crane is ready. The pipe in the form of a crossbar is securely fixed in the upper part of the product, and the entire structure is stably placed on spacers (legs).
- Mechanical lifting is designed to lift parts. It can be manual or automatic. A manual hoist consists of a winch and a cable. The worm winch is mounted on the side of the rack. The movement of the steel cable occurs through rollers.
- The structure can be equipped with a lifting mechanism, which is used in elevators. This mechanism has strong rollers.
- Connecting an electric lift drive will make repair work easier. An engine with a power of 300 to 500 W is suitable for installation. It is mounted on the base of the structure.
A crane beam equipped with an electric drive is used mainly for the reconstruction of old buildings and private wooden houses. To prevent the crane from malfunctioning, you must follow the operating rules.