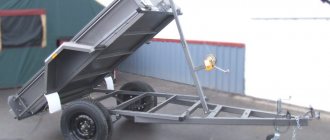
Buying a cauldron for cooking over a fire did not cause me any problems, but its further use on the grill was not very convenient. Therefore, I decided to correct the situation and ensure my own safety when cooking food over a fire - I made a stove for a cauldron with my own hands from disks from an old car. I offer step-by-step instructions for each stage of work.
Source eco-kotly.ru
Important Disc Features
To successfully build a stove from car wheels at home, it is not enough to simply learn the benefits of such products . It is also important to pay attention to the shortcomings of the feedstock, as well as a number of design features of the furnaces. One of the disadvantages of special steel is the lack of standardization for welding properties. Today there are several different technologies for the production of wheel rims , but in most cases welding activities are limited to subsequent thermal tempering (annealing), as well as flaw detection of the seam. Therefore, none of the disc manufacturers even realizes that in the future their products will be weldable.
Step-by-step manufacturing instructions
How to make a stove for a cauldron from wheel rims with your own hands; knowledge of the main stages of manufacturing this design will help solve this problem:
- First you need to prepare the discs for welding.
To do this, the front side is completely cut out on the top part. This is done to ensure free passage and uniform heat distribution in the cooking area. We carry out similar work with the middle part of the future furnace. We leave the lower disk unchanged. To eliminate confusion, write on the parts with chalk the location of the parts. Cutting out the front part - Place the bottom piece face down on a flat surface. We place the middle part on it with the inside of the disk facing down. After checking its position, we make the 4th tacks after 90.
- We place the 3rd part face down on the assembly unit, check the correct installation of the part and grab it in 4 places.
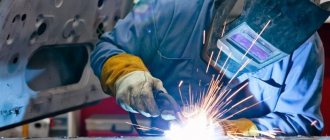
Assembly - Once again, after checking the assembly and location of the individual parts in the vertical plane, you can begin welding the structure. It is important to note here - do not completely weld one seam. To protect the parts from deformation, it is better to cook them step by step. After welding a small area at the 1st joint, turn the structure 900 and weld a section of the seam on this side. Then proceed to welding the 2nd seam. So, alternating sides and seams, weld all the joints.
- We beat off the slag and check the quality of the seam. If we detect lack of fusion, undercuts or holes, be sure to add molten metal to these places.
- We put a cleaning wheel on the grinder and clean the seams and places where the front parts are cut.
- Now it is important to make a good door for storing firewood. Stepping back 200 mm from the bottom of the stove, mark the window for the firebox; height –180 mm; width – 200 mm.
- Using a grinder with a cutting wheel, we cut out the window along the marking lines.
We will use the cut piece to make the door. To do this, we grab a wire with a cross section of 6-8 mm on 3 sides along the outside of the workpiece. On the hinge side in the middle of the window, we weld a part from a profile tube. We insert the rod for the loop into the second tube and grab it on one side. Cutting out the door
From a gas cylinder
In any metal furnace, the weak points are the seams, since they are the ones that begin to collapse first under the influence of temperature changes.
That is why the optimal way out of the situation was found - making a stove for a bath from a cylinder, as well as from a pipe. The number of seams in this case is minimal.
Among other things, the cylinders are an almost completely ready-made container for equipping a heater. You just need to cut a few holes and install doors on them.
The optimal solution for a small steam room
If your bathhouse has a relatively small steam room, you can take a small cylinder to make a stove. In most cases, cylinders with a capacity of 27 liters are used, since they have quite good dimensions: height - 50 cm, and diameter - 30 cm. Also, an excellent wall thickness of 6 mm will allow you to produce an excellent stove with good technical characteristics and a long service life.
Necessary materials for production
In order to make the most functional and economical sauna stove from a cylinder with your own hands, you will need:
- Water;
- Bulgarian;
- Empty cylinder;
- Metal mesh and stands;
- Welding machine;
- Scissors for cutting metal;
- Exhaust pipe;
- Steel hinges;
- Stones;
- Felt pen or marker;
- Hose.
It is best to use an empty propane tank as it has fairly dense metal walls. Thanks to these technical characteristics, it accumulates heat quite quickly and retains it for a long time.
Attention! The first thing you need to do when making a sauna stove from a gas pipe is to remove the remaining gas from the cylinder.
This is completely easy to do, just pour water into it. The fact is that water displaces remaining gases from the container. When the cylinder is completely filled, the water must be drained into a bucket. After this, we proceed to cutting the tap and creating the oven.
Step-by-step manufacturing instructions
- Holes for the pipe are made in the container, cleared of gas residues. For these purposes we use an angle grinder. In addition, you need to make holes in the end of the cylinder; it should be smaller in diameter than the chimney connector. It is necessary to cut a door in the center of the cylinder so that you can easily and simply add firewood, as well as clean the oven from the inside;
- Next, using the same grinder, you need to cut off the handles at the top of the cylinder;
- On one side you should drill many holes for the grate. A metal dome is fixed over the holes. It is attached by welding. This is how you get an ash box;
- Doors are attached to the box, as well as to the firebox, and at the back of the cylinder there is a pipe for the chimney.
How to use
Care should be taken to route the chimney outside the bathhouse. This is a very labor-intensive and painstaking process, which in most cases requires the intervention of an experienced craftsman.
Next, you need to place firewood inside the stove and set it on fire. Large stones are placed on top of the cylinder, which will receive heat from the hot cylinder and transfer it to the room. In order to get a large amount of steam, you should periodically pour water over the hot stones.
Step-by-step algorithm
The first thing you need for construction is a pair of classic stamped car wheels made of durable metal. The sizes of the disks should be selected to suit your cauldron; option 13 may be suitable, or maybe 15, although a very large design is not needed.
Two stamped white discs
On one of the disks we mark a cutting line, exactly above the round holes, and cut off this circle using a welding machine.
Mark the cutting line
The cut circle will work perfectly as a lid on which you can put pots or a kettle, so don’t rush to throw it away.
The part is cut out
On the second disk, you need to weld the main central hole, which will require a small piece of thick metal.
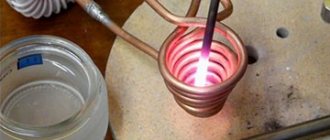
Preparing the welding machine
We carry out welding work
Then the two disks are placed on top of each other and, using the same welding machine, they are connected into a single structure.
Circular welding process
Welding from all sides
This creates an impressive seam that firmly connects the two discs. To make it more presentable, you can modify it with a grinder, cutting off strongly protruding elements and grinding the edges.
Weld seam
In order for the structure to stand stably at the required level, you will need legs. The legs can be tightly welded to the grill if you are preparing a summer cottage, or you can make the structure detachable. In the second case, the device will be mobile; it can be easily carried in the trunk of a car and, if necessary, assembled. Small pieces of a profile larger in cross-section than the legs themselves can act as fastenings for the legs. These three parts should be welded to the grill on three sides (in this case, a tripod is made).
Leg parts
There is no need for precise calculations here; it is enough to roughly estimate equal distances and weld the necessary parts to the bottom of the grill made of disks at the same angle.
Leg clamps are welded
We also cut out the legs from metal, in particular we use a rectangular profile.
The legs themselves, cut from the profile
It is worth trying on the legs by inserting them into the prepared grooves. If they enter with difficulty, you should process the edges of the parts with a grinder, and then hammer them into the grooves with a hammer.
Legs installed
Next, mark the door that will open directly into the firebox and cut it along the line.
Marking the location of the door
At the next stage, you will have to use your imagination and engineering skills to create a decent hinge for the door. For example, you can make it from one bolt. It is necessary to cut off the cap from it, then select two nuts that are screwed onto it. One nut should be welded to the door, and the second to the wall of the grill. By screwing the bolt onto the threads of both nuts, you get a convenient loop. You can weld any piece of metal of suitable size as a handle.
The door is cut out
You can make two loops using the same bolts, here all the work is done at the discretion of the master.
Loop manufacturing option
To make it easier to transport the grill, you should weld lugs to it on both sides, or at least on one side. Such improvised handles will allow you to comfortably carry the barbecue without fear of getting dirty with soot, soot or dirt.
We weld the handles
For a more uniform smoke output, you can make four even cuts along the diameter of the disk. At this point, work with the hearth to form its shape is completed.
Making cuts from the top
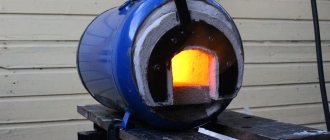
To remove paint from car rims, you should burn the resulting grill on all sides. For final processing, you can use a brush or sandpaper.
Removing paint using improvised means
Then, using heat-resistant paint, you need to paint the structure in a suitable color. Black looks very harmonious.
Paint it black
As you can see, making a grill for a cauldron is quite simple; there are no special tricks here. A simple and convenient design will allow you to install a cauldron and cook pilaf, and if desired, you can make a shish kebab on it using skewers of suitable length.
Ready product
In this simple and uncomplicated way, we create excellent conditions for outdoor recreation, which is accompanied by cooking delicious and healthy food.
Additional recommendations
To make the stand for a cauldron made from car rims more convenient and practical to use, you need to take care of the special features:
Additional stability can be added to the assembly using legs. They are made from profiled steel, which is cut to size. The blanks are welded to the sides of the furnace or the bottom and flanges. A tripod is the best option in terms of stability and economy. A good solution would be to make a separate stand for the stove from car rims for the cauldron. Its advantage is that it is not rigidly connected to the main structure and can serve as a support for anything. If there is a stand, the profiled bottom of the lower section will work as a grate. This will significantly increase draft and increase the temperature of the arch. You can simplify the project, reduce labor intensity, and save on materials if you make the oven from two segments. In this case, the roof of the structure will become lower, which will negatively affect heat transfer. This is due to the fact that during combustion pyrolysis gases are released, their contribution to the total heat release is decisive. If the arch is not high enough, they do not have time to burn completely. Contact with the cold walls of the casing causes soot deposition. Over time, the inner surface of the vault becomes coked. The heat output of the furnace is noticeably reduced. Soot fire cannot be ruled out. The versatility of the design allows you to convert the cauldron oven into a grill and barbecue with minimal changes. Without unnecessary cuts, you can get by with ready-made holes on the surface of the product - they will create several temperature zones. If you install a grate on top, it will combine the functions of a flame divider and a rasper - this will allow you to simultaneously cook roast beef of varying degrees of doneness
It is important to understand that a large company will need a more solid stove; Gazelle disks are suitable for its manufacture. They do not need to be welded together, which is a definite plus.
Heat-resistant metal adhesive can successfully handle the functions of a weld seam. Good potbelly stoves are obtained with horizontal wheel rims. It is better to cut off their convex parts with a grinder. The sections welded together form a capacious thick-walled cavity with a complex surface. Such a potbelly stove will heat up the room faster and take longer to cool down. To make such a stove, it is better to use wheel rims from trucks; they will provide a sufficient firebox volume and increase heat transfer. The efficiency of such devices is higher.
The area under the supports must exceed the parameters of the cauldron: the higher this ratio is, the more stable the entire structure will be.
Comfortable stoves with installed legs
Can be installed on a grill and used as a barbecue
Potbelly stoves heat better with horizontal disks
Which type to choose for yourself
Taking into account the above-mentioned features, it is necessary to correctly select the appropriate type of disk furnace. The need to independently construct a furnace from car rims occurs in the following cases:
- If you need to heat small non-residential premises, for example, a country house or a workshop. The use of high-quality rims will allow you to achieve maximum quality of the furnace, and will also significantly simplify production.
- If you need to equip the main “fire” part of the furnace structure without using expensive heat-resistant steel.
- If you are going to use the stove for cooking. In this case, you will have to make a stove for the cauldron from car wheels.
Most often, car wheels are used to create mobile (portable) outdoor and garden cooking stoves, as well as for arranging fire pits. The simplest version of a disk hearth stove involves the use of a large mass and side height, which significantly improves heat transfer rates and provides reliable protection from the effects of wind.
Alternative in choice
With all the variety of methods for independent design, there is an alternative, which consists in the fact that some manufacturers are engaged in the manufacture of models designed for installing cauldrons.
Such ovens are equipped with a top plate with replaceable rings, which allow the installation of cauldrons of various sizes. They are made of thick sheet metal and are ready for use. Factory-made stove
A factory portable oven can be installed in any suitable location. The opportunity to cook food outdoors always means cheerful groups of friends. The emotional mood depends on the hospitality of the owner, and the technical part of the issue depends on his level of skill and the part of his soul that he put into creating and arranging a cozy corner.
Process of creation
Constructing a furnace device from disks with your own hands begins with converting the disks into the necessary structural parts.
Such metamorphoses begin with a disk, which will be the upper compartment of the furnace being manufactured
It is positioned so that the fastening part is at the top. Next, a circular hole is cut using a grinder along the mounting holes and the cut out contents are removed. The dimensions of the circle are determined in relation to the existing cauldron, which will make it possible to achieve the stability of this specific dish. The hole must certainly be perfectly round, and therefore all flaws are corrected immediately.
The disk for the lower compartment of the furnace device is installed with the mounting platform facing down. Then the top one is placed on it, and their mating edges are carefully welded in a circle.
The result should be a welded structural blank
Let's move on to the combustion chamber system. To create it, a rectangular fragment is cut out at the base. Its approximate dimensions in centimeters are ~ 20x12 (for rims from passenger cars). When marking the location of the combustion chamber, it is necessary to make an indent of ~ 2 cm from the lower edge of the disk. Such a trick is guaranteed to provide not only high structural rigidity, but also facilitates the operation of the firebox.
The disk fragment cut out for the combustion chamber is preserved. In the future, it will serve as an excellent firebox door.
After completing the operation of forming the combustion chamber, you can choose two options for the stove under the cauldron from disks. One of them is extremely simple, but the second will require some additional steps.
Doors, legs, exhaust pipe
You need to install three doors on the furnace body: the bottom one, through which air will flow and ash will be removed, and two upper ones.
For the ash pan, use a grinder to cut a rectangular hole directly in the lower disk
Along the perimeter of the hole you need to fasten metal plates that will form a box. The door will be held on it
An important point: the door handle must be fixed in different positions to regulate air access to the firebox
Prepare 4 identical pieces of pipe for the legs of the potbelly stove
Weld them to the bottom of the stove at an equal distance and slightly inclined so that the stove stands very firmly
For fireboxes, prepare two boxes with doors and handles with locks
The openings of the fireboxes will be located on the first and third disks from the top. Make them on one side of the stove with an ash pan so you don’t have to run around the structure during maintenance.
Install the finished boxes onto the holes and weld them along the contour
In the top lid of the potbelly stove you need to cut out a hole for the exhaust pipe with a grinder, having first measured it along the contour
A piece of pipe is welded into the hole, and a metal corrugation is connected to it, which is taken outside the room
At this point, the assembly of the structure is completed. Now, if the aesthetic component is important to you, the stove needs to be brought into a condition worthy of use.
Industrial furnaces
A modern industrial cauldron oven, as a rule, is a well-thought-out and well-designed product. They have optimal sizes, are extremely functional and look elegant.
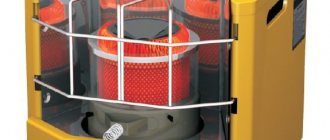
Examples include furnaces: Samarkand, Vesuvius and Samobranka
The stoves are made of steel and equipped with a retractable ash pan, which can be removed even during combustion. The grate of each of them is cast iron.
Industrial furnaces can be equipped with additional devices and equipment. The kit includes: a barbecue set, a cauldron, a device for hot smoking, a scoop and a chimney pipe, if provided for by the design.
How to make a stove from disks for a sauna with your own hands
First of all, the discs need to be prepared: cleaned of debris, rust or paint residues using sandpaper. After this, you can begin manufacturing the structure, following the stages of work in the specified order.
Water container
To equip the upper chamber of the future stove, two rims are needed. The water will be heated in this tank, so it must be sealed. To do this, cut out the central plates for fasteners from 2 disks with a grinder, leaving only the rims. They are stacked on top of each other and welded together.
Disc core cutting
The upper part of the tank is closed with a metal lid or a movable flap. For safety reasons, you can combine these two options and tightly weld the larger segment of the lid, making only the small hole through which water will be poured into the tank sliding or hinged. A metal plate cut from a sheet is welded to the bottom of the chamber.
The structure of the upper part of the stove
After welding, holes are cut in the upper part and at the bottom of the container along the diameter of the chimney pipe. It will pass through the entire tank, should be tightly overlapped by the walls and come out through the bottom. A thin tube is installed in the side of the tank near the bottom at an angle to the floor and is closed with a tap to drain hot water.
Note! The tank must be checked for leaks. Fill it with water and carefully inspect the cracks for leaks, paying special attention to the joints between the walls of the container and the slots for the pipes. If defects are found, they must be eliminated by welding, but only after removing the water and drying the tank
If defects are found, they must be eliminated by welding, but only after removing the water and drying the tank.
Arrangement of the heater and the upper part of the firebox
From the two remaining rims you need to make a heater and a firebox cover. The core is cut out of one, the second remains intact. The blanks are placed one on top of the other and stitched together by welding so that the hub of the whole disk is in the middle (it will serve as a grid). The container remains open at the top - stones are poured here. The lower part of the cylinder will serve as the upper part of the firebox.
Natural round-shaped stones, which are used in saunas and baths - diabase, basalt, peridotite, are best suited for arranging a heater. But they are quite expensive. Therefore, you can look for heater material near the nearest body of water - these stones have been well hardened by humidity and sun. The best option is dark-colored rocks with a non-layered structure.
The best stones for a heater
Note! The stones in the stove, although slowly, are destroyed under the influence of high temperatures. And this makes it difficult for smoke to pass through. Therefore, periodically the contents of the heater should be sorted out and replaced.
Therefore, periodically the contents of the heater should be sorted out and replaced.
Foundation and brickwork
It is recommended to install a sauna stove made of rims on a strong and fire-resistant foundation. It can be built from reinforced concrete screed, and the top surface can be lined with fire-resistant bricks.
When the base is dry, you can begin to work on the bottom of the oven. For a stove with masonry 62*62 cm, you will need 60 pieces of red heat-resistant bricks. They are held together with clay diluted with water and laid in a square. Don't forget to provide a cavity for the blower and a hole for the door. Attach the grate to the top of the masonry.
Stove assembly
All parts of the structure are assembled sequentially. The metal part is connected to the brick part, the firebox and ash pan are closed with doors cut from a metal sheet.
Scheme of a stove-stove for a sauna made from wheel rims
On a note! For comfortable use, it is advisable to equip the door with a handle made of one large bolt. And to prevent firewood or coals from accidentally falling out, use a latch made of a narrow metal plate and a small loop.
Next, a second section of pipe is welded to the central hole of the hub, located between the firebox and the heater, and sewn to the upper part of the chimney running through the water tank. Stones are placed in the heater: large and medium ones at the bottom, small ones at the top.
To strengthen the structure, metal channels are welded to the rim of the heater and the water tank, which are installed at a slight angle to the top of the body. The pipe is led into a chimney lined with fire-resistant bricks and equipped with a damper.
Such a stove will heat the steam room and water in the tank in just an hour.
Stages of work
After the preparatory part, you can safely begin manufacturing the structure.
First stage
We take three disks and cut out the middle using a grinder. The process can take a long time because the discs have an uneven shape, making it difficult to reach the middle.
Cutting out the core of the disc is quite difficult, but it is necessary
Second phase
The next step will be welding. We weld a square metal sheet to the lower wheel rim. It must extend beyond the walls of the disk so that burning coal or a spark from the furnace falls onto it. This is a guarantee of fire safety.
We weld the disks together in a circle. You need to be careful not to leave unwelded holes through which smoke from the potbelly stove will escape. We also weld all the holes for the valve for the camera.
We weld the seams
Third stage
Next, we cut out the doors for the firebox and ash pan. We recommend cutting a hole for the ash pan in the lowest disk, and for the firebox in the second one from the bottom. The metal pieces that remain can be used as doors. There is no hole for the ash pan, so that the draft goes well, you can open the doors of the ash pan or firebox.
Installation of a chimney pipe. We weld the pipe into the center of the uppermost disk or onto a sheet of iron that can be welded to the upper disk. In the second case, your potbelly stove will be more fireproof and reliable.
Fourth stage
Coating the oven with special paint
The last step is to install the stove on the base. Its height can be equal to the height of one brick, since the entire stove does not weigh very much. First you need to make a square formwork from bricks and fill it with cement mortar. After the solution has dried, you can safely install the potbelly stove.
To ensure that the stove lasts longer and the metal does not corrode, we recommend covering the potbelly stove with a special paint that can withstand constant high temperatures. It is especially important to paint the upper part of the structure: it is there that moisture constantly evaporates, so the metal becomes more vulnerable to losing its properties.
As a result, from the maintained materials you will get an excellent, reliable potbelly stove that will heat the room no worse than a new one.
Required materials and tools
Before you start making a mobile stove, you need to calculate its dimensions and determine the material consumption. A pivot table will help you cope with this task.
| Name of material | Standard size | Quantity | Detail | Note |
| Wheel disc | 13” | 3 pieces | Furnace casing | Can be replaced with larger diameter discs |
| Bar | D8x200 | 1 piece | Handle for damper* | Can be replaced with D10 |
| Bar | D8x250 | 2 pieces | Carrying handle | Can be replaced with D10 |
| Pipe | D50x1.5x1500 | 2 pieces | Chimney | – |
* Material for valves and hinges is selected locally from availability.
There may be slight deviations due to the specific design features.
The basic set of tools includes:
- welding machine;
- angle grinder;
- set of nozzles for metal;
- a set of locksmith tools;
- bench vice.
Consumables:
- welding electrodes;
- cutting discs;
- cleaning discs;
- individual protection means.
It is important to follow safety rules and work only with working tools.