The cooling system of a car engine consists of a number of elements that can unexpectedly fail during operation. These elements include a water pump (pump), thermostat, fan or cooling radiator. Note that one of the most common and serious problems is radiator leaks, as well as blockage of its channels. Such malfunctions lead to the cooling system losing its ability to effectively maintain the operating temperature of the power unit within the specified limits.
We also recommend reading the article about the design and operating principles of the engine cooling system thermostat. In this article, you will learn about how a thermostat works, as well as the main causes and signs of thermostat failure.
As a result, there is a need to constantly monitor the level of antifreeze in the expansion tank and add coolant in case of small leaks; the driver always needs to monitor the temperature of the internal combustion engine, etc. If the leaks through the radiator are more significant, then driving the car under your own power is extremely undesirable, since the risk of engine overheating increases significantly, which is accompanied by serious consequences for the internal combustion engine. For this reason, in this article we will look at how to repair a cooling radiator with your own hands. Such repairs can be especially useful in emergency situations when, for example, the radiator leaked while driving on the highway far from auto repair shops.
Causes of damage
There are not many reasons that cause problems with radiators. All of them can be divided into two types. These are mechanical reasons and natural wear and tear, which contribute to various damages that compromise the integrity and tightness of the device. Even a small stone that accidentally flew out from under the wheels can cause a breakdown and leakage of the radiator.
But sometimes auto mechanics are faced with another factor - head-on collisions with other cars. Even a minor blow to the bumper is enough to cause a breakdown. In addition, mechanical reasons include various repair work that is done by novice car enthusiasts. This often leads to damage to important parts and components of the device.
Corrosion processes, as well as natural wear and tear, are the second group of reasons that cause radiator leaks. It must be remembered that even minor scratches or chips can very quickly turn into a source of active corrosion. If you do not pay attention to this problem in time, then as a result of the destructive process, a hole will appear through which the coolant will flow out of the system. Minor cracks are quite difficult to detect. But if you get down to business seriously, then often all such damage can still be found.
These are two groups of typical reasons that can provoke depressurization and damage to the heat exchanger and subsequently coolant leakage. In addition, there are also some troubles during operation that can cause improper circulation of antifreeze in the system.
Main fault
Despite the fragility of the structure, the radiator can last for years. Its main enemies are poor coolant and foreign objects that can cause mechanical damage. Antifreeze or antifreeze in themselves are not very active substances that can damage the protective oxide film, and they actually do not react with unstained aluminum. We will show you how to replace the rear hub (wheel bearing) in a Skoda Octavia A5 with your own hands in the field with a minimum set of tools. But if the coolant does not meet the specified chemical standards, it promotes corrosion processes, as a result of which the walls of the honeycomb of the device are gradually destroyed.
Mechanical damage to the radiator in most cases occurs during road traffic accidents, collisions with curbs, tree stumps, etc. In addition, the device may accidentally be damaged during car . How to disassemble the 5th door Nissan X-trail with your own hands. In any case, the result is the same - leakage from a broken cell. The size of the hole determines the possibility of repair. If the heat exchanger is not seriously damaged, and the size of the problem area is several square centimeters, you can try to restore it. There is no other option to repair an aluminum radiator (we’ll figure it out later on how to solder it).
How to seal plastic parts of a car radiator
Let's take a closer look at the adhesive method for repairing a damaged radiator using the example of using two-component industrial glue from Hosch.
To seal the radiator tank, you should prepare the following materials and tools:
- powder welding granulate and liquid component of welding adhesive;
- sandpaper;
- acetone for degreasing surfaces;
- gloves;
- cotton buds.
Stages of work:
- Preparation . Both surfaces to be bonded should be cleaned of grease and other contaminants. If traces of other glue remain on the parts, they must be completely removed. In most cases, regular acetone will do for cleaning;
- Applying glue. A minimal amount of welding adhesive is applied directly to the crack. To fill the void or in the absence of fragments of the body, the powder component of the glue is sprinkled onto the liquid base. If it is necessary to restore a large depression, gluing is recommended to be done in several stages (several layers are applied sequentially with an interval of 10 minutes). After the gap is filled with dry granulate, it must be evenly saturated with the liquid component.
- Seam processing. 10-15 minutes after completion of the work, you can begin mechanical processing of the seam using a grinding machine or fine-grained sandpaper to give the seam an aesthetic appearance.
VIDEO INSTRUCTION
Instructions - how to solder plastic parts of a car cooling radiator
To solder (weld) a plastic radiator, you should prepare the following materials and tools:
- A special construction hair dryer for heating the soldering area;
- Soldering iron with a sharp tip and precise temperature control;
- Solder for plastic - special welding rods. The markings on them must match the markings on the radiator housing. As a rule, this is “PA” - polyamide (nylon) or “PP” - polypropylene. Instead of purchased welding rods, you can use pre-prepared strips cut from a similar plastic tank;
- Acetone.
Work order:
- Degrease the repair area with acetone;
- While the soldering iron is heating up, heat the joint with a hair dryer;
- We connect the seam and gradually run a heated soldering iron along it, forming a groove equal in width to the thickness of the welding rod;
- We apply a welding rod and, heating it with a soldering iron, place it in the groove of the seam;
- We check the radiator for leaks, and then install it on the car.
The welding temperature (heating of the soldering iron) is selected in accordance with the brand of plastic. For PP this is about 250 degrees.
Selecting repair methods and adhesives
There are several ways to restore the integrity and tightness of the cooling radiator:
- Soldering. The body elements of modern car radiators, made of heat-resistant plastic, can be easily soldered using a conventional soldering iron (we will look at this process in more detail below).
- Cold welding. This is the fastest way to join plastic parts without heating. A special plastic mass, which includes polymer resins, metal filler and chemical additives, connects the bonded surfaces, forming a heat-resistant seam.
This process does not require special equipment, but such repairs cannot be called durable.
Due to the low adhesion of plastic, cold welding holds very weakly. This method allows you to only temporarily solve the problem (for example, to get to the nearest car service center).
Application of glue. If the damage is minor, special glue will help restore the seal of the case.
The following compositions have proven themselves to be excellent:
Two-component adhesive 3M DP8005 is a specialized acrylic-based composition designed for gluing difficult-to-glue plastics, polyethylene, and polypropylene.
Perfect if you need to seal a radiator crack. The adhesive joint formed by DP8005 adhesive from the 3M brand is resistant to aggressive solutions and high temperatures.
The only drawback of this glue is its high price (1300-1500 rubles per 38 gram package).
Adhesive welding for plastics Hosch. This two-component industrial adhesive effectively repairs cracks and other damage in any plastic products.
The adhesive joint can withstand high and low temperatures, as well as pressure up to 12 atmospheres, so it can be used to glue a plastic radiator without any problems.
Often the joint is stronger than the plastic being glued together. The average cost of a set of two complementary components is 1500-1700 rubles.
StepUp SP9020
Price: 153 rub.
An American product that, judging by the description, is capable of neutralizing a hole along the antifreeze route in just a couple of minutes. The composition is suitable for both passenger cars and trucks. Radiators and heaters compatible with it can have any design, even flat-tubular.
SP9020 sealant hardens exclusively in the area of the hole, and this occurs due to the vigorous evaporation of individual components of the composition. Thus, the drug automatically blocks leaks where antifreeze passes.
Advantages:
- compatibility with all known antifreezes;
- the product does not harm the coolant;
- After adding the drug, replacing antifreeze is not required.
How to fix a leak in a radiator with sealant
The sealant is a special composition for sealing cracks and holes in the cooling system and in particular in the radiator.
There are several types of sealing agents:
- Powder. We fill the radiator when a coolant leak occurs. The simplest and most popular option among owners of domestically produced cars is mustard. Some car enthusiasts even use tobacco and other equally exotic substances for these purposes.
- Advantages. The advantages of dry products include low cost and the ability to eliminate small defects (up to 1 mm).
- Flaws. There is also a significant drawback, which is that not only leakage points are clogged, but also the radiator channels in the interior cooling and heating system.
- Liquid preparations. Preparations of this type are based on polymers with the addition of small metal particles. As a rule, such products are used to eliminate leaks in the engine block, but also partially in radiators. The operating principle is as follows: polymers cling to small roughnesses and sharp edges and envelop them.
- Advantages. The advantages of this option include the fact that the sealant is constantly present in the coolant and when it is replaced, it is removed from the cooling system.
- Flaw. Only small holes (no more than 1 mm) can be sealed with a polymer preparation;
- Modern polymer-type products. Products of this type contain special fibers. A striking example of such a substance is the sealant for radiators LAVR STOP LEAK. Thanks to the fibers, the adhesion of the particles of the product between themselves and the edges of cracks improves.
- Advantages. The main advantage of this option is that in a few minutes you can seal a hole up to 2 mm.
- Flaws. High price.
Sealant for car radiator - application
The main mistake of most car enthusiasts is that they do not know the main function of the seal. And it is simple - eliminating coolant leaks during temporary use. Therefore, it is recommended to use a sealant only in cases where it is not possible to eliminate the leak in stationary conditions or in the garage.
If a sealant was used to eliminate the cause of the leak, then, if possible, drain the coolant, flush the system and carry out a full repair of the radiator.
Driver actions when using sealing agents:
- A temperature sensor can indicate a leak from the radiator while driving. If the car is parked, then a puddle of coolant can tell us that it is necessary to check its level.
- If such a problem does arise, then turn off the engine, wait until the coolant cools down and proceed to inspect the damage. If the liquid still continues to flow, install a container under this place to collect it.
- Remember! Do not open the radiator cap of a car while the engine is running or hot, as this can cause serious burns.
- If you have a powder or liquid product on hand, then place it in the radiator according to the instructions.
Next, we start the engine for a few minutes, turn it off, and after a while we check again for leaks with the unit running. If the leak is small and the sealant was used in accordance with its instructions, then the coolant should no longer leak. In cases where the defect could not be eliminated, this may indicate to us that the hole is large. In this case, soldering is no longer necessary.
How to choose the right sealant?
To make the choice easier, a summary table with two characteristics will help: the time of clogging of holes of different diameters and the level of deposits. To evaluate the last parameter, we used the mass of the thermostat before and after applying the additive. Such testing of sealants was carried out at the Department of Internal Combustion Engines of St. Petersburg Polytechnic University.
Table
The table shows that sealants cope with microcracks successfully, even large holes are blocked within 2-10 minutes.
Flushing and soldering the engine cooling radiator
This type of radiator repair is used if the cracks are serious. To eliminate it, you will need to remove the element from the car. Before removal, you will need to drain the coolant through the drain holes. Such holes are located in the lower part of the radiator, and may also be present in the cylinder block of the internal combustion engine. Also, to drain the coolant, you need to remove the lower pipe from the radiator. In some cases, before removing the radiator, you may also need to disconnect and remove the cooling fan.
Next, you need to rinse the internal channels and cavities of the removed element. For flushing from dirt and various deposits, ordinary water supplied under low pressure is suitable. If there is a blockage, you can use a special product that dissolves deposits to remove scale. The specified composition is poured into the radiator after all drain plugs are tightened and other holes are blocked. Then you should wait the recommended time, after which the flush is drained and the radiator is thoroughly rinsed with running water.
To remove trapped oil and antifreeze decomposition products, you can use organic solvents (solvent, gasoline, etc.). Before cleaning, dense contaminants in the area of the pipes are removed, after which the drain holes are plugged and solvent is poured into the radiator. Next, the element should be turned over to wash all the cavities. Then you need to drain the solvent and rinse the device with plain water. Now everything is ready for repair.
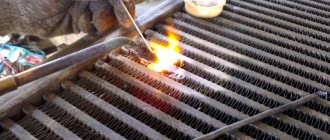
To repair a faulty radiator, you will need to prepare the appropriate tools. Let's start with the fact that the radiator can be made of brass or aluminum. As for brass radiators, various damage to such products can be eliminated by soldering.
- soldering iron (it is possible to use an electric soldering iron with a power of at least 500W);
- special flux, drill;
- zinc chloride (soldering acid);
- solder, metal bristle brush, sandpaper;
Next, the radiator, removed and cleaned of various contaminants, is inspected, after which the damaged areas are cleaned with a brush. Then you need to sand it using sandpaper. A well-polished area has a uniform metallic sheen. This grinding allows you to remove excess oxides and ensure proper adhesion of the solder to the main surface. Now acid, drill, and flux should be applied to the indicated brass surface. Next, the soldering iron heats up, after which the solder is melted with a hot soldering iron, distributing the material in the damaged area.
Please note that this method is suitable if the defective area is located far enough from the standard seams of the brass radiator, which are made at the factory. The fact is that if you work with a heated soldering iron near a seam, then the seam itself can melt and leak, since brass has high thermal conductivity. In such a situation (crack or breakdown near the factory seam), it is better to use other repair methods that are actively used for radiators made of aluminum alloys.
Soldering aluminum radiator
Let us immediately note that most of the radiators on modern cars are made of aluminum alloys. For this reason, repairing an aluminum cooling radiator by welding or soldering at home is very difficult to implement. Taking into account the above, for repairs it is optimal to use sealant or various types of glue, so-called “liquid welding”.
Preliminary cleaning and preparation of damaged areas on aluminum products is similar to the procedure for preparing a brass radiator. Washing is carried out, dirt is removed from the honeycombs, after which the damaged areas are cleaned with a brush and sandpaper. As for the selection of sealant or glue, then some features should be taken into account.
For sealing cracks and holes no more than 10 mm. “cold welding” is suitable. This “welding” consists of two bars, which are actually an adhesive base and a catalyst. The principle of operation is similar to epoxy or polyester glue.
Preparation of cold welding involves thoroughly mixing the components until a homogeneous mass is achieved. Then you need to give the resulting mixture the shape of a cone, the sharp part of which is pressed into the place of the breakdown or crack. Pressing the material allows it to partially penetrate inside, that is, contact is formed not only with the outer, but also with the inner surface. This means that the strength of the patch will be increased.
If it is necessary to remove a radiator crack in the area of the base of the inlet/outlet tubes, as well as the grille tubes, then epoxy glue or its analogues are well suited to solve the problem. It is also additionally recommended to add a little aluminum powder to the finished glue, not exceeding the ratio of 1/10, where the first number is 10% of such filler. The gluing area is thoroughly cleaned, treated with a degreaser, and then the glue itself is applied. During repairs, you can also wind several layers of fiberglass, which is soaked in glue. This will increase the rigidity and strength of the repaired area. Then you will need to dry the epoxy glue for at least 24 hours, after which you can install the radiator, fill in antifreeze and check the cooling system for leaks.
The repair method described above is also suitable for repairing extensive damage, for example, after an accident. The main components remain the same. The main difference is only the method of applying fiberglass. Several layers of fiber are needed, varying in size from smaller to larger. At the initial stage, the smallest layer is glued, then drying is carried out. Then a slightly larger layer is glued on and so on. During repairs, it is important to ensure that each layer is dry before applying the next. Let us add that radiators with a damaged plastic tank can be repaired both by gluing and by soldering plastic. Soldering plastic is similar to soldering metal products. The main thing is to use plastic for sealing that is identical or similar in its properties to the material used in the radiator device.
Types of leaks and ways to eliminate them
There are several main types of leaks:
- crack in the body of a sectional, tubular or panel radiator;
- violation of the tightness of the seam connecting the sections of the battery;
- leakage in the radiator piping area;
- leakage of pipes.
Leak on radiator piping
Using a clamp and rubber gasket
Before you fix a leak in the heating battery. formed at the connection point of the coolant supply or return, you need to prepare some tools, these are:
- aluminum clamp;
- rubber gasket;
- wire;
- pliers.
Repairing leaks using FUM tape
According to OKPD, individual heating system repairs can be carried out using a special FUM tape.
Violation of the tightness of a sectional, panel or tubular radiator
In most cases, a damaged radiator will need to be replaced.
Application of cold welding
Plate adhesive is able to eliminate any types of cracks and breakdowns and restore the tightness of the heating battery. The glue is resistant to moisture and high temperatures. Its use is considered one of the most reliable ways to eliminate leaks in a heating system and is often used as an emergency method during circuit accidents.
Removing cracks in the cylinder block and cylinder head
Engine blocks and heads consist of various metal alloys. Technologies that exist today often make it possible to restore damaged elements. Next, we will look at ways to fix the breakdown and answer the question of how to remove cracks in the cylinder block and repair cracks in the cylinder head. In some cases, you can repair cracks yourself.
One of the most widely used methods for eliminating cracks in the cylinder block and cylinder head is sealing defects in silumin and cast iron blocks using welding.
Welding can be either electric or “cold”. Cold welding means sealing cracks with various polymer-based materials. Almost all cracks can be welded using the first or second method, except for cracks in the area of the valve seat, cylinder walls, as well as those surfaces where the cylinder head and cylinder head adhere.
What is the danger of a constant coolant leak?
If the cooling radiator is leaking, you need to know what to do or which specialists to contact to fix such a problem. Constant leakage can lead to negative and even dangerous situations:
- engine overheating and further failure;
- changing the configuration of the cooling system and violating the integrity of the material used as a gasket;
- engine jamming, which will entail costly and time-consuming repairs;
- thermal burns that can occur when a crack in the radiator ruptures and hot liquid flows out in a fountain.
Why is a radiator needed and why its leaks are dangerous? Now that we have figured out, it’s time to move on to the main issue - considering ways to eliminate leaks and return the cooling system to tightness.
This is interesting: Description, properties and application of BF brand adhesives (video)
Gunk Radiator Sealer Super
Price: 627 rub.
Not cheap, but quite effective in the form of a thick brown suspension. “Super composition” from the American manufacturer Radiator Specialty Company reliably closes holes of various sizes in the radiator and is quite suitable for urgent repairs.
This sealant is suitable for both cars and trucks. The drug is able to restore aluminum, brass, and radiators made from composite materials. However, the product in a 443 ml canister also has its own “fly in the ointment” in the form of the toxic substance sodium borate decahydrate.
Advantages:
- performance;
- compatible with all types of antifreeze.
Flaws:
- leaves behind a lot of sediment, which can harm worn-out or thickly deposited areas where antifreeze passes;
- Do not allow the drug to come into contact with the skin, eyes or mouth; high price.
Assessing the extent of radiator damage
It is customary to install the radiator itself in the engine compartment, or rather in its front part. This is how it is possible to create the effect of blowing with a counter flow of air while the vehicle is moving. The disadvantage of a car heat exchanger is its fragility. This device is often called the most vulnerable part of any car.
Even if the slightest impact occurs, the likelihood of mechanical damage to the spare part in question is quite high. Heat exchangers whose water tanks are made of plastic break down especially often. Therefore, when deciding how to repair a radiator, you need to focus primarily on your capabilities. Carefully study all the methods presented above and try to figure out which method will be the most convenient and simplest from a practical point of view.
It is also important to first assess the extent of the damage. If it is strong enough, it is recommended to focus on direct soldering
This way you can deal with really large cracks that cannot be fixed with ordinary glue. If the crack is not the largest, cold welding type putty is quite suitable. Glue will be the optimal solution for restoring small cracks.
If you are not sure that you know how to seal a car’s cooling system, it is better to focus on repairing the system at a car service center. In addition, you won’t have to spend too much money on restoration work carried out by a mechanic, because the process itself is not considered difficult.
This is interesting: Unusual use of a glue gun - what can be made from hot glue
How to seal a car radiator
Now let's talk about how to seal the radiator and what glue is best suited for this. Thus, one of the best options is considered to be the two-component adhesive 3M DP 8805. The basis of its composition is acrylic, which makes it possible to use the composition for working with difficult-to-glue materials:
- the main advantages of such glue are the ability to create a sufficiently strong and reliable seam that will not lose its original shape when exposed to high temperatures;
- The disadvantage is the rather high cost.
Special welding adhesives are also a good option. They are designed for quick and, most importantly, effective elimination of defects on plastic surfaces. Adhesive joints after such compositions withstand not only high but also low temperatures. In addition, they are not afraid of high atmospheric pressure.
To avoid making a mistake in your choice, we recommend purchasing the required adhesive from a certified automotive store.
Sintec Coolant Stop Leak
Price: 134 rub.
Composition produced by the Russian manufacturer Sintec. One half-liter bottle of this product is designed for 20 liters of antifreeze.
The drug faithfully patches holes in the radiator, as well as other elements of the heating and cooling systems of the car. The composition is resistant to heat and does not harm parts made of plastic, rubber, or non-ferrous metals.
Advantages:
- does not clog the radiator;
- compatible with any automotive antifreeze based on ethylene glycol;
- when used correctly, seals even large holes in the radiator;
- not too high cost.
The only significant disadvantage of the Coolant Stop Leak composition is that it does not last long on parts.
Radiator repair methods
- You can also use a gas torch for soldering.
To quickly eliminate leaks from broken radiator tubes. You can mute them. To do this, bend both torn edges of each tube and clamp them with pliers. This method is suitable if no more than 5 tubes are broken. Such repairs are justified if the radiator is aluminum and you cannot solder it.
- When the radiator is aluminum and its plastic tank is broken. If the length of the hole is not too different from its width, a rubber plug will help to seal the hole. You need to do it like this: A plug is cut out of rubber at least 1 cm thick in the shape of the hole. A hole with a diameter of about 5 mm is made in the center. An M6 screw is inserted into the hole, onto which the corresponding nut is screwed. The plug is inserted into the hole. The screw is tightened until the plug compressed by it and the nut, expanding, loses its mobility. After this, the plug will reliably plug the hole. You can add antifreeze. If the screw head or nut falls into the hole and the plug does not expand enough, place a washer under them. After adding antifreeze, an air lock usually forms in the system. It is removed by undocking the top point of the car's cooling system.
- If the copper radiator pipe has a crack near the tank.
Remember that when buying such compounds, you risk further harming the engine cooling system
Clean, degrease and solder it thoroughly by pouring a thick layer of solder on it. This type of repair is quite acceptable.
- When the plastic pipe has a crack near the tank. Order a turner to make a tube with an outer diameter equal to the inner diameter of the pipe, 3-4 cm long. Remove the piece of pipe from the tank, clean, degrease and dry it from the inside. Glue a tube made by a turner into it onto the liquid glass so that half of its length remains outside. Dry the structure and glue it into the radiator tank. This must be done with the same glue. It is better to strengthen the joint on top with a textile bandage on liquid glass.
You need to make an oil cooler taking into account what it is made of. Its repair begins with draining the oil from it. Cork is also made. You just need to make it from oil-resistant rubber, since other oil will quickly render it unusable. Before soldering, the oil radiator should be thoroughly rinsed inside and the oil removed from the outside. It’s better not to repair the oil radiator, but to buy a new one.
How to find a crack
The following methods are used to identify cracks:
- ultrasonic detection method;
- use of magnetically sensitive equipment;
- pneumatic crimping method;
- searching for cracks using hydraulic control;
In practice, crack detection in many car repair shops is carried out by pumping air or water into the faulty engine element. In the case of air, the part is additionally immersed in a bath and defects are found by bubbles. If water is pumped into the element, then the need for immersion is eliminated, since cracks are diagnosed by liquid seepage.
To determine the exact boundaries of the crack, a pair of magnets are attached to both sides of the split, and the space between the magnets is filled with special conductive filings. The presence of a crack will cause the magnetic field lines to break, causing sawdust to partially cluster on the crack surface. This method allows you to clearly identify a crack in the cylinder block or cylinder head.
How to accurately determine the location of a radiator leak
Before you start repairing the radiator, you need to determine the nature and location of the malfunction itself. Almost all external malfunctions of the radiator (except for ordinary contamination) involve a violation of its tightness, which means there must be a coolant leak.
The intensity of liquid leakage from the radiator may vary, and at the initial stage it is not visually noticeable, but a rapid decrease in the liquid level in the tank is noticed almost immediately. After all, a decrease in the level of antifreeze or antifreeze leads to overheating of the engine, which is immediately signaled by a special temperature sensor on the driver’s instrument panel.
To accurately determine the location of a fluid leak, you can use two methods. In this case, you will need to completely drain the coolant from the radiator, and disconnect the radiator itself, remove it from the car and rinse thoroughly.
Also remove, empty and clean the radiator, but with all inlets plugged, completely immerse it in a suitable container of water. Air bubbles will be seen escaping from holes in damaged areas. If air does not come out, create excess pressure in the radiator using a pump or compressor.
Briefly about the design of the heat exchanger
To troubleshoot and subsequently repair a radiator, you need to understand its structure. “Experts” who claim that a leaking unit should simply be welded up do not have much knowledge of the design and materials from which car engine cooling heat exchangers are made.
The radiator consists of the following elements:
- a system of copper or aluminum tubes (otherwise known as honeycombs), combined with the help of heat exchange plates made of the appropriate metal;
- 2 plastic tanks with antifreeze inlet and outlet ports (there are models with an additional filler pipe);
- brackets for fastening to the car body and the electric fan casing;
- other elements - a steam outlet pipe, a socket for installing a temperature sensor, and so on.
Note. The honeycombs and tanks of different radiator models are located differently. In a unit with horizontal tubes, the tanks are located on the sides, with vertical honeycombs - on the top and bottom.
Plastic containers are boxes that are open on one side, covering the ends of all tubes and seated on sealing gaskets. The incoming antifreeze fills the first tank, passes through the honeycomb and, after cooling, is collected in the second tank, from where it flows back into the engine.
Soldering aluminum radiators
Don’t rush to take up the soldering iron - you can always do it in time. First you need to study the scale of the tragedy and choose the most appropriate repair option.
- you can simply pour solder into a place with a small defect;
- a breakdown with an impressive size will have to be covered with a patch and soldered along the entire circuit.
Next we will describe in detail how to solder the radiator. If you follow these instructions, even a person without relevant experience will definitely succeed.
We dismantle the device, drain the liquid from it, disconnect the pipes, bolts and remove the assembly. At the leak site, we remove dirt, clean off dust and dry it. We apply rosin to a dry and clean surface, but it is better to use soldering acid. For an aluminum radiator, it is important to use active flux or aluminum solder. This is due to the oxide film that forms instantly
It can disrupt the entire repair process. A leak may form on the tube - this situation is not uncommon. In this case, you will need to warm up the soldering area and remove the tube. Then soldering is carried out or the tube is replaced with a new one if the damage is large. It is not always possible to reach the tube so easily with a soldering iron. In this case, you will need to insert a heated rod into the damaged tube. The temperature will make the solder soft, allowing you to remove the tube without any problems.
Since we are talking about soldering radiators, it is worth giving advice on such repairs to copper and brass structures. To repair such parts, you need to use a special soldering iron that is designed to work with such materials. The power of such a soldering iron must exceed 250 W. The work is performed according to the following scheme:
- the surface is also cleaned and dried;
- the material warms up;
- rosin is applied as evenly as possible;
- Solder is also applied in an even layer.
How to seal a leak in a heating pipe, radiator, between sections
The method for eliminating a leak in a heating system largely depends on the location where the leak appeared. The leak could be:
- on a single pipe;
- at the junction of pipes and radiators, pipes and fittings (adapters, tees, etc.);
- between battery sections;
- right on the radiator.
Depending on the scale of the disaster (what else can we call it?), the actions differ. If these are just the first signs - a few drops per hour or a very thin trickle - you can try to eliminate it yourself, using improvised or purchased means.
You can fix radiator and pipe leaks with your own hands. The main thing is that it flows lightly
If the flow is strong, the first thing for residents of high-rise buildings is to call an emergency team. The next step is common to everyone: turn off the coolant supply. There are several options:
- The radiator is leaking. At the same time, there are shut-off valves at its inlet and outlet. Then just close the taps. For owners of individual heating, everything is simple, but for subscribers of centralized heating there are several situations. The radiator is installed with a bypass, then when the device is turned off in your apartment, nothing happens to the common riser, the heating continues to work. No problems, just do the repairs in peace.
- There is no bypass. Then you need to either inform your neighbors and (or) the DEZ, Housing Office, etc. and then start fixing the problem.
We really don’t like to call emergency lights and often try to fix everything ourselves. There is a chance to fix the leak with your own hands if the leak is not “within the radius”. Then we'll try to localize the problem.
The difference between a new and used pipe is obvious
What to do if your car radiator is leaking
Let's move on to the most interesting part - how to fix a leak in a car radiator. The radiator can leak in different places. Some leaks can be eliminated with your own hands, while others cannot always be dealt with without serious repairs.
Unfortunately, it can be difficult to determine whether the leak has been eliminated. This becomes visible only after installing the radiator on the car and filling it with antifreeze. The engine must be started and allowed to run for 30 minutes. Only then will you be able to see the result of your work.
In the process of repairing the radiator, attention should be paid to external cleaning of the heat exchanger, because the larger the area of contact of the air masses with the surface of the radiator, the more efficient the cooling of the antifreeze will be. And creating a favorable temperature regime for engine operation will subsequently pay off in the trouble-free and long-lasting operation of the car.