If a car radiator fails, not every driver can immediately replace this part. Its cost often reaches tens of thousands of rubles, and the wait for delivery drags on for months. Soldering cooling radiators helps to postpone replacement for a while. The leak elimination method is chosen taking into account the properties of the material from which the part is made.
Reasons for soldering the radiator
First of all, it is worth checking the entire pipe system for integrity. Very often, it is mechanical damage to the tubes or tank collectors due to a traffic accident that is the cause of antifreeze leakage.
Also, do not forget about the possible thermal overheating of the joints, which led to their destruction, resulting in a leak. The same reason may occur if the cooling system was operating without liquid.
If the cooling system is already old and suddenly leaks, the most likely cause may be corrosion. Please note that it may not be noticeable at first glance, as it may be located inside the system. In this case, you will still have to completely disassemble the system.
Classification of cooling systems
There are several types of engine cooling systems:
- air;
- liquid;
- combined.
The air system uses the flow of outside air to operate. Used in motorized vehicles with low power engines.
In a liquid system, a heated engine is cooled with a special coolant. Most modern car engines are equipped with such a cooling system.
The combined system combines the operation of liquid and air systems. Used to operate high-power power plants. Widely used at energy sector enterprises.
Finding a Radiator Leak
If a spot suddenly appears where the car is parked, it means the cooling system has leaked. In order to quickly and easily determine the cause, it is recommended to follow an easy inspection rule.
- Initially, you need to make sure that there is no external damage as such. Before removing the radiator, you need to carefully inspect all pipes and tanks for mechanical damage.
- Perhaps during movement the system touched some protrusion, which caused a crack to form. At this stage it is also worth checking the heat exchanger of the interior heating system.
- Next, if no external signs of failure were found, you need to prepare to dismantle the entire cooling system. To do this, you must first drain all the liquid from the system.
After dismantling the radiator, it must be carefully inspected. Particular attention should be paid to the lighting; it must be good in order to be able to examine the part in detail.
If the hole could not be found, you must first close all the tubes using plugs, thus sealing the radiator. Then place it in clean, clear water. Bubbles that appear in a chain will accurately indicate the location of the leak; this is the easiest way to diagnose.
Security measures
When repairing a car radiator, you should be extremely careful and follow certain safety measures. The heat exchanger itself must be disconnected. Drain all liquid completely.
If you have not previously had experience working with a soldering iron, it is better to entrust this task to professionals. In this case, you should at least practice on less important surfaces and parts of the car.
When working with cold welding or glue, it is important to use gloves to avoid damaging your hands. In addition, be sure to follow the instructions for using the glue. This way you can not only achieve the ideal effect of the repair, but also protect your hands from the harmful effects of adhesives.
Diagnosis of material type
After a crack through which fluid is leaking is identified, you need to find out what material the radiator itself is made of. This is necessary in order to choose the optimal method of soldering the damage, thus repairing the part.
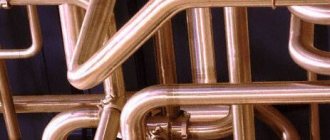
Modern models can be made of aluminum or copper; there are also models made of plastic, but much less common.
- You can distinguish the material quite simply based on its shade. The thing is that copper will have a red-brown tint.
- While aluminum will have a gray color. The plastic part has a black or dark tint.
- As a rule, radiators are not painted, so you should rely on this method.
- If the radiator is painted, it is necessary to remove a small amount of paint from the inside to diagnose the type of material used.
Copper can easily be soldered in a garage or even at home, because working with this material is much easier. But working with aluminum is much more difficult, this is due to its physical and chemical properties, which must be taken into account.
It makes no sense to solder a plastic part, because the plastic is unreliable; if there is a crack, it can be covered, but it is recommended to install a new part.
Safety precautions
| The electric soldering iron must have intact cord insulation and a working plug. During operation, make sure that the cord does not touch the tool or heated parts. |
| Hold the soldering iron by the handle only. You cannot determine its heating by touch - just hold your hand at some distance from the sting. |
| Vapors from heated solder and fluxes are harmful to health. Work should be carried out in a ventilated area or in the fresh air. |
| Please note that the solder takes a long time to cool down on a heated part, so after removing the soldering iron, do not rush to immediately touch the seam with your hands. |
DIY radiator repair (step by step)
In order to repair a broken radiator, you will need the following list of tools.
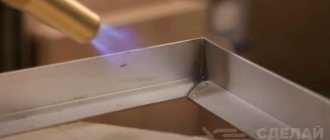
- Electric soldering iron, high power, or you can use a gas torch
- Solder of the right type
- Flux paste
- Abrasive paper
- Pliers
- Solvent
- Rags
First you need to prepare the product for the upcoming work. For this purpose, it is thoroughly cleaned of external contaminants, dust, various fragments and sawdust. Next you need to degrease it, for this purpose you need to use a solvent. Degreasing is necessary in order for soldering to be carried out efficiently.
The entire system must be thoroughly dried, possibly using compressed air through one of the pipes.
The leak area must be carefully cleaned using abrasive paper (sandpaper) so that it is smooth and even with the rest of the surface of the part.
After this, you need to apply a flux compound to the soldering area and give it a little time to dry.
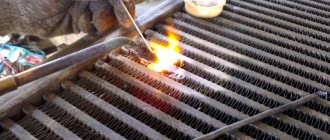
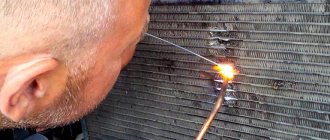
After this, solder is applied to the crack, using a high-power electric soldering iron or a gas torch, it is necessary to melt it so that it completely closes the crack and penetrates inside, thus completely closing the defect.
If it doesn’t work the first time, you need to repeat the procedure again, starting with applying the flux paste.
Using Cold Welding
This method of soldering an engine cooling radiator does not involve heating. The hole is sealed with a special substance that covers the damage. Repairs are performed as follows:
- Prepare the part. To do this, the surface is cleaned of dust and degreased. A rag is moistened with alcohol and the radiator is gently wiped with it. You can’t apply any force; the metal will be damaged even more.
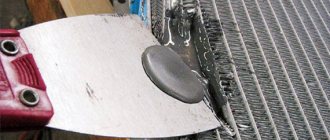
- Prepare the adhesive composition. It is selected according to the type of metal. Cold welding is a thick mixture that must be evenly distributed over the defect. Careful application improves the quality of the seam. Wait for the composition to dry and inspect the soldered radiator.
We recommend reading: Heating temperature of polypropylene when soldering pipes
The difficulty of soldering an aluminum radiator
The difficulty lies in the physical and chemical properties of this material. The thing is that when heated, an oxide layer forms on the surface.
It will not be possible to properly apply solder on top of it, thus repairing the part. Initially, you need to get rid of this layer, and then increase the fluidity of the solder itself by heating it more strongly.
After this, it is necessary to prevent the re-occurrence of the oxide layer. It will not be possible to carry out all these stages in a garage or at home, because the part requires mechanical, professional processing using special equipment.
You should also pay special attention to flux compounds and solder. They need to be selected with great care, because the quality of the final soldering depends on them.
After the repair process is completed, the tightness of the system must be checked in the same way as is used to diagnose and detect cracks in the part.