General rules for installing radiators
The battery is attached to the wall with special brackets.
It can be installed openly, which is most optimal, recessed into a niche or covered with decorative finishing elements. When deciding how to properly install an aluminum heating radiator, you need to take into account that when closing the heat source, a loss of up to 30% of power is possible. Having made this choice, it is better to lengthen the heating devices through additional sections. Any connection method will use three of the four radiator holes. Close the unused channel with a plug.
The two connection points to the system will act as input and output. On the third, always the top one, you need to connect the Mayevsky valve, through which air is removed after filling the system with coolant.
According to the design standards establishing how to correctly determine the connection location of an aluminum heating radiator, the following dimensions must be maintained:
- There should be a free space of at least 10 cm between the top of the radiator and the window sill. If the distance is made smaller, the rising warm air will heat the window sill rather than heat the room.
- The gap between the floor and the heater should not exceed 12 cm. As this gap increases, the heating of the lower part of the room deteriorates.
- You need to retreat from the wall to a distance exceeding 2 cm. At a shorter distance, the free upward flow of warm air masses behind the sections is impossible, as a result, thermal energy will go into the wall.
Often people, without thinking about where and how to properly connect a heating radiator in an apartment or other room, reduce the efficiency of this device. In this case, losses will account for a considerable part of the precious heat.
- Installation under an element protruding from the wall by 3 - 5 cm - about 4%.
- Placement in an open niche - up to 7%.
- Partially closing with a grill - up to 15%.
- By installing the grill over the entire area of the heated parts - up to 30%.
For lateral and diagonal connections, it is better to arrange the entrance through the top channel. When the coolant is supplied from below, the heating efficiency decreases by up to 15%.
The top plane of the battery must be in a horizontal position.
Trying to follow the conditions for how to most correctly and conveniently connect heating radiators, do not forget to use a supply tap that has a digital or dot scale on the adjustment handle. The presence of this option will allow you to easily set the amount of incoming liquid.
When assembling the connections of the coolant supply and discharge pipelines with outlets to the radiator and at the connection points of heating kits, taps should be used that allow you to disconnect the battery from the system if it is necessary to repair or replace it. This mechanism is called “American”.
The laying of pipes connecting the radiator to the system is carried out after installing the sections.
When choosing how to properly connect heating radiators, we will consider each combination of the type of system and method of connecting the heaters.
Soldering safety rules
Compliance with the following recommendations will help avoid injuries and other unpleasant consequences:
- The power cable of the device must have a full braid and a working plug. During soldering, the wire should not touch the tool tip or hot parts.
- The soldering iron must be held by the handle. You should not try to determine the degree of its heating by touching the tip. It is enough to keep your hand a short distance from the tool.
- When heated, consumables used in the soldering process emit toxic fumes. It is recommended to work in a well-ventilated room or outdoors.
- On hot parts, the solder cools down for several minutes. You cannot determine the quality of a seam by feeling it with your hands.
Using Cold Welding
This method of soldering an engine cooling radiator does not involve heating. The hole is sealed with a special substance that covers the damage. Repairs are performed as follows:
- Prepare the part. To do this, the surface is cleaned of dust and degreased. A rag is moistened with alcohol and the radiator is gently wiped with it. You can’t apply any force; the metal will be damaged even more.
- Prepare the adhesive composition. It is selected according to the type of metal. Cold welding is a thick mixture that must be evenly distributed over the defect. Careful application improves the quality of the seam. Wait for the composition to dry and inspect the soldered radiator.
The main reasons for the loss of radiator tightness, signs, repair features
Loss of tightness of the radiator of the cooling system may be due to the following reasons:
- Natural wear and tear. The approximate lifespan of a radiator is about 10-12 years. As the device wears out, its internal working surface becomes covered with a layer of scale and deposits formed as a result of chemical and thermodynamic processes. The walls of the radiator plates and tubes become thinner. Since the liquid in the device is under pressure, microcracks are possible, as a result of which the liquid begins to leave the system.
Considering that the sizes of microcracks are small, a strong leak is not observed in this case. Wet traces of leakage may disappear after cooling the engine and antifreeze. It is advisable to immediately detect the consequences and place of fluid leakage. The sooner repairs are made in this situation, the less damage will have to be repaired. Can be successfully repaired by cold welding.
- Filling the cooling system with water. Freezing in the cold season. If there is a slight leak of antifreeze, many drivers add limited amounts of water to the system. During the warm season of vehicle operation, the number of such top-ups can be large. As a result, the concentration and characteristics of antifreeze change. In winter, even at slightly below zero temperatures, it can freeze. In this case, volume expansion occurs. The radiator may “break”.
The resulting crack is usually large in size. It can occur at the junction of plastic and metal radiator elements. In most cases, such damage is difficult to repair.
- Filling the cooling system with low-quality antifreeze. Overpressure. In most modern engines, the coolant is under pressure. At the same time, the boiling point of antifreeze increases to more than 100 degrees Celsius. This allows you to increase the efficiency of the engine. If low-quality antifreeze is poured into the system, it may boil at a lower temperature. This may damage the radiator. It may be small. In such cases, it is better to use the soldering repair method, as it provides better performance in terms of resistance to increased pressure. Soldering is easy to do at home.
- Mechanical damage. This malfunction may be due to:
- foreign objects entering the radiator area;
- road accident;
- destruction of fan blades;
- poor quality repairs.
Read more: How to fix scratches on your car
Depending on the location and size of the damage, cold welding and soldering methods can be used for repairs.
Alternative Repair Methods
Scheme of argon welding of aluminum.
Once upon a time, a leaking car radiator was repaired using mustard powder, which was poured inside. Mustard can be successfully replaced with a raw chicken egg. Today, in auto parts stores you can purchase a special sealant in the form of a powder or liquid. This chemical clogs small cracks from the inside of the radiator. A raw chicken egg can successfully replace mustard.
The so-called cold welding also helps. A piece of this substance, consisting of 2 components, is kneaded in the hand until soft and the crack is covered. After the substance has dried and hardened, you can forget about leaks forever.
You can use the services of a welder who works with argon-arc welding. This will cost some money, but you won't have to buy a new radiator.
Soldering order
Proper organization of the aluminum soldering procedure requires thorough preparation, without which it will not be possible to achieve the desired result. Before soldering the radiator yourself, you should carefully read the relevant instructions. It states that the preparatory stage includes cleaning the area to be restored and preparing a soldering composition of the required quality.
Preparatory operations
Before starting soldering, it is necessary to remove the old coating and clean the soldering area
Before soldering an aluminum radiator using rosin-based flux, the damaged area is prepared according to the following instructions:
- Remains of the old coating and traces of contamination are removed.
- The soldering area is cleaned using abrasive.
- Immediately after this, it is degreased with a solvent.
Before soldering the radiator, you will need to prepare the flux in a metal crucible in advance. To do this, rosin is first melted with a gas burner, after which small iron filings, taken in a ratio of 1:2, are added to the melt (they act as an abrasive). At the same time, the prepared composition is mixed until it becomes a homogeneous mass.
Elimination of small defects
Upon completion of the preparatory operations, proceed to the soldering process itself:
The soldering iron picks up a small amount of solder. Using circular smooth movements, it is applied to the area previously treated with flux. During the processing process, it is important to carefully ensure that the layer of solder is distributed over the surface as evenly as possible.
When soldering, the sawdust contained in the solder removes oxides from the surface, and the previously added rosin blocks the oxygen access channel. As a result, all conditions are created to obtain reliable contact between different metals. This method is only suitable for small damage, the size of which does not exceed a few millimeters. On large areas, the flux cools quickly and does not provide good heating of the soldering area.
Restoring significant damage
To restore a significant area of the radiator, you will need a special composition - flux
The need to restore large-area aluminum surfaces is encountered quite often. You will need a special soldering compound called “flux”. Before using it, the battery surface to be treated is prepared, as was done for small areas.
Initial components for preparing flux:
- potassium and lithium chlorides;
- regular table salt;
- sodium sulfate;
- cryolite.
The mixture prepared in a certain proportion is first thoroughly ground in a mortar to a powder state. After this, it is poured into a crucible, where it is thoroughly mixed until a homogeneous mass is suitable for obtaining a melt.
Soldering procedure using flux:
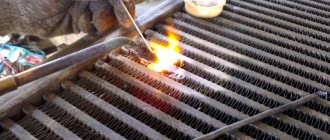
- The damaged area is thoroughly heated using a gas burner.
- A thin layer of flux is applied to the prepared area.
- The damage is soldered with tin-lead solder with the addition of small amounts of bismuth.
When working with special equipment (gas burner), it is important not to overheat the area being restored, so as not to burn it. The strength of the flame is selected so that it is only sufficient to uniformly heat the surface of the aluminum product
Repair of complex configuration radiators
Soldering a car radiator
There may be situations when it is necessary to restore (unsolder) an aluminum car radiator that has many hard-to-reach places. In this case, methods based on the use of iron rosin flux and home-made flux are not suitable. Thin-walled tubes of a copper or brass car radiator, for example, are very difficult to solder due to the design features. In this situation, it is recommended to use low-temperature solder (LTS) with simultaneous gluing of the surface to be restored. To the list of preparatory operations considered, we should add the need to crimp the damaged area of the radiator or stove with pliers, which will reduce the size of the hole.
During soldering, the area to be treated is first thoroughly heated with a gas burner, after which an NTP rod is introduced into its flame. By periodically moving it over this place, you need to try to make sure that the solder particles cling to the edges of the damage and gradually “tighten” it. At the final stage, you will need to seal the defect area using a special high-temperature glue. With its help, it is possible to “fix” all the remaining minor irregularities and flaws.
Flux
Before soldering the radiator, you will have to take care of the flux. It is this that ensures a reliable connection between the solder and the metal surface being repaired. You can either buy flux or make it yourself. You can purchase it at any store specializing in the sale of radio components. The packages of Russian fluxes intended for soldering aluminum usually have a corresponding inscription. Also, their name may contain the markings F-59A, F-61A, 34A, etc.
How to solder a car radiator at home without buying flux? Is it possible to do it yourself? Yes, you can make flux yourself. It, of course, will not have the same properties as the factory one, but it will cope with its task. To make it, you only need two ingredients: rosin and iron filings.
You can probably find rosin at home, and shavings can be obtained by processing any iron part with a file. All this needs to be mixed in a small fireproof container and heated over a fire. The resulting mixture is the simplest flux for aluminum.
To obtain a more durable connection between solder and metal, you can make a so-called flux. To do this, you need to mix the following substances in the following proportions:
- potassium chloride – 56%;
- lithium chloride – 23%;
- cryolite – 10%;
- coarse table salt – 7%;
- sodium sulfate – 4%.
The ingredients need to be crushed, mixed and poured into an airtight glass container. Store flux in a place protected from direct sunlight.
How to quickly fix a leak
First you need to determine the location of the leak. You can do this in several ways:
- We carefully and in detail inspect the line along which the fluid moves. There will be a wet spot at the leak site. This method does not always give a positive result, for example, in the case of microcracks.
- The compressor allows you to quickly find all problem areas that will need repair. All outlets on the radiator are closed, only one is left, the system is filled with water and air is supplied through the compressor. A pressure of 1 atmosphere will be enough. In places with drops of water, the cooling radiator leaks. This method does not require dismantling the faulty part, which is appreciated by many drivers.
- If the radiator in the car is leaking, but there are no wet spots on its structure and there is also no compressor at hand, then it needs to be dismantled. The structure is placed in a container of water, a bath is best, and air is supplied. Where the bubbles appear is where the problems are.
Often, leaks occur simply on the road, far from home or even any populated area. You should not continue driving, it is dangerous for the car and the driver. We will tell you how you can repair a car radiator with your own hands using available tools.
- A piece of an old car inner tube and a clamp will allow you to temporarily close the leak and drive to the nearest town or car store. We cover the leakage area with rubber and compress it with a clamp.
- Any driver certainly has pliers in his travel kit. They are needed to plug a damaged tube. There should be no more than 5 such tubes, otherwise the cooling will be significantly reduced and the system will not cope with the task assigned to it.
- Sealant is a very useful tool that can help out at the most unexpected moment. There are different sealants and the principle of their use may differ significantly. Instructions for use are always indicated on the packaging. We study it and act in accordance with the manufacturer’s recommendations.
Leak test
The quality of the repair can be checked using air or water pumped into the radiator under pressure. The air method has been previously described.
Pressurized water can only be checked during the heating season. To do this, a plug is placed on one side of the battery, and the other is connected to the supply through the Mayevsky tap. Having slightly unscrewed the tap and bypass, fill the radiator with water. To facilitate observations, a strip of white paper is placed under the battery.
If after 10-15 minutes the paper remains dry, the leak has been eliminated and the radiator can be connected to the general system.
If it is not possible to create pressure, then fill the radiator with colored water and leave it for several hours. Usually after 3-4 hours the leak manifests itself.
Main fault
Despite the fragility of the design, the radiator can last for years. Its main enemies are low-quality coolant and foreign objects that can cause mechanical damage. Antifreeze or antifreeze themselves are not very active substances that can destroy the protective oxide film, and they practically do not react with pure aluminum. But if the coolant does not meet the required chemical standards, it promotes corrosion processes, as a result of which the honeycomb walls of the device are gradually destroyed.
Mechanical damage to the radiator most often occurs during road traffic accidents, collisions with curbs, tree stumps, etc. In addition, the device may be accidentally damaged during car repairs. In any case, the result is the same - leakage from a broken cell. The size of the hole determines the possibility of repair. If the heat exchanger is not seriously damaged, and the size of the problem area is several square centimeters, you can try to restore it. There is no other option to repair an aluminum radiator (we’ll figure it out later on how to solder it).
Determining the location of damage
Car radiators are at greatest risk of damage, as they operate in temperatures with different signs and under the influence of strong vibrations.
Cases of mechanical damage to such devices cannot be excluded. Radiators of air conditioners, which are used as condensers and evaporators, are less often repaired. But such cases also happen. It’s very unpleasant when the climate control suddenly stops working in a luxury car during the hot season.
One of the most effective and affordable repair methods is soldering radiators.
If a car radiator is damaged, it is very important to promptly identify the problem and try to fix it.
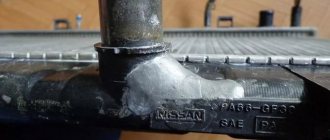
The auto radiator, which is part of the engine cooling system, is a very important component. Structurally, this device consists of two vertical tanks connected by a large number of thin horizontal tubes. The coolant circulating in them releases heat into the air through natural heat exchange and cools down. To improve heat transfer, the surfaces of the tubes in contact with the surrounding air are increased. To do this, thin metal plates - fins - are soldered to them.
Signs of damage to the radiator are an increase in engine temperature during operation, as well as a decrease in the coolant level. Of course, fluid loss can occur not only through the radiator, but most often the cause is this particular unit. Visually, major damage can be determined by observing the coolant leak. But it will be quite difficult to do this on a hot engine, since the antifreeze will immediately evaporate. Some compositions are painted with special pigments that remain on the surface of the part after drying, which helps to identify the location of damage.
If it is determined that the leak occurred in the radiator, but no damage is visible, it is necessary to remove the device from the car, first draining the coolant. After this, you need to close all the holes, leaving one, and supply air under slight pressure into it, lowering the radiator into a container of water. The location of the hole can be determined by the escaping air bubbles.
Features of working with aluminum
The choice of aluminum for the manufacture of various radiators is not accidental: this metal has an optimal combination of low weight, strength and excellent thermal conductivity. Thanks to this, plate structures with a large total area can be made from aluminum, and they will provide excellent heat transfer.
But the material also has a drawback, which is the difficulty of repairing any radiators if damaged:
A film of oxides appears on any aluminum products
- Aluminum is a chemically active material. Because of this, the metal surface oxidizes very quickly, becoming covered with a layer of oxide film.
- The oxide film becomes an obstacle to soldering two aluminum products. For maximum strength, it is necessary to achieve direct metal-to-metal contact, but when heated, a thin layer of oxides inevitably forms between them.
The oxide layer protects against corrosion - this is true for both copper and aluminum
- To effectively solder an aluminum radiator, you need to get rid of oxides on its surface. For this purpose, special compounds are used - fluxes. The use of fluxes based on cadmium, bismuth or zinc allows you to clean the surface of the material, reduce the stress on the surfaces during connection and improve the adhesion of the metal to the solder.
Oxides are removed using special fluxes
The price of high-quality fluxes for soldering this metal can be quite high (for example, Castolin Alutin 51L - about 300 rubles for 25 g). That is why, when repairing radiators at home, they use homemade compounds - the so-called fluxes.
Even such a small hole will not be easy to repair.
In any case, when soldering, the main task is to isolate the treated area from contact with oxygen. This is achieved in a variety of ways.
How to solder plastic car radiator
Soldering an engine cooling radiator is considered a fairly simple task. However, not everyone can cope with it due to insufficient knowledge of how to solder a car radiator on their own. Most car owners prefer to take their car to a service station.
Surface preparation
Before gluing the plastic on the car radiator, you will need to thoroughly prepare the surface for this process. For this purpose, we will need to clean it from grease, dust and dirt. Lightly dampen a rag and very carefully wipe the areas of plastic around the resulting crack.
In order to achieve a better effect, it is recommended to use an alcohol solution
It is important that in no case should you overdo it. The fact is that too active mechanical impact on the damaged area or excessive pressure on it when cleaning can damage the heat exchanger even more.
Preparing the adhesive mixture
Now you need to worry about how to seal the crack on the car radiator. So, let's prepare the adhesive mixture. If you decide to use exclusively glue specially designed for such purposes, then its use will be as simple as possible.
A small amount of adhesive should be applied directly to the damaged area. When a part is missing a certain piece of the body or there is no gap between the two halves that are formed due to a crack, it is recommended to sprinkle the liquid base with the powder component of the glue.
So, if the crack itself is too deep or a sufficiently large part of the body is missing, gluing must be performed in several stages. You should apply glue to the damaged area two or three times, waiting until each layer is almost completely dry. When the resulting gap can be completely filled with dry gradulant, it is recommended to saturate it with a liquid composition. This way you can be completely confident that it will adhere perfectly to the surface of the spare part.
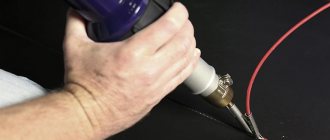
Cold welding
In addition, you can seal a car radiator using cold welding. Since it comes in the form of a fairly thick putty, it will be enough to apply it to the seam and wait until it cools completely
It is important that this same putty must be applied in a neat and even layer so that the seam is of the highest quality.
Cold welding must be used as:
- the main method of restoring performance;
- an additional means of securing the result obtained by soldering or gluing.
A layer of cold welding applied on top of the glue layer will allow you to preserve the quality of the auto part repair for a long time and extend the service life of the part.
Final stage
When the glue has completely hardened and all the main working steps have been completed, you need to carry out final surface treatment. It is necessary to ensure that the resulting seam becomes neat and smooth. For such purposes, the soldering area will need to be treated with fine-grained sandpaper, and ideally with a grinding machine.
In this way, you will be able to get rid of all minor defects that will not have the best effect on the further operation of the product. After this treatment has been completed, install the heat exchanger back in its place.
Restoring duralumin damage
Any welding of aluminum, as well as its soldering, is impossible without cutting off air, otherwise instant oxidation cannot be avoided. Since it is impossible to solder an aluminum radiator like a copper one, it is possible to take solder from bismuth with indexes 33 or 50.
But for it you first need to prepare a powder from four chemical elements that are difficult to find. They are used only at car service stations.
Another method can be used. To do this, have a carbon dioxide cylinder. Direct its jet to the place where the solder is applied. Apply solder and use a soldering iron to place it evenly over the area.
Remember that DIY repairs are not always the best solution. The problem can be fixed temporarily. Therefore, do not delay and at the first opportunity, seek advice and diagnostics from the service center specialists. Repairing a radiator is a task whose solution should still be trusted to experienced craftsmen.
Repair work
If aluminum batteries were installed correctly and were operated in compliance with all required technical conditions, then their period of operation may significantly exceed the ten-year warranty stated by the manufacturer. In this case, repair work will not involve large labor costs, even if it is necessary to add additional sections.
Manipulations of a repair nature will in this case consist of shutting off the shut-off valves and riser, from which the coolant must first be drained.
To drain this media, place a container under the bottom connection valve. Then the bottom tap is unscrewed to release the remaining water from the battery or, in the case of using such a coolant, antifreeze. After this, the upper valve is unscrewed and the radiator is removed from its place.
If an aluminum heater does not produce heat, then the root of the problem should be sought by bleeding air from the heating system. After this, you need to wait until the batteries warm up enough, and if this does not happen, you will have to dismantle the radiator and check it for clogging.
Aluminum radiators, consisting of sections, contain a relatively small volume of coolant. By filling the previously removed battery with water, you can determine whether or not the amount of water corresponds to that indicated in the technical passport. If a discrepancy is detected, it is necessary not to repair the radiator, but to flush it. To do this, it is necessary to pass a stream of water under high pressure through the removed battery until the water clears.
In some situations, the only way to bring batteries into working condition is to completely replace damaged sections or add them. If there is a side connection, then such manipulation will not cause much trouble, but in the case of a bottom or diagonal connection, you will have to, depending on the situation, either increase the pipe or, conversely, reduce its length.
Disassembling the dismantled battery into separate sections begins with unscrewing the nipples. To do this, the right nipple should be rotated with a wrench to the left - along the left thread. Accordingly, the left nipple must be turned to the right, since it has a right-hand thread. Carrying out this manipulation requires great care, because the nipple may well “stick” to the battery and you can break the thread with a careless movement. As a result, you will have to throw away 2 sections together.
In a similar way, the nipples on the remaining sections are unscrewed one by one. After dismantling all sections, they are cleaned. The assembly of the structure is carried out in the reverse order.
During the repair, it is necessary to check the condition of the threaded connections for all battery sections and inspect them for chips. Both nipples should be unscrewed and tightened several times in order to achieve sufficient ease during their further installation in place.
If the areas where the sections are joined are covered with dye, then it should be sanded down to the aluminum of the battery. Otherwise, after a while the paint will crack, the coolant will be underneath its layer and microcracks will appear on the surface of the structure.
The next section is screwed on from the reverse side of the nipple, continuously maintaining a tight fit of each element until the entire structure is assembled.
When tightening nipples, never use force to avoid stripping the threads. If a leak of an aluminum heating radiator occurs during the heating season, you should be wary of the hot coolant so as not to get burned from it.
Difficulties in soldering aluminum radiators
Soldering an aluminum radiator with a soldering iron is complicated by the shape of the product itself. Depending on where the breakdown occurred, the place may be difficult to access, have a surface prone to metal spreading, and so on. Everything is complicated by the high activity of the metal, leading to oxides. When heating aluminum to the desired temperature, it is very difficult to track how well it has warmed up, since the metal almost does not change color at this time. This can lead to melting of the base metal.
Methods for soldering aluminum radiators
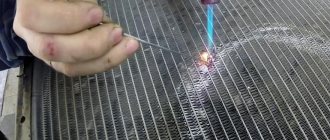
There are two main types of soldering used when working with aluminum radiators. The first is to use a soldering iron, which is more accessible, but less effective and convenient. The second method - soldering aluminum with a gas torch gives a more effective result, but is more expensive, and not everyone has the appropriate equipment, since it has a relatively high cost.
Soldering an aluminum radiator with a gas torch
As a flux in each of the methods, the following can be used as solder:
- Cadmium;
- Tin;
- Bismuth;
- Zinc;
- Combined flux;
- Specialized grades for aluminum.
Preparation for soldering
Soldering an aluminum cooling radiator begins with the preparatory process. First of all, you should deal with the surface of the base metal. Mechanical processing takes place here to remove particles of dirt, dust and other unnecessary elements. After this, everything should be treated with a solvent. It could be gasoline, acetone or something similar. These procedures should help get rid of the oxide film.
Soldering an aluminum car radiator requires the correct choice of flux. If you need to prepare it yourself, then this should be done before heating the metal. Otherwise, you just need to prepare it at your workplace to make it convenient to use.
Step-by-step soldering instructions
When all preparatory procedures are completed, you can begin to apply flux to the surface of the base metal. You need to cover almost the entire soldering surface with flux. This must be done in order to isolate as much as possible from the influence of oxygen from the air, since it leads to the appearance of difficult-to-destroy oxides. If the flux is not liquid and the work is carried out with a soldering iron, then it must first be melted before application. When using a gas burner, it can be melted on the base metal.
After this, a small part of the solder is taken and applied to the surface under the influence of temperature. The molten metal will spread a lot, so you need to be careful and not use too much solder. Application should be done with gentle circular movements, evenly distributing the amount of material over the entire surface. It should spread not only to the problem area, but also to the surrounding area.
Soldering an aluminum radiator with tin and other types of solders may have its own distinctive nuances, but the principle of the procedures is almost always the same. Difficulties are caused by large chips and holes. They have to be soldered in several passes. Little by little, solder metal is applied to the edge of the surface. It cools down and then another layer is applied, gradually covering the entire hole. The problem is that solder has a lower melting point than the base metal and can melt quickly.
Soldering mode table
Each solder has its own melting point, which forces the master to select his own temperature conditions for each of them. Here are the main brands used:
| Brand | Soldering mode | Maximum strength parameters of the resulting seams, kgf/mm2 | ||
| AMts | AMg6 | D20 | ||
| P-300-A | 440° C | 11 | 22 | – |
| P-425-A | 12 | 20,8 | 20,8 | |
| 34A | 550° C | 9-10 | – | 28,8 |
| B-62 | 510°C | 12 | – | 23,8 |
Safety precautions
During soldering, you need to ensure good ventilation, natural or artificial, in order to breathe in metal vapor as little as possible. The soldering iron and torch should never be left on for long periods of time when not in use or unattended. This may cause a fire.
Repairing a radiator at home
The radiator is one of the most vulnerable parts of a car. If it malfunctions, it is not necessary to contact specialists; you can repair it yourself
. To solder a radiator with your own hands, you need to have room and the necessary tools.
To repair the radiator, just go through the following steps:
- remove the radiator from the car and drain the liquid;
- find the right tools;
- solder the damage;
- check the result of the work;
- put the radiator back in place.
To properly fix the problem, be sure to dismantle it. At the same time, it will be possible to inspect all damage to the radiator and properly solder the gaps
. We find cracks using polyethylene, a vessel and water. We cover the holes with film and then lower them into the water.
. Small bubbles will appear from the water above the cracks.
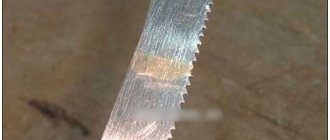
We wash and clean defective areas. You can sand it using sandpaper, a fine file (semicircular, thin, flat), or an iron brush.
. This stage must be taken seriously, since the rest of the work will depend on it.
The next step is degreasing, then sealing, it depends on the choice of the necessary tools.
To solder the radiator you will need the following tools:
- electric soldering iron;
- gas burner;
- a mixture of lead and tin;
- flux;
- rosin dissolved in alcohol.
The choice of tools for soldering depends on the material of the radiator, for example, a copper radiator is soldered with solder with a low melting degree, etc.