When the material being processed requires powerful and at the same time soft blows, a wooden hammer comes to the aid of the master. This tool with an unusually shaped striker is often used by joiners, carpenters and many other professions. A mallet, simple in its structure, becomes a real salvation when it is necessary to forcefully influence an object without damaging its surface. Like the models of this tool, the technological processes for its manufacture vary. In this article, we will talk about the areas of application of the mallet and share a detailed guide to creating this hammer from a minimum set of materials.
Area of application of the mallet
The use of a wooden hammer extends to many areas of activity.
Most often, a mallet is found in carpentry, where it is used together with a chisel or chisel. The dimensions and weight of tools used in this industry can vary significantly. In addition to the usual hammer design, the mallet can have a turning shape (turned on a machine) and be used in figured wood cutting. The tool is no less widespread in the plumbing industry. A mallet is used when it is necessary to remove a jammed part from its place or straighten dents in sheet metal. For such work, a wooden hammer with a round striker is used. Rubber mallets are less effective in plumbing because they have a less precise impact, unlike wooden ones.
Assembling and dismantling furniture also did not bypass this loyal tool, where it is used to tightly connect parts with a decorative surface. A mallet (or a spinning hammer) greatly facilitates the laying of paving slabs when it is necessary to compact an object in an adhesive solution. These are not all areas where such a device can be used. If you have seen the potential of this tool, then you will find instructions on how to make a mallet with your own hands from wood.
Technological map of the mallet
{adsr}Wooden hammers can have a wide variety of shapes: with rectangular or cylindrical strikers, round, oval and even carved handles.
Each master who independently makes an instrument for personal use tries to make it as convenient as possible and at the same time proceeds from his capabilities. Some may have a functional workshop with a workbench, sawmill and router at their disposal, while others only have a saw and a sheet of sandpaper on hand. Below we will present several options for assembly drawings of the mallet product, so that you can accurately determine the design of your future tool, and not encounter problems during its manufacture. The technological map for manufacturing the mallet presented above describes the simplest process of manufacturing this device. Instead of a workbench, in the fourth step, you can round the handle using a plane and sanding paper, as indicated in the adjacent instructions. The drilling workbench can be easily replaced with a regular drill. The above instructions require a lathe, and demonstrate how to make not only a convenient, but also a beautiful tool. For the most accurate resemblance to the sketch, it is better to use templates. This drawing of a mallet (or training card) is aimed at producing the tool in large volumes and in an equipped workshop, but with the right experience it can be repeated at home.
1.
Before you begin the process of creating a mallet, it is important to decide what type of wood it will be made from. The best wood for the striker is birch, oak, beech, pear or maple. It is better to make a handle from birch, rowan, maple, ash or elm. To make a mallet you will need only 3 pieces of wood measuring 120x90x18 (for the striker) and one 350x40x18 (for the handle). To work, you will need a wood saw, wood glue, as well as a clamp or vice to hold the product while it dries.
2.
Having selected and sawed the material, we clean it with sandpaper.
3.
From the diagram above you can see that the central part of the striker is a groove for the handle. Since the width of the handle is 40 mm, and the striker is 120 mm, we need to measure and cut parts 40 mm from the edges, as shown in the photo below.
4.
We assemble the parts of the striker, leaving a groove for further fastening the handle.
Apply glue, clamp with a clamp or vice and wait for it to dry completely (at least 2 hours). 5.
While the firing pin is being glued, you can shape the handle by smoothing out the corners at the grip area.
For this, it is most convenient to use a cutter. If you don’t have such a tool in your arsenal, you can trim the edges with an ax or chisel, and then clean them with sandpaper. 6.
When the firing pin is completely dry, it is recommended to slightly file its side (impact) parts at a slight angle. In order not to make a mistake in the slope, we simply mark 10 mm from the lower parts of the striker and draw a line to them from the upper corners. The point is that the firing pin is not rectangular, but prismatic, as in the photo below.
Wooden mallet.
12/11/2014. 8th grade
Topic: Making a mallet for carpentry.
Lesson objectives:
—
Introduce students to the product of a mallet for carpentry.
—
Strengthen skills in drawing up a work plan for products, reading drawings, technological maps.
Develop cognitive interest, speech correction, through correctional tasks and practical work, enriching vocabulary.
Foster independence, hard work and a culture of communication.
Lesson type
: combined.
Equipment
: notebook, textbook, workbench, marking tool, sanding paper, hacksaw, plane, drilling machine, technological maps.
Dictionary
:
A mallet
is a large wooden hammer.
Drilling machine, chisel.
DURING THE CLASSES
1 . Organizing time
.
1.Greeting.
2.Checking readiness for the lesson and organization of workplaces
Lesson setting to activate mental activity.
(decipher the proverb)
Teacher: “Without labor there is no good
»
2. Updating basic knowledge.
Frontal survey:
- What tools are needed to make a mallet?
Why can the tapholes become clogged with shavings when planing?
Why does the quality of all work depend on the markings?
3
.
Learning new material.
Teacher: We will get acquainted with the carpenter's tool - a mallet, and also consolidate knowledge on drawing up a plan for practical work of the sequence of making a carpenter's mallet.
Corrective exercise.
Task: Determine the longest and shortest segment.
Summing up the completed task.
Teacher: Guys, what type of wood should the mallets be made from?
(made of hard, sticky wood)
The strength of the workpiece, and therefore the product, depends on the age and type of wood, the location of the cut and the conditions for obtaining and storing the material. Wood species can be easily identified if you know their characteristic features. Such as, for example, the presence or absence of a kernel, growth rings, width of sapwood, size of heart-shaped rays, color, smell, texture. For wooden parts of instruments, any hardwood that grows in our area is suitable. But when selecting a workpiece, you must remember that the wood must be damp, without cracks or knots. All carpentry tools are used to process hardwood.
And so the guys use dense, viscous hardwood to make a mallet.
Let's make a plan for making a mallet. Routing.
Plan:
1. Select materials for the head and handle.
2.Mark and cut out the blanks. The blank for the head is taken along the length of 2-3 mallets at once to make planing more convenient.
3. Plane the blank for the head to size.
4. Make a handle.
5.Mark the head, drill a blind hole and clean it with a chisel.
6. Saw off the head from the workpiece and process the ends.
7.Fit the end of the handle to the hole in the head, make a cut, and make a wedge.
8.Place the head onto the handle.
9. Clean the mallet.
Equipment
: hacksaw, plane, drilling machine, chisel, sanding paper, product template, technological map.
Physical exercise to strengthen the eye muscles.
Starting position: sitting at a desk.
- Close your eyes. -3 seconds.
Close your eyes tightly. - 5 second.
Perform frequent blinking - 5 seconds.
Repeat 5-6 times.
Work in a notebook.
Exercise.
- Write down the date and topic of the lesson.
Write down a work plan.
(Today we will expand our vocabulary of words, read aloud and write down)
4. Fastening:
1.How is the mallet head connected to the handle?
2. How long is the blank for the mallet head?
3.How do you make holes for the handle in a mallet?
Teacher:
(Continued study of the topic)
Based on the consolidated and acquired knowledge, we begin the practical work of making a mallet.
Briefing.
And before starting work, we will repeat the TB with the tool you will have to work with, that is, TB with a hacksaw, TB with a chisel, TB with sanding paper, TB with a drilling machine, TB with a plane.
5
.
Practical work.
Ongoing teacher briefing.
Checking the quality of work.
Self-control
.
Analysis of work, analysis of typical errors and identification of their causes.
6. Summing up.
I think that today's lesson has given you the knowledge to make the main parts of carpentry tools.
And if in later life you choose the profession of a joiner or carpenter, then this knowledge will be useful to you.
Assessing students' work in class.
Cleaning the mind.
A mallet
is
a large wooden hammer.
Drilling machine
Chisel
DIY mallet aslan
wrote in March 9th, 2018
In general, now there is a large selection of mallets; purchased white rubber mallets are excellent for the job. White because it does not leave black spots from use. I have one like this. I also have another homemade one, made from a pillow from a truck. In general, I have a total of more than 25 hammers, sledgehammers and mallets.
But I am of the opinion that it is more pleasant to work with a beautiful instrument. And I decided to make myself a beautiful mahogany mallet. Well, why not? Some will say that this is foppishness, but I enjoy working in the workshop. If lace on a mallet brought me pleasure, I would attach it :)
Some people will be outraged by this, guys, you won’t be nice to everyone. Yes, I use hand tools.
I decided to make the handle from a stick from an oak pallet, and decorate the headband with sapele. A drawing was downloaded from the Internet
It's not that I don't have anything to make a handle out of, but first I need to look at the grain of the wood. Someone told me it was like Japanese oak. I haven’t been to Japan, I won’t say.
I cut oak and sapele into rough cuts.
I cut it and forward, with a plane. I have both a surface planer and a jointer (it’s dangerous to approach it with such wood chips), but I do it for my own pleasure, right?
I will have sapele around the edges, and the same oak inside. We assemble the block with glue. The handle is made on a reverse wedge, i.e. When working it will only shrink more tightly. The handle doesn't stick.
Now, using a chisel and a plane, we form the bevels, and also knock down the chamfers.
I decided to glue strips of veneer onto the handle, otherwise it looks a little rustic + there is a mark from a nail. The stick is from a pallet. Then I chamfered the handle so that it would fit in my hand.
And here is our result after coating with oil.
I use a mallet. It fits well in the hand, you take it right away, your hands feel the orientation of the striking part due to the rectangular handle.
When buying chisels, do not forget to pay attention to the issue of purchasing a product such as a rubber mallet. This tool causes the least damage to the chisels themselves, although it also has certain disadvantages. Let's figure out which ones exactly, and whether there is an ideal mallet option.
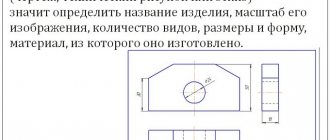
§ 2. Design documentation
A set of graphic and text documents that set out all the information about the design of a product is called design documentation. Design documentation includes: detail drawing, assembly drawing, general view drawing, specification, electrical installation drawing, diagrams and instructions.
When developing a product design, the following design tasks are solved: product samples are analyzed, the best version of the product, its structural elements, materials are selected, and drawings are made.
Rice. 4. Parts with surfaces of various shapes
Products can have surfaces of various shapes: flat, cylindrical, conical, spherical, shaped (Fig. 4), as well as structural elements such as chamfers, fillets, grooves, shoulders, ribs, etc. (Fig. 5).
Rice. 5. Some structural elements of parts
Structural elements allow you to connect parts, provide strength, give a beautiful appearance and are necessary for the ease of use of the product.
Design documentation is carried out according to the standard (GOST) in accordance with the unified system of design documentation - ESKD. Deviations from the ESKD lead to the appearance of non-standard documentation, errors and violations, and the release of low-quality products.
A general drawing defines the design of the product, the connection and interaction of its components, and explains the principle of operation of the product. Based on the drawing of the general view of the product, drawings of the parts included in it are made.
An assembly drawing is necessary for assembling and connecting parts. Often the assembly drawing and the general arrangement drawing are the same.
Specification is a document defining the composition of an assembly unit.
The diagram contains the components of the product in the form of conventional images or symbols and reflects their interaction.
The instructions include instructions and rules for the manufacture of the product, its assembly, adjustment, and control.
Product designs are developed by designers, and draftsmen carry out the drawings.
The drawing of the product begins with choosing a scale, after which axial lines and lines of symmetry are drawn (Fig. 6). Then, relative to them, contour lines and an image of all elements of the product are drawn. Provide the required dimensions.
Rice. 6. Sequence of drawing a handle
Figure 7 shows an assembly drawing (general view) of a box for accessories for a blackboard with: the main inscription and specification.
Rice. 7. Assembly drawing of a box for accessories for a chalkboard
The main inscription indicates the name of the product or part, the scale of the image, the names and signatures of the developer and inspectors, etc.
The specification includes data on the assembly units, parts, standard products and materials that make up the product.
Practical work No. 3
Development of design and execution of product drawings, filling out specifications
- Get a task from your teacher to develop a product design.
- First make a sketch and then a drawing of this product.
- Fill out the main inscription, and for the general view drawing (assembly drawing) - the specification.
New words and concepts
Design documentation: general view drawing, assembly drawing, specification, diagram, instructions; ESKD, structural element, designer, draftsman.
Testing your knowledge
- What elements of design documentation do you know?
- What problems are solved when designing products?
- List the possible structural elements of parts and products.
- In what sequence are drawings of parts and products made?
- What is the difference between a part drawing and an assembly drawing?
Rubber mallet – both convenient and safe!
Even such a simple tool as a mallet has many different incarnations, of which the most popular are wooden and rubber products of various shapes. The main purpose of the mallet is to be the “engine” of chisels in the process of cutting parts. This happens as follows: in one hand the master holds a chisel, applying it to the point of the desired cut, and in the other hand he holds a mallet, with which he hits the end of the chisel handle, giving it the force necessary for cutting. The lightness of the material allows you to avoid severe hand injuries and is gentle on the instrument itself.
There are two types of mallet in shape - a lathe mallet, which is turned from a single piece of wood, resembling a pin or a small bat, and a hammer mallet, which is shaped like a sledgehammer, but is made entirely of wood. The advantage of the first is its convenience, because whatever point of the mallet you hit will be correct, which significantly reduces the load on the hand. A mallet-hammer allows you to deliver stronger, more concentrated blows, although you should be very confident in holding the tool in your hands and monitoring the position of the head in relation to the chisel.
Therefore, the former are still more popular, although it will not be possible to make such a tool without a special workbench.
Sanding parts
After finishing turning, the surface of the workpiece is cleaned with sandpaper attached to a wooden block (Fig. 5). To reveal the wood grain of a part, its surface can be polished with a block of harder wood. This operation is performed with the machine turned on. Grinding of the finished part is carried out with sanding paper, which is wrapped around the part and held by hand (Fig. 5, a), or with a sanding block (Fig. 5, b).
Rice. 5. Sanding the part: a - with sandpaper: b - with a sanding block
Sometimes decorative ring strips are applied to the surface of the sanded part. To do this, take a block of wood that is harder than the wood of the workpiece, and apply the edge of the block to the part rotating on the machine. The surface at the point of contact heats up and burns a little. As a result, circular brown stripes remain on the part.
Disadvantages of materials - imperfect mallets!
Mallets have a significant drawback - since they are made from a blank with longitudinal fibers, with intensive use, the working part of such a mallet after some time resembles a real washcloth, no matter what type of wood it is made from! The hammer sledgehammer has fewer such problems, however, as already noted, its shape is far from ideal. Taking these two forms as a basis, manufacturers offer us what they consider to be improved tools. For example, a bronze “casing” is put on a turned mallet.
To some extent, the result is a truly durable tool, but the chisels themselves cease to be so! After several visits, they will look exhausted, not the mallet.
. For such a tool you need to buy special, reinforced chisels, which is not always affordable. In this case, it would seem that a rubber mallet would be the ideal option! Of course, it is not all made of rubber - most often, it is a fairly thick layer of material or rubber inserts on the edges of the hammer. Indeed, the impacts are very gentle on the tools, but it is still inconvenient to work - rubber tends to spring back when impacted.
It turns out that there is no ideal mallet? After all, we need to combine qualities that are incompatible in our case:
- convenience;
- durability;
- lack of shock absorption;
- optimal weight.
Manufacturers have not yet proposed an ideal option, but the craftsmen themselves have learned how to make it!
The ideal do-it-yourself mallet is not wood, not rubber...
Leather! We forgot about her! On the one hand, the material is quite heavy, on the other hand, it does not spring, and on the third, it is very durable. What options are there for creating a mallet? If you have previously purchased a turning tool, then at a minimum you can wrap several layers of tape around the work area to protect the mallet from further damage. To prevent the skin from flying off, you need to securely fasten it - glue one edge to the wood with wood glue at the beginning of the winding, and lubricate the skin itself during the winding process.
In addition, if the size of the material allows, intercept the protruding edges at the base of the bit with a worm clamp or, as a last resort, make a winding of strong twine. You can nail the protruding edges on top to the end of the mallet with small nails or simply cut them off - if you glued the layers well, this option will last quite a long time. However, it is much better to make the mallet entirely out of leather, with the possible exception of the handle. This option will last almost forever! To do this, you will need a lot of leather; in the market you can look for scraps from sellers, which they will be happy to give, if not for free, then cheaply. You also need glue, a large washer, a drill and a fairly large bolt.
How to make a mallet with your own hands - step-by-step diagram
Step 1: Prepare the handle
It is best to use hard wood for the handle, such as oak or beech. Birch or walnut will also work. If it is possible to turn it on a lathe, then do this to obtain a round shape that is comfortable for the hand. In addition, this way you can make a protrusion in the middle of the handle so that there is a stop for the layers of skin. If you don’t have a lathe, you can wind several layers of rope for support.
Step 2: Preparing the Skin
You need to cut many round pieces of the leather of the same size. To begin, make one layout and mark the required amount on a piece of material for it - depending on the size of the working part itself, you will need from 50 to 70 of these circles. In addition, the thickness of the skin plays a role - the thicker it is, the fewer layers will be needed.
Step 3: String the Layers
Make a hole in each layer so you can thread the leather onto the handle. We connect each layer with subsequent PVA wood glue, trying to press the layers together as tightly as possible. When all layers are strung and coated with glue, clamp the tool in a vice or clamps until the glue dries completely.
Step 4: Attach the washer
To prevent the leather layers from falling off in the future, you need to attach a large washer - metal or wood - to the upper end of the handle. To do this, drill a hole in the handle itself, apply a washer and screw the bolt tightly. Of course, try to find the optimal size for your handle so that it does not crack. That's all! The leather will not shatter into small chips during operation; impacts actually stick to this material and do not create as much noise as when working with a conventional wooden tool. Of course, it makes sense to tinker with such a tool when you constantly work with chisels and have already changed more than a dozen mallets, but for infrequent use, an ordinary wooden hammer mallet is quite suitable!
Installing the workpiece on the machine
1. Loosen the fastening of the tool rest and move it away from the frame towards you.
2. Move the tailstock to the right.
3. Insert the workpiece with the cut into the center of the trident body and use a mallet to lightly push the workpiece onto the fork.
4. Place the tailstock so that the center fits into the punched recess.
5. Secure the tailstock bolt nut.
6. Loosen the quill clamp screw and use the tailstock flywheel (handle) to move the center all the way and secure the quill with the lock.
7. Install the tool rest so that it is 3-4 mm above the axis of the workpiece and at a distance of 3-4 mm from it.
8. Turn the workpiece by hand several times to check that it is securely fastened and does not touch the handrail.
Fastening the workpiece to the faceplate.
For turning workpieces that have a small thickness and a large diameter that do not fit into the chuck,
a faceplate
. The workpiece is attached to the faceplate using screws through the holes in the faceplate, then the faceplate is screwed onto the spindle (see Fig. 7 c, d, e).
Fastening the workpiece in the chuck
used if it has a small diameter and length does not exceed 150 mm. For such fastening, one end of the workpiece is processed into a cone and screwed into the chuck (Fig. 7, a), and a screw is screwed into the workpiece through the side hole in the chuck.
Rice. 7.
Periodically, every two to three minutes of operation, the machine is stopped and the reliability of the workpiece is checked. If necessary, the workpiece is additionally pressed with the center of the tailstock.
How to make a mallet out of wood - as easy as shelling pears!
To do this, you don’t even need a drawing of a mallet - it’s very simple! Find three fairly large pieces of maple or birch that are the same thickness. It is not recommended to take harder types of wood, except for handles, since they split from constant impacts. Adjust all the scraps to the same thickness - 2-3 cm. Take one of the bars, attach a pen to it and trace its outline. Then cut the block with a band saw or bow saw so that the resulting two pieces fit tightly to the handle. It is important that the handle and these two trims have the same thickness, equal to the thickness of the two wide bars of the striker.
We glue all the bars and the handle with wood glue, clamp it with clamps and leave it for at least 12 hours. When everything is glued, mark the rounded profile of the striker and the bevels of the sidewalls and trim off the excess. Sand it thoroughly with sandpaper and coat the wood with drying oil. It will take you a total of two days to make such a tool, of which only a few hours will be devoted to direct labor.
- Look, the handle bracket is chrome.
The product itself is an inertia-free mallet from Vladimir Zhukov. Assembled from hand-selected wood. Oak and plum (cherry). The whole process is in the photo. I needed a heavy mallet with a short handle.
First, a blank for the head of the mallet is glued together from the blocks. Bog oak plates (veneer) are laid between the parts. The gluing was carried out at the “Joiner” moment.
After the glue has dried and the sander has given it a more rectangular shape, a Forstner cutter is used to select through holes that connect to each other.
We clean them to an oval shape and fill them with lead shot. From below you can see that another flat part is being glued in (exactly the same one will close the cavity on top)
We also glue the ends with plugs. The shape of the blank is first roughly given with a plane, and then finished using a grinder.
The handle is exactly the same sandwich (in the part held by the hand) at the junction with the “head” it has a rectangular cross-section. For wedging, two cuts should be made; to protect against splitting, they end with holes.
The handle is placed on glue, wedged and, after final gluing, it is sanded again, this time by hand.
Finishing treatment: coating with AQUATEX balm colorless oil
Learned a real man's rattle! Its weight was 827 grams. When struck, it does not rebound upon impact and, despite its small dimensions, has a large weight.
The feeling when working is approximately like slapping your palm on asphalt or wet clay.
In general, the thing turned out to be not only functional and comfortable, but also stylish.
In general, now there is a large selection of mallets; purchased white rubber mallets are excellent for the job. White because it does not leave black spots from use. I have one like this. I also have another homemade one, made from a pillow from a truck. In general, I have a total of more than 25 hammers, sledgehammers and mallets.
But I am of the opinion that it is more pleasant to work with a beautiful instrument. And I decided to make myself a beautiful mahogany mallet. Well, why not? Some will say that this is foppishness, but I enjoy working in the workshop. If lace on a mallet brought me pleasure, I would attach it :)
Some people will be outraged by this, guys, you won’t be nice to everyone. Yes, I use hand tools.
I decided to make the handle from a stick from an oak pallet, and decorate the headband with sapele. A drawing was downloaded from the Internet
It's not that I don't have anything to make a handle out of, but first I need to look at the grain of the wood. Someone told me it was like Japanese oak. I haven’t been to Japan, I won’t say.
I cut oak and sapele into rough cuts.
I cut it and forward, with a plane. I have both a surface planer and a jointer (it’s dangerous to approach it with such wood chips), but I do it for my own pleasure, right?
I will have sapele around the edges, and the same oak inside. We assemble the block with glue. The handle is made on a reverse wedge, i.e. When working it will only shrink more tightly. The handle doesn't stick.
Now, using a chisel and a plane, we form the bevels, and also knock down the chamfers.
I decided to glue strips of veneer onto the handle, otherwise it looks a little rustic + there is a mark from a nail. The stick is from a pallet. Then I chamfered the handle so that it would fit in my hand.
And here is our result after coating with oil.
I use a mallet. It fits well in the hand, you take it right away, your hands feel the orientation of the striking part due to the rectangular handle.
The product itself is an inertia-free mallet from Vladimir Zhukov. Assembled from hand-selected wood. Oak and plum (cherry). The whole process is in the photo. I needed a heavy mallet with a short handle.
First, a blank for the head of the mallet is glued together from the blocks. Bog oak plates (veneer) are laid between the parts. The gluing was carried out at the “Joiner” moment.
After the glue has dried and the sander has given it a more rectangular shape, a Forstner cutter is used to select through holes that connect to each other.
We clean them to an oval shape and fill them with lead shot. From below you can see that another flat part is being glued in (exactly the same one will close the cavity on top)
We also glue the ends with plugs. The shape of the blank is first roughly given with a plane, and then finished using a grinder.
The handle is exactly the same sandwich (in the part held by the hand) at the junction with the “head” it has a rectangular cross-section. For wedging, two cuts should be made; to protect against splitting, they end with holes.
The handle is placed on glue, wedged and, after final gluing, it is sanded again, this time by hand.
Finishing treatment: coating with AQUATEX balm colorless oil
Learned a real man's rattle! Its weight was 827 grams. When struck, it does not rebound upon impact and, despite its small dimensions, has a large weight.
The feeling when working is approximately like slapping your palm on asphalt or wet clay.
In general, the thing turned out to be not only functional and comfortable, but also stylish.
The word “mallet,” despite its ornate sound, denotes the name of a special carpenter’s wooden hammer. The name of this instrument is derived from the word “cue”. So, the Slavs have long called a large stick or club. Nowadays, mallets are made not only from wood, but they also come in various shapes and sizes.
This is a necessary tool in the arsenal of any home craftsman in situations where strong and at the same time soft blows are needed when processing material.
§ 17. Drawings of parts made on lathes and milling machines
When manufacturing parts on lathes and milling machines, the same graphic documentation is used as when manufacturing parts from rolled products: drawings, sketches, technical drawings (Fig. 59).
Rice. 59. Methods of presenting products made on lathes and milling machines: a - assembly drawing of a knob: 1 - clamp; 2 - handle; b - technical drawing of the punch; c - technical drawing of the jig for drilling holes: 1 - body; 2 - handle; 3 - bushing; 4 - base
Many parts have internal surfaces (grooves, holes), the shape of which cannot be determined from the view shown in the drawing. To show the details of the design, cutting planes are used, with the help of which the part is mentally cut and images called sections and sections are obtained (Fig. 60).
Rice. 60. Obtaining a section and section: a - part with a cutting plane; b - dissected part; c - drawing of the part; g - section; d - section
The section shows only what is located directly in the cutting plane (Fig. 60, d). Section - an image of a dissected part showing what is in the secant plane and what is located behind it (Fig. 60, d). Hatching on the section and section is applied only in those places where the cutting plane cuts the part.
For metal products, hatching is used with thin solid lines at a short distance from each other at an angle of 45° (Fig. 61, a). Non-metals (for example, rubber) are hatched crosswise (Figure 61, b), wood - as shown in Figure 61, c.
Rice. 61. Types of shading of parts in sections and sections: a - metals and hard alloys; b - non-metallic materials; c - wood
Parts made on a lathe have the shape of bodies of rotation - a cylinder, a cone, a ball. In the drawings of such parts, an axial dash-dotted line must be depicted (Fig. 62). Parts made on a milling machine usually have a prismatic shape. For example, the handle of the knob shown in Figure 59 should be made on a lathe, and the knob clamp should be made on a milling machine.
Rice. 62. Drawings of threaded parts made on turning (a) and milling (b) machines: a - knob handle; b - nut
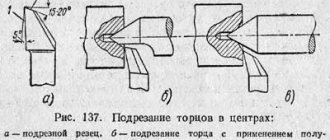
The end edges of rotating parts, as a rule, are cut to a cone - this is how a chamfer is formed. The chamfer facilitates the assembly of parts and protects the hand of the turner or assembler from cuts. The chamfer designation is shown in Figure 62. Number 1 shows the height of the chamfer (in mm), and 45° is the angle at which it is cut.
On the handle of the knob on the right (Fig. 62, a) there is an external thread Mb. The letter M indicates that the thread is metric, and the number indicates that the outer diameter of the thread is 6 mm. If you mentally cut a metric thread with a cutting plane passing through the axis of rotation of the part, then the section will represent the thread profile in the form of triangular peaks and valleys. The profile angle - the angle between the sides of the turn - for a metric thread is 60°. Figure 62, b shows the internal thread in the nut.
Threaded connections of parts are very common in technology: a vice is attached to a workbench with bolts and nuts, the tension of the hacksaw blade is adjusted using a nut and a movable threaded head, etc.
Practical work No. 18
Execution of drawings of parts with turned and milled surfaces
- Draw a drawing of a knob clamp (see Fig. 59, a), a punch (see Fig. 59, b), a jig for drilling holes (see Fig. 59, c) or other parts suggested by the teacher.
- Consider the nuts and bolts available in school workshops. Measure them with a caliper and make sketches.
New words and concepts
Graphic documentation, cutting plane, section, cut, shading, body of revolution, chamfer, metric thread, external and internal thread, thread profile.
Testing your knowledge
- What is graphical documentation?
- What are cuts and sections used for?
- What is the difference between a section and a section?
- How is a section hatched on a drawing of a plastic part?
- What is a body of revolution?
- How is a chamfer indicated in a drawing?
- What is a thread profile?
How does the instrument work?
The mallet consists of a striking part (the striker) and a handle (handle). The firing pin comes in a variety of shapes and is made from different materials depending on the application. The handle is attached to the through hole of the head, which has the shape of a cone, so that the striking part does not fall out during operation. Most often, the mallet handle is made from the following elements:
- hardwood trees, for example, rowan, birch, ash, maple, elm;
- strikers are made of dense viscous wood, for example, elm, hornbeam;
- durable rubber or fluoroplastic (highly resistant polymer).
Characteristic
Wooden mallets are the so-called classic version of this instrument. They are used to give shape to various structures in assembly and dismantling work. Mallets with a wooden striker have a clearer and more accurate blow, unlike a striker made of rubber. It is easy to make such a wooden hammer yourself at home.
To protect against mold, rot, and drying out, the strikers and handles of mallets are covered with drying oil.
Form
The striking part of a wooden mallet, depending on the functions performed, can have several forms.
- Round striker.
It is used for installation and straightening processes. For example, this hammer can be used to straighten dents in metal. In addition, these mallets are often required for laying paving slabs and paving stones. - Rectangular striking surface.
It is used when chiseling material together with a chisel and chisel. It is also suitable for roofing and seaming, making permanent joints using seams. - Square shape.
The purpose of such a striker is roofing and folding.
conclusions
An operational flow chart is a mandatory attribute of welding work performed in production. It is difficult to expect that without it a specialist will place the correct welding seam. Quality control also becomes impossible, since there are no explicit requirements for the welding process. Accordingly, there is nothing to compare.
It is necessary to pay attention to the fact that welding cards also exist for individual technological operations. For example, there is a document on ultrasonic testing of welded joints. Compilers resort to such techniques in cases where the work is very complex and accompanied by a large amount of data.
For example, there may be one technological map for welding steel pipes, but a technical map for welding metal structures of complex configuration consists of several separate documents. It is not practical to collect all the information in one flow chart, as this will only complicate the execution. Dozens of tables and a large amount of information are inconvenient to study and be guided by in your work.
Types and scope of their application
Most often, wooden hammers are used by those who engage in carpentry along with a chisel and a chisel, since their handles contain a crimp ring. Wooden mallets come in several types.
- Carpentry.
They have flat, voluminous sides. The striker of these hammers is flat on one side with a smooth striking surface, and rounded on the other. The ends are cut at an angle of 6–7 degrees to the axis of the handle and are not parallel to it. The handle is attached in front of the striker, where the rounded edge is located. These tools are used for chisel or chisel work to knock out cutters. - Metalworking or tinsmithing.
These hammers have a rectangular head. The rounded handle has a slight taper on one side. In this part, a cut is made and a wedge is inserted. These mallets are used for processing metal sheets, for straightening and folding. - Lathes.
All parts of such a wooden hammer are made on a lathe. It is recommended for the same work as a plumber's mallet.
Safety precautions during burning
For these jobs, like any other, the specialist is required to comply with safety regulations.
When sawing wood, the master must adhere to the following principles:
- use limiters and guides;
- do not allow your free hand to be near the hacksaw blade;
- Do not blow off the chips; they are swept away with a brush.
When performing work on a lathe, a specialist must perform the following actions:
- read the occupational safety manual for this equipment;
- Process only by trained people.
When performing drilling, the master must pay attention to the following rules:
- install the drill in accordance with the requirements for the machine or drill;
- the product being drilled must be securely fastened;
- the drill feed should be carried out without acceleration or jerking;
- at the exit of the drill, slow down the movement.
When performing paintwork:
- Do not keep the container with varnish open for a long time.
- While doing work, do not bring the varnish to your face.
- The room must be ventilated.
- It is necessary to use personal protective equipment: protective mask, gloves.
- Upon completion of work, wash your hands thoroughly using soap.
When using an electric burner:
- ensure air flow into the room;
- conductive parts must be reliably insulated;
- When finishing work, you should turn off the device from the network.
Making boards requires a craftsman to spend approximately 12 hours; the technique is simple and does not require large financial investments. There are a huge number of options for the shape of finished products, as well as their finishing; it all depends only on the imagination of the performer.
Video: Master class on making a cutting board
Dimensions and weight
The standard size of these hammers is considered to be a molding mallet with rubber strikers (GOST 19645 - 74). The classic instrument is 30 centimeters long and weighs about 300 grams. If we systematize a wide range of tasks where the impact of a wooden hammer is necessary, then for fine work it is customary to choose small mallets, for rough work they should be larger. Thus, hammers made of wood weighing up to 300 grams are used for various processing of wooden products, and for straightening (straightening unevenness) of metal you will need a tool weighing more than 1 kilogram.
The length of the handle can also be very different, but you need to take into account the fact that the longer it is, the stronger the blow.