Resistance welding has long been used in all industries. This technology is no less popular among home craftsmen. It is quite difficult to assemble a spot welding machine with your own hands, but this approach helps reduce the cost of purchasing equipment.
Where is resistance spot welding used?
The technology involves connecting workpieces or welding individual parts to metal structures without creating an electric arc.
The method is applied under the following conditions:
- At manufacturing plants. Spot welding is used in the manufacture and repair of cars, aircraft, and complex technical equipment. The method helps to create strong, durable connections that have no signs of deformation or other defects.
- At home. A self-made machine is suitable for performing simple welding operations. It will help you weld elements of a fence or pipeline, or repair a car or motorcycle.
Device design and necessary parts
Any contact type welding unit consists of 2 units:
- power supply (transformer);
- clamping pliers.
To obtain a powerful electrical discharge at a minimum voltage, an induction transformer is used.
The correct ratio of windings allows you to generate a current that is strong enough to melt the metal. The design of the pliers includes graphite or copper contacts installed on different levers that fix the mechanism.
The following types of clamps exist:
- Mechanical. Includes a powerful spring and lever. The welder's muscle force is used to compress metals. Clamps of this type are installed in household devices used for simple operations.
- Pneumatic. Installed in portable hand-held devices. Adjustable by changing the pressure in the air channel. The disadvantage is considered to be low productivity and the inability to adjust operating parameters during welding.
- Hydraulic. The clamps also have a low operating speed, but their range of settings is wider than the previous type.
- Electromagnetic. They are distinguished by the highest productivity and are installed in both manual and stationary units. Electromagnetic clamps allow you to adjust the compression force of parts during welding. This reduces the likelihood of lack of fusion and metal leaks.
Sometimes the design is complicated by adding liquid cooling systems, control of current parameters, and automatic movement of electrodes.
When assembling a homemade spot welding machine, the master will need the following parts and materials:
- a modified transformer from an old microwave oven or car battery;
- thick copper wire or cable harness of small cross-section;
- levers used to assemble clamps;
- base for installing unit blocks;
- clamps;
- wires;
- insulating materials;
- copper electrodes necessary for welding;
- control key.
We recommend reading Description of resistance spot welding technology
Varieties
The riveting of both sections occurs due to the strong electrical influence that accumulates in the two-terminal networks, and the process itself is divided into three categories:
- contact implies tight pressing of both workpieces and contact of the electrodes to the required place. As a result of touching, electricity is supplied to a small area of the object, the temperature of which promotes melting and future attachment. Regarding the voltage, it is equal to 15 kA, and lasts for 0.3 seconds;
- impact technology is also designed to connect both elements, however, the supply of electricity is carried out using a short-term impact. The operation time is reduced to 1.5 m/s, which reduces the melting area;
- point technique. In this situation, you will need two copper contacts that touch the object on two sides. The current intensity reaches 10 kA, and the products are bonded at the point of contact.
contact welding
Spot welding technique
In the first case, the effect of electric current is applied to the plane of the workpiece, and riveting is carried out by applying a pulse with a force of up to 100 A, and within 0.005 seconds. In certain circumstances, the current can reach 1.2 kA even at a voltage of 60 V. Here the duration is 0.6 seconds.
In the second option, the discharge is produced on the secondary winding, and from it is transmitted to the communication site. Regarding the influence parameters, we can say that it is 1 kV (on the secondary coil 6 kA). The length of all changes is 0.001 s.
General operating principles
The algorithm for assembling the welding unit includes the following steps:
- Removing the transformer. The part is taken from an old microwave oven. It is not completely needed; to manufacture the device, a primary winding and a magnetic circuit will be required. The remaining parts are carefully removed as unnecessary.
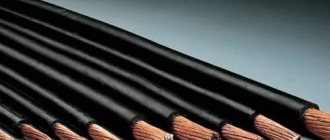
- Formation of a new secondary winding. To do this, use a copper cable with a cross-section of at least 100 mm². Durable rubber insulation is replaced with textile insulation. To create a powerful welding machine, 2 transformers with a common winding are used.
- Installation of a control unit that ensures uninterrupted flow of the contact welding process.
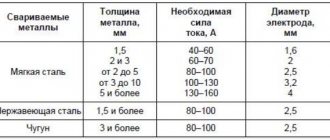
- Manufacturing and connection of electrodes, the type and diameter of which are selected taking into account the properties of the metals being welded.
- Housing assembly. The main units of the device must be reliably protected from external influences. At this stage, you can use the housing from an old microwave oven or assemble the structure yourself from sheets of metal.
Distinctive features
Standard welding involves the use of complex equipment that uses special electrodes. They are applied to the surface being processed, which creates ignition of the winding, leading to melting of the rolled metal. Next, the molten metal flows into the bath, where, after solidification, it holds the elements together. Only an experienced person can handle such a thing, and the gas and ultraviolet radiation released will have a negative effect on the body. It should be noted that this system cannot weld small components.
Capacitor welding does not harm the environment, and after manipulation there are practically no traces of external influences left on the plane. This approach will also save electricity, and the process requires minimal personal protective equipment. The device does not require cooling, and everything will take a minimum of time. A special feature is the high precision and accuracy of the connection. The equipment is compact, and its scope of application is micro-welding and electric welding of large sections.
How to make electrodes
When manufacturing these elements, the following points are taken into account:
- The diameter of the electrode must correspond to the cross-section of the wire to which it is connected. Copper rods can be used as rods. Electrodes for low-power welding units are made from soldering iron tips.
- During the welding process, the electrodes wear out quickly. To restore their operating parameters, the ends are sharpened. Over time, the electrodes are replaced with new ones.
- The wire for connecting the welding rod should be short. Otherwise, part of the device's power will be lost. The current strength also decreases if there are a large number of connections in the electrode-transformer circuit.
- It is recommended to solder copper tips onto the wires to which the rods are connected. This increases the efficiency of the equipment. Since the electrodes are removable, the connection points with the tips are not soldered.
Assembling a device from a microwave oven
The device manufactured in this way allows welding with alternating current with unregulated force.
List of required tools
To create a homemade device from a microwave oven, you will need the following equipment:
- Screwdriver Set;
- sandpaper;
- copper rods;
- hammer;
- chisel;
- knife.
Conversion of microwave parts
After removing the transformer from the furnace, perform the following steps:
- Remove the secondary winding using a hacksaw or chisel. Dismantling is carried out carefully, trying not to damage the underlying layer. It is advisable to fill the space between the windings with corrugated cardboard.
- Remove the metal shunts that limit the current.
- A secondary winding is formed. At this stage, you will need a KG 1x35 wire. It can withstand prolonged exposure to high voltage and current up to 1200 A. The outer rubber insulation is removed from the cable.
- The core is covered with tape, which facilitates the sliding of the wire during winding. The cable is laid in 3 tight turns. For winding, the use of stranded soft wire is allowed. The total diameter of the cores must be at least 1 cm.
We recommend reading: How to make spot welding for a 18650 battery
After the alteration, the transformer must have an open circuit voltage of no more than 3V and a current of at least 800 A.
Homemade device diagram
Creating an electrical circuit for a welding machine is not difficult. The electrode is connected with a soft cable to the secondary winding of the transformer. The circuit includes thyristors and rectifier bridges. One end of the pressure gun is connected to the secondary winding, the other is securely fixed to the device.
The operating principle of the electrical circuit of the unit is as follows:
- Single-phase or three-phase current is supplied to the clamping mechanism.
- When the button on the gun handle is pressed, the thyristor opens.
- The capacitor is charged from the transformer. The thyristor closes, the clamping mechanism is activated. The latter operates until the capacitor discharges. Pressing the button again will generate a new impulse. The time for maintaining the charge of the capacitor is set by a variable resistor.
Assembling the device
To create the working part of the device, perform the following steps:
- Assemble the base from the bottom of the microwave oven body. One end of a metal profile or wooden beam is fixed to it. To do this, use self-tapping screws to ensure a strong fixation. A welding electrode with a cable connected to a transformer is connected to the second edge of the profile. The wire is wound around the rod, which prevents damage.
- A movable part of the apparatus is installed, which looks like a lever. A long nail is used as an axis. The side posts, created from profiles or bars, are fastened with self-tapping screws. There should be no distance between them and the base of the lever. Otherwise, the accuracy of the device’s impact is reduced.
Performance test
After all installation and assembly work, the device is checked in the following ways:
- The main operating parameters of the unit are measured. An oscilloscope is used for this. The current pulse strength should be about 800 A.
- The assembled device is used in practice. To do this, create a test seam. After completion of work, measure the temperature of the transformer. If it is too high, the circuit is not assembled correctly. When the indicator is within the normal range, 2 more test stitches are made.
Application experience
Our experience has shown that a device assembled according to these circuits works almost flawlessly. We were pleased with the functionality and quality of the resulting seams. Of course, with the help of such a unit you will not be able to perform professional welding work, but it is not necessary. This homemade welder is suitable for pulse welding of a fence or greenhouse. In a word, it will not let any home craftsman down, and its assembly will be very cheap.
The welder assembled according to these diagrams is designed to work on a 220V network. But in our memory there have been situations when the voltage was unstable, especially in the country. Nevertheless, the arc burned stably and was ignited quite simply. Yes, this is not professional micropulse welding, but still. By the way, we recommend using only consumable electrodes when working with such a homemade device. Welding with a consumable electrode is much more effective and stabilizes the arc quite well.
Naturally, we needed to spend our own time and effort to assemble it. But the final cost of a homemade pulse welding machine turned out to be several times lower than that of budget models from the store. At the same time, the homemade device copes with its functions perfectly.
Contactor from a welding transformer
Such equipment can be turned into a full-fledged resistance welding tool. The only drawback is the inability to control the current strength.
Drawing development
The correct choice of circuit helps to produce a working welding machine. Preference is given to simple drawings that include a minimum number of parts and blocks. Such options do not allow you to create an overly powerful device, but the device is sufficient to perform minor repairs on a car, garden equipment, and fences.
We recommend reading: How to make a welding machine from a microwave
List of parts and consumables
To convert a welding transformer into resistance welding equipment, you will need the following elements and materials:
- a transformer that converts electrical energy;
- thick cable;
- copper electrodes;
- bolts;
- tips;
- breaker;
- wooden blocks, plywood to create the body.
The process of creating a device
The homemade device is assembled as follows:
- The welding transformer is installed in a housing made of metal sheets. The electrical board is assembled on a textolite sheet more than 1 cm thick. The part is fixed in the body of the welding machine.
- A welding wire is bolted to the busbar and secondary winding. The remaining end of the cable is connected to the electrode.
- The power wire is connected to the contact block located on the electrical board.
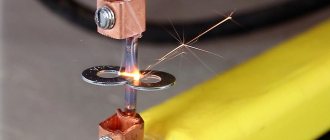
Spot Welding Operation
A master using a contact transformer apparatus must stand on a rubber mat and use protective gloves and goggles. The grounding cable is connected to the part to which another workpiece will be welded. After this, press the power key, compare the elements to be connected, and clamp with the electrode of the welding gun.
5 seconds after the start of the impact, the rod is transferred to the next point.
The essence of technology
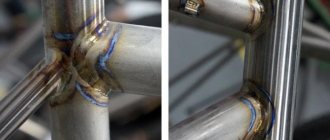
The operating principle of resistance welding is based on heating the metal to its melting temperature by passing a short-term current pulse of sufficiently high strength through it. The duration of such a pulse ranges from a hundredth to a tenth of a second, the time is selected based on the parameters of the metal.
Under the influence of current, the parts heat up and melt. A liquid core forms between them. Until it hardens, the surfaces of the workpieces should be kept under pressure. As a result of core crystallization, a local connection of two products occurs.
Pressure must be applied so that during the flow of current along the perimeter of the area of local melting of the metal, a sealing belt is formed, which does not allow the melt to flow outside the welded area.
Spot welding machine.
It is possible to obtain a high-quality and reliable connection of workpieces only after proper pre-processing of the parts. It is important to remove oxides and corroded areas from the surface.
In tasks that require high-quality connection of parts with a thickness of one to one and a half millimeters, capacitor equipment for contact welding is used.
The operating principle of such devices is based on the following: a block of capacitors is charged with a small current. Then the capacitors are discharged. The resulting pulse force is sufficient to ensure the required welding mode.
A welding machine for welding of this type is widely used in tasks requiring the connection of miniature products, for example, in radio engineering and electronics.
It is also worth noting such an advantage of this device as ease of manufacture. Anyone can make a spotter from a welding transformer. And getting the necessary parts is easier than ever. For example, welding can be done with your own hands from a microwave.
Even if this piece of kitchen equipment is not available, it will not be difficult to purchase the specified equipment on the secondary market. In our case, only the transformer is of value in the microwave, so it is necessary to consider non-working equipment options. It will cost significantly less.
DIY resistance welding pliers
To make such a device yourself, follow these steps:
- Form the basis. For this purpose, available materials are used - steel sheets up to 5 mm thick. Strips 2 cm wide are cut from them. The length depends on the design of the welding tongs. The strips can be replaced with metal rods. The ends of the two blanks are bent in the form of tongs.
- Place the parts on top of each other and join them together. A hole is drilled in the central part where the adjusting screw will be located. A dielectric layer is placed between the plates.
- A hole is drilled at one end of the rod or strip to secure the copper cable. The same actions are performed for the second workpiece. The holes should be opposite each other.
- The metal elements of the pliers are covered with a rubber pad and electrical tape. The materials will protect the welder from electric shock during work.
- Install the spring between the handles of the pliers. The part is necessary for fixing the elements to be welded.
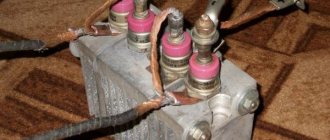
Using spot welding on lithium batteries
Using a battery to weld a nickel plate to the battery is the easiest way. To assemble the mini-unit you will need a battery, a charging cable, a piece of single-core wire, and electrical tape. 2 electrodes are created from the core, the ends of which are stripped and secured. The distance between elements should be 3 mm.
A charging cable connected to the terminals of the lithium-ion battery is connected to the other ends of the electrodes. Place the nickel plate on the battery and press the energized electrodes against it. As a result of a short circuit, the metal melts.