Retaining rings and their purpose
To limit the movement of a bearing, axle, shaft or other parts, many mechanisms use retaining rings (also called split washers). These parts are similar to lock washers, but their main difference is the presence of a through cut. High-strength spring steel is used to manufacture the split washer. Structurally, this part looks like a washer with a slot. Near the slot there are two areas with holes, which are called ears. It is through these lugs that parts are removed and installed.
The operating principle of such devices is quite simple - when the ring is compressed or unclenched, which is done by applying a special tool to the ears of the part, the circumference changes. The split washer, in a compressed or uncompressed state, is inserted into the groove and then released. In this case, it is compressed or expanded, thereby encircling the shaft, fixing the bearing and excluding its axial movement.
This is interesting!
Retaining rings have found their application in many areas of production. In everyday life, such parts are also found, for example, on bicycles, motorcycles, door handles, and in the design of various household appliances and tools.
Notes
- GOST 13940-86 Flat external concentric spring thrust rings and grooves for them. Design and dimensions. Developer - USSR State Committee for Standards
- GOST 13942-86 Flat external eccentric spring thrust rings and grooves for them. Design and dimensions. Developer - USSR State Committee for Standards
- GOST 13941-86 Flat internal concentric spring thrust rings and grooves for them. Design and dimensions. Developer - USSR State Committee for Standards
- GOST 13943-86 Flat internal eccentric spring thrust rings and grooves for them. Design and dimensions. Developer - USSR State Committee for Standards
What types of retaining rings are there and how do they differ?
Retaining rings are classified into two main types according to their purpose. Let’s find out in detail what they are called and how they differ:
- Internal - fix parts inside the holes.
The main distinguishing features of this part are the location of the lugs inside and the large cutting distance. The principle of removing and installing internal retaining rings is based on the fact that the ears need to be compressed, thereby reducing the outer diameter of the part, and inserted (or withdrawn) into the groove of the mounting hole. To install the part, you need to unclench the ears and remove the tool. The protruding part of the ring will limit the movement of the bearing in the axial direction. Available in diameters from 8 to 100 mm - External - fix parts on shafts, rods and axles.
They are installed on the shaft from the outside, so by design they have external lugs. The distance between the ears is small, since they only work to unclench. To seat the part in place, you need to spread the ears and place the ring on the groove of the shaft. By releasing the ears, under the influence of elastic forces, the split washer will be tightly compressed in the groove. Available in diameters from 3 to 100 mm
Rings are divided into types not only by purpose, but also by other parameters, such as thickness, size, material of manufacture.
This is interesting!
The procedure for removing retaining rings differs depending on the type of parts. To remove the internal devices, you need to compress the ears, and to dismantle the external parts, they need to be unclenched.
Requirements
In order for the fixing part to guarantee long service, it must meet the technical requirements set out in GOST 11872-89. The main requirements, according to GOST, include:
- calculating angle tolerance;
- the possibility of selling parts of a different thickness not specified in the tabular list;
- washers are also made without bent legs, but this is agreed with the buyer;
- the steel used to create the element must have a surface hardness ranging from 41.5 to 49.5 HRB.
Bronze can also be used as a material for manufacturing, but such a part will be 2 times more expensive. According to the requirements of the document, the fastening object cannot have visible defects. Cracks and chips will seriously reduce the fastening strength and other characteristics, so they are unacceptable. The technical requirements also include the dimensions indicated on the drawings.
The control method is a visual inspection of the part (for the presence of cracks and dents). It detects most defects, but still does not determine basic performance characteristics. To test the basic properties, the part is tested in special installations to study strength, reliability and hardness.
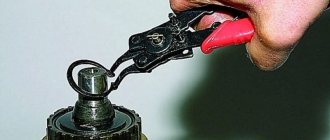
Retaining ring pullers - design and types
To remove and install split washers, a specialized tool called a ring puller is used. Moreover, such instruments are produced in different designs. They are united by such working elements as a handle and cone-shaped jaws. The handle consists of two elements connected to each other via a hinge. The jaws have a conical design, which serves to engage with the ears of the retaining rings. Ring removers are manufactured according to the standard. Moreover, foreign instruments are produced in compliance with the DIN 471 standard, and domestic pliers have GOST 13942-86.
Pullers for retaining rings are divided into two types, and they are used depending on the type of part (internal or external).
- Outer ring puller
ensures the opening of the part's ears. The operating principle of this tool is based on the fact that when the handles are brought together, the part is stretched, therefore its internal diameter increases. To remove the outer locking rings, you need to get the sponges into the holes of the ears and squeeze the handles - Inner ring puller
— the principle of its operation is similar to the functioning of ordinary scissors, pliers or forceps. When the handles are brought together, the jaws are also compressed, thereby affecting the part. As a result of this operating principle, the ears are compressed and the outer diameter is reduced, which allows the part to be removed from the mounting groove - Universal pullers
- allow installation and removal of locking rings of various types - internal and external. The operating principle is changed using a special selector lever. Additionally, universal lock ring pullers can be supplemented with a screw stroke, clamps and lever mechanisms, which greatly facilitates the operation of the devices
When choosing a tool for dismantling split rings, it is important to determine the thickness of the jaws. Small split washers cannot be removed with a tool with thick jaws and vice versa. That is why pullers are often sold in sets of 2 or 4 pieces with different jaw sizes.
Replacing the VAZ 2110 CV joint technological conditions and work sequence
First, you need to decide which “grenade” requires replacement, because These spare parts cannot be repaired and must be replaced entirely. The exception is the boot of the product, but it can still be replaced only by removing the CV joint from the car. The process of determining which CV joint should be replaced is carried out by measuring the amount of play of the receiving shaft at the edges of the “grenade”.
There is play in the articulated drive, i.e. There should be no slight tolerance in shaft rotation caused by wear of the part if it is in good condition. When the “grenade” is worn out, the play is determined by the rotational movements of the receiving shaft. In any case, replacing the CV joint on a VAZ 2110 external type is carried out only after dismantling the “grenade” along with the receiving shaft and internal CV joint.
When carrying out the dismantling operation, the following spare parts and lubricants will be required:
- CV joint;
- lubricant for it, and only the type of fuel and lubricants that is used for CV joints needs to be prepared for work;
- boot with fasteners for replacement.
To carry out repair work on replacing the CV joint, no special adapting devices are needed; all work can be carried out in a private garage with an inspection hole or on a lift.
Important: even if the driver has set a goal to replace one CV joint, it is always necessary to have a second product, or at least an additional boot, available. Any time a “grenade” is removed, the boot must be replaced and fuel and lubricants added!
- Before starting work, place the vehicle motionless on a flat surface, eliminating the possibility of spontaneous movement or sliding off the safety stands.
- Dismantle the wheel and remove the hub nut with a wrench.
- We disconnect the lower ball joint fasteners, after which we remove the external CV joint axle shaft from the hub, and then the internal “grenade” from the body part.
- When removing a shaft with two hinges, it is more convenient to carry out repairs on site by a mechanic than under the car. And one more advantage of this stage: the possibility of carrying out a complex of repair and restoration work for the “grenade” that remains on the shaft.
- Installation of the replaced product on the vehicle is carried out in the reverse order. Long-term operation of these products requires constant monitoring of their condition during vehicle use.
Important: systematic monitoring of the condition of these spare parts and components will make it possible to timely notice and replace a cracked, torn or otherwise inoperative boot, which will significantly extend the service life of the VAZ 2110 CV joint. Many car enthusiasts ask about the cost of this product
The price of a CV joint on a VAZ 2110 is approximately 1200-1500 rubles. Products are offered with minimal markups in virtual stores, on the website of which the buyer can view the selected product in all its glory and receive it without being distracted from other car repairs
Many car enthusiasts ask about the cost of this product. The price of a CV joint on a VAZ 2110 is approximately 1200-1500 rubles. Products are offered with minimal markups in virtual stores, on the website of which the buyer can view the selected product in all its glory and receive it without being distracted from the rest of the car repair.
The only problem is that you will have to pay for delivery, but, as a rule, this is a small amount. You can also come to the distribution center for the purchased product and receive the item in person.
Where are the split washers located and when will the use of pullers be needed?
Today there are a lot of mechanisms in which retaining rings are found. As mentioned above, they come in different types, but perform one function - they eliminate axial movement. Split washers are found quite often, and here are the main places where they are used:
- CV joints
- Car starter
- Half shafts
- Grenades
- Wheel bearings
- Door handles
- Pistons
- Hydraulic cylinder rods
- Screwdrivers, drills and hammer drills
- Turbines
The door handles use small parts, and the axle shafts have large devices. To dismantle certain products, you will need to use appropriate pullers. There are split washers that do not have ears with holes. These devices are found on automobile pistons and other types of equipment. Pliers are not suitable for removing and installing such rings. Their installation and dismantling is carried out using a screwdriver. The video below shows how to remove and replace the piston retaining ring using a screwdriver.
How to replace a CV joint: inner, outer and boot
The drive of the front steered wheels, and often the rear ones with independent suspension, is carried out by shafts with constant velocity joints (CV joints). These are quite reliable units, but if they are used mercilessly, the protective boots are damaged, or simply after a long service life, they may require replacement.
The operation is not extremely complicated; with some skill and knowledge of the equipment, it can be performed independently.
Retaining ring pullers and their main characteristics
Like all tools, pullers have their own basic characteristics, which will be useful to know about for those who are planning to purchase these devices.
- The size of the jaws is one of the most important parameters that determines the ability of the tool to work with fasteners located in recesses and hard-to-reach places. The longer the jaws of the tool, the less force is required to compress or unclench the locking ring when removing or installing it. Dimensions are indicated directly on the tool itself
- Length of handles - the larger the size of the handles, the more convenient it is to use the tool
- Jaw shape - there are pullers available with straight tips and those bent at an angle of 90 degrees. If straight lines are used to access distantly located rings, then curved ones are used when working in hard-to-reach places
- The diameter or thickness of the jaws - they must be commensurate with the size of the holes on the ears of the parts. If the tool is not designed to remove thin or thick split washers, you should not attempt to use it. This can lead to either one of the jaws on the puller breaking off or damage to the lugs on the retaining ring.
- Jaw reverse bending function - this mechanism is used on external type pullers designed to work with external locking rings, operating in the unclamping mode
The most popular puller options are universal models. They allow you not only to use jaws of different lengths and thicknesses by replacing them on the tool, but also to work with different types of locking rings (internal and external). The advantages of universal pullers include their cost, since one tool costs less than a whole set. Most models are equipped with force limiting mechanisms, which eliminates the possibility of damage to thin parts.
When using universal pullers, it is important to use tips from identical pairs. Their difference in length or diameter will lead to negative consequences. During removal or installation, a part may slip out and hit a person or equipment.
This is interesting!
The disadvantage of universal pullers is that high-quality materials are not always used for their manufacture. If you are planning to purchase a universal tool, then you need to choose from models from well-known brands TopTul , Jonnesway and others.
What it is?
The best way to explain what a lock nut is is to compare it with conventional examples. “Classic” when interacting with a bolt guarantees a completely reliable connection. But this persists only until stable intense vibrations appear. After some time, they break the mechanical adhesion, and weakening and unscrewing begin. Theoretically, the stopper can be provided using locknuts and lock washers.
That is why locking (self-locking) nuts are in very wide demand, and their importance only grows over the years. There are quite a few types of such fasteners. The production of lock nuts in Russia is regulated by GOST standards.
Thus, hexagonal steel nuts with automatic locking must comply with GOST R 50271-92. Products without galvanic coating are designed for temperatures from -50 to 300 degrees. If galvanized, the maximum permissible heating is 230 degrees. If the nut has inserts made of non-metallic materials, the critical temperature level is 120 degrees. The standard normalizes:
- test load voltage;
- Vickers hardness level;
- Rockwell hardness level;
- the amount of torque.
Self-locking nuts can maintain the prevailing torque even after repeated tightening and unscrewing. The chemical compositions of the steels used are also standardized. The nut inserts responsible for the predominant torque cannot be made of steel alloys - completely different materials are needed for this purpose. Fasteners made of free-cut steel also comply with the standard (if its use does not violate the supply agreement). The highest sulfur content in nut steel should be 0.24%.
The regulation strictly prohibits the use of hydrogen embrittlement material
This is especially important when applying special coatings
The standard strictly defines temperature requirements for operation - stable use at air temperatures from + 10 to + 35 degrees. If necessary, additional research of these properties can be carried out through full-scale testing. The standard covers self-locking nuts made of solid metal or non-metallic elements that have:
- triangular cutting ISO 68-1;
- combinations of diameters and pitches prescribed in ISO 261 and ISO 262;
- large rifling spacing (M3 - M39);
- small gap of rifling (M8x1 - M39x3).
Snap Ring Removal Training
How to remove retaining rings is of interest to many beginners who are faced with such parts. First of all, you need to understand that dismantling or installing split washers can only be done using a specialized tool - pullers. Such tools can be either factory-made or home-made. Removal of retaining rings is carried out in two ways:
- Part of the mechanism being repaired is dismantled and then fixed in a vice. Only after this do they begin to dismantle the retaining rings and further disassemble the mechanism
- Without partial disassembly - dismantling of parts is carried out without first removing part of the mechanism
If you don’t have the necessary puller at hand, you can use homemade tools. How to make them is discussed in the following sections. However, making homemade tools is justified only in one case - when it is urgent to remove the split washers. If you plan to use the tool frequently, then it is recommended to purchase it for such cases. How to remove the split washer from a hammer drill is shown in detail in the video.
Inserting a piston into the inner diameter of a cylinder
If the sealing surface of the cylinder block was not subjected to finishing during repair, then thoroughly clean it of gasket residues. Thoroughly clean all threaded holes of any dirt, oil or coolant that may still be there. Do all the cleaning work before inserting the pistons into the cylinder bores. Wet all surfaces in the piston with fresh engine oil.
Don't forget the piston pin and connecting rod bearing! When installing, pay attention to the direction of the piston (markings for installation on the piston bottom, valve pockets). Clean the inner bore of the cylinder again with a rag and also moisten it with engine oil.
Check your piston ring tension band for damage or dents, repair them and replace the tool if necessary. When installing the piston, make sure that the tension band or tapered mounting sleeve lies flat on the sealing surface of the cylinder head,
When installing the piston there should not be strong pressure. If the piston does not want to slide inside the cylinder, be sure to check the piston ring tension band. Do not twist the opening of the tape so that it is in the same place as the butt ends of the rings.
Do not install pistons into the engine without the installation tool (risk of injury, risk of ring damage). If a hammer handle is used for installation, only the weight of the hammer itself can act on the piston bottom. Never use a hammer to force the piston into the cylinder diameter! If the piston rings do not break during installation, they can still bend, and because of this they will not perform their task well enough.
Forced installation not only damages the rings, but can also damage the piston.
This is especially important for gasoline engine pistons. Their fire or working belts are very thin, and when hit, the rings easily break or break completely.
The result: loss of power and quick (and expensive) repairs.
Avoid allowing dirt and sand to enter the cylinder bore after the pistons have been installed. Place a clean cloth over/in the openings if necessary to prevent contamination. Especially when work takes place in a dusty environment and/or outdoors.
What methods of installing split washers are known and how to remove them
There are three options for installing split washers:
- Manual is the most popular, which is used by craftsmen when repairing cars, motorcycles, bicycles and other types of equipment.
- Mechanical - based on the use of a mounting cone, which has the same diameter as the shaft. Using a special pusher, the part moves along the cone until it falls into the groove
- Automatic - installation and removal of rings is carried out using specialized hydraulic and pneumatic tools
Like most parts, retaining rings can fail. If after dismantling the part there is a loss of spring properties, it is recommended to replace it. Even if you manage to install it in its place, this does not mean that it will not fail in the process.
Diagnose part problems
The grenades are protected by a rubber boot. It is mounted on an external and internal hinge. The boot prevents dirt from getting into the CV joint. Another of its functions is to retain lubricant; without it, the hinge will not work.
If the boot wears out over time or is torn, sand, small stones and dirt will begin to get into the joint. After some time, the CV joint will become unusable and the grenade will have to be replaced. Such repairs will cost much more
Therefore, it is important to monitor the integrity of the anther. If a defect is detected, replace the CV joint boot
You can visually check the condition of the anthers yourself, without resorting to the services of service station workers. It is best to drive your car into the inspection hole
First of all, you should pay attention to the boot of the outer CV joint. VAZ 2110 has two boots on each outer side of the wheels
These anthers most often fail. The inner boot needs to be replaced much less frequently than the outer boot.
You can check the integrity of the outer CV joint boot without a hole. We stop the VAZ 2110 on the road, preferably in a place where the car will not interfere with the movement of either cars or pedestrians. We turn the steering wheel to the right to the extreme position, this will be enough to diagnose the outer boot on the left side.
We similarly inspect the boot from the opposite side. If traces of grease are visible on the boot or there are cracks and cuts, then the boot should be replaced. The design of the VAZ 2110 allows you to cope with the replacement yourself.
Following the recommendations of experienced craftsmen, you should replace the boots of both the outer and inner CV joints at the same time. Even if the inner CV boot still looks intact and without cracks.
How to make a circlip remover with your own hands from pliers
Pliers or pliers are a specialized type of tool whose functionality can be expanded. For example, if during disassembly of the mechanism it becomes necessary to dismantle the split washer, and there is no special tool at hand, then you can make pliers from pliers.
The manufacturing method is quite simple, for which you will need pliers, old drills, a core, a drill or a drilling machine. After this, we proceed to making a puller for locking rings with our own hands:
- First, you need to use a core to make marks on the side where the holes will be drilled.
- Drill holes on both parts of the pliers jaws. The drilling depth is 50-60% of the total thickness of the jaws
- It is necessary to install old drill bits from the drill into the resulting holes, having previously turned the tail part, if necessary, to the required diameter. It is also necessary to sharpen the working part of the drill, making it in the form of a cone
- After this, we get a ready-made tool for removing the retaining rings. If you need to make a tool for removing parts in remote places, then the holes in the jaws of the pliers need to be drilled from the end side
After using the tool, you can remove the removable pins and continue using it as pliers.
Comparison of different types of washers
To compare the effectiveness of different types of lock washers and other locking hardware, laboratory tests are carried out using the Juncker method on a vibration stand. The basis of the vibration stand is a platform mounted on hydraulic supports. An electric motor is used to create vibration. The values of fastener operating parameters are monitored using sensors, the data from which is sent to a computer and processed by special software to produce the final result.
For testing, fasteners are mounted in holes made on the platform. Tightening is performed with the specified primary torque value. Next, the stand engine turns on and transmits vibration to the platform through hydraulic mounts. After a specified time, the actual value of the tightening torque is measured and compared with the primary value. The test results allow us to evaluate which type of fasteners better secures the connection and protects it from self-unscrewing.
Juncker tests show that wedge washers are one of the best types of hardware for locking. They almost completely retain the tightening torque, significantly outperforming other types of fastening parts. For example, at the final stage of testing, the tightening torque of the connection made with the grower is lost almost completely, which leads to its spontaneous unscrewing.
Making a puller from old pliers
If you have broken pliers or pliers in your arsenal of tools, then you can use them to make a full-fledged puller. To make it you will need tools such as a grinder, a welding machine and a sharpening machine. Before you get started, it should be noted that you can use unnecessary pliers to make pliers for removing and installing external snap rings. The manufacturing instructions look like this:
- Initially, we cut off part of the jaws on the tool so as to align them
- After this, we prepare the tips for the future puller. We will make them from bolts or studs with nuts
- The threaded part of a bolt or stud is ground on a sharpening machine to form a cone
- Finished tips must be welded with the side of the cap to the pliers
- After this, we calcinate the tips so that when removing or installing retaining rings, we eliminate the possibility of damage to them.
- We remove the weld seams, and you can test the tool in action.
The resulting do-it-yourself puller for removing and installing split rings will please the craftsman when it is necessary to use it. After all, the main advantage of this tool is that it is made by hand, and instead of disposing of broken pliers, they can serve for a long time and effectively.
In conclusion, it should be noted that removing the retaining rings is not difficult if you have knowledge of the principle of operation of a specialized tool. Some craftsmen resort to dismantling rings using nails and other improvised means, but these methods are not only ineffective, but also dangerous. If you don’t want to buy new pullers, then make them yourself, which is not difficult to implement.
Replacing CV joints on VAZ cars.
Initial stage of work.
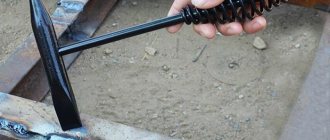
Before replacing the CV joint with your own hands, you need to secure the car with a parking brake, and put bars under its rear wheels for better fixation. Then you should loosen the hub nut, first removing the protective cap using a regular screwdriver. Only a strong tool that will go in conjunction with the pipe will help you do this. Although for these purposes you can also build (or borrow) a homemade key designed to unscrew the drive, which is deservedly considered the most reliable and trouble-free tool. It consists, by the way, of a chisel with a welded screwdriver for 30 and a one and a half meter metal pipe.
Once the hub nut is loosened, the wheel bolts can be loosened.
Next stage.
Raise the front wheel or both front wheels and install supports under the body to secure the front of the car. Then unscrew the wheel bolts and remove the hub nut thrust washer. Then unscrew the 2 bolts from the steering knuckle connecting it to the lower ball joint, and turn the steering wheel to the extreme right/extreme left position (this depends on the side on which you are replacing).
Pull the steering knuckle with the strut and pull out the splined end of the outer CV joint from the hub. Next, use a pry bar to push the inner CV joint out of the gearbox.
The drive shaft is fixed in a vice, then the clamps are removed from the inner and outer CV joints, the anthers are turned inside out or cut off with a knife. The CV joints themselves are knocked off the shaft with a hammer and drift.
The final stage.
If the situation requires it, a new boot is put on the shaft, and a CV joint pre-filled with lubricant is stuffed onto the splines. Next, the boot clamp is clamped onto the drive shaft with pliers. Well, in order to equalize the air pressure in the latter, before this action, use a screwdriver to turn away the outer edge of the cover. Only after this the clamp is clamped.
During the process of assembling the inner CV joint, it is also important to remember about the plastic plug that is attached to the end of the shaft, therefore, before installing the assembled drives in their places, a new snap ring should be installed on the inner CV joint
When the drive is installed in the gearbox, it will need to be seated before the CV joint is finally fixed in the side gear. To do this, you will need to make half-force blows with a hammer along the axis of the shaft, using a softening stand, for example, a block of wood.
All further assembly must be carried out in strict accordance with the steps performed, only in reverse order. In this case, the old hub nut must be replaced with a new one.
After final tightening of the hub nut, its edge must be closed.
This is approximately how a CV joint in a car is replaced if you carry out this procedure yourself. But if you doubt your abilities, then it is better not to start this work at all, but immediately turn to professionals for help.
I recommend reading:
Why do brake pads squeak?
Replacing the radiator of the VAZ 2114 stove.
Adjusting the clutch of a VAZ 2110.