Not every home craftsman has a drilling machine that will allow you to make a hole at a perfect right angle. And it’s almost impossible to drill like this with a conventional electric drill or screwdriver - the error will still be noticeable. And yet, there are several effective methods that can be used to achieve perpendicular penetration of the drill into the material.
4 best drill guides
The mechanics of drilling holes at first glance seem quite simple. The drill rotates, you apply force along the axis of the tool, and go deeper into the workpiece. At the same time, various force vectors act on the drill, on which the accuracy and quality of drilling directly depends.
- Rotation around its axis, and even with increased friction on the edge, tends to move the drill to the side. This is especially noticeable when starting work, when the tip is not yet buried in the workpiece. If the surface has a reverse radius of curvature (for example, a pipe), it is almost impossible to start drilling: the tip will slide off all the time. When working with metals, you can use punching: creating a small depression at the desired point. However, this method is not always possible. And if you work with plastic or ceramics, it is completely unacceptable.
- Already in the process of going deeper into the material (we are talking about deep holes, where the length is much greater than the diameter), the parasitic force vector tends to divert the drill from straight-line movement along the axis. This occurs due to uneven friction on the side walls of the hole.
- It is extremely difficult to maintain the exact drilling angle relative to the surface of the workpiece, especially in deep holes. It is almost impossible to do such work manually, especially if a value other than 90° is set.
- If you are drilling holes of large diameter (for example, a recess for a switch in the wall), it is even more difficult to start work and maintain the direction.
Yes, there are drilling machines. But they only allow you to work with workpieces of small diameter. In addition, bulky equipment takes up space in the apartment. In addition, work on the wall is not performed using the machine.
To make using the drill easier, manufacturers offer special guides. These are devices that allow you to maintain the correct positioning of the tool relative to the workpiece both before starting work and during the process of penetration into the material. The main advantage of these devices is mobility and affordability (relative to drilling machines).
Work rules: tips
When working with tools, you must follow the safety rules and general recommendations:
- 1) Protect your respiratory system when performing work, dust is harmful.
- 2) If you work outside, then you need to install 2.5 meter fences.
- 3) When working at a height of more than 1.5 meters, use a strong scaffold or sawhorse foundation.
- 4) When working with the tool, the speed must be turned on smoothly, and in no case should it be turned off when it is in the wall housing.
- 5) When drilling through plaster, you need to carefully study the communication plan so as not to damage anything.
- 6) It is strictly forbidden to drill into the decorative coating.
- 7) Select the correct drill bit for each surface.
- Wet the drill bit with water to prevent overheating.
The simplest guide attachment for a drill with your own hands
When considering this attachment option, you should take into account the fact that you will not need to spend any money to implement the idea. But along with this, there will be special difficulties in making a guide for the drill. But at the same time, the created device can only serve for a short time.
It is important to note that it should not be considered as a full-fledged addition to the tool. In the event that you have to create a hole at a considerable distance from the workshop and there are no other alternative devices, then it is with the help of such a nozzle that you can most effectively solve the problem. In addition to this, it will bring significant benefits to those home craftsmen who do not work with a drill very often.
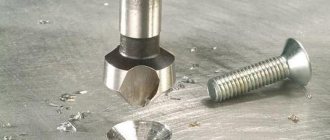
Conductor
The device is a plastic housing in which guide bushings for different drill diameters are rigidly fixed. By limiting deflection, drilling can be performed with acceptable accuracy on a variety of materials.
The conductor is held with one hand, and the other holds the drill. There is no need to constantly monitor the slip angle. In addition, the device allows you to accurately start drilling at a given point. No punching is required.
Almost all guides with an angle of 90° allow you to work on rounded surfaces (pipes). For this purpose, a special groove is provided on the lower support heel.
There are also simpler designs (if a clip of several diameters is inconvenient to use). For example, a mandrel into which bushings of various sizes can be inserted.
In addition to standard guides with an “attack” angle of 90°, there are specialized jigs in which the bushings are located at a different angle.
- low accuracy (there is a slight play in the guide sleeve);
- wear effect on the drill.
Professional drill guides
As a rule, guide posts for professional use are equipped with their own drill chuck. Why is this being done?
Even the most accurate drill clamp has a serious error. In addition, the drill gradually wears out, the bearings on the shaft give a slight play. All this affects the drilling accuracy.
The stock guide chuck mount is less susceptible to wear because it is used less frequently. Plus, it doesn't matter to you which drill is connected to the chuck. It's just a source of rotation.
- high accuracy;
- thoughtful fastening on the workpiece;
- ability to perform work with high intensity and load.
- high price;
- narrow specialization.
Guides with sliding carriage (household version)
They represent a support frame on which vertical posts are fixed. The carriage moves freely (but without distortions) along the guides, in which the drill body is secured. The simplest designs cannot change the angle of the racks.
As a rule, fixtures are equipped with a 45° cutout for fixing cylindrical workpieces (for example, pipes). The support is equipped with a handle for holding and has a non-slip coating. With its help, you can start drilling with high precision and under visual control and maintain a given angle.
Application can be limited only by the area of the workpiece: if it is smaller than the size of the support area, use is impossible.
Due to the fact that the support is fixed by the hands of the master, the placement of the guide can be anything: even on the ceiling.
- affordable price;
- high positioning accuracy.
- Works only with certain drill diameters, and with the only possible shank.
Semi-professional drill guides
Semi-professional guides can be equipped with various fastening devices for the frame, drilling depth regulators, the angle can be set both along and across the plane of the tool’s swing. Due to this, the equipment turns out to be more bulky.
Manufacturing process
First you need to perform certain manipulations with the drilling tool. To do this, twist the nut and the fixing drill from the drill. Then you need to mark its diameter on the plastic bottle as close to the neck as possible. Then draw a circle corresponding to this diameter using a felt-tip pen. The end result should be a complete circle.
This template, which must be cut out later, should also be marked on the bottle cap, and care should be taken to ensure that its width is sufficient for this.
The next step is to cut the bottle or jar. The choice of the structure to be cut should be approached very carefully, since this will subsequently affect the depth of the holes created using the guide.
Particular attention should be paid to work safety. To do this, it is recommended to sand the edges of the jar to make them even and smooth.
The holes that were previously marked on the bottle and its cap should be cut exactly along the intended mowing line, using a stationery knife. The processing should be carried out with the edges of the cuts, which need to be thoroughly sanded. Then they take the lid and place it face down in the jar, applying physical force to it to ensure the tightest possible fit. It is in this area that it is glued.
The strongest possible connection can be achieved if, after applying the adhesive, a strong compression is provided, which must be maintained until the adhesive dries. Considering that doing this work manually is associated with certain difficulties, it will be useful to attach several thin rubber bands on top, thanks to which you can maintain the required pressure.
After waiting for the glue to dry, the drill attachment can be used for its intended purpose. A drill is inserted into it, after which, using a plastic nut, it is fixed on the tool and drilling of the hole begins. Although it does not have the ability to select the depth, this problem can be solved by making several similar nozzles and using as needed the most suitable one.
READ How Many Volts Does a Screwdriver Charger Produce
Materials
To make a guide, you need to prepare the following materials and tools:
- plastic bottle;
- plastic cover;
- drill;
- stationery knife;
- felt-tip pen;
- universal glue;
- ring drill;
- sandpaper;
- drill.
How to drill a hole at a right angle with a drill?
Practical recommendations from experts
Drilling diagram for a concrete wall.
In order for the drill to stand exclusively vertically when drilling openings, use a square. It is placed strictly at a right angle, in parallel with the drill.
Regular carpentry work involves purchasing a special stand that will hold the power tool perpendicular. The stand allows you to control the depth of the grooves.
To firmly fix the wooden block, you should use a vice or a workbench. Holding the material in your hand is not at all safe: at the moment of processing, the dry base can crack and split, injuring the master.
To ensure a smooth entry groove, it is recommended that any remaining board be placed under the base of the groove so that it can be discarded later. The product can be drilled. This technique works well for flat surfaces.
Article rating:
Save to:
How to drill a perpendicular hole with a drill? Link to main publication
Every furniture maker should have this device! Conductor for minifix and dowels
An expensive jig is applied to the workpiece, they come in variations - they lie freely, or they are fastened with clamps; this method is usually used to drill holes.
A rotary device is used if you set a goal to work with cylindrical workpieces. They have a vertical, horizontal and rotary axis. For small production, you need to use universal devices that are easy to re-adjust. A tiltable jig is used if you need to drill in different planes.
Sliding jigs are not attached to the machine, but are set separately according to their diameter. They are the least productive and are usually used if the work is done on a single-spindle machine and you need to make several different diameters on the part; for this purpose, the guide bushings are made on folding bars.
Such a device will also be made in artisanal conditions; for this purpose you need to find a drawing suitable for you and carry out everything according to it. At work you must:
- drill
- Bulgarian
- apparatus
- locksmith tools.
How to drill a perpendicular hole with a drill | How to drill straight holes
To make the most common device, you need to take square-section reinforcement measuring 10x10mm. Then cut a piece to the required length and clean it with sandpaper. Now you need to mark the template holes.
The center cannot be closer to the edge than 8mm, this is equal to half the thickness of the chipboard sheet. Available standards suggest that the distance between centers should be 32 mm.
When the centers are marked, holes with a diameter of 5 mm are made here. To produce the stop, an iron plate 4.5 mm wide is used, its thickness should be 1 mm. It is bent at an angle of 90 degrees and, together with a piece of prepared reinforcement, after securing them in a clamp, they make a place for the thread.
Significantly simplifies the work of the master.
Quality and speed of work are what this device provides.
We will ship to cities in the Russian Federation.
Transferring the angle of inclination to the balusters.
We attach the stand with the previously set angle to the baluster and mark this angle.
- Drilling the string
- Drilling handrail
- Drilling balusters for studs.
- Adjustment of the drilling center using shims
- Marking the angle on the baluster. (This angle on the jig is transferred to the destination of the cut on the baluster)
- Application of feather drills of various sizes
all in one device at one place for staircase assembly
If you have ever made furniture at home, you understand that most of the parts are connected end-to-end using dowels. In order to accurately and correctly make holes for dowels, you just need to take a jig to drill holes.
At large furniture factories, special machines are used to drill such holes. Some craftsmen, on their own, or in small enterprises, first drill holes in the end of one part, then insert special cone-type taps here.
After that, they attach the second part, mark the places on its surface, the places for the holes, and then drill them. Although using this method you can make holes, unfortunately, it is doubtful that you will be able to accurately repeat the drawing and achieve alignment, and in addition, the myth is that the method is very slow and labor-intensive.
If you have a drawing of furniture, you want to repeat it very accurately and ensure high-quality fastening of all furniture parts, but it is not possible to purchase expensive equipment, a solution for drilling will be the way out.
The conductor is a device that looks like a strip with holes and sleeves. To make holes, the jig is attached to the part using clamps, after which a drill is inserted into the sleeve and a hole is made. For one and the other part that connects to each other, the same jig is used, then our client only has to work correctly and coaxially.
The main advantages of the designated device:
- drilling accuracy
- they turn out perpendicular because a sleeve is used
- simplicity and speed of work.
The jig is used not only in the furniture industry, it is also used in mechanical engineering, you will prefer larger or more expensive ones. They are also used for drilling holes of mixed types; they all allow us to accurately repeat the drawing and our client remains to comply with the dimensions indicated by him.
And perhaps the conductor is also used in light industry or construction; in this case, expensive models made of wood, sheet metal or plexiglass are used.
It is impossible to drill a pipe or a cylindrical workpiece because the drill constantly slips. If you use this device, the process is significantly simplified and accelerated and the work is not difficult to complete.
It is especially important to use this device if you need to drill holes in a cylindrical workpiece with a small diameter.
This device also allows you to make perpendicular holes, which would be very difficult to make without its implementation.
There are various types of such devices; they will be used both when drilling and milling, as well as when performing turning, trimming, and assembling parts. There are expensive, rotating, tilting and sliding models.
How to drill a perpendicular and vertical hole
Although it is sometimes necessary to drill at an angle, it is most common to make vertical holes (that is, perpendicular to the surface). In order for drilling to take place strictly at an angle of 90 degrees, it is necessary to use special guides. They will allow you to drill perpendicularly without deviating in any direction.
The simplest guides allow you to make only vertical holes, but there are also more complex designs that allow drilling at certain angles.
Source
Varieties of devices for additional equipment of the drill
The most common drill attachment is a stop, which allows you to simply and quickly drill holes to the required depth. The design of the simplest stop device includes an auxiliary handle and the stop itself, on the surface of which a metric scale is applied.
A more complex design and, accordingly, greater functionality has a parallel stop, with which you can control not only the depth of the hole being made, but also the position of its axis relative to the surface of the workpiece or structure. Attachments of this type are produced both for tools used in construction and repair, and for wood drills.
Drilling blind holes for furniture hinges with a forstner drill is much easier using a drill stand
Parallel stops, intended for use in conjunction with tools for construction and repair work, are installed on powerful drills, which are used to drill holes in concrete and brick building structures. This type of attachment consists of a stop with a scale and an auxiliary handle for the drill. Some rip fence models have a built-in suction unit for removing processing waste, which is connected to a vacuum cleaner.
Using this milling attachment, grooves, slots or profiles are cut
A fairly large category among the elements of additional equipment for hand-held electric tools are attachments and attachments for drills, with which you can drill at an angle. This device for drilling holes works where it is not possible to use a conventional drill. The working head, depending on the model of this equipment, can be located at different angles (up to 90°) relative to the axis of rotation of the main drill chuck. The most popular and in demand are devices for drilling at an angle of 90 degrees.
Variable angle drill stand allows for easy drilling of angled holes
On the modern market there are widely available devices for drilling holes that allow you not only to limit the depth of the holes created and control the verticality of their axis, but also to use the drill as a small router. Such devices are especially popular among home craftsmen who make their own furniture.
When using various working attachments on a drill for wood processing, you can perform many technological operations (in particular, side drilling of holes in products with a round or more complex configuration, requiring the use of special inserts). Some models of such devices are equipped with special suction units connected to a vacuum cleaner, with the help of which dust and small chips are removed from the treatment area. It should be borne in mind that even such functional devices do not allow turning a drill into a full-fledged manual milling cutter, which has the same operational capabilities, but provides higher accuracy and quality of processing.
READ How to cut threads on a metal pipe
Dust removal attachments for drills
No one will dispute the fact that using a drilling machine rather than a drill to form holes is much more convenient (and the accuracy of processing using stationary equipment is higher). Meanwhile, a simple drilling machine can be made from a hand-held power tool, for which a guide attachment for a drill is used. Most modern models of such devices are equipped with a vice for fixing the part during processing, as well as a frame along which such a vice can move freely. The power tool itself is placed in a special drill holder (basket), which is a universal clamping device and can be used for almost any model of drilling tool. Such a device, on the stand of which an accurate metric scale is applied, is a very useful acquisition for any home craftsman, as it allows you to make holes with less labor and higher accuracy.
A drill stand paired with a vice adds the ability to clamp workpieces and even grind them
Attachments to drills are very popular, allowing them to be used as a wood lathe. Such equipment is fixed on the work table, and the drill itself acts as its drive mechanism. To install a drill into the design of such an attachment, a special stand and fastening mechanism are used.
Homemade lathe from a drill
Such attachments are available in various designs, with a different set of cutting tools and accessories, making it easy to realize the dream of many home craftsmen to have their own lathe. Of course, a lathe driven by a conventional electric drill cannot be compared with specialized equipment either in terms of service life or in the accuracy and productivity of the processing performed. If you use such an attachment in intensive mode, the electric drill will not withstand significant and prolonged loads and will eventually fail. That is why, in order not to be left without a drill, such an attachment should be used to perform simple and not too long wood turning work.
The most popular accessories for drills include attachments that allow you to turn such a tool into an electric sharpener or emery machine. Their installation does not pose any difficulties even for inexperienced craftsmen. Such attachments can be used not only for sharpening knives and circular saw blades, but also for restoring the geometric parameters of drills, turning tools, chisels and plane knives. Thus, by using such devices on a drill for sharpening, you can not only solve many everyday problems with their help, but also save on contacting qualified specialists. Even those who have no experience in this area can successfully use such sandpaper, including for sharpening cutting tools.
Emery or grinding discs can be used as a working attachment for this machine.
Additional equipment for a drill is necessary not only for home craftsmen, but also for professional furniture makers. Such equipment, in particular, includes an attachment for milling, with the help of which grooves are made in carpentry and furniture elements to create corner joints. When using such an attachment, there is no need to fix the workpieces in the clamping device. It provides high precision processing, and to create a groove of the required width and depth, it is equipped with special adjusting elements.
In order to effectively use tools driven by a drill even in the most inaccessible places, you can purchase a flexible drive or an angle adapter.
Angle attachment for drill
The flexible drive and the angle attachment for the drill are fixed at one end in the drill chuck. Their second end is equipped with a clamping device in which drilling, milling, abrasive and any other tool with a shank of a suitable diameter can be secured. When choosing between two such devices, it should be borne in mind that the flexible drive, from the point of view of processing hard-to-reach places, has greater capabilities than an angle attachment for a drill. The bending angle of such a drive is not limited to 90°, it can be any.
Examples of using angle attachments
The question of whether it is possible to use an electric drill as a drive for a pump intended for pumping liquids is not without meaning. To practically solve such a problem, you don’t have to come up with various homemade products, don’t rack your brains over making a reliable mount for a drill on the body of a standard pump, and don’t worry about which adapter to use. All these issues have already been thought through by specialists and implemented in the design of the pump attachment.
Despite its small size, the pump nozzle can provide quite decent pressure
Such a pump for a drill, although not intended for long-term and intensive use, is capable of effectively solving many problems. In particular, it can successfully pump small volumes of both viscous liquids (such as oil or paint) and ordinary water. To change the pumping speed of the liquid medium, it is enough to change the number of revolutions made by the drill chuck. Since drill pump housings are usually made of plastic, they do not have a long service life, but this disadvantage is compensated by the low cost of such devices.
The furniture jig ensures precise alignment and perpendicularity of the holes drilled with a drill.
Electric drills are often used in combination with special templates, which not only increase the accuracy of drilling and further assembly, but also significantly speed up the processing process. Templates for professionals are made of metal and retain their geometric parameters for a long time. For home use, you can purchase an inexpensive plastic template, which, although not as durable as their metal counterpart, ensures high accuracy of the processing performed.
Drilling templates are divided into household and professional
The meaning of drilling templates is that their design includes the standard sizes and location of holes that are most often made in elements of furniture structures. Thus, there are templates designed for drilling holes for fastening furniture hinges, inserting locks and installing furniture ties. In such templates, not only the distance between the holes being made is precisely maintained, but also the distance at which such holes should be from the edge of the workpiece.
How to drill a wall perpendicularly
Only at first glance it seems that drilling is very simple.
If you need to get not a hole, but a hole, then the task is not so simple. A few tricks will help solve the problem. First of all, how is a hole different from a hole? The hole is drilled in a strictly defined place, and also has a certain size and direction. In other words, if what comes out after drilling exactly matches the master’s idea, then this is a hole . Otherwise there would be a hole.
It is especially difficult to make a good hole in a wall. You have to work with a drill suspended, often in an inconvenient place; I almost missed it and the drill went at an angle. How to drill a hole in the wall strictly perpendicular? I must say that the human eye quite accurately determines a right angle. At the very least, the accuracy of the eye is more than enough for most drilling work needed in everyday life.
The trouble is that the perpendicularity of the hole in the wall is determined by two right angles - vertical and horizontal. But the human eye is no longer able to track this. The solution is to provide one of the right angles automatically, without human intervention. Then you will only have to watch one of the corners, and the job will be much easier.
Most often, the horizontal drill is fixed. It is very convenient to place some kind of stand , such as a table, in order to move the drill along a solid supporting surface. Unfortunately, this is not often possible to do, since the holes are made at different heights and it is not always possible to select a stand. A drill with a level greatly facilitates the work . After a little training, the holes turn out strictly horizontal.
If there is no level on the drill, then you should not run to the store for a new one. It is quite enough to temporarily attach a small building level to the drill body with tape.
Another original method is based on the fact that the human eye can very well assess the straightness of various objects. For example, carpenters evaluate the evenness of slats by “shooting” their gaze along the part.
a thin mirror is fixed above the hole drilling site . After this, it is enough to position the drill so that the reflection of the drill seems to be its exact continuation, without bends or fractures.
If this condition is met, the drill will be strictly perpendicular to the mirror, and, consequently, to the wall.
Source
Drilling at 90 degree angle
Drill attachments, as well as attachments for this power tool, provide it with new functions and the ability to successfully solve various technological problems. Accessories for equipping a drill allow you to use it not only for drilling, but also as a mechanical saw, milling cutter, small lathe or even a pump for pumping liquids. Modern manufacturers offer a wide variety of attachments and attachments that make the drill truly multifunctional.
Modeller's sawing machine based on a drill
Of course, attachments and other accessories will not turn a drill into a device comparable in performance and processing accuracy to specialized equipment, but they can be used quite successfully to solve simple technological problems. It is very convenient to use elements of additional equipment of a drill to solve construction and repair problems, as well as many other issues related to keeping housing in good condition.
Types of drill attachments
Attachments used with drills are also used to expand the functionality of the latter. This includes, in particular, a range of drill attachments for cutting sheet metal. Such drill attachments for cutting metal can work as notching or nibblers. Even when used with a conventional drill or screwdriver, they demonstrate high efficiency. For example, such a drill attachment for cutting can cope with metal sheets up to 1.5 mm thick, mesh made of metal, and thick plastic.
READ How to cut gypsum tiles at 45 degrees
Attachment for cutting metals and plastics
In most cases, it is better to use a drill attachment for cutting metal rather than a manual or electric jigsaw. This is explained by the fact that a jigsaw, like many other devices with which you can cut sheet metal, contributes to intense heating of the processing area. This may cause the protective coating applied to the surface of the sheet to burn. Some of the most popular drill attachments used for cutting sheet metal include devices called "Cricket" and "Steel Beaver", as well as attachments that look like tin snips but are operated by a drill or screwdriver.
Among home craftsmen, as well as those who professionally engage in car body repairs, grinding and polishing attachments for drills are very popular. The working body with which such grinding attachments are equipped can be a drum with sandpaper glued to its surface, as well as a felt or felt disk.
To use a drill as a polishing machine, simply secure the tool on the table using the holder
The material through which the drill attachment for grinding will come into contact with the surface being processed is selected depending on the nature of the technological task. Thus, a grinding tool, with which rougher processing is performed, is often made of an abrasive material of the appropriate grain size, and felt or felt is glued to the polishing tool. A brush attachment, installed in the drill chuck using its shank, is also used as a polishing tool.
The drill attachment for polishing a car can be used not only after body repairs have been completed, but also in cases where the owner of the vehicle wants to give it its original shiny appearance. If you want to save on purchasing grinding attachments for a drill, you can make such a device yourself. For this, a homemade wooden drum is suitable, in the central part of which the shank must be securely fixed. Using this structural element, such a device will be fixed in the drill chuck. Sanding and polishing with a drill using a drum like this can be done using materials such as sandpaper, felt and felt.
Nylon brush attachment helps clean the engine
Power tool attachments used for cleaning products made of various materials work on a similar principle. Thus, metal and abrasive attachments, as well as a brush attachment, can be used to clean metal products. The brush is made of metal wire and allows you to effectively clean the surface of the product from dirt, rust and remnants of old paintwork. The brush itself, which is equipped with such attachments, can be located on the end or side of the device (it all depends on the tasks to be solved). Such attachments also differ in the material from which the brush is made. Such materials, in particular, can be polymer fibers or metal wire.
Using a mortar mixing attachment, a regular drill can be turned into an effective construction mixer. Mixing construction and finishing mixtures, which is done using a mixer attachment for a drill, is carried out not only quickly, but also efficiently. It is only important not to exceed the volume of the mixture to be kneaded, so as not to reduce the effectiveness of using such a device.
Using a drill as a mixer, you should calculate the load in proportion to the power of the tool
Speaking about what can be done with the help of additional equipment used in conjunction with hand-held electric tools, we should also mention the riveter attachment for the drill. The tool on which such a nozzle is installed must have a reverse function, and the rivet fixed using such a device can only be of the pull-out type.
If you want to save on purchasing serial devices, you can make many drill attachments with your own hands. In such cases, it is better to use the advice of those who have already dealt with practical solutions to similar issues and decided to share their experience via the Internet.
The design of the conductor is determined by the parameters of the part for which it is made. If the holes in the part are placed on one straight strip (along the X axis), then the jig will be a strip, angle or channel of a certain length with holes drilled in a row. If the holes are not located on the same strip (offset along the X and Y axes), then the jig must be made from a single piece of sheet metal or welded from an iron profile.
Make a blank for the conductor.
Precision rotary device
for drilling at an angle of up to 65°, strings for balusters, railings, for the production of wooden stairs,
Highest precision thanks to inserted level and precisely ground guide. The guide bushing for drills includes 3 bushings for 7mm drills. 8mm. 10mm.12mm
Simple and precise adjustment using the built-in level. The stubborn frame should be set according to the angle of inclination of the bowstring on the device for drilling stairs relative to the marking strip on the stringer, there are adjusting washers, tighten it - and you're done!
The angular frame is smoothly adjustable within a range of up to ± 65°.
Precise drilling depth thanks to continuously adjustable drilling depth limiter ring.
Compact and comfortable for almost all baluster and railing systems.
Perfectly suitable for the production of wooden stairs specifically at one installation location.
The drilling jig is self-centering. self-centering jig for drilling holes
Now all that remains is to cut the thread and connect the two parts into one structure. When using it, it is possible to do the work without worrying only about protruding beyond the edge of the sheet.
It’s not difficult to make such a device, but unfortunately it makes the work of furniture assemblers or those people who make it much easier. If you have no desire to create this device without the help of others, buy it ready-made.
If you need a conductor to carry out work on making furniture on your own, then the simplest one will do and its price will be insignificant. Professional equipment has a fairly high price.
In any circumstances, whether you buy a jig or make it yourself, this device helps you connect furniture parts more easily and quickly or make repairs.
See a selection on the manufacture and use of homemade conductors:
There are two methods in the video, the second is at least original
No duplicates found
I don’t know if I’m the only one who noticed that he didn’t drill at 90 degrees)) it’s clear that when a square puts a gap between the handle and the block, there’s such a normal gap) of course, this is not a method of jeweler precision, but still.
He is still trying to cover this gap with his finger.
If there is no mirror, you place the phone on a piece of wood, turn on the front camera, and drill through the proximity sensor.
Works best on iPhone 10
Damn, this is really useful. Otherwise, with my crooked hands, shit happens, but I didn’t come up with it myself.
But you and your hands did not snatch a piece of meat from your finger, like this master.
With a mirror, it’s not entirely clear: if left/right, then you can set it to 90°, but forward/backward, in theory, no matter what the angle is, the drill and its reflection will still line up in one straight line relative to the observer, and again, depending at what angle to look in the mirror - a little to the left, a little to the right - and it won’t work.
I tried it with a mirror, I saw it a long time ago, it’s easy to blame it on yourself. and the corner works. Sometimes it saves my crooked hands.
He really got it
He just managed to drill straight a couple of times, but he always manages to show the angles
A stand for a drill costs pennies and the accuracy will be higher.
He probably hasn’t even heard of a drilling jig – 200 rubles. issue price.))
Sources:
https://booktube.ru/sverlenie-pod-uglom-90-gradusov/