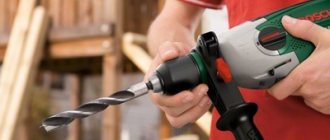
If you follow the recommendations and use the appropriate tool, you will cope with the task quite quickly and efficiently. Recommendations from experienced builders accurately describe the procedure, so it’s not difficult to get confused in the steps. The easiest step would be to buy a special drill for glass or ceramics. It can be feather or tubular. The tip drill bit features a carbide tip that resembles a spear. The advantage of such a drill is its price. A tubular drill uses diamond chips, so it can handle the hardest materials.
What is the diameter for the socket?
As a rule, the socket box has a round shape and standard dimensions. The main function of the socket box is to ensure rigid and reliable fastening of the socket inside the wall. The standard diameter of the socket box is 68 (mm).
Interesting materials:
Where can I post an article on VAC? Where can you have fun in Baranavichy? Where can you have fun in Novokuznetsk? Where can you look at Moscow from above? Where can I rent Tinkoff? Where can you pick mushrooms in Sochi? Where can I save a screenshot? Where can you watch a movie together? Where can you study to be a painter? Where can you study to become a flight attendant?
Tools for work
To properly make a hole in the wall without deforming it, you need to choose the right tools. You should have on hand:
- Drill
- Drill
- Insulating tape
- Felt pen
- Vacuum cleaner for collecting dust
If you need to make a hole in a tile on a wall of large diameter, a ballerina drill is often used.
They also use round drills with cutters, which, using a hexagon, are installed at the same distance from the center. The cutters move at different distances, so you can easily make a hole of the desired size. Mark the required parameters and, holding the tile firmly, drill at low speeds. The price of such a tool is low; you can purchase it at any hardware store.
Important! It is necessary to work with a ballerina drill at low speed, holding the tile tightly so that possible fragments from under the drill do not touch you. While drilling, try not to jerk the working tool; you can use a special tripod to strengthen the position.
Marking the hole using improvised means
Often, to apply markings for drilling, it is quite enough to slightly destroy the enamel with a steel drawing pencil or a fairly sharp self-tapping screw. This operation will allow, even when using a low-power drill, to achieve accurate and error-free penetration into ceramics of any structure.
A drill equipped with a round shank will cost thirty to fifty rubles. A simple hammer drill will cost fifty to seventy rubles.
Tips and secrets
As in any business, the procedure for drilling tiles has its own nuances, subtleties and little tricks, knowledge of which will make the task easier and allow you to give a clear answer to the question of how to drill a hole in a tile without unnecessary hassle.
- The hole should not be made at the edges of the tiles, in the crosshairs and in the gaps between adjacent tiles, since the likelihood of chips and cracks in this case is very high.
- During the drilling process, you can turn off the drill and periodically moisten the drill with water to avoid overheating.
- If the required drill or cutter is not available for sale, and you need to make a hole, you can use “handicraft” methods.
- Sometimes you can use a drill and a hammer drill. The drill is clamped into the chuck, first the tile is drilled with it (non-impact mode), then the mode is switched and the wall is drilled. Drilling is carried out at low speeds.
- You can also use a metal drill to drill tiles at low speeds. True, it’s enough for one time.
Additional accessories
Beyond simple jigs, construction tool manufacturers have developed more advanced positioning devices.
They provide precise and high-quality drilling. Such devices are equipped with suction cups that allow you to fix a template or stop on the front surface of the tile. They can be mounted on vertical and horizontal surfaces.
General rules
Under the general name tiles lies a wide range of finishing materials with very different properties. First of all, you should pay attention to the presence of glaze and firing temperature. If the finishing material was fired at a high temperature, 1200˚C or higher, then it has increased strength and will be more difficult to verify. This applies to porcelain stoneware and Metlakh tiles.
In any case, adhere to the following settings:
- The rotation speed of the drill should not exceed 800 rpm. Exceeding this speed has an almost linear effect on the probability of tile breakage;
- Use only special drills;
- Don't try too hard. The pressure on the tool should be even, without jerking or impact;
- “Wet drilling” is preferable to dry drilling, as it avoids local overheating.
- When drilling, be sure to place the tiles on a flat, horizontal surface. The best option is to lay a piece of drywall or plywood.
- Always drill from the front side of the tile. It is easier to center the drill on the reverse side, but when exiting there will almost always be chips in the glaze.
Compliance with the requirements of only these six points guarantees an excellent result by 90%.
Large holes for pipes and sockets
To drill large holes for pipes or sockets, crowns are used. They are represented by a special device made in the form of a cylinder.
The cutting part below has a special high-strength abrasive coating of various fractions. There is also a hole on the side of the device to remove dust from the drilling area. Depending on the size of the hole that needs to be drilled, the diameter of the crowns can be from 30 mm to 80 mm.
To ensure precise drilling, an additional drill is provided, installed in the center and secured with a bolt. It is necessary to align the device strictly in the center.
If the hole is measured with a large radius, commensurate with the length of the tile, then a jigsaw and special tile files are used.
Ballerina
If you need to get a hole with perfectly even and smooth edges, it is better to use a “ballerina”. It is a special device into which a drill with a spear-shaped tip is inserted. There is also a bracket and an adjustable cutter.
When rotating, the drill is pressed into the thickness of the tile, while at the same time, layer by layer, the main part of the tile is cut off with a cutter. After cutting, the edges on the part are perfectly smooth.
Crown
A crown is a type of tool for drilling holes in ceramics with a diameter of 30 mm or more. The product is a piece of cylindrical metal, which is equipped with diamond segments or diamond dust on the cutting part. Due to the large wall thickness and the presence of a dust extraction hole, the service life of such equipment is quite long.
Hole for a snipe in a tile on the wall
To drill the tiles, use special so-called feather drills with a carbide plate attached in the form of a sharp tip. Drills with two cross-shaped plates are impractical because they cannot be sharpened.
It is convenient to make markings for cutting or drilling on a smooth ceramic surface with an alcohol marker of a contrasting color, traces of which can be easily removed with an alcohol solution.
The tip material is harder than the glaze and does not slip on it. To securely fix the drill, a piece of masking tape or adhesive tape is glued to the tile, a place for the snipe is marked, and drilling is performed. After passing through a layer of ceramic tiles, the pen drill must be replaced with a concrete drill with a Pobedit tip.
Set of crowns of different diameters
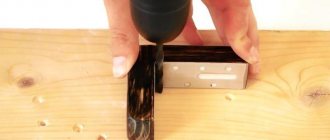
You can also drill holes with a diameter of 3-12 mm using a concrete drill, which is more common among home craftsmen. We make a mark on the tile with a marker, apply a dowel or tap to it and, with a light blow of a hammer, make a chip in the glaze of the ceramic so that before starting drilling, we can fix the drill in it. Drilling is carried out at low speeds, the slotting mode is applied only after the drill has passed through a layer of clay.
Round holes of smaller diameter can be made in ceramic tiles by screwing in screws with a self-drilling tip. The consumption of self-tapping screws for one such hole is 2-3 pieces.
What to do if you only have a hammer drill
It is possible, but inconvenient, to drill tiles with a powerful and heavy tool. It is mainly used by experienced craftsmen when they forget to take a drill to a site. At such moments, they become followers of the philosophy “use what is at hand and don’t look for anything else.” However, the average person is not a master with many years of experience, so he must soberly assess his capabilities and know about the disadvantages of working with a hammer drill when drilling tiles:
- the heaviness and dimensions of the tool interfere with normal operation - the angle of inclination constantly changes;
- the increased length of the drills provokes a slight backlash when they rotate, which can damage the tiles;
- Too high a rotation speed can cause the tile to overheat and damage its integrity.
This method is only suitable if you have a lightweight hammer drill model and you only need to drill a couple of holes. In all other situations, it is better to buy a screwdriver or drill.
The main differences between spear-shaped attachments
A nozzle with two blades must be sharpened when the working edges wear down to a certain level, which significantly reduces productivity.
Such equipment is quite affordable, since the 6 mm version costs about sixty rubles. The work is progressing at high speed.
- As for the four-blade version, it will no longer be possible to sharpen it as easily and quickly as its two-blade counterpart.
- The cost in this case will be much higher, because a drill with a diameter of 5 millimeters will cost one hundred and seventy rubles.
It is easy to conclude that it is a disposable nozzle, but not cheap at all.
Accurate hole marking without core
None of these drill bits are suitable for drilling into brick or concrete masonry. That is why, after these attachments pass through the tiles, it will be necessary to install a hammer drill in the drill.
A similar attachment for a drill equipped with an impact function is also quite suitable.
- Due to the fact that the final part of the spear is not much inferior in sharpness to the core, in this case marking the hole with a core will not be necessary.
- You just need to accurately position the drill at the site of the future hole, lightly hit its body, and it will make a deepening sufficient to continue the operation.
Cuttings with cutting disc
The tile must be fixed on a soft, thick base, for example, on a wooden block. The reason is that the disc will come out from the back side by 5-7 mm. With this immersion depth, it is possible to trim the edges of the hole more accurately.
The gap between each slot is 3-4 mm.
The cuts are made crosswise. In this case, most of the jumpers will fall off on their own. The protrusions remaining at the edges are broken off with wire cutters or pliers.
The edges do not need to be processed if they will be covered with decorative panels or overlays.
Narrow holes for installing dowels
When an apartment owner decides to equip a bathroom with wall-mounted devices, he has to fix them on tiles that have long been firmly attached to the surfaces of the bathroom. In this case, the grooves required are not very large, sufficient to accommodate dowels with a diameter of 4 to 12 mm.
If the homeowner decides to equip the bathroom with a rosette, then the corresponding grooves are made before the cladding begins.
In such cases, a pipe comes out of the architectural elements of the room for supplying cold or hot water, draining sewage, and there is also a ventilation duct there.
Additional recommendations
Before drilling on the wall, it is recommended to practice on scraps of tiles that should remain after installation. For training, it is better to buy a separate drill so that the main work can be done with a new cutting tool. This is especially true for porcelain tiles, which are stronger than ordinary ceramic tiles.
In addition, before marking, you should check where the water pipes and electrical wiring run. Craftsmen with a lack of experience often disrupt these communications due to haste. The easiest way to do this is with a multi-detector or wiring detector.
Cut with a diamond blade.
The cheapest, but also the most labor-intensive method, but it is only good for wall tiles; cutting a hole in floor tiles using this method is much more difficult, and in porcelain tiles it is better not to even try.
To do this you will need a hacksaw, a diamond blade and a little patience. The diamond blade looks like this:
Diamond blades are sold in stores and markets. Estimated price 2-4$.
If the pipe falls on one ceramic tile and is already installed, then first draw the contours of the hole on the front side of the tile with a pencil or marker (taking into account the thickness of the seam) and cut the tile with a tile cutter so that the cut of the tile falls in the middle of the future hole. I understand that this is not easy to do, it requires certain mathematical calculations, and all the same, as practice shows, errors are not uncommon. Don't worry, it will definitely work out with the next tile. The newer the blade, the faster you will cut the hole, but you will still have to tinker for 10-20 minutes. To prevent the glaze on the tile from chipping, you need to cut the tile only in one direction, moving the hacksaw along the metal and, accordingly, the blade downwards. Of course, we have the glaze or the face of the tile on top. You need to lift the canvas carefully, again so as not to break off a piece of glaze.
How to drill tiles correctly?
The process of drilling tiles has its own characteristics, little secrets, the knowledge of which simplifies the task and allows you to give a comprehensive answer. Do not make holes along the edges of the tiles or at intersections. At the time of drilling, when periodically turning off the drill, you need to regularly lower the drill into water, so that the tool does not overheat. If suddenly the required drill is not on the counter, you can use a drill. If it is necessary to make a hole at low speed, a steel drill is used.
Straight Tile Cutting Tool
When carrying out tiling work, ceramics are cut in a straight line using the following special tool.
Glass cutter
The glass cutter is suitable for cutting wall tiles; it is quite difficult to cut hard porcelain floor tiles with it; work with a roller glass cutter is performed in the following sequence:
Manual tile cutter
A standard tile cutter is a bed with a rubberized surface, above which there are two guides - the cutting element mounted on the handle moves along them. The slab is placed inside the device towards the base, the cut is made by smoothly moving the cutting wheel along the surface with slight pressure. Upon completion of the pass, the handle lowers and a special lever presses on the slab, breaking it along the cutting line.
For convenience, each tile cutter is equipped with an angular ruler, which allows you to cut pieces of the same size; high-quality expensive tile cutters have a floating bed and one durable guide, which allows you to cut with high quality edges.
Rice. 10 Tool for cutting ceramics straight
How tile crowns work
| The principle is based on a simple method of boring and drilling. The rim of the bit cuts into the tile and, under the rotation of the drill, gradually cuts off layers of material. As you can imagine, this friction produces a lot of energy in the form of heat. To prevent the material from cracking, you need to carry out all work at low speeds and press, but not hard, and evenly. |
Due to its hardness, a diamond tile bit can use the same principle to “cut” more durable materials, including metal parts of the wall, if you need to lay a cable to bring it to an outlet.
Materials that can be “cut” using crowns:
- Tile;
- Brick;
- Porcelain tiles;
- A natural stone;
- Plastic;
- Faience;
- Concrete;
- Tree;
- Metal.
The diamond crown for tiles can be produced in various versions.
The photo shows a tubular version and a standard crown with teeth. For one-time use, you can purchase a set of tile crowns in large hardware stores, but most often their quality leaves much to be desired. It is not clear where buyers get these kits from, but most often they break down faster than you achieve the result; even the attached certificate does not in any way affect the life expectancy of such kits. It is best to buy such sets from well-known brands, and even better if the tools from these manufacturers have excellent reviews.
| Do not work with tile crowns using an impact drill. With its help, you can only chip the slab, but you cannot drill it. |
Impact drilling of porcelain tiles
If you have to deal with porcelain stoneware, it will be quite difficult to do without using the impact function, because the cutting ability of the drill alone will not be enough to achieve the goal.
Regardless of the width of the drill, its tip tends to slide off the selected location. This is the peculiarity of glossy tiles.
Drilling large diameter holes
To obtain a large diameter hole, you can use an angle grinder with an abrasive disc, a multi-tool (renovator), an engraver and a special tile bit.
In the absence of special equipment, the opening can be drilled around the perimeter, cut with a hacksaw or circular tile cutters.
Angle grinder with diamond blade
The hole for the sewer pipe can be cut using a diamond blade with a diameter of 115 mm. Grinding with a grinder (angle grinder) is performed from the front side of the tile, the working surface of the disk is located at an angle of 45 degrees.
Instead of recessing, you can use the straight cutting technique. In the marked opening, 2 cuts are made crosswise, and then a square is cut out along them, inscribed in a circle of the required size. Remains of ceramics are removed with side cutters.
The cut surface is processed with a file or sanding paper.
Engraver
The engraver allows you to get precise and clean holes of any diameter. A milling tool attachment is suitable for producing large holes.
Crowns
Crowns are the main device for making large holes in ceramics and porcelain tiles. The working edge is covered with an abrasive material - tungsten carbide or diamond chips. A central drill may be located inside the crown, fixing the attachment relative to the surface.
The cost of such attachments is an order of magnitude higher than carbide drills. The price depends on the manufacturer, edge shape, diameter, presence of a central drill and other parameters.
Hacksaw
A hacksaw is used in combination with a thin drill. The saw blade is inserted into a small hole made with a carbide tip. This method allows you to cut openings of complex configurations, but requires precise following of the contour and a lot of time.
For sawing you will need a diamond-coated string. Metal blades are too ductile for cutting ceramics.
Ballerina
A hand ballerina is a tool with two points that operates on the principle of a compass. The central part is firmly fixed on the surface of the tile, and the side part extends to the length of the radius and moves in a circle. This device is often supplied with a tile cutter.
The ballerina drill has 2 peripheral points and 1 central point for fixation on the surface. The recommended operating mode of the drill is no more than 500 rpm.
Multifunctional tool
Unlike drilling tools, the renovator operates by oscillating rather than rotating. The spindle of the device deviates from the central axis by 3-4 degrees, which allows you to effectively mill the cladding, but avoid the destruction of fragile materials.
Drills, diamond-coated flat hammer attachments and saw blades are suitable for working on porcelain stoneware and tiles.
Budget renovators are suitable only for a single application: for example, drilling 3-4 holes for sockets or pipes. With prolonged use, the bits quickly become dull, so it’s worth purchasing a diamond bit.
Drilling around the perimeter
In the absence of an angle grinder, tile cutter and renovator, you can use a spear-shaped or tubular drill. The outline of the future hole is applied to the surface of the glaze, along which small holes are drilled. They should be located close to each other and touch the markings only tangentially. If you install the tip on the contour itself, the resulting opening will be larger in diameter than necessary.
After drilling around the perimeter, the middle is removed, and large irregularities are chipped off with pliers and sanded with sandpaper.