Drilling springs
In order to drill a spring leaf, you need to use a variety of equipment and tools:
- mechanical hand drill;
- electric drill;
- drilling machine.
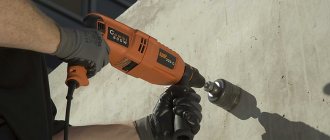
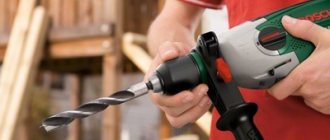
Electric drills are a special tool most often used for various repair work. The drills are powered from a 220 V network or a battery pack. Electric motors with a power of 500 - 1200 W are used as a power element in drills, and shaft rotation speed switches and a speed controller are used to change the speed.
If the need arises, when it is necessary to drill a hole in the spring of a machine in a workshop to carry out operations, various types of machines can be used:
- table drill;
- aggregate-drilling;
- vertical drilling;
- radial drilling.
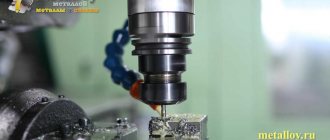
Most often, vertical drilling machines are used to perform hole drilling operations, which provide the necessary processing speed and accuracy.
The spring leaf is made of high-strength metal and requires special technology and the use of especially strong drills for processing.
The process of drilling springs at home is divided into several operations:
- Using a felt-tip pen, mark the point where the drilling will be done on the sheet and use a core to make a notch.
- In order to make a hole in the spring, you need to use 3 drills with different diameters, for example, for a 10 mm hole you need to use drills with a diameter of 3, 6, 10 mm, which greatly simplifies the complexity of the operation and reduces the possibility of overheating. When drilling, it is necessary to periodically lubricate the drill and the place on the metal where the processing is carried out with machine oil, which reduces the load and at the same time cools the contacting working surfaces.
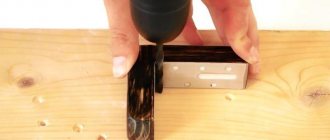
Drilling a spring with a hand drill
When using an electric drill, it is necessary to select a model with a power of 1 - 1.2 kW and equipped with a chuck rotation speed regulator. The recommended speeds required for drilling a sheet are in the range of 500 - 1000 rpm. In order to drill a sheet, you can also use a screwdriver with a low speed of rotation of the working shaft. It is also necessary to apply moderate force when pressing the drill when drilling. During the working process, dull drills must be sharpened in a timely manner to reduce heat and speed up drilling. To facilitate sharpening of drills, it is better to use a special device with mandatory observance of the symmetry of the central part of the drill. Misalignment leads to the formation of a hole with a larger diameter than necessary. The edges must be the same size. The sharpening angle should be 120°, which is suitable for working with most materials.
- Before drilling a sheet, it is imperative to firmly fix it, depending on the equipment used, using a vice, clamps or special clamps.
To reduce the load on equipment and tools, you can also use the drilling method, when the spring leaf is preheated. To do this, an exact mark is applied to the spring leaf with a felt-tip pen, where drilling will be done and a notch is made using a core, then the spring leaf is heated red-hot using a gas burner and a hole of the required diameter is drilled. To restore the characteristics, the sheet is again heated red-hot on the burner and cooled in a bath of oil (hardened).
How to drill a spring - How to drill a spring at home, video
alexxlab | 05/27/2019 | 0 | Questions and answers
How to drill a spring Sports video
3 years ago
This operation requires carbide drills (I have them containing cobalt). To begin with, drilling...
4 years ago
How to sharpen a drill for drilling HARD STEEL.
5 years ago
Read useful tips for everyone every day at https://sovety-vsem.ru/
5 years ago
Drilling steel P18 Drill bit for drilling tiles https://goo.gl/HWzkhm. You just need to adjust the tip to...
4 years ago
TURNING WORKS KEMEROVO - call. I suggest drilling hardened steel with a properly sharpened drill.
6 months back
Drilling spring leaf lends itself well to cobalt drills.
11 months back
Experiment with homemade drills. We check how nails and screws will drill into stone. Also check...
1 year ago
Help develop the channel?- Webmany- WMR- R343186939009 WMZ- Z060687763592 …
2 years ago
Answer to the video “How to drill a file”
8 months back
How to drill a file at home. We drill a file on a desk in 11 seconds))) Contact…
9 months back
How to drill a file. Than to drill a file.
3 years ago
The brazing angle on the drill has been sharpened, the hammer drill is in drilling mode.
2 years ago
Spring steel.
2 years ago
Info about me: (some info about me) Instagram: https://goo.gl/3MnuPk channel: https://goo.gl/okGK1C For orders: ...
3 years ago
This video shows in detail how to make a main sheet for a Fiat Ducato minibus, similar...
2 months back
One of the options for how and with what you can drill hardened steel.
4 months back
We straighten the spring at home.
6 years ago
sports-video.ru
Empire - Online video search service
Tired of missing cinema premieres due to the frantic pace of life? Are you tired of TV channels broadcasting worthwhile films at inconvenient times? Do your family members often share the TV remote control? Does your child ask to watch cartoons for children when you are busy and there are no good cartoons on the channels? And, in the end, do you just want to relax after a hard day on the couch in home clothes while watching an interesting movie or TV series?
To do this, it is best to always bookmark your favorite site, which will become your best friend and assistant. “How can you choose such a site when there are so many of them?” - you ask. The best choice for you will be imperiya.by
Using a cutting tool
The type of tool used plays an important role in the operation when it is necessary to drill a leaf of a spring. The following types of cutting tools made from heavy-duty steels and alloys are used for drilling metals:
- low-carbon and free-cut steel (with an index of up to 550 N/mm 2);
- high-carbon steel (with an indicator of 350 - 850 N/mm 2);
- medium carbon steel (with an indicator of 450 - 700 N/mm 2);
- low-alloy steel (with an indicator of 600 - 900 N/mm 2);
- medium alloy steel (with an indicator of 700 - 1000 N/mm 2);
- high-alloy tool steel (with an index of 900 - 1200 N/mm 2);
- high-strength steel (with an indicator of 1200 - 1500 N/mm 2);
- hardened steel (45 - 63 HRC);
- nickel alloys (over 35 HRC);
- titanium alloys.
Carbide drills are used when working with products made of super-hard steel, which can significantly increase the service life of the tool while simultaneously increasing the productivity of operations. Drills are produced shorter than standard ones with a length reduction of 20-35%, which is due to the possibility of limiting grinding cycles directly dependent on the length of the plates. This type of drill uses a helical flute angle of 20° to 60°. During manufacturing, most drills are thermally hardened to a hardness of HRC 56-62 and carried out simultaneously with soldering of carbide plates. For the production of plates, hard alloys of the VK 6, VK 8 grades, as well as the tungsten carbide group, are used. This type of drill is more efficient than high-speed drills, which reduces the time it takes to drill holes in the workpiece.
Carbide cutting tools have a number of advantages:
- high resistance to destruction;
- high accuracy;
- higher feed speed;
- good guidance and centering performance.
The use of carbide drills allows the spring to be processed with the least effort and in a short period of time.
To determine the required metal drilling speed, you can use the formula:
- where V – drilling speed (m/min.);
- D – diameter of the drill used (mm);
- N – number of rotation speeds (rpm);
- π – constant value equal to 3.14;
- then n = 1000 × V/π×D (rpm).
To increase the strength of cutting edges, drills with plates made of hard alloys are produced. This type of drill can be used for processing car springs. Industrial enterprises produce drills with inserts made of hard alloys:
- straight grooves;
- oblique grooves;
- screw grooves.
To process springs, you can use drills with helical grooves that allow you to perform operations with the greatest efficiency.
Features of heat treatment
The result of high-temperature processing of high-speed steels is a change in the structure of the material to obtain certain physical and mechanical properties required when working with this tool.
Annealing
HSS steel after the rolling and forging process acquires increased hardness and internal stress. In this regard, the workpieces are preliminarily annealed. Annealing relieves the internal stress of the material, improves machinability and prepares it for hardening.
The annealing process occurs at a temperature of about 850-900°C. However, one should be wary of excessively increasing the temperature and duration of exposure, because this may cause the steel to become more hard. Due to the reduced thermal conductivity of the alloy, heating is carried out slowly and evenly.
The products are loaded into the oven at a temperature of 200-300oC, while subsequent heating is increased at a rate of 150-200o/hour. The process ends with slow cooling: first in an oven to 650 ° C, and then to room temperature in the open air.
Machine-building plants subject a small number of workpieces to isothermal annealing. They are heated to 880-900oC for a short time, and then transferred to an oven with a temperature not higher than 720-730oC for 2-3 hours. To protect against the appearance of excessive internal stresses, the workpieces are cooled in an oven to 400-450°C and then left in the open air.
Conventional annealing takes longer than the isothermal process. Subsequently, the workpieces undergo mechanical processing, and then the tool undergoes the final heat treatment process - hardening and tempering.
Hardening
Tools made of high-speed steel are hardened at temperatures above 1300°C. After the hardening process, repeated tempering occurs at 550-560°C. This temperature is necessary to dissolve a large number of carbides in the austenite to obtain highly alloyed austenite.
With further cooling, highly alloyed martensite is obtained, which contains large amounts of tungsten, vanadium and chromium. Martensite does not disintegrate when heated to 600°C, which gives high-speed steel red-hardness.
To obtain high red-hardness values, the temperature during hardening must be very high. However, there is a limit, when exceeded, rapid grain growth begins in high-speed steel and melting occurs.
Vacation
Hardened high-speed steel must undergo a tempering process. At a temperature of 550-560°C, a multiple process is carried out at intervals of 1 hour. The purpose of tempering is to transform austenite into martensite. High speed steel goes through two internal processes:
- When heated and subsequently tempered, ground carbide is released from the retained austenite. As a result, the alloying of austenite is reduced, which facilitates easy transformation into martensite.
- During cooling at 100-200°C, martensite is obtained. This also relieves the internal stress that arose during hardening.
Nowadays, factories most often use the process of accelerated tempering of steel, which takes place at elevated temperatures.
Methods for drilling holes in hardened metal
How to drill a hole in hardened metal using acid, a welding machine, special drills and what additional tools are needed for this. Which drills work best with hardened steel?
It is not difficult to drill ordinary steel or any other metal; standard drills made of high-speed material are used for this. Drilling through hardened steel is another matter: it requires some work. After hardening, the workpiece acquires extraordinary strength, and the question arises of how to drill a hole in hardened metal, because in this case an ordinary drill can no longer help much.
Experts recommend making holes in the parts before hardening occurs. You can also try tempering the steel, then drill and harden the material again. If this is economically justifiable and technically feasible, then this should be done, but in some cases it is simply impossible to do otherwise than proceed to obtain a channel on an already hardened surface.
Technology for drilling stainless steel at home - DeloPro LLC
Stainless steel is widely used in household and industrial applications to create various items due to its significant number of positive qualities. It is an alloy of various materials that give stainless steel resistance to corrosion and aggressive environments. Based on their percentage, it is possible to create different types of material in the alloy.
At home, items made from so-called food-grade stainless steel are often used, such as taps and mixers, sinks and sinks in the kitchen, tableware and other things. Therefore, it is often necessary to drill through stainless steel for some purpose. However, you should prepare for the process. That is, study the recommendations of more experienced craftsmen if the procedure is being performed with your own hands for the first time, and also select suitable drills and lubricants.
In addition to experience, you will need a bit of sensitivity and attentiveness. This is far from the only thing a master needs. What helps most when drilling is lubricating fluid, without which the master risks damaging the drills and the material. The lubricant consists of machine oil and sulfur, so it is easily recognized by its viscous form and increased fat content. In addition to choosing the right material, you need to know some features of how to drill a hole in stainless steel.
Nuances when drilling
What needs to be done is to decide on a tool. What exactly to use depends on the diameter of the holes needed. If up to 12 mm, then at home you can use a hand drill.
Nothing else will help you drill holes in stainless steel as efficiently as preliminary marking. It is especially effective when making single holes or processing hardened and sheet metal. Axial marks are applied to the workpiece under the drill, and then a small recess is made in the product. Later they are deepened to the required size.
A template is another thing that will help save time when drilling, because the contours of the holes are pre-marked on it. Craftsmen have to resort to tricks when the work is done from the edge of the surface. Usually, half-holes are needed here, which are made as follows: a plate of the same material is attached to the workpiece, which is clamped in a vice. After which you can drill out a standard recess, and upon completion of the work, simply remove the attached plate.
Use of lubricants
To prevent the procedure from ending in failure, you need to use cooling materials. The thing is that stainless steel has high viscosity. During operation, the load falls simultaneously on the drill and the material, as a result of which overheating of either one or the other may occur
That’s why it’s so important to consider how to cool the instrument.
When you have to drill a lot, it makes more sense to attach an automatic supply of lubricants to the machine. If drilling is a single and rare case, then the drills are processed immediately before drilling. A mixture of machine oil and sulfur is used as a lubricant. In this case, sulfur can be taken both colloidal and for fumigation, well known as “sulfur color”.
If it was purchased in powder form, then the substance is simply mixed with machine oil. When the sulfur is lumpy, it still needs to be ground. An effective cooling lubricant is a mixture of sulfur and fatty acids, which can be obtained at home from ordinary laundry soap.
To do this, perform the following steps:
a bar of soap is rubbed, and the resulting mass is poured with hot water, technical hydrochloric acid is carefully poured into the soap solution, when fatty acids float to the surface, pour in cold water, wait until they harden and remove the top layer.
When creating a cooling material, fatty acids and sulfur are taken in a 6:1 ratio. The effort and time spent are justified, because this composition will help drill through even the thickest stainless steel.
Methods for drilling hardened steel
Drilling hardened steel is characterized by high heating of the surface of the workpiece and tool, which leads to rapid wear of the latter. Therefore, during processing, they try to remove excess heat or make the area where the channel will be softer.
The first method, which allows you to make hot metal more pliable, is based on the use of acids. Suitable substances may include nitric, perchloric or sulfuric acid. These liquids are used pointwise, that is, they are used to treat specifically the place where there will be a hole in the future (the area is etched). To prevent the acid from leaving the working area from materials not exposed to acid (polymers, paints, paraffin), something like a side is organized around the future hole. The hole is filled with active liquid and left for a certain time. Next, drill with a regular drill.
The easiest way, but not the cheapest, is to purchase a special drill designed for making holes in hardened metal. The cutting edges of such a tool are reinforced with pobedit tips or made of pobedit plates. In this case, it is also desirable to use additional cooling of the work area.
When working with acids, you need to be extremely careful and perform the operation in a well-ventilated area. This will help prevent burns or poisoning from harmful fumes.
How to drill in hardened steel? — Machine tools, welding, metalworking
To improve the basic characteristics of the metal, it is often hardened. This technology involves increasing the hardness of the product due to strong heating of the metal and its rapid cooling.
In some cases, after heat treatment it is necessary to perform drilling. By increasing this characteristic, drilling hardened metal becomes more difficult.
Let's take a closer look at all the features of drilling hardened steel.
How to drill through hardened steel
Drilling a hole in hardened steel
The widespread question of how to drill hardened steel can be associated with the fact that when using conventional technology, the tool quickly becomes dull and becomes unusable
That is why you need to pay attention to the features of drilling hardened alloy. Among the features of the technology, we note the following points:
- It is necessary to properly prepare the hardened workpiece.
- In some cases, a special tool is required.
- Coolant is being used.
If necessary, you can make a drill for hardened steel with your own hands, which requires certain equipment and skills. However, in most cases, a purchased version is used, since it will cope better with the task when cutting hardened steel.
Hardened steel drilling process
Nuances when drilling
The technology in question has a fairly large number of features that need to be taken into account. Drilling of hardened metal is carried out taking into account the following points:
Before carrying out work, pay attention to the hardness of the surface. This parameter is used to select the most suitable drill
Hardness can be determined using a variety of technologies. During drilling, a large amount of heat is generated. This is why rapid wear of the cutting edge occurs. In this regard, in many cases, cooling liquid is supplied to the cutting zone. When cutting difficult-to-cut material, it is necessary to sharpen the cutting edge from time to time. For this, a conventional sharpening machine or a special tool is used. Only diamond-coated wheels are suitable as an abrasive.
Steel Drilling Tool
There are a variety of methods for cutting hardened steel. Some of them significantly simplify the processing. Only by taking into account all the nuances can the quality of the resulting hole be improved.
Useful drilling techniques
A variety of technologies can be used to work with hardened steel. The most common technologies are characterized by the following features:
- Surface treatment with acid. This technology is characterized by long-term use, since it takes quite a lot of time to reduce the surface hardness. Sulfuric, perchloric or other acid can be used for etching. The procedure involves creating a lip that will contain the substance used in the cutting zone. After prolonged exposure, the metal becomes softer, and it will be possible to drill using the conventional version.
- You can use a welding machine to achieve your goal. When exposed to high temperatures, the metal becomes softer, which greatly simplifies the procedure.
- Most often, a special drill is used. There are versions on sale that can be used for processing hardened steel. In their manufacture, metal with increased resistance to wear and high temperatures is used. However, the complexity of manufacturing and some other points determine that the cost of a special tool is quite high.
In addition, to achieve this goal, a punch is often purchased. It can be used to make a small hole, which will simplify further drilling.
Use of lubricants
When drilling through hardened steel, serious friction occurs. That is why it is recommended to purchase and use various lubricants. Among the features of this processing method, we note the following points:
- First, the drilling area is processed. A small amount of lubricant is applied to the surface where the hole will be located.
- Oil is added to the cutting edge. To process hardened steel, a small amount of the substance is required, but it must be added from time to time, since it scatters when the tool rotates.
- During work, it is recommended to take breaks to cool the cutting surface and the surface being processed.
Application of lubricants
- The drilling area on hardened metal is marked with a core. Apply a small amount of lubricant to this point. If it is liquid, then squeeze out a drop of oil so that it does not spread.
- The cutting area of the tool is dipped into the lubricant and placed at the previously marked point.
- When drilling hardened metal, monitor the amount of lubricant and add it as it is used up.
- Monitor the heating status of the instrument, preventing it from overheating. Intensive smoke emission from burning lubricant indicates the need to stop work and cool the equipment and metal.
Errors when working with a drill
Professionals highlight three points:
- It is strictly forbidden to pick up the rotating chuck with your hand - the electric drill should be held by the body.
- If work is done with gloves, they must be the correct size. There is no need to take textiles with a “spare”, since the fabric can get into the cartridge and cause injury.
- When the tool is turned on, do not press with all your might, otherwise you may damage the tool and drill.
If you carry out the work in accordance with the recommendations, choose the right drill and place for drilling and avoid the most common mistakes, then drilling any hole will not be difficult.
Brands of drills for hardened steel
Steel grade R6M5K5 is a domestically produced material, where there is less tungsten, only 6%, but its deficiency is compensated by the use of the cobalt element in the alloy (up to 5%). Cobalt also contributes to the strength of the equipment and the ability to withstand increased thermal loads for a long time when working with hardened materials.
Among foreign analogues of high-speed steels suitable for the production of drills for hardened metal, it is worth noting the HSS-Co brand. This is, in fact, the same tool as the previous one, where there is a similar composition of the main alloy elements.
Any drills for porcelain stoneware are also suitable for making holes in hardened metal, only their pobedite tips need to be sharpened.
Homemade drill
It is not necessary to buy an expensive drill for the job; in some cases it can be made at home. A cobalt-tungsten alloy rod is best suited for this - it wins. Such a rod is easy to recognize among other pieces of iron: it will not be cut with a metal blade. Then do the following:
- Place a diamond wheel on the emery.
- They trim one side of the rod and grind off slots on this side, like on a flat-head screwdriver.
- Next, grind down the sides to create a sharp cone.
Dear site visitors, please share in the comments your suggestions on how else you can drill a hole in steel that has been hardened.
Category: “We work with metal”
Of course, you need to drill steel until it’s hot. And if you come across a hardened workpiece (especially a thick one), release it, drill holes with a regular drill and harden it again, if necessary. But this option is not always possible and justified; sometimes non-standard situations arise in which it is necessary to drill (perforate) steel that is already very hardened.
Well, for example, the blade of a knife broke, or you decided to make a knife from a piece of a saw. It’s a pity to throw away such valuable material; skilled people usually give such things a second life.
Yes, it’s not technologically advanced, but folk craftsmen have come up with many different ways to drill hardened steel, or how to make holes in it. To do this with less effort, you need to proceed from the capabilities and materials that you have, and also depending on what purposes. Maybe, instead of a hole, you will be satisfied with just a slot with a grinder, into which you can put a screw and secure the part. To make the slot smaller, you need to make it on both sides, and use a trimming disc of the smallest diameter, i.e. almost erased.
Before drilling, you need to thoroughly examine the steel to see how hard (crumb) it is, and from there choose methods. If, after all, the steel bends even a little and then breaks (this can be determined by the broken end or by running it with a file), then it can be drilled with an ordinary concrete drill with pobedit tips. True, the drill must be sharp. It is also very advisable to change (correct) the sharpening of the drill, the angle, like a metal drill, then the drilling process will go much faster.
But it is useless to sharpen a Victory drill on ordinary emery; this should only be done with a diamond wheel, then it can be done easily and effortlessly. And if you don’t have a diamond wheel, just take a new concrete drill with pobedit tips.
When drilling hardened steel, you need to press the drill quite firmly and drill at high speeds (if the drill is dull or not sharpened like for metal), having previously lubricated the drilling site with w-40 spray or oil. It will be easier to make a hole if you drill first with a drill of a smaller diameter, and then with a larger one. The resistance area will be smaller, and therefore the drill will go into the material easier.
Thin steel, for example, for a knife, can be drilled with hardened rods or pobeditov, you need to sharpen it like a drill and several pieces at once (make a peak and sharpen 2 edges), and change them as they become dull. A couple of minutes and the hole is ready.
From my experience, I can say that it’s good to make holes in hardened steel with all-alloy Pobedit drills; I had a couple, 6 mm in diameter. Having sharpened it as if for metal, I dropped some oil, and everything goes like clockwork, at about 600-1000 rpm.
The next method is long, requires several hours, but reliable. A hole in a steel plate can be easily etched with acid: sulfuric, nitric, or chloric, 10-15% will do. We make a side of the desired diameter and shape from paraffin, drop acid there and wait. The hole turns out to be slightly larger than the diameter of the side, this must be taken into account. To speed up the process, the workpiece can be heated slightly, to about 45 degrees.
How to drill a spring. Sports video
This operation requires carbide drills (I have them containing cobalt). To begin with, drilling...
How to sharpen a drill for drilling HARD STEEL.
Read useful tips for everyone every day at https://sovety-vsem.ru/
Drilling steel P18 Drill bit for drilling tiles https://goo.gl/HWzkhm. You just need to adjust the tip to...
TURNING WORKS KEMEROVO - call. I suggest drilling hardened steel with a properly sharpened drill.
How to drill a file. Than to drill a file.
Drilling spring leaf lends itself well to cobalt drills.
Help develop the channel?- Webmany- WMR- R343186939009 WMZ- Z060687763592 …
Experiment with homemade drills. We check how nails and screws will drill into stone. Also check...
How to drill a file at home. We drill a file on a desk in 11 seconds))) Contact…
One of many ways to drill alloy steel.
In this video I begin repairing a kitchen knife and talk about the options for drilling hardened steel. continuation…
The brazing angle on the drill has been sharpened, the hammer drill is in drilling mode.
One of the options for how and with what you can drill hardened steel.
Info about me: (some info about me) Instagram: https://goo.gl/3MnuPk YouTube channel: https://goo.gl/okGK1C For orders: ...
How to drill through a reservation. Real test of a real hardened steel plate, Art. 65G. For questions about emergency opening...
Answer to the video “How to drill a file” https://www.youtube.com/watch?v=mxfwcXCTI74.
Ruman › Blog › How to drill spot welding correctly. Tools and accessories
Novice bodybuilders often wonder how to properly remove a part (fender, sill) when replacing it, if this element is not attached with bolts or screws, but with factory spot welding. Here you need to immediately decide why it is needed. If you take it off and throw it away, then you don’t need to think long, but just use an angle grinder or a chisel and chop as you want, but not everywhere...
In places where the repair part is placed under the metal, for example, the threshold slides under the middle pillar and under the wings at the front and rear, this is where you need to carefully drill out the spots for spot welding.
Not knowing about the existence of special devices, I sharpened simple drills evenly so that they cut the metal around the welding point from resistance welding, oh, I had a lot of trouble with them, I’ll tell you. But let’s not talk about sad things, but let’s move on to the procedure of removing the threshold (for replacement) using special drills for drilling out spot welding.
To remove the threshold I use:
- an angle grinder (small) with a speed regulator, a cutting disc (1.2 mm thick - the optimal thickness for working with car metal) and an angle grinder with a cleaning disk (6 mm thick), - pliers, - a finely sharpened chisel, - a crown for drilling spot welding, - a drill, - a core, - a drill with a diameter of 2 mm (3 is possible), this is not essential, - a screwdriver.
Ask why so many things? The answer is quite simple - so as not to rearrange the drills, and not to change the discs on the grinder.
So, let's start removing the threshold. First, you need to drill out those places where a new threshold will subsequently be installed - the middle pillar, the boot of the rear and front (if it is not removable) wing.
For this we need special drills for drilling spot welding. This entire device is called a “crown with a mandrel for drilling spot welding.” The crown is those “teeth” that cut the metal, and the mandrel is the thickening on it to impart rigidity and hold two oppositely located crowns.
It is problematic to buy them in a simple tool store. Therefore, I order such crowns from the online store.
As you can see, you can use both a drill and a crown, but for myself I chose and use a crown, which I’ll tell you about.
Why a crown and not a drill?
How can I tell you? This is an amateur thing, and besides, there is one nuance - the guide tip on the drill does not always cut through the hardened part of the spot weld, and you need to drill it with another drill so that it goes deep enough to cut off the top iron. Chaotic? Well how could I...
The price of a branded crown is more than a thousand rubles, Chinese (Taiwanese) from 130 rubles. I worked with both, and I’ll tell you a secret that I preferred the Chinese ones. Branded ones are sharper and hold an edge longer, but are more fragile and break at the slightest careless movement (misalignment).
The Chinese ones are not so susceptible to crumbling, and they hold an edge quite well. There is one drawback, this is the sticking of the guide rod. But if you had a branded one, like I did, then later you can simply put Chinese crowns on the shank. By the way, they are (it turns out) on sale separately from the shank. In the photo it is 9.5 mm, I also have 8 mm, I have never seen a smaller one. This device itself is dismountable - the crown is removed (unscrewed - the thread is normal) and, as you have already noticed, the cutting edge is on both sides, if one side is damaged, we turn it over and continue working.
Forging a knife from a spring takes place in several stages
Stage 1.
First of all, you need to collect all the materials for work so that they are ready. The author's source material was a spring leaf from an old car.
Since the spring is made in a curved shape, it must be bent. This is done like this: the metal is heated, after which it gradually cools. A torch is suitable for heating, or you can simply put the leaf of the spring in a well-lit fire. After the workpiece has cooled, you need to take a hammer and an anvil and process the spring so that it becomes a straight plate. After tempering, the metal has become softer, it will be easy to cut, drill, etc.
Stage 2.
First you need to make a knife template. The author used a ready-made template from the Internet. If there is a desire, it can be improved. After printing the template, you need to glue the paper onto the cardboard and cut out the template with scissors. Having held it in our hands, we can figure out what a knife made from a spring will look like. After this, we need to attach the template to the metal and outline it with a marker.
Stage 3.
Now we are starting the most difficult stage of the work - we need to cut out the profile of the knife. This is done using a grinder - when using this tool, it is not recommended to overheat the metal. If the steel begins to change color at the cutting site, this means that it is overheating. In this case, the metal must be poured with water. In those places where it is impossible to cut, the metal can be drilled in a row of holes and then this part can be broken off.
Stage 4.
This is the final stage of shaping the main profile of the blade. For such work, a belt sanding machine is very convenient and simple. Craftsmen with extensive experience can use an angle grinder. The outer plane of the knife should be sanded so that it shines. The author used a block to press the workpiece against the sanding belt. Here you also need to ensure that the metal does not overheat.
Another important aspect of grinding is making bevels on the knife.
Stage 5.
To securely secure the lining to the handle, this knife uses 4 pins. You need to drill holes for them. To select the diameter, we focus on the existing pins, which are traditionally used as brass rods. For this case, regular steel nails are also suitable.
Stage 6.
After hardening, the blade becomes hard and does not dull for a long time. To harden the blade, you need to take oil - motor or vegetable oil, a stove or a good fire will do. The metal must be heated to such a state that a permanent magnet will not be attracted to it. As the author notes, when heated, the metal has a dull red color. After this, you need to lower the workpiece into the oil. Be careful as the oil often ignites with smoke and spray flying in all directions. The container for hardening should be made of metal.
It happens that during hardening the metal begins to deform. This situation can be corrected. To solve the problem, you need to heat the workpiece, level it, and then try to harden it again.
Stage 7.
To make handle linings, we take two boards of small thickness. We cut them to the required size and drill holes in them for the pins.
Now we glue the blanks together using epoxy glue, applying a good layer on both pads. Then you need to insert the pins and clamp the handle well with a clamp. Leave it like this for 24 hours so that the glue is completely dry. Immediately take a rag or toilet paper to remove any remaining glue.
After the glue has dried, you need to take out the knife and finally shape the shape of the handle. For these works we use a belt sanding machine.
At the final stage, we polish the knife, if necessary, we make the surface of the blade mirror-like. You can also polish the handle, so it will become smooth. Wooden linings must be impregnated with linseed oil or other impregnations. Sometimes this is done by heating beeswax and mixing it with linseed oil.
At the end of the work, our knife, a knife made from a spring, should be sharpened well with your own hands. The most affordable option is fine-grain sandpaper.
vote
Article rating
Hole in plastic without drill
A simple way to make an opening in plastic. To do this, you can use a regular gas burner and an awl.
Heat the awl red-hot with a torch and carefully pierce the plastic. You will get a smooth hole in the plastic, which can be quickly made without a drill.
Instead of an awl, you can use a nail clamped with pliers. And the burner can be replaced by a switched on gas stove.
Of course, if you need to drill a lot of holes, then it is better to use a drill. But 2-3 punctures can be easily done this way.
Hole in metal without drill
To drill through thin metal or plastic, you will need a screwdriver and a self-tapping screw with a cutting head. It comes in different lengths, it is better to take a short one.
- Mark the point on the surface where you will drill.
- Insert the screw into the screwdriver and carefully screw it all the way through
- At the same time, press down on it so that the tip cuts into the workpiece and pierces it.
The operation will only take a few minutes and the passage is ready. This self-tapping screw can cut several openings, then it needs to be replaced.
These tools are also suitable for drilling holes in wood. First you need to screw in a small screw, and then a larger one.
Hole in brick without drill
The solution is how to drill a hole in a brick if you don’t have a drill. The main thing is that you have a metal drill of the required diameter at home.
- Break off the spiral rod strictly perpendicularly.
- Using this drill and hammer, gouge out a hole in the wall.
- Turn it clockwise regularly. Then it will gradually deepen more and more.
It will take about 5 minutes to make a hole 5 cm deep with a broken drill and a hammer. Therefore, if necessary, you can pierce brick using these tools.
Safety precautions
If handled incorrectly, the tool can cause serious injury to a worker, so it is important to know the basic safety rules:
- Before each use, the instrument must be inspected for defects.
- If you are going to make a hole in the wall, you need to make sure that there are no communications in the selected location.
- It is highly not recommended to use a drill in a room with a high level of humidity.
- Do not use a tool that has been exposed to water.
- While working, you should not put too much pressure on the drill, and before pulling out the drill, you need to release the pressure.
- To replace the drill, you should turn on the drill and wait until it stops completely.
- If the drill body gets hot and the motor starts to hum, you need to postpone work and let the tool cool.
Following safety precautions reduces the risk of injury
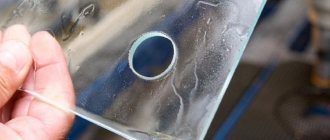
Hole in glass without drill
A way to make a hole in glass without a drill so that it doesn't crack. To do this you will need molten lead.
- Load lead fishing weights into a metal container.
- Light the burner and melt them.
- Wipe the glass surface with alcohol to remove grease and other contaminants. Otherwise the glass may crack.
- Place a pile of fine wet sand on the cleaned area.
- Using a stick, make a kind of well to form a vessel.
- Pour molten lead into this vessel. Thanks to wet sand, the temperature inside the well will be maintained for a long time.
- After 1-2 minutes, clean the surface.
A hole is formed in the place where the molten lead was poured. And the glass will not be damaged.