The supports are secured in different ways. For wooden posts, fastening can be done using tie rods, bolts and dowels.
The word "baluster" comes from the ancient Greek expression - pomegranate flower. This is the name given in Ancient Greece to low fencing posts that support railings in the fencing of stairs, balconies, mezzanines and various balustrades.
Pillars are made from completely different materials such as wood, marble, granite, metal and even glass. They can be of different shapes: round, flat, carved, etc.
Supports are used to decorate fences both indoors (stairs, mezzanines) and in the formation of outdoor architectural structures. In this article we will pay special attention to the topic of how to attach balusters to the floor indoors.
This type of structure is made from materials that imitate natural ones. For example, valuable wood species, granite, marble. Outwardly, they are not inferior to expensive products, but they are several times cheaper.
Criteria for choosing balusters
The pillars for the wooden structure are selected from the same material. To create an interesting composition, use lighter or darker shades.
Before fixing the balusters to the wooden floor, determine the type:
Metal balusters are more suitable for spiral staircases. Thanks to them, the design acquires airiness and lightness. They are made by welding; such poles will last a long time. There are:
- With cylindrical or square rods. This type is outdated and can be seen in old multi-story buildings.
- Forged. Combines well with many materials.
- Cast. Durable and versatile variety. It costs less than the previous one.
They have the following advantages:
- long service life;
- ease of maintenance (they lend themselves well to restoration work);
- versatility (can be used indoors or outdoors).
The most popular metal options are stainless steel and cast iron. The first has the following advantages:
- Anti-corrosion properties. Perfect for rooms with sudden temperature changes and high humidity.
- Strength and durability (the latter characteristic depends on the design of the railings themselves).
- Aesthetics.
The disadvantages include the high cost.
Cast iron has the following advantages:
- Versatility. Compatible with a variety of staircases.
- Durability. Does not lose its operational and aesthetic features.
Not every ladder can withstand them, because... they are very heavy.
Before attaching the baluster to the floor and railings, you need to think about tightening hardware. They are used to attach the pillars to the steps. The handrails are mounted on the top with grooves or a fixing film. Brackets are used for fastening to the wall.
They are selected from 0.8 m in height for the safety of everyone who will climb and descend. You can install them yourself, but it is better to entrust this task to professionals.
At the same time, when studying information on how to make balusters, you should simultaneously select drawings and decorative carving options. This will allow you to integrate these decorative elements into the exterior of a building or structure without any problems. An experienced woodcarver can create several options for balusters, the combination of which will add originality to the architectural image of the house.
Functional purpose and positive characteristics
Durable wooden deck balusters perform several important functions. That is why these products must be as durable and reliable as possible.
Main functions of racks:
- used as a support;
- provide the necessary stability to the ladder;
- give the stairs an aesthetically attractive appearance;
- provide the necessary safety for human movement from the first floor to the second.
Balusters made from durable solid wood are very popular among private property owners. High-quality products have the following advantages:
A universal model with an unusual pattern
How to prepare drawings and make flat wooden balusters with your own hands
Do-it-yourself flat balusters made of wood, drawings for them, as well as a tool with which you can make similar staircase structural elements are the subject of hunting for lovers of home crafts. The fact is that if you make balusters with your own hands, this will give your staircase an original and memorable appearance that cannot be achieved by other means.
Baluster fastening diagram.
Concept and types of structural element
Wooden balusters are an architectural element that consists of columns of staircases and ground fence railings carved from wood. Initially, balusters were installed on the porch of the house, and these were panels made of solid boards. Their main purpose was to protect the porch from bad weather. Later they became a decorative element, as a result of which their appearance acquired the familiar outline of a column.
Types of balusters.
Balusters have several varieties, and they are divided into different types depending on:
- forms;
- material;
- the presence of decorative elements;
- method of fastening to other elements of the building structure.
In addition, the most common balusters in our country can be decorated with various types of ornaments:
Scheme for attaching balusters to railings and steps.
- deaf;
- end-to-end;
- contour;
- stapled;
- embossed.
At the same time, when studying information on how to make balusters, you should simultaneously select drawings and decorative carving options. This will allow you to integrate these decorative elements into the exterior of a building or structure without any problems. An experienced woodcarver can create several options for balusters, the combination of which will add originality to the architectural image of the house.
Flat wooden balusters can be decorated with elements of the same shape, placed in random order, their pattern can repeat the pattern of the previous element. The third type does not have an internal thread, and the element is cut out to a given shape.
Choosing the optimal wood
To make wooden balusters, you need to choose the right type of wood.
So, it should not only be durable and functional, but also be easy to process manually.
At the same time, when starting to choose a material for making a wooden baluster with your own hands, it is worth remembering that larch, oak, pine, birch and beech are most often used for this.
Naturally, each type of wood listed has its own advantages and disadvantages, which you should familiarize yourself with before you start making balusters with your own hands.
If we consider them in detail, we can identify the following properties of various types of wood:
Scheme for attaching balusters to the bowstring.
All of these features of the various types of wood used in the construction of flights of stairs should be taken into account when making balusters on your own. Wood must be selected for the manufacture of balusters, taking into account the processing method and the method of finishing the surface of the finished product.
The process of working on a product
The production of wooden balusters begins with the creation of drawings and sketches of the future product. This will allow you to get an idea in advance of how the balusters will look in the “tree”. Moreover, if all the elements are uniform, you can depict only one on paper, and then replicate it in wood. A complex design of balusters will require the creation of several drawings of the elements of this product.
Wooden flat structural elements of staircases are usually cut from boards, while maintaining symmetry and maximum smoothness for the edges that are processed. After one piece is cut, it is connected to the other using glue. Before this, the surface of both parts is thoroughly cleaned and degreased.
When gluing balusters, try to use sketches of the product so as not to confuse the ornament or glue it incorrectly. In addition, making these wood products with your own hands in a similar way requires adherence to drying technology. If you neglect this rule, you risk getting a crumbling product before the end of its standard service life.
An interesting video that clearly shows the entire process of manufacturing a flat baluster on a CNC machine.
After all the parts are glued, the balusters can be installed in place and covered with railings. The result of the work is a beautiful, but unstable structure, which makes sense to further strengthen. This can be done using metal corners or additional wooden structures.
We should also talk about installing balusters on a wooden staircase. For example, you should always use only the wood from which flights of stairs are made. This will avoid distortions and deformation of the structure, and will also make it possible to create a single design ensemble of the staircase structure.
Video about the rules for installing balusters and handrails on stairs.
In addition, installing balusters on a staircase is significantly different from installing these products on other elements of the building, so if you do not have experience in carrying out this type of work, it makes sense to invite a professional to do this. And yet, you can learn how to make flat balusters and install them on stairs yourself; the main thing is to carefully study the information available on this matter and gain skills in working with wood.
The next plank goes right through the second step and rests on the first, and so on along the entire height of the staircase. They are mounted using bolts that are inserted into pre-drilled holes with a diameter of 10 mm. Unaesthetic seams at the top and bottom are covered with decorative details, which are securely fastened with self-tapping screws.
What type of wood to choose
In order for the staircase to remain strong and presentable for a long time, it is recommended to make all elements: railings, balusters, steps from the same type of wood. When making supports for stairs, it is best to choose hard wood:
- Oak. Noble and strong, it has the highest performance characteristics. It is durable, resistant to temperature changes, moisture and decay. Oak products have a beautiful dark shade. The products practically do not crack or warp. Despite the density of the wood, oak can be processed in all available ways.
Example of carved oak balusters - Ash. It has a very beautiful texture of valuable wood. The main advantage of ash is its resistance to moisture and rot. The structure of the tree is elastic and dense, withstands heavy loads well, bends well, and is resistant to deformation.
- Beech. Beautiful and easy to process, beech is almost as strong and durable as oak. The wood is perfectly polished and sanded, and lends itself well to decorative finishing with various compositions. The disadvantage of beech is its susceptibility to rotting and deformation in places with high humidity. In order for beech products to be of high quality, you need to choose properly dried wood.
- Birch. Rarely used for making balusters. The main disadvantage of birch is its tendency to rot, cracks and severe shrinkage.
Drawings and patterns of birch balusters
Although wood has good strength indicators, it is easy to process, sand and paint. After appropriate processing, birch can be given the appearance of noble wood. - Larch. Over time, wooden larch balusters only become stronger. The wood is resistant to warping and high humidity, it does not rot and burns very poorly.
- Pine. A budget option with good resistance to fungi, moisture and temperature changes. Wood lends itself well to processing with cutting tools and is the most popular material for creating stairs.
To make balusters with your own hands, it is important to choose wood of the correct moisture content, without cracks, knots and other defects. Overdried wood is very fragile, and wet wood can crack after drying.
Various types of carved balusters
It would also be wiser for novice craftsmen to choose inexpensive types of wood - pine or birch, which are easy to process. Valuable species such as oak or walnut are too expensive to be damaged during the training process.
Mounting the support post
The methods of fastening and installing the support post are labor-intensive, but it is worth it, since high reliability of the entire structure is achieved. Fastening can be done in two known ways:
- Anchors - a groove of a rather complex shape is cut out at the bottom of the post, into which an anchor is screwed, the diameter of which can be from 5 mm to 16 mm;
- Bayonet nut - to mount it, you will need a special key and washer.
When installing a support column, you must adhere to one rule - the inner wedge of the anchor must be driven in, not twisted. A hole is drilled in the floor into which an anchor is driven with a hammer up to the limiting edge. A supporting baluster is then attached to it.
Features of fastening balusters made of other materials
Advantages and disadvantages of concrete balusters
In addition to durability and reliability, made concrete pillars have many other advantages:
- they do not crack due to temperature changes;
- do not absorb moisture;
- not subject to corrosion (unlike metal);
- have low cost;
- easy to install;
- they do not require special care;
- not exposed to ultraviolet radiation;
- have a variety of configurations (due to the use of different molds for casting) and sizes;
- they can be decorated to look like stone or marble (any color and texture);
- are environmentally friendly.
The disadvantages of balusters made of concrete include:
- low resistance in case of impact (compared to natural stone);
- the presence of a matte surface (lack of gloss) of unpolished concrete elements;
- Compared to natural stone, concrete products have a shorter service life;
- impressive weight, which is unlikely to allow you to install the posts yourself without outside help.
Types of balusters
Posts for supporting railings in fences inside houses are made mainly of wood and natural stone. Recently, with the advent of new artificial materials, it has become possible to industrially produce balusters from composite materials.
Wood is a natural material that can be easily processed, which is why wooden supports are very popular in the building materials market.
Wooden balusters
Wood support structures are made mainly in three ways:
- turned supports; they are made even at home, if you have a simple lathe;
- milled posts; the production of such parts involves the use of more complex equipment; balusters are produced in special workshops; the machines allow for various cutting of wooden blanks (longitudinal, screw and oblique cutting);
- pillars with complex relief patterns; they are produced on computer numerical control (CNC) machines; Industrial enterprises are equipped with such equipment.
Composite balusters
The construction market offers a large selection of staircase support pillars of various shapes.
They often imitate valuable types of wood, granite, marble and other materials.
Particularly impressive are the supports made of silicate glass.
The production of balusters of this type is possible not only in industrial production.
If you have experience in the construction business, you can cast balusters in special molds in your homestead.
Balusters made of natural stone
The architectural details made of chiseled marble, granite and malachite are very beautiful. Racks of this class are designed to form the interiors of expensive houses. The cost of such architectural forms is quite high.
The production of balusters from natural stone is organized at special industrial enterprises engaged in the processing of natural stone. The manufacturing process is quite complex and is carried out using CNC machines.
Balusters made of natural stone are rarely installed in the interior of homes; they are mainly used to decorate balustrades of open areas and fencing of staircases in the local area.
When manufacturing staircase elements, you should pay special ATTENTION to the direction of the wood grain . Drawings must be transferred to the source material, taking this feature into account, along the greatest direction of the template.
Tags
wooden balusters reliable balusters from the manufacture of balusters from the installation of balusters the manufacture of balusters from such balusters you can Balusters the purpose of balusters otherwise balusters should Cylindrical balusters from Methods of making balusters Methods of making balusters manufacturing method wooden When making or with your own hands. with your own hands with your own hands with your own hands with your own hands. Step-by-step guide with your own hands from step-by-step guide with your own hands. with your own hands. hands can install wooden balusters from wood can be milled woodworking machine from wood from wood making wooden decorations from wood from wood in woodworking. form wooden products
jigsaw base
Content
- Introduction Wood Grain Direction
- Wall stringers
- Attaching steps to a string - methods
- Methods of fastening balusters
There is another method of fastening - fastening with a nut or capercaillie. This method is more reliable, but when using it, you have to cut the baluster and make a recess in it for the pin (it is screwed into the base of the balustrade), drill a hole in the center of the baluster and then, putting the baluster on the pin, it is clamped with a nut. Or a recess is made for a bevel and secured with a screw.
Definition
The time has come when technology comes first, people are increasingly trying to bring a piece of the past century into their lives. Architectural trends such as classicism, baroque, and gothic are returning. Balusters are not very large posts that look like miniature columns; they support the weight of the railing. With their help, various fences are created for stairs, balconies, terraces, and are often used on roofs. Balusters are given different shapes and styles, and different materials are also used, such as classic reinforced concrete structures, concrete, plaster, and stone.
Return to contents
Wooden balusters
The most beautiful way to attach wooden balusters to “chopiks” (rounded pins)
With this type of fastening, there is no need to damage the baluster; it remains in its original form. But such a fastening may become loose over time and you will have to raise the balusters or fasten them differently. In this method, a hole is drilled in the center of the baluster and at the base of the balustrade in the place where the center of the balustrade is located and the baluster is mounted through the chopper with glue.
There is another method of fastening - fastening with a nut or capercaillie. This method is more reliable, but when using it, you have to cut the baluster and make a recess in it for the pin (it is screwed into the base of the balustrade), drill a hole in the center of the baluster and then, putting the baluster on the pin, it is clamped with a nut. Or a recess is made for a bevel and secured with a screw.
There are methods of fastening through shaped recesses, when a “male” is made on the baluster, and a “male” on the base or railing; this method is more reliable than the first and is even inferior to the second in some cases.
You can install racks on such a structure directly on the bowstring. If the dimensions of the bowstring are not suitable for the base of the balusters, a special board is used - a sub-baluster. With its help, the width of the bowstring is increased.
A wooden baluster is conventionally divided into three parts:
- Base. The lower support part of the rack is made with a length reserve for fitting and fastening the product.
- Central part. The most beautiful component of the baluster, which has a decorative and aesthetic function. Often decorated with carvings ranging from simple patterns to sculptural forms.
- Support for handrails and railings. This part of the racks is attached to the railing and railings.
Wooden balusters are made from different types of wood, and they can have the most imaginative shapes, different sections and thicknesses. First of all, the following types of balusters can be distinguished:
- Flat - made of boards or plywood.
- Simple racks are pieces of a certain size with a round or square cross-section.
- Figured and turned - processing of wooden racks is carried out according to a template on machines.
- Carved - are the most complex and decorative carved balusters, often handmade.
Return to contents
To attach the upper part of the balusters, you must first prepare grooves in the handrails. These grooves should be the same size as the top of the vertical supports. As a rule, structural elements are not attached directly to the handrails. A fixing bar is placed on them, and only then a handrail.
Attachment to string
To connect balusters with a bowstring, all the described methods are suitable, from cutting to fastening with modern zip bolts. The only difference is that the lower ends of the enclosing elements are sawed off at the same angle that the bowstring forms with the horizontal floor line. Only in this case will they be able to be installed vertically.
The support posts are sawn off to length at a right angle, and the intermediate posts for installation on the string are cut at an angle
Helpful advice! When fastening with wood grouse, zip bolts or dowels in the trimmed base of the baluster, it is difficult to determine the center and drill a longitudinal hole. Therefore, they are made before trimming, and after the stand is adjusted to the bowstring, they are drilled to the required depth.
Another way to secure balusters and railings to a wooden staircase with a bowstring is based on the use of an auxiliary element - a baluster. A groove is carved into its lower edge, exactly corresponding to the shape of the upper cut of the bowstring. A similar groove with a width equal to the cross-section of the supporting part of the balusters is also on the upper edge.
Balance
First, all the balusters are fixed with a through fastening on the baluster, and then it is mounted on the bowstring. Glue is used for connection, and nails or screws are used for additional fixation. The gaps between the balusters in the upper groove are closed with a strip that hides the fastener heads.
After installing all the balusters in one row, they are clamped between even slats in a strictly vertical position. On each of them, cutting lines are marked along the guide. After trimming, a railing strip is screwed onto the balusters, and a handrail is installed on it.
Wooden mount
Most often, the stairs in the house are decorated with wooden supports. You can install them yourself. The main thing is to follow some rules. Fastening wooden balusters to the floor is done using screws, pins or self-tapping screws. Fasteners must be made exclusively of metal. Otherwise, the fastening of the structure will be unreliable.
Experts recommend not using a threaded connection that becomes loose during operation. You need to opt for active tightening hardware. Nails and wooden dowels should not be used.
To attach the upper part of the balusters, you must first prepare grooves in the handrails. These grooves should be the same size as the top of the vertical supports. As a rule, structural elements are not attached directly to the handrails. A fixing bar is placed on them, and only then a handrail.
The fixing strip and supports are fastened together with pin-headed nails. For reliability, the attachment points can be treated with a special adhesive composition.
If the staircase is installed between two parallel walls or the width of the structure reaches one and a half meters, then the handrails should additionally be attached to the walls. In this case, you need to use special brackets.
It is advisable to opt for vertical supports, the sides of which in sections vary from 3 to 8 cm. Vertical supports must be purchased as a set. No need to skimp on hardware. The reliability of the fastening will depend on them. Therefore, preference should be given to those companies that have been operating on the market for several years and have a good reputation.
This is the simplest mounting option considered. Before fastening it in the balusters, it is necessary to drill holes with a diameter smaller than the screws used. In the upper part, the hole must be widened in order to hide the screw head.
Marking and fastening of pillars
The pillars are the basis for positioning the entire stair railing. They are located on each top and bottom step of each flight of stairs. If there are intermediate platforms, including rotary ones, this rule must also be observed. At the same time, the uppermost post can be common to the railing and balustrade.
Factory posts come in two types: solid and box-shaped, that is, glued together from strips of thick plywood or wood panels. It is very important that each post has a straight edge at the junction of the handrails, because in the case of joining with a round support, factory trimming of the edges of the handrail is required, which significantly complicates the installation process.
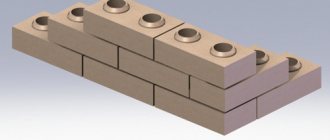
Hollow pillars are attached through a boss - a 150–200 mm piece of timber, the outer dimensions of which correspond as closely as possible to the cavity of the pillar. The boss is attached through a through axial hole using a pin screwed into the step or platform. This method of fastening allows for rotation of the post around its axis and a slight lateral play for its precise positioning. The hollow post is glued using thick glue; the lower end is first lubricated with a small amount of sealant; this perimeter band will prevent excess glue from squeezing out.
A - box-shaped post with fastening through a boss. B - solid post with dowel fastening. 1 - pillar; 2 - base; 3 - plinth; 4 - pin or anchor; 5 - dowel
Monolithic poles are fastened to one large (20–30 mm) dowel or to several small ones evenly distributed over the support area. With this method of fastening, it is desirable that the junction of the post to the site be framed by a plinth, which helps to hide the adhesive seam and increase the support plane. If you have a baseboard, you can also use the fastening method with ties for cabinet furniture, since the niches for the nuts will ultimately be hidden anyway.
The alignment of pillars is better with parallel pairs, that is, on intermediate platforms where flights of stairs converge. The distance between the pillars should provide a sufficiently large gap between the lower handrail and the steps of the upper flight. In the longitudinal direction, the position of the pillars is determined by two long straight slats laid on the edges of the steps of converging marches. The plane laid across the line of intersection of the slats is the ideal position for installing the posts. If necessary, they can be moved towards the spans, but not back, otherwise the railings will overlap. When paired pillars are positioned on landings and turns, the end ones are also marked using the same principle; it is important here that the connection with the railing is carried out at the same height.
How to fasten wooden balusters?
There are two options for attaching balusters to a wooden staircase:
You can install balusters on a wooden staircase with your own hands in one of the following ways:
It is not recommended to fasten with nails. As a result of the constant load aimed at loosening the structure, this will cause the nail to expand the hole into which it is driven and lose its function. Let's consider each of the acceptable methods in more detail.
Using a dowel
Dowels are small sticks with a diameter of 8-12 mm and a length of 100-120 mm. In addition to the dowel, you will need glue. It is allowed to use PVA glue or special wood glue.
Let's consider the option of attaching balusters to steps; the only difference from attaching to a bowstring is that for the bowstring it is necessary to cut the bottom of the baluster at an angle.
Fastening with studs
The length of the pin is desirable to be at least 10 cm, the diameter depending on the type of wood is from 8 to 10 mm, for hardwoods a smaller diameter is possible. Additionally, prepare PVA glue or wood glue.
Fastening balusters to a wooden staircase using a pin is only possible for perpendicularly located elements. This fastening is carried out when the balusters are located on the steps:
- For fastening with studs, it is also necessary to drill holes equal to half the length of the stud, but the diameter of the hole should be 2 mm less than the diameter of the stud.
- Pour glue into the prepared hole in the baluster and use a gas wrench to tighten the pin so that the side with the screw remains outside.
- Add glue to the tread hole and screw the baluster into it.
The drilling depth in hardwood is greater than the screwing depth, otherwise the pin may break.
Fastening with self-tapping screws
This is the simplest mounting option considered. Before fastening it in the balusters, it is necessary to drill holes with a diameter smaller than the screws used. In the upper part, the hole must be widened in order to hide the screw head.
After installing the balusters on the stairs, the drilled holes for the screws must be masked using wood putty.
How to attach balusters? If there are small children in the house, you need to carefully monitor the distance between the posts, otherwise the child may simply fall out.
The process of installing a wooden balustrade on the stairs - step by step
Now, having understood the methods of fastening balusters, we can move on to considering the stages of installation work on assembling the stair railing as a whole.
The instruction table below will present one of the options for assembling a staircase balustrade. However, it should be noted that this method is not the only one, since each master works according to his own template, developed over the years.
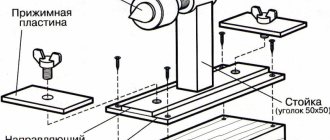
| Illustration | Brief description of the operation performed |
| So, after the steps of the stairs are mounted, their edge area is marked. The line for installing support posts and balusters is determined. For marking, you will need a flat metal or wooden plank with a length equal to the length of the flight of stairs, a metal ruler, a pencil and a construction square. By the way, you can use a galvanized profile, which is used for installing plasterboard structures. The profile or plank is laid along the edge of the steps, approximately at the same distance from the edge. Then, the exact distance from the edge to the plank is measured across the entire width of the step, and a line is drawn at the points found. Thus, all steps are marked. At the end of the process, all lines on the steps must coincide with the common bar. | |
| The next step is to determine the locations for fastening the support pillars, between which the balusters will be fastened. The pillars should have a cross-sectional size larger than the balusters, approximately twice as large. For example, if the balusters have a size of 50x50 mm, then the pillars should have a cross-section of at least 80x80, and preferably 100x100 mm. You can use a pin, screw or dowel to secure the support posts. If the pole is installed on a wooden surface, the length of the fastening element should be 100 mm and the diameter 8÷10 mm. In this case, these bolts with conical threads are used, like a screw. | |
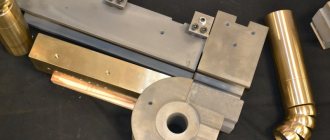
| In the example shown, the upper platform on which the staircase rests is made of concrete. Therefore, calculating the action plan in advance, a so-called embed was built into the concrete at the edge of the site - this is a metal plate measuring 80×80 or 100×100 mm and a thickness of at least 4÷5 mm. On top of the plate, strictly vertically, the mentioned bolt-screw with a length of 100 mm and a diameter of 8 mm is welded. | |
| A hole corresponding to the diameter of the welded bolt is drilled in the lower end part of the support column. Then, the post is simply screwed onto a threaded pin welded to the mortgage. To ensure that the post is pressed tightly to the floor surface, the bottom of the drilled hole can be slightly widened. | |
| If the support post is installed on a plank surface, then a hole for the fastener is drilled in it, just like in the end of the post, according to pre-made markings. | |
| The post can be fixed to a horizontal surface using the same bolt. To do this, you will have to drill a through hole in the wooden surface of the stairs, and then insert the fastener from below, having first placed a wide metal washer on it. You can fix the post with a dowel, gluing it into the end of the post, and then into the hole of the step, or with a pin, screwing it first into the end of the post, and then into the step board. In a word, by any of the methods discussed above, whichever seems more convenient. | |
| Typically, the bottom support pillar in a flight of stairs is mounted on the last step and pressed against the riser of the previous step, which gives it some additional rigidity. | |
| When installing support pillars, it is necessary to ensure that they are not only perfectly vertical, but also on the same line, otherwise the staircase railings will be installed crookedly or will not be able to fit into their designated place at all. | |
| Having installed the support pillars, you can proceed to determining the mounting points for the balusters. For this procedure you will need a construction corner and a ruler. If the steps are wide enough, then it is best to attach two balusters to each of them. All elements of the balustrade must be located at the same distance from each other. Typically, when installing two balusters on each step, the distance between them is 70÷80 mm. The exact location is marked along a previously outlined general line. | |
| After the installation points for the balusters are determined, through holes are drilled through them, through which the racks will be fixed to the steps. If you choose the option of fastening using dowels or pins, then before gluing fasteners into the balusters, half of the racks will need to be shortened somewhat so that they are installed exactly under the handrail. Thus, the first baluster of the step remains at its original height, and the second, located closer to the bottom step, is shortened by approximately half the height of the step. In each specific case, the cut part will have its own size, depending on the width and height of the step. | |
| Balusters can be attached to the steps using any of the methods described above or, as in this case, using a bolt-screw screwed from below through a through hole in the step board into a hole drilled in the lower end of the baluster. A metal washer is put on the bolt, then it is inserted from the bottom of the step into the hole and screwed using a socket wrench-ratchet through the board into the hole drilled in the end of the baluster. A screw 80 mm long and 6 mm in diameter is suitable for this purpose. | |
| When all the balusters are secured to the steps, a straight guide bar is attached to them so that it passes through the upper corners of the balusters. The plank can be secured using clamps. After this, along the guide, on each of the balusters, a line for the future cut is drawn with a pencil. In addition, the vertical location of each of the racks is also marked on the guide. The balusters must be numbered so that there is no confusion during further assembly of the structure. | |
| After this, the balusters are carefully unscrewed and removed from the steps. Holes with a diameter of 5 mm are drilled in the center of their end upper part. Then, using a miter saw, cuts are made along the marked lines. The next step, according to the numbering, is to return the balusters to their original place and secure them to the guide along the pre-made marking lines. | |
| Now you can move on to working on the railings. The first thing that needs to be done is to determine the cut angle of the ends of this part, since they should be used to connect it to the support posts. For this purpose, you can use a tool such as a malka. Experienced carpenters advise simply not to change the angle set on the saw for cutting down the balusters. Before making cuts, it is necessary to accurately determine the length of the railing. To do this, they are laid on the edge of the steps, from the supporting upper to the lower pillar, and their exact length is marked with a pencil, taking into account the oblique cut. The width of the railing should be equal to the width of the support posts. | |
| After this, oblique cuts of the railing beams are made according to the markings. Next, the cut end sides must be thoroughly cleaned using sandpaper. | |
| Now on the railing beam, along its entire length, it is necessary to cut a groove, the width of which should be equal to the width of the balusters. The groove depth should be 7÷8 mm. The groove should be in the middle part of the beam, that is, it is made at a distance of 12–15 mm from the edges. To make such a groove, of course, there is no way to do without a manual or stationary milling machine. | |
| To securely fasten the railing, you will additionally need a wooden railing strip with a thickness of 8÷10 mm and a width equal to the width of the groove cut in the railing. The underrail is screwed with self-tapping screws to the upper ends of the balusters while they are fastened with a guide rail. The bar will replace the last one and fix the racks in the required position. Once it is secured, the temporary guide can be removed. | |
| Railings are laid on top of the planks and screwed to it from below using self-tapping screws. | |
| Additionally, the railings, wherever they are installed, are fixed with long self-tapping screws to the support posts. To do this, a through hole with a diameter of 5 mm is drilled from the outside of the post. First, the hole is widened so that the self-tapping screw goes deep into the wood, approximately 20 mm, passes through the post and is screwed into the end of the railing by 30–40 mm. The length of the screw is calculated depending on the size of the support post. |
Additionally, it is necessary to recall that when installing balusters in their permanent place on any fastening, it is recommended to coat their end surfaces with wood glue. It is best to do the same when installing the railing strip, as well as the railing itself. The glue, when hardened, will strengthen the structure and make it more durable.
Building a staircase with your own hands is not as easy as it might seem at first glance. To obtain a strong and reliable structure, it is first necessary to carry out accurate calculations, taking into account the lifting height, the free space that can be allocated to it, ergonomic criteria and even the height and weight of the inhabitants of the house. In these calculations, every parameter is important, from the thickness and width of the steps, to the cross-section and height of the balusters, as well as other structural details. Therefore, in order for the staircase structure to be safe and reliable in operation, it is best to entrust its calculation to specialists. And if you plan to build the staircase completely on your own, then you will need to strictly follow the drawn up drawing, observing all the dimensions indicated in it.
A metal stand is not a difficult installation
The use of metal in staircase construction is considered traditional. Such elements are distinguished by sophistication, elegance, and the regular appearance of new ornaments and curves of lines reminds of a new time, a new trend or a new fashion trend.
How to fasten metal balusters? It’s very simple, because these racks come with all the necessary parts and detailed instructions. The standard installation sequence is as follows:
- the distance between the balusters, previously coated with paint, is outlined;
- the stand is screwed onto the tread using a bolt or self-tapping screw;
- the railings are attached to the post from above, after which the railings themselves are glued.
Private houses do not require the use of hollow balusters; they are much more popular in office buildings. The main advantage of such structures is a special protective layer that prevents rust and therefore increases service life. We fasten the balusters with our own hands:
- You need to make marks on the steps, in place of which the columns will be located in the future.
- Bolts or screws must be used to install each column.
- The holders on which the railings will later be attached can be rotated to the required angle.
Material: performance characteristics
Larch
The right choice of material will help you create balusters for a wooden staircase with your own hands in accordance with the necessary operational requirements. The use of solid rock will protect the structure from deformation even under conditions of exposure to atmospheric phenomena, high humidity, and temperature changes.
You can make balusters with your own hands using different types of wood:
- Larch. The products are durable and not afraid of moisture. The red-brown or brown color of the texture will emphasize the decorative nature of the fence. The disadvantage of the material is the likelihood of cracks occurring during drying.
- Pine. The material is quite flexible, easy to grind, and resistant to temperature changes. Light yellow or yellowish-red elements will organically fit into the interior.
- Ash. The dense structure of the raw materials will ensure the strength and durability of the structure. The wood is yellowish in color with a beautiful pattern.
- Beech. It is important to take into account the instability of the array to humidity. It is recommended to use beech balusters for stairs for internal structures of a home, additionally treating the surfaces with special compounds.
- Oak. The material has a high degree of strength and wear resistance. The raw material has a dense structure and does not deform. Used for making small and shaped elements.
After choosing the material, you should develop a design for the shape of the product and prepare the necessary tools. The work includes the availability of special equipment. You will need a lathe, jigsaw, drill, router, screwdriver and a set of chisels.
Design of balusters, their sizes and shapes
The baluster consists of three main elements:
- Base (bottom of the column).
- Central part (decorative). Is the largest element.
- The supporting part (on which the railing rests).
The dimensions of manufactured products depend on where they will be used. If handrails are installed on them, the height of the products should vary from 800 to 1000 mm.
The shape and thickness of the central element of the column are determined in accordance with the project. Most often, the cross-section of the product is round, and its length can have any shaped shape. The photo shows various configurations:
Preparation of tools and materials
In most cases, making concrete balusters with your own hands is done using the M500 grade and gravel. If it is necessary to increase strength, a plasticizer can be added. It is necessary in order to give the solution plasticity and improve its quality. Also, for work you will definitely need galvanized or simple fittings.
As for its length, it is selected based on the dimensions of the product itself, in this case it is a baluster. As for the necessary tools, you will need the following:
- Hammer.
- Hammer.
- Putty knife.
- Master OK.
- Grinder machine.
- Electric drill.
- Measuring bucket.
- Construction mixer.
- Chisel. abrasive paper.
- Paint brush.
- Level.
- Container for pallet.
- Bulgarian.
Don't forget to prepare your instrument
What will you need for work?
Balusters.
Before starting installation work, prepare the elements for assembling the structure:
Currently reading: Methods of drilling concrete
Balusters are vertical posts that hold handrails. Handrails are a component of the railing that is held by hand. Bollards (rotary and end) are vertical posts that are stronger than balusters and are attached at the beginning and at the end of the staircase railing.
The choice of construction arsenal depends on the material for the stair railings. So for metal railings you will need:
welding machine; grinder; tape measure; building level; hammer drill; screwdriver; electric drill; cord.
For wooden fencing structures use:
hammer; chisel; chisel; wood saw; jigsaw; screwdriver; screwdriver; building level.
Before installing wooden railings, their surface must be polished.
Return to contents
Role in staircase design
Functionally, a baluster is a fairly simple element. Humanity designed this detail of the staircase design in a simple manner. A timber or hewn cylinder was installed. He solved the following problems:
- ensured the strength of the railings. The baluster allowed several people to lean on the long span;
- guaranteed an increase in maximum load in both vertical and horizontal directions.
With a certain installation technique, the baluster increased the strength of the flight of steps. The staircase received support and an additional element of rigidity in the form of a railing.
Very quickly the baluster ceased to be a purely functional element. She embodied the taste of the owners and began to fulfill an artistic role. For the manufacture of such elements, noble stone began to be used, and inlay was used. Complex decors were created using the intarsi technique, using gold foil and other expensive materials.
In Ancient Rome there was even a cult of worship of intricately made columns. This decoration of the exterior of temples has the same functional purpose as a baluster.