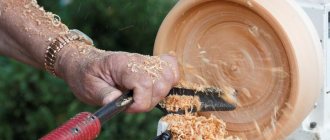
The operation of lathes is impossible without the use of cutting equipment. Most often, the equipment is equipped with cutters, which allow most processing operations to be performed. Among them are boring, cutting grooves and threads, trimming, etc. A separate group of cutting tools is used for preliminary preparation of wood. The operator eliminates excess workpiece mass, allowing it to be integrated into the work area for more precise, targeted operations. But in any case, the cutter for a wood lathe must have optimal sharpening. Special equipment helps to bring the characteristics of the equipment into the proper form, but first you should understand the design of the cutter itself.
How is the cutter constructed?
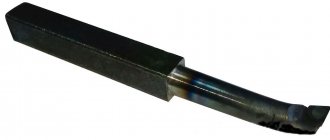
The base is a metal rod, which can be divided into two parts: the working head and the shank. The cutting part has the shape of a triangle with rear and front auxiliary surfaces along which chips flow during the cutting process. Processing is performed with the main cutting edge, which craftsmen call the apex. This is the intersection of the secondary and main edges.
As for sharpening, the condition of this particular part matters. The top may be rounded or sharp. The tool also has different formats. Usually the size of the holder is taken into account - on average from 8 to 25 mm. For universal work, it is better to purchase a set of wood cutters for a lathe, which includes more than 10 pieces. The standard set includes cutters with different shapes, which allows you to make grooves, grooves, chamfer and perform shaped processing.
Carving tools
General principles
Wood carving is a fairly popular technique for decorating various products.
As a rule, the process itself follows this scheme:
- First, a blank is made from wood, be it a flat board, a block or a figured blank.
Note! Sometimes undisturbed parts of trees are decorated with carvings. In this case, a fragment is selected whose shape has maximum decorative potential.
- Then a rough leveling of the surface of the workpiece is performed, during which all defects are removed from it.
A variety of tools are used for figured carving
- After this, the surface is processed with special cutters, with the help of which a part of the wood is selected. Due to this, a decorative relief is formed.
- After the actual carving is completed, finishing is carried out - grinding the cut areas, impregnation with protective compounds, full or partial painting, varnishing, etc.
The most important tools in this process are the wood carving cutters. In addition to the skill of the carver himself, it is the quality and correct selection of the cutter that determines how clean the ornament or plot image on the wood will be.
That is why below we will look at the main types of such tools and describe where and how they are used.
Main types of incisors
Chisel profiles
To create three-dimensional images, craftsmen use a variety of types of wood cutters. In principle, if you have the skill, you can do without some of the products listed below, but to achieve the best result, it is better to collect as extensive a set as possible and use each device for its intended purpose.
Cranberries with blades of different shapes
The main types of cutters are presented in the table below:
| Variety | Application at work |
| Blunt knives |
|
| Chisels | The most common type of incisors. A typical chisel is a long rod with a cutting edge formed at the end. Depending on the shape of the chisel edge, there are:
Wood chisels of most varieties can be produced with both straight and curved shafts. In the first case, the design of the tool allows it to be used together with a mallet, in the second, the carving is carried out solely by muscular force. |
| Klukarzy | Clukars are special chisels that are characterized by a strong bend in the working part. Clukarza is usually used for finishing carvings with strong penetration, which allows the formation of a clear relief. Generally, these tools are classified by blade shape:
|
| "Goat's legs" | This variety is a chisel, the blade of which is curved in the shape of a step. This design allows for deep cutting without affecting the surface layers of the wood. |
| Spoon cutters | As the name suggests, these devices are used in the manufacture of wooden spoons. The working part of the spoon cutter is a ring or half-ring, the sharpening of which is applied to one of the side faces. The main function of this device is to remove wood cleanly and in large volumes. |
Spoon cutters of different shapes
Additional accessories
However, a master carver, in addition to chisels and knives of various shapes and sizes, also requires other tools.
The required minimum additional equipment includes:
- Wood saws (hacksaw or reciprocating saw for rough work, bow saw for finishing work).
- Jigsaws.
- Drills and rotators.
- Planers for leveling planes.
- Set of wood files (rasps).
- Mallet for processing hard wood with cutters.
- Devices for sanding wood.
Teslas of different sizes
If the master works with fairly large structures, then in addition to simple cutters he may also need figured hatchets - the so-called adzes. According to the principle of operation, they are similar to cutters (naturally, adjusted for the scale and purity of the work).
Tips for choosing
If you are planning to master the technique of wood carving with your own hands, then you need to start by selecting the appropriate tool. And here we are faced with a dilemma: really high-quality cutters are quite expensive, but if you buy a set for beginners “on the cheap,” then working with inconvenient and constantly losing sharpness devices will discourage you from engaging in this type of creativity for a long time.
Ready set of tools
The optimal solution would be to buy several good cutters, and then, if necessary, expand your toolkit. To begin with, we will need at least one medium-sized blunt knife, as well as four to five chisels: one flat, several corner and semicircular ones with different blade curves.
High-quality products from a foreign manufacturer
As for specific instances, you need to pay attention to the following features:
- The blade must be durable and well-hardened, free from rust and other defects.
- The cutting part must be securely, without play, fixed in the handle.
Note! This does not apply to knives with replaceable blades - in any case, they will have minimal play that you will have to put up with.
- Handle material: wood or durable plastic. However, the second option is still somewhat worse, since the wooden handle fits much more comfortably in a sweaty hand.
- Naturally, the handle should be even and smooth, without burrs or cracks.
Products with mushroom-shaped handles
- If we talk about the shape of the handle, the most common are cylindrical options (suitable for impact carving with a mallet), conical and mushroom-shaped models.
- Some manufacturers produce chisels and jambs with anatomically shaped handles equipped with finger grips, but many novice craftsmen have complaints about their convenience.
- The manufacturing company also plays an important role: today on the market you can find both domestic and foreign forms that produce products of quite decent quality. But what you should refuse are the frankly cheap Chinese and some domestic cutters: yes, you will save on the purchase, but even if you cut these products, they won’t last long.
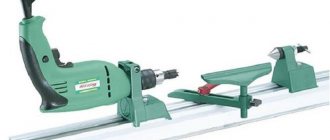
Types of turning tools
The general segment of turning tools in the main classification involves the division of equipment by purpose - for wood and metal. In this case, the first type is considered. Such models differ from metal cutters in the material of manufacture. Technologists use tool grades of steel, while metal processing is carried out with cutters made of carbon hard alloys.
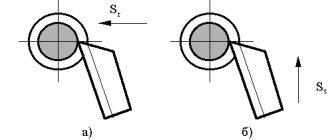
Also, different types of cutters for a wood lathe differ in design. The working part can be straight, bent, drawn or curved. The choice of one or another type of cutter is determined by the wood processing method, cutting characteristics and equipment. By the way, the parameters for integrating the equipment into the fastening zone also determine differences in the design of the shank. Modern machines focus on versatility, that is, the ability to work with rectangular, round or square holders. Moreover, in this aspect, differences between cutters for metal and wood are most often not made.
Criteria for choosing tools for wood processing
If you want to master the amazing technique of wood carving with your own hands, then you need to start by choosing the right tools. It is best not to purchase cheap products; first, you can buy several high-quality copies and only then gradually expand your collection. Initially, you will need one medium-sized jamb knife, as well as five chisels: one flat, several semicircular and angled ones with different blade curves. To definitely avoid mistakes when choosing, it is important to adhere to the following rules:
- The blade must be well-hardened and durable, without traces of rust or other possible defects.
- It is best if the handle is made of wood or plastic. But the first option is more practical, since the plastic handle fits rather poorly in a wet hand.
- The cutting part must be securely fixed in the handle without possible backlash.
- Tool handles should be smooth, without cracks or burrs.
- Many manufacturers produce jambs and chisels with anatomically shaped handles. Such models are equipped with a special selection for fingers, which is not always convenient for novice craftsmen.
- The manufacturer also plays an important role. Today on sale you can find tools for wood processing from foreign and domestic companies. But it is better to refuse Chinese fakes, as they are short-lived and dull very quickly. In order not to overpay extra money, it is better to consult with a specialist.
Read also: Assembling a power panel for 3 phases
How do you make cutters with your own hands?
As you can see, the cutter is designed quite simply, and an ordinary lathe can easily be equipped with a homemade analogue. Typically, such products are created on the basis of files and rasps. Home craftsmen only remake them to fit the format of specific turning equipment. You can also use car springs or sections of reinforcing bar as a basis. But in such cases, more effort will be required when finalizing the shape of the element.
Next, homemade cutters for a wood lathe are carefully mechanically adjusted to the required size. This is the first sharpening during which the working edge will be formed. The disadvantage of a homemade cutter is that the workpiece may have internal defects resulting from previous use. The same file, after long-term use for its original purpose, due to stress in the structure, is often endowed with voids, which reduces its working life.
Other hand cutting tools
In addition to chisels in carving, other general purpose woodworking tools are used:
- Typically, three types of knives are used in work: with a folding blade, replaceable and fixed. They are used to work out details.
- There are different types of hand saws used, it depends on the task they need to perform. A bow saw is often used. Excess wood is removed with a saw and curved lines are cut out.
- A scraper is used to quickly remove bark and excess wood for subsequent finer processing. This tool is ideal for making cups, masks or spoons.
- Shaped processing of wood, giving the workpiece a special shape - this is the purpose of a molding plane. The plane's cutters have shaped edges and a multi-stage sole. It is installed depending on the profile shape. Other types of planes are also used.
- A planer cuts wood as cleanly as a planer. It is designed for processing curved elements and in some situations it is the only tool that is suitable for solving the task.
- Abrasives are rasps and files that smoothly and, most importantly, quickly remove excess wood. The surface of the tools can be smooth, medium or rough. To penetrate hard-to-reach places, abrasives of various shapes are used, in which the teeth are placed on both sides of the blade.
- A sharp steel scraper leaves the finest chips and a clean surface after work. It is also used to remove dirt or glue stains.
- Many carvers use hand drills and rotary hammers in their work. They are silent, lightweight, easy to use and absolutely do not depend on electrical energy.
- Although experts use glue or tenon joints to create a work of art, a set of hammers is also indispensable.
Read also: Is it possible to connect an oven via an extension cord?
Special devices
There are special tools that are included in the basic set for wood carving:
- Mallets. This tool is necessary when working with chisels across the grain, with large workpieces or on hard wood. The mallet has a round head, which allows you to hit the chisel at any angle. They are made in various diameters from 75 mm to 150 mm and are classified by weight.
- Tesla. The tool is designed for quick removal of waste during rough processing of the form. They are produced with a round and flat cutting edge. The round shape is convenient to work with when cutting out concave containers.
- Mints. This tool presses out small depressions in wood and is used to create a speckled pattern or create a surface that imitates ripples.
Why is cutter sharpening important?
The need to perform this operation, at first glance, is similar to sharpening kitchen knives. A sharp blade handles cutting tasks more efficiently, requiring less effort and time. But in the case of machine tool correction, there are other technological nuances. High-quality sharpening is a preventive measure that eliminates the risk of the working head falling off during operation.
In addition, negative deformation phenomena in the form of chipping and scuffing are prevented. Obviously, the quality of the work itself on a wood lathe also improves. Correctly sharpened cutters form even grooves and grooves, not to mention shaped operations. Other factors affect the quality of work, but the sharpness of the tool tip is key to achieving optimal results.
Self-made cutter
To make a high-quality wood cutter at home, you need to follow these steps:
- Making blanks for a knife for a cutter. It is best to use an old circular wheel to create blanks. The metal must be cut using a regular grinder into small rectangular strips measuring 20x80 mm. It is worth noting that each strip can be turned into a good tool cutter in the future.
- Giving the correct shape to the main incisor. In order for the part to acquire the desired shape, it must be carefully ground. The procedure can be carried out in two ways: by forging or by sharpening on a machine. Forging is necessary to create the correct bend, and turning is necessary to obtain a good shape for the cutter knife.
- Correct sharpening of cutters for hand tools. To properly sharpen a knife, you will need a regular grinding machine with a fine-grit working wheel. The part itself must be held at an angle of 45 degrees. Depending on the total length of the cutter, the sharp part of the tool should be 20 or 35 mm. The knife itself can be sharpened not only manually, but also using specialized equipment.
- Making a handle for comfortable operation. To prevent wood carving from causing discomfort, it is necessary to make a high-quality wooden handle. Depending on personal preferences, the handle can be made manually or on a special machine. If you chose the first option, then after planing the product must be sanded with sandpaper.
- Connections between the knife and the handle. The metal cutter must be carefully inserted into the handle. To do this, you will need to drill a hole 20 or 30 mm deep in the center of the wooden handle. The blade of the cutter should be located outside, but the base itself is carefully driven into the handle. Separately, it is worth noting that for reliable fixation at the end of the metal workpiece, it is necessary to provide a special point in the form of a thin needle. At the moment of forgetting, it is advisable to use a guard made of thick fabric, so as not to dull the working blade of the knife by the end of the procedure.
- Installation of a crown for quality carving. In order to secure the manufactured knife, it is necessary to install a special metal retaining ring. A hole is cut out on a wooden handle, the contour of which corresponds to the size of the ring. Then the thread is made and the crown itself is secured. At the end of this procedure, the wooden handle should be crimped and the cutter should be securely fixed inside the product itself.
- Grinding the knife. In order for the process of wood processing to bring pleasure and good results, you need to bring the blade to readiness. For these purposes, it is best to use a small sharpening stone or simple ceramics. A little lubricant should be poured onto the surface of the sharpening product (motor oil can be used), after which the cutter can be safely sharpened perpendicularly.
After this, you are guaranteed to get a sharp tool, and if you sharpen the cutter correctly, then the wood carving will be of better quality and faster. If necessary, the cutter can always be upgraded and slightly modified.
Modern tools and wood processing technologies are directly dependent on each other. That is why, when purchasing specialized cutters, it is important to take into account not only the manufacturer’s brand and declared performance characteristics, but also the scope of their use. Standard and inexpensive kits are most suitable for minor household repairs and the creation of simple products. Professionals will require more advanced and versatile tools that will make the process of processing wood workpieces faster and more comfortable.
And those who have already gained the necessary experience can make their own wood cutters, filling their collection with the most diverse and unexpected elements.
Knives for wood carving are a must-have accessory in the arsenal of a craftsman who makes decorative objects from natural wood.
Such tools can have different types and shapes, which directly affects the specific processing of individual parts. The most famous cutter, which is very popular among our craftsmen, is the Bogorodsk knife.
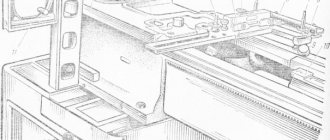
Sharpening equipment
Since the cutter is made on the basis of tool steel, its sharpening must be carried out on high-power equipment. For such needs, boring machines are used in different configurations. The basic structure of the design includes two base clamps and a retractable hand rest with a V-shaped stop. As an addition, adjustable hand rests can be used to expand the possibilities for securing the workpiece.
For example, if it is necessary to modify a bevel cutter for a wood lathe, then an appropriately shaped attachment may be required. In this case, an adjustable hand rest will help. But most often, universal holder models are used, designed for a wide range of standard cutters. The fixing base is usually attached under the elements that perform sharpening. The relative position of the functional sides in this part is determined by the sharpening parameters. Modern models of sharpening machines also allow you to service scraper blades, planer and chisel equipment.
Electrical tools
Modern carvers widely use electric wood tools, which are lightweight, functional, and portable:
- The electric drill is the main power tool in the market. Drills are produced both mains powered and cordless. Many people, out of habit, purchase a powered tool, although cordless models are more convenient to use. They are lightweight, quiet, and have removable battery packs or come with wall stands with a built-in charger. The range of use of an electric drill is expanded by all kinds of accessories for it.
- An electric jigsaw is a tool that works like a hacksaw and an openwork, or bow, saw. Modern designs are equipped with electronic speed control, the engines are highly balanced and have little vibration. All jigsaws are designed so that the saw blades can be easily changed. A wide variety of different types of wood saws with special tooth configurations are produced.
- a circular saw or circular saw when he needs to cut wood in any direction, quickly, accurately and safely. The main thing is to choose a tool with precise guides and reliable saw blade guards. Some models have a built-in electronic control system that provides a smooth start when turned on and selectable speed.
- An electric planer is ideal for quickly adjusting workpieces to size or for trimming. There are several types of knives that simply change if both edges become dull. The knife block is protected by a barrier, which prevents not only the worker, but also the knives from damage.
- Using electric grinders, you can prepare the surface of a product for polishing or varnishing. There are belt and disc vibratory sanders.
- A manual electric milling machine has taken the place of planes, chisels, tongue and groove sheets and folding tapes. With its help, edges and grooves are cut out in a wooden workpiece, quarters are selected, and chamfers are removed.
Sharpening with abrasive wheels
A sharpening machine is only a technical basis for organizing the mechanical interaction between the tool being processed and the abrasive. Sharpening is carried out with discs made of electrocorundum when they rotate at a frequency of about 3000 rpm. The abrasive can be made from other materials of varying degrees of hardness, but in any case it must prevent overheating of the cutting edge.
For example, in some cases, low-frequency sharpening at 2000 rpm using a 20 cm aluminum oxide wheel is recommended. This results in a kind of “soft” sharpening effect, which is beneficial if you are using a medium-format or low-power wood lathe. How to sharpen a cutter with an abrasive disc? Experienced craftsmen recommend sharpening with slight pressure of the tool against the rotating disk. At the same time, uniformity must be ensured, which is achieved by moving the blade from side to side. If you use a machine with a retractable tool rest, then it is important to ensure that the contact patch between the abrasive and the cutter is located higher than the axis of rotation of the wheel.
Making a wood turning tool from an old file
Turning belongs to the category of those that require the smallest number of tools. Indeed, having acquired several basic incisors, you can do a lot of work. Further expansion of the “park” of tools allows, mainly, to increase the convenience and speed of work. Of course, there are several highly specialized cutters, chucks, and rear centers, which, in their field of activity, are quite difficult to do without. But these works, sometimes quite exotic, and such products, such as turning things with a shifted center of rotation, are not of interest to everyone and look more like a fun experiment than an example of beauty. Well, or as a sort of demonstration of skill. The same goes for extra-large and extra-small products. Super thin and super long. All this touches the mind, but not the soul.
Craftsmen often make turning tools for woodworking on their own - partly because of the relative simplicity of the process, a third of which is occupied by close and familiar woodturning, partly because of the high cost of good finished tools. When designing such a tool, it is very important to acquire a suitable piece of hardware - shape, grade of steel. And here, old, worn-out files work quite well. For metal.
Everyone, from us to almost one-year-olds, was taken to the Tolkova to the point of bleeding, And in the basements and semi-basements, the children wanted to go under the tanks. They didn’t even get a bullet, Don’t worry about living in your craft. Neither dare, nor risk, but they took a risk - Make knives from files.
“Ballad of Childhood”, V.S. Vysotsky.
The file blade has good steel for our purposes, good factory hardening, you just need to choose older specimens as blanks. With the current ones, only the surface is hardened. Carefully avoiding overheating, having cut the workpiece into the desired shape, you need to sharpen it and provide it with a comfortable handle, that’s all. In this case, a whole layer of complex heat treatment work is omitted.
Thus, quite a few shapes of cutters and cutting inserts for special holders can be made from old files.
What you will need for work.
Tools
A set of metalworking and marking tools. An angle grinder, preferably a small one, is much more convenient for it to perform small and more or less precise work. Abrasive wheels for it are thick for “cleaning” and thin for cutting. Obviously, ear protection and goggles. An extension cord came in handy. Large bench vise. For pouring water over the workpiece, it is convenient to make a “sprinkler” from a soft plastic bottle by melting several small holes in the cork with a hot wire. Alcohol-based, water-resistant felt-tip pen for marking. Tool for sharpening - electric sharpener, abrasive wheel.
Materials
Actually, the file itself, of a suitable size and profile, a finished handle or materials for its manufacture - a block blank, a piece of a thin-walled tube of a suitable diameter. LMB, brush.
So, first of all, we decide on the shape of the cutter and select a suitable file-blank; as already mentioned, the older ones are now hardened differently during manufacturing. Below, we show the production of a fairly powerful cutter for end turning; however, in some places it is convenient to use it for regular turning, in the centers.
After selecting a file, it is better to sharpen its surface; I have also seen “lazy” cutters, with a notch - not very beautiful and not particularly pleasant to hold with your hands. And considering that when turning with a ready-made cutter, you will still have to hold on to the piece of iron with one (naked, gloved) hand all the time, it is better to go the extra mile. Grinding is best done with an angle grinder, turning it “away from you”, sort of like working with abrasive wheels on Velcro or with petals. In this case, it is convenient to secure the workpiece with a small clamp, periodically rearranging it. The disk is thick corundum, for cleaning. The main feature is to prevent overheating and tempering of the workpiece metal, otherwise all factory hardening will be a waste. An angle grinder is a resourceful tool and it’s as easy as shelling pears to burn through a piece of metal. Here you should prepare yourself in advance for a long fuss. Literally a few movements of the tool and watering, a few movements and watering. And so on until the desired condition. Overheating can be determined visually by the color of the tarnish - the first will be brownish. But this is already an accident. The processing time should be shorter the closer the tool is to the edge or thin parts of the workpiece. It won’t hurt to sometimes touch the piece of iron being processed with your finger to check whether our watering can cope with the excess heat; if you can’t hold your hand, let’s go have tea with chocolates - you deserve it. If the workpiece is not hot, it’s ok, you can still sharpen it.
Having ground off the teeth, we mark the cutter piece on a smooth surface. An alcohol marker works great. We take into account that the cutter is gradually shortened during periodic sharpening, but too long a piece of iron will force the turner’s hands to be in an awkward position when working, and the “weight distribution” of the cutter, especially a large one, will be unpleasant.
When sawing out a cutter, it is convenient to use a large vice. We replaced the disc with a thin cutting disc; discs with a thickness of 1 mm were used. When cutting, everything said about overheating and discoloration remains valid. We are closely monitoring this matter - the further we go, the more upsetting it will be to throw away an almost finished piece of hardware.
The iron is cut out where necessary, we round off the sharp edges and sharpen the flaws. Order. The most tedious part is done, all that remains is the handle and sharpening.
The handle of turning cutters is unique and, above all, quite long - for safety, and generally convenient. There are different forms of them, let's take a look at what Robert Sorby, a locomotive in the manufacture of cutting tools for woodworkers, makes.
Here he found a small plate with an assortment of handle sizes, you can choose the right one. The handle is turned from wood - beautifully from the wood of fruit trees, simply and cheaply from birch logs without knots. It is recommended to make the handles from maple - it is less “straining” on your hands, but here, you do not need to apply significant force to the instrument.
So, we decided on the dimensions, selected the wood, and turned it. Turning is simple, “in the centers”, without any special tricks.
Decorative rings, if desired, can be applied with iron wire. A simple tool is made - a small piece of wire, to the ends of which handles - short sticks - are attached. The wire is pulled by hand and pressed against the rotating part in the desired location. To prevent the wire from “scouring” the part, especially on “descents,” a small groove is made with a jamb knife. After some time, the wire at the point of friction heats up and burns the wood, while simultaneously “eating away” the groove. The decoration can be sanded, the charred mark remains in the groove.
After sanding, the handle was varnished. There are different opinions on this matter; choose a turner. I made a metal ring from a thin-walled steel tube - a handle from a broken mop with a lever for squeezing a sponge-rag. The steel is quite thin, but the ring here is rather decorative - I prefer to glue the piece of iron in rather than drive it in. Lokomotiv-Robert, he still hammers the iron, his rings are bronze. It's certainly more beautiful.
At the end of the handle, I drilled a deep hole with a long drill of a suitable diameter, then drilled it half the depth with a thicker drill, ensuring that the shank of the piece of iron fits into this hole with some effort. Prepare the required volume of epoxy glue. It is very convenient to use trays from “boxed” chocolates. One “seat” is cut off with scissors, and the glue components are mixed in it. Afterwards, the tray is thrown away without regret. Use a long stick to lubricate the walls of the hole and the shank of the piece of iron. We attach the handle, remove the excess glue that appears, or add it with a stick if the hole is not completely filled. The cutter with the glued piece of iron is installed vertically, preferably in a warm place - polymerization of the glue will occur faster, its strength increases. We don’t throw away the tray with the remaining glue and the stick for now - this is a control sample, it’s convenient to judge the “setting” of the glue without disturbing our cutter.
After the epoxy glue has completely hardened, all that remains is to sharpen the cutter. Here, too, options are possible, for example, different apex angles, cutting edge angles. The latter should not be made too sharp, otherwise the cutter will dig into the workpiece too much and will be difficult to control. The cutting edge will quickly become dull. The angle of the top, for universal use, is convenient to make less than 90 degrees.
It is better to do the initial formation of the cutting edge on an electric sharpener, not forgetting about cooling, and final finishing on a low-speed abrasive wheel. The icing on the cake is polishing the blade on a leather surface with GOI paste.
Babay Mazay, 2016
Finishing the characteristics of the cutter
This is a more precise operation performed on machines with diamond wheels. This sharpening method is most often used when it is necessary to remove obvious defects. For example, if a wood lathe cutter has burrs, cracks or nicks. In this case, the working process is carried out under mechanical control. That is, the tool being processed is fixed in a vice and controlled by a hydraulic or electric drive. The operator adjusts the cutter displacement parameters in accordance with the requirements for its correction parameters.
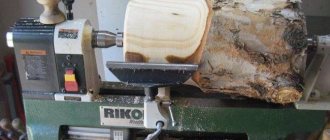
Installation of a wooden blank
Hand tools for wood carving are very sharp. Therefore, it is important for safe operation that the workpiece is secured. They use both special fixing devices or standard clamps, as well as those made independently.
You can do carving on a table, a special stand or a carpentry workbench..
When sculptural cutting, the main condition for comfortable work is the ability to quickly change the angle of the product. To do this, use a special rotary clamp, with which you can quickly change and fix any angle of the workpiece.
A bench vise can be used for wood carving by installing soft jaws on it so as not to leave traces of the metal sponge on the future product. A standard carpenter's workbench vice can be used if you attach a clamp to it, which will continue to hold the workpiece.
For clamping a flat workpiece on the surface of a stand or workbench, a carpenter's quick-release clamp will be convenient. A gasket must be placed between the product and the clamp. Bench stops can be used for the same purpose.
A woodcarving vice is similar to a bench vice , but is made of wood rather than metal. They have thicker cheeks, which are covered with leather or cork to prevent damage to the product. A model vice is an analogue of a metal vice. They have large, wood-lined cheeks that can swivel.
For rigid fastening of workpieces on a stand or workbench, a workbench screw is used. The threaded end of the screw is screwed into the wood, and the other end is secured with a nut through a hole in the stand or workbench.
The carver's stand is a wooden workbench that consists of four massive legs spaced out for secure support and a thick surface. The surface is drilled in order to use fixing devices on it. For stability, the stand must be made heavier by attaching additional weight to it.
General recommendations for sharpening
Even before starting sharpening, the condition of the machine and the grinding wheel should be carefully checked. When working manually, the cutter must be supported on a handy support part, and not supported by weight. As a rule, the tool rest itself is installed 3-5 mm from the abrasive disc. To eliminate the risk of critical overheating, sharpening of cutters for a wood lathe is carried out with periodic cooling with water. This also avoids the formation of small cracks that occur under extremely high thermal loads.