A situation may arise that a home craftsman will need to carry out simple turning work on wood blanks, which will not require the purchase of professional equipment.
Since it is quite possible to independently assemble a wood lathe from a drill and improvised means. This article will help you understand the manufacturing process and understand how it works.
Lathe - what is it, and is it possible to make it yourself?
This device allows you to make various products and blanks at home - sticks, barrels, cylinders. They can be used in repair or construction. Often such elements are used to create decorative products. They can also be used in modeling.
Purchasing a large lathe is not always necessary. It has a high price and large sizes. Making a wood lathe with your own hands from a drill is simple and accessible.
The principle of operation of such a device is simple. To begin with, the workpiece is cut into the headstock chuck. In this case, the tailstock fixes the product along its length. Then you need to install the tool rest, turn on the drill and start turning the part.
Mechanism assembly sequence
We assemble the machine frame using channels and beams. The larger the parts you plan to work with, the stronger the materials the frame should be made of.
To produce the headstock, we will need a hydraulic cylinder with a wall thickness of 6 mm or more. We press 2 bearings into the cylinder. Using large diameter bearings we lay the shaft.
It is necessary to fill the lubricating fluid into the hydraulic booster. Then we install the caliper with guides and pulley.
We install a tool rest to give the cutter stability. At the bottom we attach a small strip of metal, which makes the working part wear-resistant.
Device
Any lathe includes a certain set of components that should be in a home device.
bed
This node represents the base. It ensures reliable fixation of the elements and their correct placement. The stand also makes the device stable.
Headstock
This part of the device fixes and rotates the workpiece secured in the chuck.
For reference! On small homemade devices it moves along the guide elements of the frame.
Tailstock
It is a moving part that fixes and presses the workpiece to the chuck. This is carried out during processing in centers. This element must have perfect alignment with the spindle assembly.
Caliper
On small machines, the support function should be performed by a tool rest. It is important that it moves along the guides of the frame and is well secured in the working position. On small machines, this fragment serves as a stop for the cutters.
When manufacturing a device, it is important to consider its design
Main components
The most important components of such a device include
- Bed;
- Electric drive;
- Front and back headstock;
- Stand for accessories.
Selecting materials to create a device
To make the device you will need:
- Electric drill - performs drive functions. It must be fixed to the wall of the front support.
- The support should preferably be made from boards and beams. The best option would be a product in the shape of the letter T.
- Supports - they are made of metal corners or beams. The materials used affect the strength and reliability of the machine.
- Bed - can be made of steel. This will make the tool more reliable.
Choosing a bed
When purchasing, you do not need to rely on the manufacturer. Now there is a lot of low-quality equipment on the market, so when purchasing a machine, it is worth carefully checking the design.
Manufacturers offer the buyer a large number of different types of drilling machines:
- Radial drilling.
- Vertical drilling.
- Horizontal drilling.
- Multi-spindle.
Size, type and quality will affect the price of this equipment.
Products with plastic inserts can be immediately added to the blacklist, because the machine will beat, move the drills to a distance of 0.5 millimeters, and it will grow with each hole made. We check the existing console for play. It is best that its play is insignificant or absent altogether.
Options for homemade machines
To make a lathe, it is recommended to perform a number of actions:
- Attach elements that will regulate the interval from the table to the chuck. You can use boards for this.
- Make a back support from wooden beams. In their design, it is important to provide a screw that can be adjusted.
- Make a tool rest from wooden blocks. You need to attach a rail to it. Its length must coincide with the interval between the supports.
- Provide a button that will put the device into operation. To do this, you need to transfer the contacts to a new button or block the regular press. In the second case, the device will start when the plug is plugged into the socket.
There are also various types of device modifications:
- The base can be a beam or a metal structure.
- To secure the drill, you can use 3 pieces of plywood in the shape of the letter P.
- If you have a welding machine, you can make the tailstock yourself. This will require several nuts, bolts, and bearings. You also need to take sheet steel and short pipe fragments.
Emery from a washing machine motor
What's good about Soviet washing machines is that they were equipped with reliable electric motors
Another advantage of using such motors for a sharpener is the low power and shaft speed, and this is important for an emery grinding wheel, which at high speeds can simply crack upon contact with the tool being processed. Good weight and power supply from a 220 V network are also convenient: in the first case, the emery will be stable without the use of additional attachments, the second indicator saves the master from the need to assemble the starting unit for the emery: it can simply be taken from the washing machine
Sandpaper from a washing machine engine is in no way inferior to factory models. And if in the case of Chinese technology one can still doubt the longevity of the product, then a homemade design, where every detail has passed through its own hands, will indeed be an indispensable assistant for many years.
What you need
To make emery with your own hands, you will need certain tools and materials. The simplest design eliminates the need for welding and turning, which allows it to be manufactured by almost anyone. Set of necessary tools:
- a jigsaw or a regular wood hacksaw (it’s better if the hacksaw is a packaging one);
- electric drill with a set of drills;
- screwdriver or shaped screwdriver;
- Angle Grinder;
- soldering iron 100 W;
- small chisel;
- a square with one of the angles at 90 degrees;
- calipers;
- drawing compass;
- drawing pencil and tape measure;
- metal scissors;
- bench vise;
- a piece of 150 grit sandpaper.
Set of necessary materials and equipment:
- model of a Soviet electric motor from a washing machine with capacitors;
- toggle switch for loads up to 1.0 kW;
- cord with socket 2 meters long;
- small sharpening stone with a mounting hole diameter of 32 mm;
- chipboard slab measuring 0.5x0.5 meters and thickness 0.02 meters;
- multilayer plywood measuring 0.15x0.15 meters and thickness 0.01 meters;
- timber measuring 60x60 mm and height 0.2 meters;
- wood screws 50 and 20 mm with a press washer;
- galvanized sheet 0.5x0.5 meters in size and 1 mm thick;
- rubber stoppers for antibiotics in the amount of 4 pcs.
Which engine to choose
As mentioned above, the parameters of the washing machine motor must meet certain criteria. Taking the first engine you come across and building an emery structure around it is not very practical if in the end it turns out that it will be impossible to work on such a machine. Therefore, craftsmen with practical experience recommend proceeding from the following points when choosing an engine for making emery with your own hands:
- the most common models among Soviet engines that are used to make emery are the motors of such washing machines as “Malyutka”, “Sibir”, “Volga” or “Vyatka”;
- the recommended engine shaft rotation limit is 1500 rpm;
- It is advisable to take the power no lower than 100 Watts and no higher than 1000 Watts, the most famous motors have a power within 400 Watts;
- if the engine has support legs with holes for fasteners, this is welcome;
- The engine of the future emery must be designed for a voltage of 220 Volts.
When removing the engine from the washing machine, it is important to remove the entire starting circuit along with it, so as not to separately select and buy capacitors for the emery. If the engine does not have support legs, this will not prevent it from being installed in the structure
It is important here that it has studs, by means of which the body of the unit is tightened: by attaching it to these studs, the motor will be installed on the emery.
How and from what to make security elements
The protective casing in the emery is an extremely important design element. It serves as a protection against possible injuries when the grindstone breaks, and also prevents sparks from getting into the eyes and onto nearby objects. Also, if you take motors from washing machines, then in some of them the stator winding may be open and it must be protected from abrasive and other foreign particles. It is impossible to seal the engine housing, as this disrupts the cooling mode of the unit and it may fail. In this case, the protective casing also plays an important role, simultaneously protecting the emery motor. The most convenient way to make a protective casing with your own hands is to make it from galvanized steel. It is not necessary to make it round, following the contours of the working grinding wheel; it is easier to make it in the form of a truncated cone, where the upper part is slightly larger in size than the diameter of the stone. The easiest way to attach such a casing is not to the engine, but directly to the emery support on which the motor is mounted.
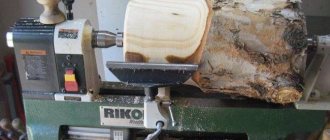
Practical examples of a homemade lathe
To make a simple machine, it is important to ensure the alignment of the drill shaft with the support tip. It can be placed on a frame made of durable plywood. It is not necessary to use a spindle. It is quite acceptable to clamp thin workpieces in a drill chuck. For larger items, you can make a special washer plan. The drill itself is supported by a special bracket. This helps prevent vibrations.
The stop for the incisors must be movable horizontally and vertically. The tailstock is not vertically adjustable. In this case, horizontal fine adjustment is carried out using a screw.
Note! The main advantage of this design is the ability to use the drill for its intended purpose. To do this, it needs to be dismantled.
Additional nodes
Additional components allow you to make the machine more functional, for example, to be able to drill holes at an angle, perform some kind of turning or even milling operations. For example, to provide the latter, you will need an attachment that will allow you to move the part horizontally. To do this, the horizontal table is given mobility, and a special vice is mounted that will clamp the part. For example, it could be a helical gear that is activated by a handle, or a regular lever drive that is activated by a handle. In other words, a second stand is installed on the machine, but horizontally, and a vice will be placed on it instead of a drill.
You can drill at an angle if you use an additional rotary plate with holes placed in an arc. The carriage will move along with the drill on this rotating axis, and the axis itself will be fixed to the frame. The holes with which you can fix the position of the working head are usually cut at an angle of sixty, forty-five and thirty degrees. Such a machine, equipped with a rotating mechanism, can also be used for turning operations if the additional plate is rotated horizontally.
Next, in a circle on the additional panel, you need to drill holes at angles that are measured using a protractor. At the next stage, the holes for the axes of both parts are aligned and fixed with a fin. Then you will need to drill three holes through the additional panel on the rack, and fix the first one at the desired angle with pins or a combination of screws and nuts.
How to make a stand for a drill with your own hands, watch the video.
Is it possible to make this on metal?
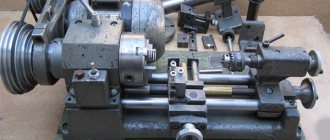
To make such a device, you need to take into account that the power of the electric drill will be small. In addition, the lathe is made exclusively of metal. In any case, it can only be used on soft materials such as copper, aluminum or bronze.
Important! Instead of a drill, you need to use a powerful and professional tool. Household devices break down too quickly.
The metal cutting machine must be more powerful
Make or buy?
An electric drill is a ready-made drive, gear, spindle and chuck in a monoblock. Place it on the carriage of the machine and you can drill. In terms of accuracy, the solution, generally speaking, is not optimal (see below), but in many cases it is acceptable, but eliminates the need to order expensive turned parts of increased accuracy, see below. In view of this, frames for installing drills are now sold only on the street from trays; prices are affordable. When choosing one to make a drilling machine from a drill, be guided primarily by the operating mode of the equipment; The price also depends on it:
- Occasional drilling/milling for yourself with the accuracy of what you get - cast plastic bed or stamped steel. The feed mechanism is lever with a cranked lever (see below). Carriage sliding bearings (see below) are steel on steel or with nylon liners. Prices are $20-$30.
- Regular drilling for yourself or to order with ordinary machine-building precision. The materials processed are up to the hardness and toughness of ordinary structural steel. Everything is the same, but the sliding bearings are steel on steel (worse) or with bronze bushings, and the frame is cast iron or (more expensive) composite, also vibration-absorbing. Prices: $30-$40.
- Regular drilling and milling of any materials that can be tooled with periodic overloads of the tool and/or with increased accuracy - plain bearings are only bronze on steel, cast iron frame. The feed mechanism is rack and pinion (see below); vibration-absorbing console. Prices: $60-$180.
Choosing a bed
The stand for the drill (which sellers for some reason stubbornly call stands) must be chosen not according to - not “China”); Now the market is full of “German China”, not to mention products from post-Soviet states. The design needs to be checked.
First, samples with plastic non-nylon liners for sliding bearings are definitely rejected: runout and drill drift of more than 0.5 mm will appear already on the 10th – 20th “hole” and will further increase. The second is console play. We take it by the far end, swing it up and down and to the sides while holding the latch. There should be no noticeable “chatter” (the tactile sense of an untrained person feels a beat of 0.4-0.5 mm).
Next is an inspection of the structure, see Fig. below. For regular drilling, the one shown in pos. 1. The ideal option is at pos. 2: collet clamp of the drill, shifting the column to the side reduces the vibration of the console by an order of magnitude, and by turning it sideways by 45 degrees, you can mill the part by hand with the precision “as best you can” on a standard fixed table, removing a couple of table fasteners, because in this case, its manual displacement relative to the horizontal working axis of the console will be linear.
How to choose a bed (stand) for a drill
And here is a sample for pos. 3 do not take under any circumstances. Firstly, the collar of its column is low and its fastening is unreliable. Secondly, longitudinal grooves under the table facilitate manual milling “as it happens,” but, unlike diagonal ones, they do not dampen vibrations of the bed. Moreover, they will concentrate where shown by the arrows (the tide under the column is made too narrow) and from there they will go straight into the column and table.
Popular articles Pharaoh's snake
Which is cheaper?
Bench Drill Press Spindle Drawings
Let’s say the price for the machine you like doesn’t suit you. Or a drill, if it’s a “crowbar” one, with an impact mechanism, that was used in work on building structures and the beating of the chuck is visible to the eye. Then the first thing we do is find out if there is a craftsman within reach who owns a lathe with high precision (no rougher than 0.02 mm). Which, by the way, is not a fact - a high-precision machine is very expensive and never pays off with the flow of regular orders. But let's say he was found. We take the drawing in Fig. on the right, we go to him and ask if he can turn it out of steel no worse than 30KhGSA, and how much he will charge for the work. “This” is the drawings of the tabletop drill spindle. The rest of its parts can be turned on a regular machine, or found in ruins at an iron market or in your trash. Most likely, it will turn out that it is cheaper to buy a bed + table, and if you estimate the costs for the rest, then perhaps a drill of increased accuracy will emerge. There are some of these on sale; they can be recognized by the absence of a striking mechanism and a collar specifically for installation in the frame: a turned steel cuff is put on it.
Rules of care and use
In order for the device to serve as long as possible, it is necessary to provide it with high-quality care. To do this you need to do the following:
- promptly remove waste that gets on the device during operation;
- keep the machine in a dry place, since wooden elements may be damaged by moisture, and metal elements may become rusty;
- promptly change parts when they fail - this must be done before starting the next work.
Making a lathe from a drill is not difficult. To get a high-quality and reliable design, you need to think through all its components and prepare drawings indicating dimensions.
Recommendations for making your own case
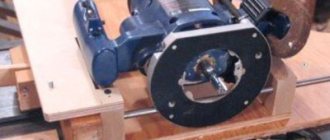
When creating home machine tools, the main emphasis is on creating a solid foundation - a housing or stand. For these purposes, an ordinary board or sheet of thick plywood is often used. It is necessary to drill a round slot in the rack to install the body of the electric drill.
The hole size must exactly match the size of the power tool.
It is necessary to provide for the installation of a tightening bolt on the machine body. After making the slot, a small recess is sawed in the form of a 2 mm groove.
The housing stand is secured to the fixed frame with a metal angle. The drill is placed in the finished slot and secured with a clamping screw.
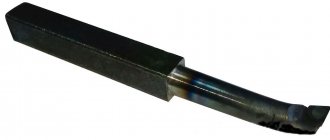
A metal reinforcing bar with a cone-shaped part on one side serves as a blank for the central part of the headstock. At the end of the rod, before the beginning of the tapering part, a thread is cut for an M8 nut.
Tailstock design
The wooden blank of the tailstock part must match the contour of the front stock in shape. And to secure the middle, a steel blank with a sleeve is used, which has an internal thread M 14 x 1.5. You also need to remember to install the M 8 locking bolt. Along the edges of the bushing, you need to cut an M 24 x 3 thread to screw in the nut holding the bushing.
The components of the cutting stop are assembled from rolled steel. The bracket is made from a metal sheet strip measuring 6 x 10 mm. The size of the cylindrical mandrel in diameter is 15 mm; the edges of the bracket are welded to the pipe using electric arc welding. A stop is attached to the stand, like a corner. The assembled mechanism is connected to the workbench with a bolted connection. To install the bolt, a special nut with a wide side is provided, which is attached to the bottom cover of the workbench with screws.
Installing a work piece
Before you begin processing the parts, the wooden workpiece should be thoroughly dried and ground 3 mm on one side for better processing. Two recesses are made at both ends of the workpiece to install the nut. The workpiece is placed between the middle parts of the headstocks and firmly fixed with a stopper.
After installing the workpiece, the cutting stop is moved to a distance of no more than 20 mm from the installed part.
The working plane of the cutter is located at the height mark of the central part of the workpiece.