SHARE ON SOCIAL NETWORKS
FacebookTwitterOkGoogle+PinterestVk
From this article you can learn how to make a metal cutting machine with your own hands at home using the simplest materials. All stages of creating structures based on a cutting disc or grinder are described here in detail: preparation of materials and tools, calculation formulas, detailed step-by-step instructions, as well as related information with useful tips.
A do-it-yourself metal cutting machine will allow you to obtain equipment that is ideally suited to the owner’s needs
§ 22. Technology for manufacturing products from metals and artificial materials
The manufacturing technology of a thin sheet metal product usually includes the following operations:
- preparatory (selection of metal blanks, their editing and marking);
- processing (cutting, bending, hole making);
- assembly (connecting product parts with a seam seam or rivet);
- finishing (cleaning the surfaces of parts, varnishing or painting).
A workpiece made of thin sheet metal must have allowances for processing, since it is impossible to find a workpiece that exactly matches the dimensions of the finished part. Allowances allow you to correct inaccuracies in the operations of marking or cutting a part. However, the allowances should not be large, since the metal used for allowances when processing the workpiece turns into waste. For example, if a tin product has dimensions of 150 x 190 mm, then for its manufacture you should take a workpiece with dimensions from 155 x 195 to 158 x 198 mm (Fig. 101), i.e., the allowance should be 5...8 mm.
Rice. 101. Making a box for small parts: a - drawing; 6 - technological process (1-9)
When making a product from wire (Fig. 102), first select and mark the blanks of the parts from which it consists. Then the blanks are cut and bent in accordance with the drawing. The resulting parts are cleaned, connected to each other into a finished product, which is then varnished or painted.
Rice. 102. Making a screwdriver: a - drawing; b - technological process (1-7)
If you need to make a product from sheet plastic (Fig. 103), then the workpiece is first marked, then the holes of the internal contours are processed. After this, the outer contours are cut out, the surfaces are cleaned and, if necessary, painted.
Rice. 103. Making a number plate for an apartment door (blank - made plexiglass): a - general view (the number and location of the mounting holes is assigned by the student); b - technological process (1-8)
Figures 101-103 show the technological processes for manufacturing three products: boxes for small parts (made of thin sheet metal), screwdrivers (made of wire) and a number plate for the apartment door (made of sheet plastic - plexiglass).
In school workshops, when making a part from metal or artificial material, students usually work according to a technological map (in the form of a table), which sets out the technological process for manufacturing the part.
At enterprises, technological processes for manufacturing parts from metal and artificial materials are developed by technologists.
Practical work No. 20
Development of technology for manufacturing parts from metals and artificial materials
- Read a teacher-provided drawing of a sheet metal, wire, plastic part, or a drawing of a part from your own creative project.
- Write down the technological sequence of manufacturing this part in your workbook (see Fig. 101-103). Compare your notes.
- Determine what tools you will need to make this part and write down their names in your workbook.
Find on the Internet an example of the technological process for manufacturing other parts from thin sheet metal and wire.
Testing your knowledge
- Remember (from the section “Technologies for manual processing of wood and wood materials”) what a technological process and a technological operation are. What operations are used in the manufacture of products from thin sheet metal, wire and plastic in educational workshops?
- How are the technological processes for manufacturing parts made of wood and metal similar?
- What is an allowance for machining a sheet metal part?
- Why is the product cleaned before painting?
Marking
The next stage of preparing parts for welding is carried out manually or using special devices. The simplest devices are a core, a metal ruler and a caliper. The metal surface is pre-primed so that the marks are clearly visible. In continuous production, templates are made, applied, and traced.
There is a distinction between the concepts of “basing” and marking. The first is the creation of a preliminary contour, the second involves punching around the entire perimeter and marking. Basting is needed when using templates. It is first outlined with a scriber, and then the contour is passed with a core. When marking manually, core punching is carried out immediately.
Marking workpieces manually is difficult and time-consuming. Preparation and assembly of workpieces using optical or dimensional cutting is preferable. Marking and marking machines have been created for marking metal; they operate on the basis of optics according to a given program. The core moves quickly, the marked sheet metal leaves the machine at a speed of up to 10 meters per minute.
The marking stage is carried out manually or using special devices
Cutting and primary processing of the workpiece
The fastest way to saw a workpiece is with a grinder with a thin metal cutting disc. If it is not possible to use a grinder, you can use a hand hacksaw for metal
It is important to correctly install the file into the hacksaw. The saw teeth should be directed forward and the hacksaw should cut while moving away from you
Cutting and preparing the workpiece
First, the approximate shape of the knife is cut out using straight cuts. Then the bends are cut out. The easiest way to cut them is with several oblique cuts converging at one point.
It is important to leave an allowance of 2-3 millimeters to the drawn outline. This is due to the fact that when using a grinder, the metal at the cutting site overheats. By grinding off 2–3 mm using a file and sandpaper, you can remove the overheated edge of the metal
By grinding off 2–3 mm using a file and sandpaper, you can remove the overheated edge of the metal.
What exactly are we talking about?
There are dozens of traditional designs of units for precise cutting of sheet, roll and long materials, not counting lasers, etc. from the age of high technology. We will further consider machines with a swinging working module and a round rotating cutting element - an abrasive or saw blade. Such cutting machines are called pendulum. They are the most versatile (including suitable for broaching - making longitudinal cuts of limited length) and can be done independently in a shed and garage workshop. When they say “cutting machine,” in the vast majority of cases they mean a pendulum cut grinder.
Motor or angle grinder?
This refers to the machine drive - separate or combined in a monoblock with a working (cutting) element and a power transmission to it. A separate motor has the advantage that the swinging part of the unit - the rocker (pendulum, rocker arm) can be made properly balanced, which greatly simplifies the work on the machine and increases its productivity; the latter depends relatively weakly on the cutting resistance of the material
In addition, the entire machine can be made suitable for intensive round-shift work, which can be important for those who earn income with hands that grow in the right place and a head that works as it should. An angle grinder (grinder), as you know, can work continuously for 20-60 minutes
(depending on the model), and then forced technical downtime to cool down the instrument. But for occasional use, an angle grinder has a number of advantages:
- A fairly durable and accurate cutting machine from a grinder can be made without turning parts and with a minimum of welding work or without it at all, see below.
- The basic tool remains suitable for manual work outside the machine.
- Power supply – single-phase 220 V from a household outlet.
- Starting devices and protective grounding are not required, because Only angle grinders with double insulation are widely sold.
- The external characteristic of the commutator electric motor of an angle grinder is softer than that of an asynchronous electric motor with a squirrel-cage rotor, which saves motor power and electricity consumption. In most cases (except for cutting thick, strong and/or viscous materials), we can assume that an 800 W electrical angle grinder is equivalent to an asynchronous motor with 1.2 kW on the shaft (see below), and a 1300 W angle grinder is equivalent to a separate 2.0 kW motor. 2 kW.
- Cutting machines made from angle grinders are lighter, more compact and transportable than those with a separate drive.
- Inexpensive angle grinders are not equipped with speed controllers, but a regular speed controller for a drill is suitable for them (no more than $20; usually $5 - $6). A “frequency generator” for an asynchronous motor up to 2.5 kW costs from $50.
About speed control
Why adjust the disk speed? In order not to exceed the maximum linear speed of the edge and/or rotation speed indicated on it. Otherwise, the disc may not rupture, but its performance will drop significantly, wear will increase, and the quality of the cut will deteriorate. The nominal rotation speeds of asynchronous motors 2800-2850 rpm allow the use of conventional disks with a diameter of up to 350-400 mm or more, which gives a cutting depth of at least 150 mm. The grinder spindle rotates much faster (from 6000 rpm), and placing a regular disk with a diameter of more than 160 mm on it is dangerous. The cutting depth reaches 50-60 mm, and the high-speed disc is expensive and wears out quickly. Installing a speed controller solves the problem. Productivity and cut quality do not suffer, because determined by the linear speed of rotation along the cutting edge.
About the name
An angle grinder sounds “technically”, but in fact it is inaccurate, because... The grinder does a lot more cutting than grinding. The “angle drill” is even worse, because... to drill – to drill, bore, for which an angle grinder is generally unsuitable. An angle grinder is a tracing paper from English. "angle grinder machine". But the English word to grind is much broader in meaning than all types of abrasive processing. For example, a meat grinder is a meat grinder. “To grind” does not have an exact Russian analogue; in meaning it is something like “shred into shreds along the back streets.” In general, the colloquial “Bulgarian” is terminologically incorrect, but it is short enough and it is clear what it is.
Advantages and disadvantages
Assessing the advantages and disadvantages, it is worth noting that there are much more advantages. These include:
- Functionality. By changing the working blade and operating power, such a saw can be used for cutting workpieces made of various materials.
- Quality. Most of these tools are made for professional use. Therefore, the quality and service life of such saws is increased.
- Accuracy. The workpiece is cut very accurately at the required angle of inclination, which cannot be done using another tool.
- Speed of work. Thanks to the design of the machine, you can cut a lot of workpieces in a short period of time. At the same time, changing the angle does not require spending a lot of effort and time.
- Easy to maintain. Changing working tools is quite easy, and the necessary parts can be easily found in almost any hardware store.
The only disadvantages include the high cost of the tool. But when used professionally, it is compensated by properties and characteristics. It should also be noted the low quality of discs made by unscrupulous manufacturers
Therefore, when purchasing consumables, it is recommended to pay attention only to trusted manufacturers.
Sequencing
A homemade cutting machine must meet the design features of the disk device. Therefore, before starting work, it is necessary to make careful calculations.
The wizard's procedure is as follows:
The tool being manufactured belongs to the class of dangerous, so first you should take care of the manufacture of protective casings. They will cover all cutting elements of the structure.
The disk will rotate due to the motor, which must be connected correctly - to the cutting element through transmission, to the network through wiring.
The drive has a pulley; it must be mounted on a pre-prepared shaft. The engine and disk are located at the top of the structure, representing a pendulum.
The machine frame serves as a place to place the spark arrester and the workpieces themselves.
After mounting the pendulum to the frame, it’s time for the wiring.
After a trial run, if there are any shortcomings in the work, the elements are debugged.
The electric motor is the most important component, therefore the start and emergency stop elements must be installed in full accordance with the diagram.
Procedure for making your own machine
You can assemble a high-quality machine with your own hands only by studying each of the key elements separately.
Engine
The power of the electric motor depends on how hard the metal will be processed and how often the homemade machine will be used. The optimal power range is from 1.5 to 3 kW. The number of revolutions must be at least 2500 per minute. We must not forget about the required current strength. For a home workshop, the best connection option would be a common 220 volt network. It is advisable to choose an engine with the ability to change the number of revolutions.
Separately, we need to talk about the diameter of the cutting discs. Optimal sizes are from 300 to 400 mm. The larger the disk, the more revolutions it requires for high-quality processing. However, on any consumable, the maximum number of rotations per minute that are allowed during cutting is indicated. Most often, the maximum is at 4400 rpm.
Drive unit
To make the drive, you need to use a belt drive. To make it, you need to find two pulleys that will be equal in diameter. Attach one pulley to the shaft from the electric motor. The second is installed on the drive shaft of the abrasive disc. Next, the shaft of the equipment is fixed on two bearings. The motor must be installed on the back side of the finished pendulum. For this, 4 bolts are used. The fasteners must be installed in slots that allow the engine to be moved by 5 centimeters. This will allow you to select the optimal belt tension. With a moving engine on a homemade machine, it is easier to change consumables and belts.
Console pendulum
The console is a key piece of equipment, the assembly of which determines the accuracy of the cuts. For the base of the pendulum, you will need two bushings, which must be made from a metal square measuring 4x4 cm. Their height should not exceed 10 cm. Holes must be made in the racks to secure the bushing shaft. Next, a rocker arm is welded to it. A surface is installed to secure the electric motor. The lever for lowering the disk to the workpiece is calculated depending on the desire of the person.
Desktop
Principles of making a desktop:
- Make a cut through which the disk will pass while cutting metal workpieces.
- Dimensions are selected depending on the stroke of the pendulum and the diameter of the equipment.
- Additionally, you can build a broaching mechanism.
- Install a side clamp so that you can clamp the workpieces while cutting.
The optimal thickness of a metal sheet for a desktop is about 4 mm.
Homemade desktop
Desktop Design Requirements
The cutting unit must have a working table of optimal dimensions. The required parameters are: 701*1000*900 mm. The table is welded from a corner measuring 25*25 mm, after which it is covered with a steel sheet having a thickness of 3 mm. Slots are made in advance in the sheet at the point where the circle rotates.
A clamp with a rotary clamp and a rotary stop are fixed at the workplace. Such a homemade mechanism allows you to cut products at an angle and perpendicularly.
Any cutting machine for metal requires compliance with a number of conditions during its installation:
- adjustment of the rotation angle is required (its location must be perpendicular to the surface of the desktop);
- the master needs to protect his hands from damage by installing covers around the disk and rotating elements;
- it is important to calculate the rotational speed of the circle in advance;
- equip the handle with an emergency stop button, which, when pressed by hand, instantly stops the operation of the entire mechanism;
- Place the wheel feed force in the cutting zone.
Rotation angle adjustment
Why make a machine from an angle grinder
A cutting machine is a useful and necessary thing, not only in industrial conditions, but also in the household. With this useful tool you can make precise cuts of parts and workpieces. This is achieved by securely fixing the cutting disc, into the spindle of which you can install not only abrasive wheels for cutting metal. A stationary machine can be used for cutting tiles, bricks, marble, granite and other similar materials, using special diamond-coated wheels in the design of the tool. If necessary, such a machine can be used for sawing beams, boards and other wood workpieces.
Many people who have repeatedly faced the need to make an accurate cut of a workpiece want to know how to make their own cutting machine from an angle grinder and available materials. Holding the grinder in your hands, you can also make a precise cut, but it is more difficult to do this, since you have to hold the tool exclusively with both hands. Using a homemade cutting machine, you can not only perform, but also simplify the following work:
- Cut sheet material, such as galvanizing, used for chimney insulation and other purposes
- Cut ceramic tiles and tiles - keep in mind that the cut can only be made straight
- Cut materials at different angles
- Cut a metal profile, pipe, wooden beams, boards, etc.
The manufacture of a machine from a grinder requires an appropriate approach. After all, the tool itself is very dangerous, so the slightest miscalculation can lead to the master being seriously injured. The consequences of working with an angle grinder if safety regulations are not observed are known, so first, before building a homemade product, it is worth noting the following:
- Only with the correct manufacture of a stationary cutting machine can you be confident in its reliability and safety
- If you plan to do it, then you need to calculate every step so that no disaster happens during operation.
- Using a machine is in some ways safer than using a tool while holding it in your hands. However, you need to be aware that an angle grinder is a mobile tool, and making a homemade one is already a violation of safety regulations
- For manufacturing, it is necessary to use materials of appropriate reliability, corresponding to the power and size of the main power tool.
Having dealt with the need to manufacture the machine, you can get down to business.
This is interesting!
If you can’t decide whether it’s better to buy a new machine or make it yourself, then the second option is more preferable, since the cost of a factory device will cost at least 10,000 rubles.
If you make it yourself, you won’t need any expenses, since the grinder is already on the household, and the components can be found in the garage. https://youtube.com/watch?v=3ZogZ3Thre4%3F
Option 2 - how to quickly and easily make a pendulum saw
If you have a welding machine and consumables, you can make a stationary machine from an angle grinder in a matter of hours. Moreover, you don’t need to buy anything for this, since the necessary tubes, fittings and profiles can be found in a garage or a pile of scrap metal. To build a simple cutting machine using an angle grinder as the main tool, you will need to use the following parts:
- Metal profiles measuring 150-200 mm
- Sleeve 10-15 cm long
- Hairpin 20 cm long and 8-10 mm in diameter
- Washers
- Metal corner
- A sheet of metal 2-3 mm thick, which will act as a base
So, to make a simple homemade product you will need to perform the following steps:
- Cut the stud to the required length, then place the sleeve inside (it should move freely along the stud), and tighten the nuts onto the ends of the protruding stud. Tighten two nuts on both sides, since the second will act as a lock nut
- The nuts should not be screwed in completely; they should not come into contact with the sleeve
- The resulting structure should be welded to a steel sheet. In this case, it is important to grab the nuts, and the sleeve must remain mobile, that is, move freely
- At the next stage, it is necessary to make mounts for the grinder. To do this, you will need metal profiles, as well as washers that will act as brackets
- Cut to the required length (it all depends on the tool used, but for a low-power grinder, the profile length is 15-20 cm). Weld washers to the ends of the profiles. It is recommended to use at least 2 mounts for an angle grinder, but three is better
- The angle grinder has threaded holes for connecting the handle. We use these holes to attach the tool to the movable base using pre-prepared brackets
- First, the brackets are attached to the tool using bolted joints of the appropriate size, and then the reverse ends of the profiles are welded to the sleeve. As a result, we get a ready-made machine that can be produced literally within an hour
The photo below shows the design of a homemade machine made from a grinder with a detailed description of the necessary materials. Using the instructions, or for some, a diagram is enough to make a homemade cutting machine. It is important to take into account that a casing for an angle grinder must be provided, otherwise the risk of serious injury increases. Operating the tool without protective clothing, not only on a person, but also on the device itself, is strictly prohibited.
The simplest device is ready for use. The angle in the machine design is used as a guide for centering cutting materials. You also need to make a straight hole in the iron sheet, into which part of the disk will “go” when sawing workpieces.
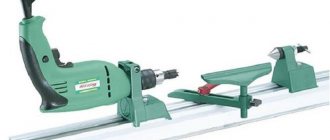
What does a lathe consist of?
Typical design
Even a small lathe weighs a lot and creates vibrations during operation. A reliable frame (1) is required, on which functional units and individual parts are secured. If you plan to create a floor version, use reliable supports of the required length. The final height of the work area should be user-friendly.
The following list contains other components:
- The front headstock (3) houses the gearbox. It is designed to adjust the spindle (4) rotation speed and change the torque value.
- On the reverse side, the workpiece is supported by the tailstock (6). If necessary, taps, drills, and other tools are also installed here.
- In the standard processing mode, the cutters are fixed in a special holder (5).
- This unit is mounted on a support (8). For smooth horizontal movement, a screw mechanism located in the apron (7) is used.
- The feed box (2) drives the drive shaft.
Lathe support
Device
Notes on the drawing:
- the carriage (1) and the entire block as a whole (17) are driven by the running shaft (2);
- the movement mechanism is connected with a special handle (15);
- these slides (3) provide freedom of movement of the upper part in the transverse direction (12);
- it is mounted on a rotating unit (4) with longitudinal guides (5);
- the cutters are installed in the holder (6);
- screws (7/8) are used to secure this part/tools;
- the handle (9) can be used to safely move the cutters at a distance from the working area;
- fastening element (10) of the upper part (11);
- for its precise movement in the appropriate directions, handles (13, 14) with a screw drive are used;
- The flywheel (16) moves the caliper manually.
When studying this part of a metal lathe in detail, it is necessary to take into account the increased loads to which it is exposed during technological operations.
It is necessary to pay attention to the large number of moving components
Maintaining precision requires more than just durable parts. Constant adjustments will help eliminate play to compensate for wear. It is recommended to replace damaged seals with new products.
Tailstock
Main components of the unit
Here and further we will consider projects that are easy to reproduce on your own with clarifying comments. The example in the figure is more suitable for woodworking equipment. To work with durable workpieces for a long time, you should make a support shoe from a steel plate.
In addition to the standard equipment, such replacement devices will be useful
With their help, the basic capabilities of the tailstock are expanded. The author's recommendations suggest removing part of the standard cartridge mount (3). This will allow you to increase the working stroke of the tool and process larger workpieces.
Features of making a lathe headstock with your own hands
Simple design solutions are used to make homemade products.
A belt drive (1) is used here, which is characterized by its low cost and low noise level. For stepwise change of torque, a double pulley (2) is installed. To extend the life of the spindle (3), you need to use a pair of ball bearings. If necessary, holes are made in the housing for periodic filling of lubricant.
As a rule, a metal lathe is equipped with three-jaw chucks
These clamps center automatically without further adjustment. Making such units yourself will cause difficulties. Therefore, you can buy this functional element of the headstock of a lathe in a store.
Models with four jaws are used for processing square workpieces.
How to make a tool holder for a lathe with your own hands
It is better to make the main part of the holder in a collapsible design
This will allow you to make repairs without unnecessary difficulties. Bolts are screwed into the threaded holes to firmly secure the tool. The distance between the plates is determined taking into account the size of the cutters.
A handle is installed on top to quickly turn the unit. This device allows you to quickly change tools for complex sequential processing of workpieces
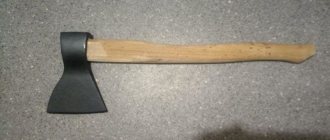
Sharpening two-handed saws yourself or how to simply restore an old long hacksaw
If you have an old two-handed hacksaw Druzhba-2 in the garage, then before using it, it is recommended to restore its integrity
Before using the tool, pay attention to the following points:
- Handles - wooden handles may have dried out over a long period of non-use, so it is possible that they could freely fall out of the holes. You can restore the serviceability of the handles by dipping them in water for several hours so that they swell. You can also machine new handles for the tool, which won’t take a lot of time and effort.
- The presence of corrosion on the canvas - signs of rust should be eliminated, and then treat the device with machine oil
- Sharpening the teeth - after storing the tool for a long time in the garage, there is a high probability that the hacksaw needs to restore the sharpness of the teeth
If there are no difficulties with restoring the handles and removing corrosion, then sharpening the teeth is just the opposite. A large saw requires a lot of time and effort to restore the integrity of the links. However, there is an advantage to this, since large teeth are much more convenient to sharpen. Although the tool differs from an ordinary hand hacksaw, however, the principle of restoring the sharpness of the teeth is similar. A step-by-step description of sharpening teeth on a two-handed saw has the following format:
- First you need to fix the tool. It will not be possible to do this in the jaws of even the largest vice, so we use two corresponding board lengths. We place the boards parallel to the blade, leaving only the teeth visible. If you don’t have a vice, you can use a clamp
- Work should begin with setting the teeth. All teeth must be the same height. You can determine the presence of protruding links by eye, and to align them with the rest, you should work with a flat file
- At the next stage, it is necessary to align the teeth at the same angle of deviation from the plane of the blade. To perform the wiring, you will need a special tool. It is also recommended that you first make a template (layout) to check whether the links are sufficiently spaced (or buy one). The teeth should be spaced 0.5 mm from the plane of the blade or 1 mm from each other. The wiring process is performed one by one. Not many craftsmen know how often to set teeth. According to the rules, it is necessary to carry out setting no more often than 1 time per 5-6 sharpening of teeth
- As soon as the teeth are set apart, you can move on to the final and most important stage - sharpening. For this, a special triangular file is used, the size of which must be no less than the height of the teeth
- Correct sharpening is performed by moving the file away from you with medium pressure against the tooth. In the reverse position, the file should not touch the blade. It is necessary to pass the file confidently, but not quickly
- First you need to go along one side of the teeth, and then along the other. When sharpening, you should also choose the appropriate angle from 35 to 70 degrees.
Finally, all that remains is to treat the tool blade with machine oil and use it for sawing thick logs, trees and even lumber. When carrying out work, it is recommended to follow safety precautions to avoid injury.
This is interesting! If you have mastery of working with a grinder, you can sharpen the teeth with a power tool with an abrasive disc.
Why are cutting machines needed?
Summer cottages always require minor repairs: replacing a greenhouse post that has worn out over time, making a metal fence for a plot of land, repairing a garden wheelbarrow or cart - cutting metal at right angles or with a bevel is always necessary. Making blanks for any metal products is easier and more efficient using the machine.
Using cutting machines, you can cut any materials: steel, cast iron, copper. Cutting is done at angles of 45º and 90º. You can make products with your own hands from pipes of all diameters. As a rule, cutting mechanisms are used for cutting semi-finished products into measured lengths.
Metal processing equipment can also be used to process other materials, eliminating the work of the cutter. The machine, made with your own hands, is compact; it is possible to install it under a canopy, and in winter, move it to the workroom.
You need a flat and hard surface with lighting. A similar corner can be found on the site of any building. All-welded and dismountable equipment designs are used. In order to reduce manufacturing costs, the device can be periodically given to neighbors for temporary use.
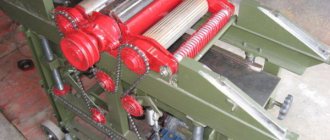
Spun straight frame
The spun straightening frame rotates around the longitudinal axis and transmits bending loads in an overlapping spiral pattern, which ensures a high degree of straightness of the material being passed. The principle is that the circular and longitudinal effect of the die on the wire, transforming it into a spiral or wave, disappears when the wire enters the next die, blocking the hole in the previous one, and as a result, the output is a straightened, straight wire. Straightness depends on various factors, mainly feed, speed and the condition of the correct equipment.
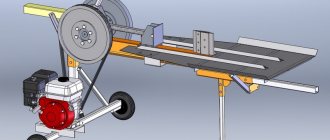
Making a stationary circular saw with your own hands
You can buy a ready-made stationary circular saw from 9 thousand rubles. It will ensure proper work safety and save time on sawing wood. But, you can not spend money and make your own machine according to drawings and blanks.
Circulation saw table
Despite the external complexity of the design, it is not so difficult to assemble it yourself at home. Any stationary saw model consists of several elements:
- table;
- disc with teeth;
- engine;
- adjustable side support;
- shaft
Complete compact installation
To assemble all the parts of the circular saw, prepare:
- metal sheet from 8 mm thick;
- metal corner 45 by 45 mm;
- electric motor;
- disc with teeth;
- ball bearing;
- welding machine;
- block of wood;
- a piece of plastic or leftover laminate.
To make all the elements correctly, you should choose a drawing that will indicate the dimensions of the table for a hand-held circular saw, as well as all other dimensions and materials for the work. Here are some examples of ready-made schemes:
A simple version of the tableDimensions of the disk for home toolsDetailed plan with all dimensions3D model of the table
The assembly of the structure itself will proceed according to a certain plan, regardless of the chosen scheme:
Illustration Sequence of work
The tabletop must be made strong and stable. Use sheet metal according to your dimensions
If you plan to install other devices on the table, then arrange a place for them using thick plywood.
When making a guide for a circular saw with your own hands, pay attention to its height. It should protrude 12 cm above the table
This way you will have the opportunity to process the boards in width and thickness. To make a guide, take two pieces of corner and a clamp.
Make the central saw adjustable in height.
For the motor, mount a separate platform on the same axis with the rocker arm. Fix it with a bolt with a diameter of 1.5 cm. Install a metal plate on the side of the saw, having previously made a hole in it through which the bolt with attached handles passes.
For more detailed instructions on making a stationary circular saw, see the video:
Watch this video on YouTube
a circular saw
We make a circular saw from an angle grinder with our own hands: drawings and production videos
To create a circular saw with your own hands, you need to prepare a grinder engine, a profile rectangular pipe and steel corners. To get a truly comfortable saw, it is worth considering a stop, an axis handle and rods for adjustment.
Here are some do-it-yourself drawings of a stand for an angle grinder. Using them you can assemble a stop that allows the saw to slide.
Option drawing for workAssembled equipment
The order of assembly of the stop will be as follows:
- Several metal angles are required for a standard "T" stop. Place them at a distance of 3-4 mm on each side of the disk.
- The edges at the bottom must be rounded to avoid scratches on the workpiece during operation.
- Attach the corners with cross braces to the bolts and nuts on the front and back. The slots are fixed with washers.
- Place a metal clamp on the body. At the rear, you fasten the elements so that the thrust post and the clamp become one.
- Drill 2-4 mounting holes in the gearbox housing. It is more convenient to do this in the disassembled state of the element.
After assembling the stop, make an axial handle and an adjusting rod. Watch the video on how to make a frame for an angle grinder with your own hands according to the drawings:
Watch this video on YouTube
After connecting all the elements, your homemade circular grinder will be ready. In addition to it, various parts can be made. Here are some photos of DIY circular saw accessories:
A simple stop made from a long wooden beam. A quick version of a table for a circular table. A cover for a disk with teeth. A convenient work table.
Exploitation
Before use, the machine must be installed on a raised table or workbench, this is necessary for the comfort of its use. It is also necessary to make room for cutting, carrying material and storing workpieces.
The Makita LC1230 saw is compact; its installation requires a small area, but do not forget about moving the material and workpieces; as a result, the working area of the cutting saw is a rectangle of 2x4 meters. With a material length of 2–3 meters.
Cutting with a pendulum saw is not a difficult task, but nevertheless requires attentiveness and accuracy. Thus, sparks and hot metal particles flying from under the saw pose a particular danger. Partially, the collar installed on the saw body saves you from them. But nevertheless, we should not forget about personal protective equipment.