An indispensable tool on a hike, a useful tool in your home, a unique assistant for your household - meet the axe. From the simplest to the ergonomic and with a memorable blade shape, only made of wood and steel or decorated with leather and patterns - there are all sorts of axes. And what’s interesting is that everyone is capable of making a homemade ax, even in the form of a Viking military weapon.
Making an ax is a pleasure.
What kind of ax can you make?
Having different purposes of use, the ax takes different forms:
- carpentry – light, with a small blade: used for processing wood and other malleable materials;
- cleaver – heavy and with a conical blade: for splitting stumps and logs of hard wood;
- tourist and its subspecies, tsalda - with a long blade and overall short length: needed to accompany the tourist in his activities and clearing thickets;
- taiga - more tourist and multifunctional: also used for chopping firewood;
- kitchen - with a very durable blade: needed for cutting bones when preparing food and semi-finished products.
Making any of them yourself at home does not require superpowers.
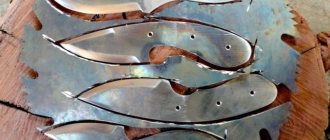
Blanks for gift options
A creative person may get the idea to make a beautiful decorative tool for himself or as a gift to a friend if he suddenly discovers an ordinary old blade in his household.
On the other hand, photos of the best homemade axes seen on the Internet can contribute to this. As you know, the world wide web is today the main source of inspiration.
Having bought a blade of a suitable type at some flea market and found a suitable block, something from which to make an ax handle, a person begins to create.
Step-by-step manufacturing instructions
Approximately the technology for creating an ax is as follows.
Ax design
Homemade axe.
The very first thing is to choose the appropriate shape: the contours of the blade, the geometry of the head and the bend of the handle.
The tool is extremely individual, so it is important to draw a sketch of the ax and find the best option.
After this, the determination of suitable design and materials is carried out. Products from the same material or different ones are possible: an all-metal axe, with an ax handle made of wood or plastic, or even completely made of stone. Each of them is convenient for a specific purpose:
- an all-metal one will be good only in terms of durability and the absence of the need for repairs;
- a metal head and a plastic handle (fiberglass) are good for work not very far from home;
- metal head and wood handle are ideal for hiking and heavy-duty work (wood is highly resistant to vibration and bending);
- an ax made of stone (entirely or just the head) is good for aesthetic purposes, but is not suitable for practical work due to its low strength characteristics.
Head
When an ax is made independently, there is every opportunity to create any shape: a narrow and refined cleaver, a wide and even executioner-looking cleaver, or even a shaped blade.
There are several main manufacturing variations:
- cut off the toe and heel, leaving a narrow blade;
- round the toe and make a cutout on the heel, giving an elaborate and sometimes fabulous shape (the cutout will also serve a practical benefit - it is useful for a short grip with a weak swing);
- cutting the toe to the same level as the butt and building up the heel: the blade becomes elongated, the head has increased mass and higher kinetic energy, making the blow more powerful.
For the latter option, you will need not only a welding machine or forging tools.
It is better to lengthen the blade using a material identical in chemical composition to the base head. The mark and GOST on it will suggest a solution - it is optimal to take axes from the same batch. Otherwise, the difference in the crystal lattices of the materials will lead to the detachment of a new part.
Giving the desired shape is done with a regular grinder. Rounding the corners with an emery wheel.
Giving the correct shape.
Choosing a blank for the head
An ordinary household (carpenter's) ax is suitable as a workpiece. Sold at hardware stores, weighs about 1.5 kg. It is also possible to take something old – one that has been lying around for a long time and is already rusty. The main requirement is the presence of a mark: without it, durability during operation is not guaranteed.
The shape of the eyelet is also important. To securely hold the ax, its best shape will not be round - asymmetrical in the form of a cone or trapezoid.
Drawing with dimensions of the ax head.
Blade material
The blade must be without eyes.
When selecting a head, you should pay attention to the blade. In the presence of nicks and especially cracks, restoration has a chance to leave microscopic tears and imperfections.
They will become fracture sites in the future if the impact is strong enough. In this case, it is recommended to submit the entire head for melting.
It is also recommended to select a workpiece with a straight blade - finishing a crooked tip can take a long time. This operation is considered auxiliary along with sharpening.
Grinding
A smooth and mirror-like surface is obtained by sequential processing with a grinder with a soft grinding wheel and sandpaper from coarse to fine grain. At the final stages, obtaining specularity is accelerated with finishing pastes (such as GOI or others).
Hardening
Heat treatment is carried out in several stages:
- annealing – resetting the crystalline structure and stresses: heating to 750 degrees (to a dark red color) and natural cooling to 550 degrees (to a dark brown);
- hardening - hardening of metal grains: dipping the head (or blade separately) into oil or water for 3-4 seconds;
- tempering - to reduce the fragility of hardened metal: holding for an hour at 300 degrees (not brown, but dark color) with natural complete cooling in air.
The process of hardening an ax.
Drawing
A high-quality pattern on the cheeks is obtained by applying the required ornament or symbols with paint or stain (up to 3-4 layers). After drying, the paintwork is applied using a welding machine - there is a whole technology for this.
Making an ax
After selecting a blank from the desired type of wood and the required length, the shape is given - longitudinal and transverse.
- Bend directly affects the convenience of work - with strong impacts, the curved blade will “play” and take on a significant part of the dynamic load.
- The cross-section is optimally rounded for maximum comfortable coverage and tight contact with the hand. The presence of angles upon impact will not be a very pleasant property of the work - they will be concentrators through which the force will be transmitted to the hand.
Drawing of an ax handle for a carpenter's axe.
Material selection
Wooden handles.
The best materials to use are oak, birch, ash or maple. You should take a completely dried workpiece - if you take a damp one, as the water evaporates, the size of the ax will decrease slightly, resulting in a play in the eye.
The best harvesting method is to cut wood in the fall. The raw workpiece is placed in a dark, but not damp room. Thanks to natural drying, moisture will evaporate evenly without making changes to the structure of the wood. If the wood dries too quickly, it will “lead”—torsion and cracking will appear.
Cutting out the template
A template is applied to the finished workpiece - the shape of the future ax handle, made of cardboard or sheet plastic. Drawing directly on the workpiece is not technologically advanced - the lines will be erased during processing. An important nuance is that the shape is given taking into account the length of the handle: after processing the end surfaces it will decrease slightly.
Cutting out the workpiece.
Hewn out the workpiece
Hewing is performed parallel to the wood fibers. Shaping - with a carpenter's knife, chisel or plane. For future head positioning, the upper part is made wider. During forming, transitions and fillets are created.
The initial design sometimes includes indentations for the fingers, but it is recommended to have fewer unique protrusions that will create grip difficulties during operation.
Grinding the ax
Handle grinding.
Obtaining the required roughness is done with sandpaper - from large number to small number. The resulting burrs must be removed and cleaned.
Over time, the surface itself optimizes naturally; the essence of the operation is to remove traumatic protrusions.
Impregnation with a protective composition
Due to the use of tools in the air and in a humid environment, the wood must be protected with a water-repellent composition. For this purpose, stains, varnishes, waxes and other special products are used.
Their job is to prevent wood from rotting from moisture and the appearance of parasites, which can appear in the ax handle during long-term storage.
Impregnation of wood for protection.
Placing the head on the handle
To install, the top of the ax is cut into one or more grooves for inserting metal or wood strips. The ax handle is wrapped in gauze, which is impregnated with resin or natural glue. The head is hammered onto the handle (with a hammer or other tool), and strips are driven into the grooves. Full depth entry required.
The protruding parts of the slats and gauze are cut off after drying.
Ax head.
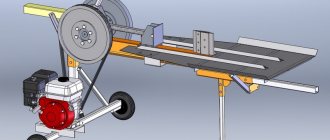
Sharpening
The assembled ax will be ready for use after sharpening the blade. Sharpening at an angle of up to 35 degrees to the blade is considered optimal - this will lead to deep penetration of the metal even into a damp barrel.
The ideal use for this is a sharpening wheel - sharpening the blade by hand will be time-consuming and labor-intensive. When sharpening using a mechanized method, it is very important to prevent overheating of the metal (monitor its temperature and color) and to achieve uniform removal of the excess layer.
The sharpening should be uniform.
Work process
Materials and tools for work
Handmade axes require at least basic plumbing and carpentry skills. We will make a DIY Viking ax from a simple ax that can still be used to chop wood. For this we need:
- A block of wood. No, regular pine or spruce will not work. Below is a list of acceptable breeds. There is one requirement for all of them - there must be longitudinal fibers, not transverse ones.
- Paper with pencil for sketch.
- Wedges.
- Varnish or oil (linseed, tung, teak).
- A small piece of leather or leather substitute.
- Ax blade. Any one will do, even one that is corroded.
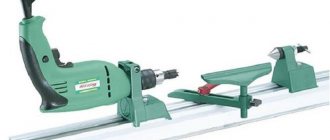
From the tools:
- Angle grinder.
- Welding machine. Regular MMA welding is sufficient.
- Grinding machine.
- Bormashinka.
Separately, we need to talk about the tree. We will need a little bit - a 40x40 block. But what breed? There is a choice:
- Beech. In principle, inexpensive and beautiful material. Of all hardwoods, it is the cheapest. The only thing that needs to be taken into account is the intensity of moisture absorption. It needs to be covered with a thick layer of oil.
- Oak. Probably the best material for a handle. Strong, durable, reliable.
- Maple. Its advantage is elasticity. Where oak cracks under stress, maple will remain intact. By the way, one of the most beautiful types of wood.
- Ash. The hardest rock of the list, and inexpensive.
Now we can make a Viking ax with our own hands.
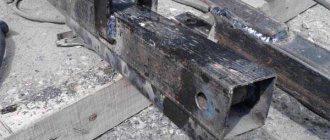
Cleaning corrosion
It will also need to be divided into several stages. And the first of them is cleaning:
- Before you make an ax handle with your own hands, you need to remove the old one. The easiest way is to knock it out. We cut straight along the beard of the blade and knock it out using a chisel or drift.
- Now let's move on to processing the blade. You need to remove the rust from it using a grinder. For this, a regular petal circle is enough. We'll do the polishing later.
- Now we look for cracks and grooves on the blade. If there are any, we simply brew them and clean them with a grinder. There is nothing complicated here.
Photo ideas
The head and its handle may have an original appearance. A drawing is made on the head and the shape of the canvas is changed. If the ax handle is aged, burned or treated with colored impregnation, the overall appearance of the product will change greatly.
Main components
When making and choosing a weapon, its future owners are often faced with the question of how to calculate the mass of a taiga ax. To do this, you need to focus on its components and compliance with certain proportions between them. On average, the weight of the product does not exceed 1 kg; its main components are a wooden ax handle and a metal head. The main elements are shown in more detail in Figure 2.
Figure 2. Main components of the product
The weight of the taiga ax handle and its length should be proportional to each other. The optimal value for everyone is considered to be equal to the distance from the wrist to the shoulder joint, provided that the shaft is fully grasped by the hand, in order to avoid injuries. 50-55 cm is enough to work for a long time with one hand or chop something with two hands.
The ax handle should be quite light, since the main weight of the product is concentrated in its head. With a total mass of the specimen of 800-1000 g, the wooden part is approximately 40-60 cm and weighs about 200-400 g.